MyCat的zookeeper集群模式总结
一、简介
本文将介绍ZooKeeper部署管理Mycat,ZK管理mycat的server.xml、schema.xml、rule.xml等一系列配置,ZK修改配置,同一个集群中mycat节点配置自动更新,下面就总结一下如何搭建ZK集群环境管理MyCat配置。
二、集群搭建
【a】环境准备
环境准备
- 虚拟机:CentOS7
- jdk版本:1.8.0_161
- zookeeper版本:zookeeper-3.4.14
- mycat版本:1.6
- 两台虚拟机主机:192.168.8.130 、192.168.8.131
【b】禁用防火墙
# 关闭防火墙
systemctl stop firewalld.service
systemctl disable firewalld.service

# 关闭SELINUX
sed -i 's/SELINUX=enforcing/SELINUX=disabled/g' /etc/sysconfig/selinux
setenforce 0- 注意,两台服务器都要暂时禁用防火墙,在生产环境就需要开放zookeeper相关端口:2181(对client提供服务)、2888(集群内机器通讯使用,leader监听此端口)、3888(选举leader使用)。
【c】分别在两台服务器上安装zookeeper
cd /usr/local使用xftp将zookeeper-3.4.14.tar.gz上传到服务器:
//解压:
tar -zxvf zookeeper-3.4.14.tar.gz
//创建软链接:
ln -s zookeeper-3.4.14 zookeeper
cd zookeeper
mkdir data log
cd conf/
cp zoo_sample.cfg zoo.cfg
【d】修改ZK配置文件
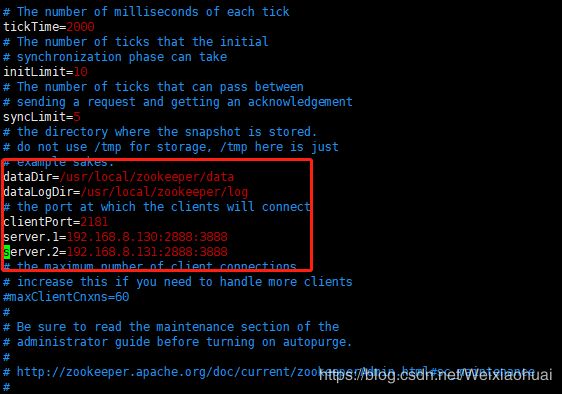
vim zoo.cfg文件具体内容如下:
# The number of milliseconds of each tick
tickTime=2000
# The number of ticks that the initial
# synchronization phase can take
initLimit=10
# The number of ticks that can pass between
# sending a request and getting an acknowledgement
syncLimit=5
# the directory where the snapshot is stored.
# do not use /tmp for storage, /tmp here is just
# example sakes.
dataDir=/usr/local/zookeeper/data
dataLogDir=/usr/local/zookeeper/log
# the port at which the clients will connect
clientPort=2181
server.1=192.168.8.130:2888:3888
server.2=192.168.8.131:2888:3888
# the maximum number of client connections.
# increase this if you need to handle more clients
#maxClientCnxns=60
#
# Be sure to read the maintenance section of the
# administrator guide before turning on autopurge.
#
# http://zookeeper.apache.org/doc/current/zookeeperAdmin.html#sc_maintenance
#
# The number of snapshots to retain in dataDir
#autopurge.snapRetainCount=3
# Purge task interval in hours
# Set to "0" to disable auto purge feature
#autopurge.purgeInterval=1
【e】添加myid文件
vim /usr/local/zookeeper/data/myid同理,也要记得修改131服务器上面的myid,修改为2。
【f】启动zookeeper
cd /usr/local/zookeeper/bin/
./zkServer.sh start- 192.168.8.130
- 192.168.8.131
【g】安装Mycat
cd /usr/local/
tar -zxvf Mycat-server-1.6-RELEASE-20161028204710-linux.tar.gz- 注意:两台服务器都要安装。
【h】执行mycat初始化脚本
2个节点Mycat都执行如下脚本:
cd /usr/local/mycat/bin
./init_zk_data.sh
【i】配置mycat支持zookeeper
cd /usr/local/mycat/conf/ vim myid.properties- 192.168.8.130
loadZk=true
zkURL=192.168.8.130:2181,192.168.8.131:2181
clusterId=mycat-cluster-1
myid=mycat_fz_01
clusterSize=2
clusterNodes=mycat_fz_01,mycat_fz_02
#server  booster  ;   booster install on db same server,will reset all minCon to 1
type=server
boosterDataHosts=localhost1- 192.168.8.131
loadZk=true
zkURL=192.168.8.130:2181,192.168.8.131:2181
clusterId=mycat-cluster-1
myid=mycat_fz_02
clusterSize=2
clusterNodes=mycat_fz_01,mycat_fz_02
#server  booster  ;   booster install on db same server,will reset all minCon to 1
type=server
boosterDataHosts=localhost1
- 注意事项:
- * loadZk必须改为true才生效 ;
- * zkURL的地址是多个中间用“,”隔开 ;
- * clusterId:同一个zk内的集群ID必须唯一 ;
- * myid:本实例的id在当前的mycat集群内ID唯一 ;
- * clusterNodes=mycat_fz_01,mycat_fz_02:所有myid名称的集合;
- * 配置完zk并启动mycat后,会更新本地conf下的相关配置文件;
【j】启动mycat
cd /usr/local/mycat/bin
./mycat restart
【k】用zookeeper配置mycat
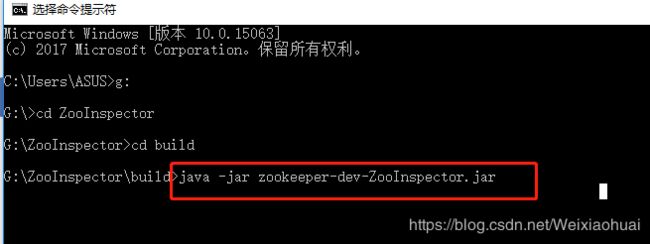
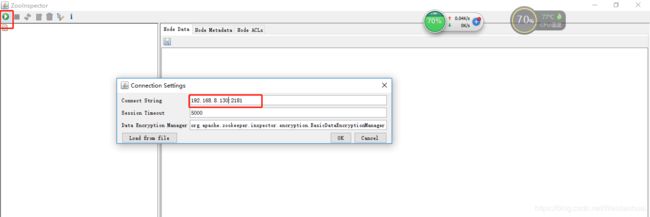
使用ZooInspector工具管理ZooKeeper:
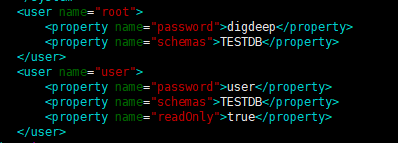
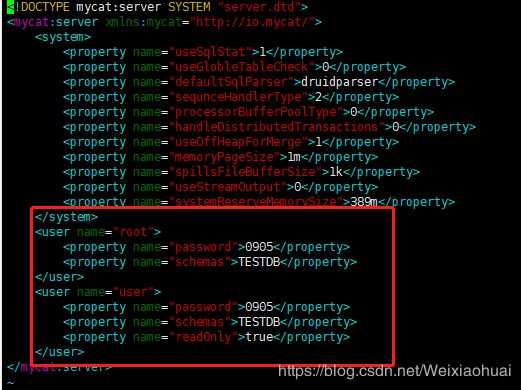
java -jar zookeeper-dev-ZooInspector.jar 尝试通过zk修改配置文件,这里以server.xml为例,如下面是修改之前的内容:
[{"name":"root","property":[{"value":"digdeep","name":"password"},{"value":"TESTDB","name":"schemas"}]},{"name":"user","property":[{"value":"user","name":"password"},{"value":"TESTDB","name":"schemas"},{"value":"true","name":"readOnly"}]}]修改后的内容:
[{"name":"root","property":[{"value":"0905","name":"password"},{"value":"TESTDB","name":"schemas"}]},{"name":"user","property":[{"value":"0905","name":"password"},{"value":"TESTDB","name":"schemas"},{"value":"true","name":"readOnly"}]}]这时候,回到mycat客户端,查看conf目录下的server.xml已经成功同步过来了。
vim server.xml至此,就完成了ZK统一管理mycat配置了,读者可自行尝试配置,如有不对之处,欢迎大家指出,相互学习,一起进步。


