Spring Cloud Bus消息总线(学习总结)
一、简介
前面我们介绍了如何通过/refresh接口手动刷新配置文件内容,但是,当我们的系统中服务越来越多之后,维护这样的刷新清单将会变得非常繁琐麻烦,而且容易犯错。本章介绍使用Spring Cloud Bus消息总线实现配置文件的集群动态刷新。Bus消息代理中间件可以将消息路由到一个或多个目的地。
二、准备工程
【a】eureka-server: 服务注册中心,端口1111;
【b】config-server: 配置服务中心, 端口2222;
【c】config-client: 服务消费者,端口3333;
这里对eureka服务注册中心的搭建不做详细讲解,比较简单。下面我们新建springcloud_config_server工程,引入spring-cloud-config-server,具体pom.xml:
	4.0.0

	com.springcloud.wsh
	springcloud_config_server
	0.0.1-SNAPSHOT
	jar

	springcloud_config_server
	Demo project for Spring Boot


		org.springframework.boot
		spring-boot-starter-parent
		1.5.2.RELEASE


		UTF-8
		UTF-8
		1.8
		Camden.SR6


			org.springframework.boot
			spring-boot-starter-web


			org.springframework.cloud
			spring-cloud-config-server


			org.springframework.cloud
			spring-cloud-starter-eureka


			org.springframework.boot
			spring-boot-starter-test
			test


				org.springframework.cloud
				spring-cloud-dependencies
				${spring-cloud.version}
				pom
				import


				org.springframework.boot
				spring-boot-maven-plugin
三、启动类加上@EnableConfigServer,@EnableDiscoverClient
@SpringBootApplication
@EnableDiscoveryClient
@EnableConfigServer
public class SpringcloudConfigServerApplication {

	public static void main(String[] args) {
		SpringApplication.run(SpringcloudConfigServerApplication.class, args);
	}
}
配置文件application.yml:
server:
  port: 2222
spring:
  application:
    name: config-server
  cloud:
    config:
      server:
        git:
          search-paths: repository
          username: 对应你的git用户名
          password: 对应你的git密码
          uri: 对应你git仓库路径
      label: master
eureka:
  client:
    serviceUrl:
      defaultZone: http://localhost:1111/eureka/
注意:如果配置文件中含有中文,需要自定义PropertySourceLoader解决,解决方法见https://blog.csdn.net/Weixiaohuai/article/details/82759084。
四、新建springcloud_config_client
【a】引入一些必须的依赖: spring-cloud-starter-bus-amqp、spring-boot-starter-actuator、spring-cloud-starter-config等,具体pom.xml:
	4.0.0

	com.springcloud.wsh
	springcloud_config_client
	0.0.1-SNAPSHOT
	jar

	springcloud_config_client
	Demo project for Spring Boot


		org.springframework.boot
		spring-boot-starter-parent
		1.5.2.RELEASE


		UTF-8
		UTF-8
		1.8
		Camden.SR6


			org.springframework.boot
			spring-boot-starter-web


			org.springframework.cloud
			spring-cloud-starter-config


			org.springframework.cloud
			spring-cloud-starter-eureka


			org.springframework.cloud
			spring-cloud-starter-bus-amqp


			org.springframework.boot
			spring-boot-starter-actuator


				org.springframework.cloud
				spring-cloud-dependencies
				${spring-cloud.version}
				pom
				import


				org.springframework.boot
				spring-boot-maven-plugin
【b】配置文件bootstrap.yml:主要配置git仓库路径,分支等
server:
  port: 3333
#注意application-name(配置文件前缀)需要对应git仓库中 config-client-dev、config-client-test、config-client-prod为名称的配置文件
spring:
  application:
    name: config-client
  cloud:
    config:
      #指定当前所属环境
      profile: dev
      discovery:
        #开启通过服务访问config-server的功能
        enabled: true
        #指定配置中心注册到eureka的serviceId(即config-server的application-name)
        serviceId: config-server
      #git仓库分支
      label: master
eureka:
  client:
    serviceUrl:
      defaultZone: http://localhost:1111/eureka/
配置文件application.yml:主要配置权限拦截、rabbitmq消息中间件支持
#RabbitMQ相关配置
spring:
  rabbitmq:
    port: 5672
    username: guest
    password: guest
    virtual-host: /
    host: localhost
#忽略权限拦截
management:
  security:
    enabled: false
【c】启动类
@SpringBootApplication
@EnableDiscoveryClient
public class SpringcloudConfigClientApplication {

	public static void main(String[] args) {
		SpringApplication.run(SpringcloudConfigClientApplication.class, args);
	}
}
【d】暴露接口给外部访问
注意加上@RefreshScope注解
/**
 * 测试客户端从配置服务中心获取配置文件中的内容
 *
 * @author weishihuai
 * @date 2018/9/26 10:59
 */
@RestController
//@RefreshScope注解的作用: 如果刷新了bean,那么下一次访问bean(即执行一个方法)时就会创建一个新实例。
@RefreshScope
public class GetPropertyFromConfigServerController {

    private static Logger logger = LoggerFactory.getLogger(GetPropertyFromConfigServerController.class);

    @Value("${com.springcloud.wsh.message}")
    String message;

    @RequestMapping("/getPropertyFromConfigServer")
    public String getPropertyFromConfigServer() {
        String msg = "hello, i am " + message + ", i'm come from config server";
        logger.info(msg);
        return msg;
    }

}
五、启动项目
依次启动eureka-server、config-server、config-client(可以启动多个实例,这里启动两个实例,端口分别是3333和4444)。启动config-client客户端时,控制台可以看到客户端程序多了一个/bus/refresh请求。
【a】分别访问请求http://localhost:3333/getPropertyFromConfigServer和http://localhost:4444/getPropertyFromConfigServer,如下图,分别返回当前git仓库中config-client-dev.properties配置文件中的内容:
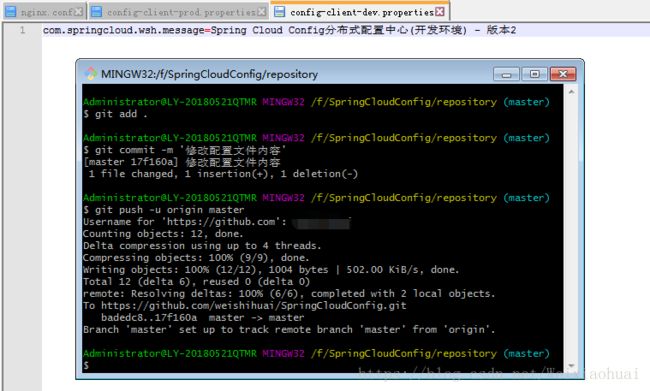
【b】然后,我们通过git工具修改git仓库中config-client-dev.properties配置文件中的内容:
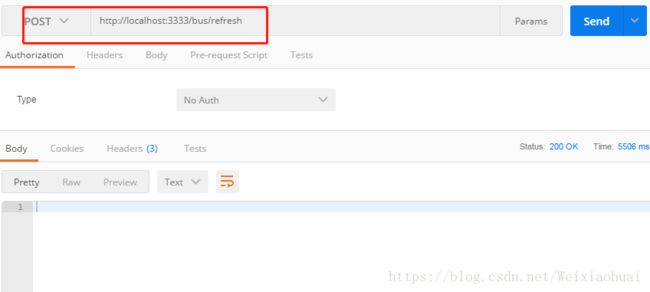
并发送POST请求/bus/refresh,http://localhost:3333/bus/refresh或者http://localhost:4444/bus/refresh,其中一个都可以
执行完之后,配置会通知到消息总线上,这样会扫描@ScopeRefresh注解注释的Bean,重新创建一个实例,这样所有监听消息总线的服务都可以获取最新的配置文件信息。
【c】最后,我们再分别访问http://localhost:3333/getPropertyFromConfigServer和http://localhost:4444/getPropertyFromConfigServer,此时两个请求返回的配置文件信息都是最新的。
至此,我们已经实现了通过Spring Cloud Bus来实时更新总线上的属性配置。
六、原理总结
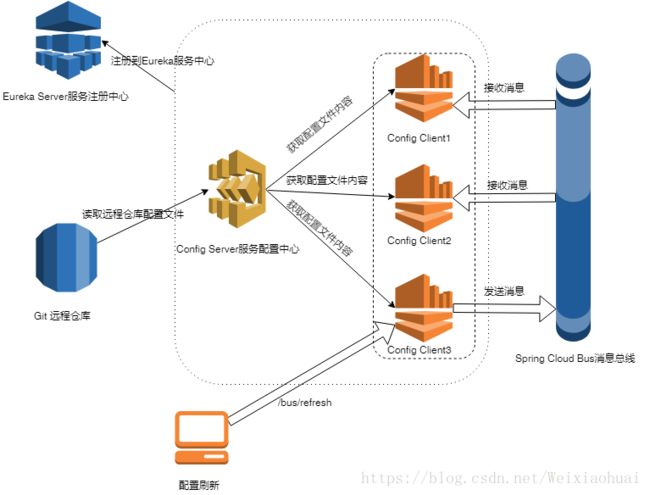
这里,我简单的画了一个基本的原理图。总结两点:
【a】Config Client1、Config Client2、Config Client3都从Config Server中获取配置信息,服务配置中心从git远程仓库获取配置信息,这时候我们在各个服务消息者客户端可以成功获取到git中配置文件信息。
【b】假设,我们对Config Client3的配置内容进行了修改,这时候Config Client1、Config Client2、Config Client3中的配置信息其实并没有更新到最新的,还是以前的。只有我们向Config Client3发送/bus/refresh的post请求之后,因为Config Client3会通过RabbitMQ通知到消息总线上,这样监听消息总线上的Config Client1和Config Client2都能从消息总线上获取到最新的配置信息,从而实现配置信息的动态更新。
七、指定刷新范围
有时候在特殊场景下,我们只需要刷新某个服务或者某个实例的配置,Spring Cloud Bus提供了destination参数来实现只更新部分配置。
【a】某个实例更新:/bus/refresh?destination=config-client:3333,只更新端口为3333的config-client服务实例
【b】某个服务的全部实例更新: /bus/refresh?destination=config-client:**,这样会更新config-client服务的所有实例
八、优化
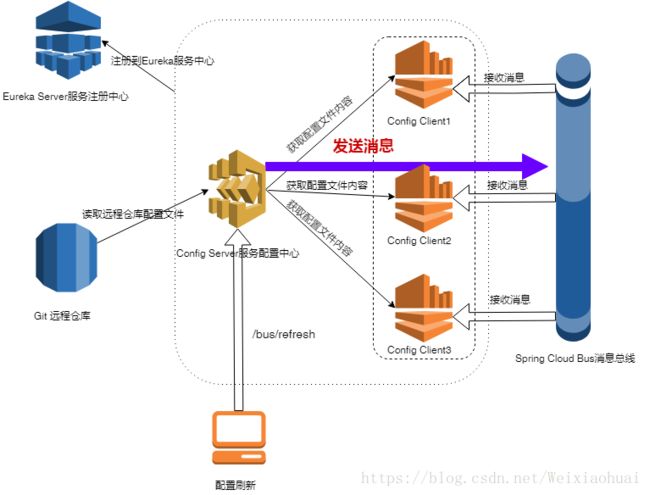
由上面原理总结的图可以看到,我们使用/bus/refresh发送到我们其中一个config-client中,然后再同步更新整个服务的配置文件信息,这样这个实例就跟其他实例不一致,额外承担了刷新配置的功能。试想一下,能否将发送post请求刷新配置的任务交由config-server配置服务中心来处理,这样所有服务实例都是对等,由配置服务中心发送消息通知消息总线更新整个集群中的配置。通过上面的改动,服务实例就不需要再承担触发配置更新的任务。
九、总结
以上就是使用Spring Cloud Bus消息总线实现配置动态刷新的功能,同时还谈到了一种优化的方案,让配置服务中心去发送/bus/refresh 请求去执行更新配置任务。本文是作者在学习消息总线的一些总结,仅供大家参考,共同学习,共同进步。


