Spring Security OAuth 2.0学习总结
继上一篇Spring Security的文章,这次聊聊Spring Security OAuth 2.0,当然还是只能简单聊聊,比较基础和片面。
首先说一下主要参考的文章:
阮一峰的《理解OAuth 2.0》
徐靖峰的《Re:从零开始的Spring Security Oauth2系列》
Spring的《OAuth 2 Developers Guide》
也就是说,还是拾人牙慧。
OAuth 2.0
在一切开始之前,我们有必要理清这个概念,什么是OAuth 2.0?如果你时间充裕,想了解的更多,那就看看OAuth的官网吧.
这里我就结合阮一峰的文章,谈谈我自己的理解,希望能给你节省一点时间。
我们一般开始的时候,可能都接触过登陆对吧,很简单的一个交互,用户在浏览器上把帐密post到后台,然后后台程序直接验证,成功放行,不成功拦截。
上面这种情况,所有资源都由后台全部掌握,只有后台,用户两方,这时还没有第三方的概念出现。
但是,后来随着需求的增长,出现了第三方。举个例子,大家现在很常见的第三方登陆,或者可能有点不恰当,现在手游都有QQ账户登陆和微信账户登陆,这里面,QQ和微信登陆就是第三方,虽然我们为了玩游戏,但是使用的资料却需要从QQ/微信中调取,比如什么好友啊,头像昵称之类的。
那么我们如何获取这些内容?直接把QQ/微信的帐密给手游程序吗?那我号被盗了怎么办?我的资料被恶意篡改怎么办?有人在我QQ上发黄图小广告,我还做不做人?还有什么好友诈骗等等,风险太大了!
那我们不把第三方帐密告诉我使用的程序,但又能从第三方处获得我想要的数据,怎么做?
OAuth就是这么诞生的!
那它是怎么做到的呢?
首先我们用户、程序、第三方外,存在一个授权层,这个授权层负责完成一系列复杂的操作,保证我们不提供帐密的情况下,能够让程序在第三方那拿到我们授权范围内,它想要的数据。
程序的QQ账户登陆其实就是我们用户的授权按钮,当我们点击这个按钮的时候,就说明我们授权程序到第三方那里拿我们的数据,这时授权层会给程序颁发一个token,程序带着这个token给第三方发送请求,第三方验证没问题,把程序想要的资源给它。
以上内容出自阮一峰的博文。
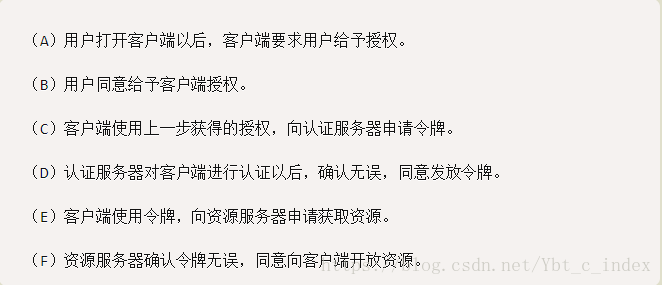
上面的用户就是我们,客户端就是我讲的程序,认证服务器就是授权层,资源服务器就是上面说的第三方。
其实流程还是蛮简单的,就是请求,授权,发token,带token请求,返回资源。
现在就是这个授权,是需要我们去了解的,因为其他的都是自然而然地,再有就是token地验证。
这个授权就有4种模式,分别是:
- 授权码模式(authorization code)
- 简化模式(implicit)
- 密码模式(resource owner password credentials)
- 客户端模式(client credentials)
其中,简化模式由于其自身地问题,基本不会使用,常用地就是三种,密码模式、客户端模式、授权码模式。
这其中密码模式需要将用户地帐密提供给客户端,但客户端不能存储密码,这种模式好像和我们之前说的不一样啊?其实,这种模式一般用在高度信任地情况下,比如合作厂商,自己系统地各服务之间地通信等。
客户端模式更加地简单了,直接由客户端像认证服务器请求令牌,没有用户什么事。
最接近我们之前描述地其实是授权码模式,但是这种模式又非常地复杂,涉及到回调地址,而且用户没有向客户端提供帐密,最后客户端是通过授权服务器发放地token(也就是授权码)来拿资源地。关于回调地址,如Github,原文是这样的:
The Authorization callback URL (redirect URI) is the path in the application that the end-user’s user-agent is redirected back to after they have authenticated with GitHub and have granted access to the OAuth application on the Authorize application page.
对于这个授权码模式感兴趣的同学可以看下这个Github的项目.
分析及讲解
而今天,我们把焦点聚集在密码模式和客户端模式。
这里我就直接使用徐靖峰的例子来讲解了。
项目地址。
大体是一致的,细节部分有不同我注释了。依赖自己看pom文件吧,我就不贴了。
首先我们预设客户端需要的资源:
@RestController
public class TestEndpointsController {

    @GetMapping("/product/{id}")
    public String getProduct(@PathVariable String id){
        // for debug
        Authentication authentication = SecurityContextHolder.getContext().getAuthentication();
        return "product id: " + id;
    }

    @GetMapping("/order/{id}")
    public String getOrder(@PathVariable String id){
        // for debug
        Authentication authentication = SecurityContextHolder.getContext().getAuthentication();
        return "order id: " + id;
    }

}
为了对比,我们后续会把product作为公共访问接口,order作为权限访问接口。
接下来我们需要为资源定义一个资源服务器,用来验证访问资源的权限等。
@Configuration
    // 资源服务器
    @EnableResourceServer
    protected static class ResourceServerConfiguration extends ResourceServerConfigurerAdapter {
        @Override
        public void configure(ResourceServerSecurityConfigurer resources){
            resources.resourceId(DEMO_RESOURCE_ID).stateless(true);
        }

        @Override
        public void configure(HttpSecurity http) throws Exception {
            // @formatter:off
            http
                    .sessionManagement().sessionCreationPolicy(SessionCreationPolicy.IF_REQUIRED)
                    .and()
                    .requestMatchers().anyRequest()
                    .and()
                    .anonymous()
                    .and()
                    .authorizeRequests()
                    // or可以通过access_token访问,但是and不行;经过测试,应该是hasRole()方法出了问题,这里无法通过
//                    .antMatchers("/product/**").access("#oauth2.hasScope('select') and  hasRole('ROLE_ADMIN')")
                    .antMatchers("/order/**").authenticated();  // 配置order访问控制,必须认证过后才可以访问
            // @formatter:on
        }

    }
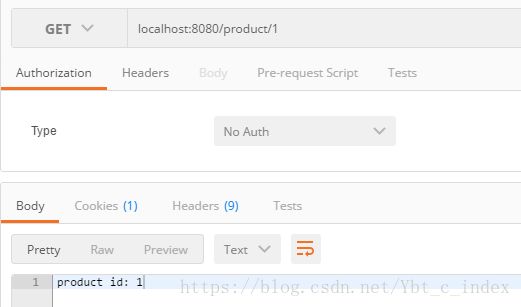
可以看出上面的配置对于”/order/”是资源受限的,而”/product/”没有任何配置。
接着我们需要一个身份认证服务器:
@Configuration
//    身份认证服务器
    @EnableAuthorizationServer
    protected static class AuthorizationServerConfiguration extends AuthorizationServerConfigurerAdapter {
        @Autowired
        AuthenticationManager authenticationManager;
        @Autowired
        RedisConnectionFactory redisConnectionFactory;
        @Autowired
        UserDetailsService userDetailsService;


        @Override
        public void configure(ClientDetailsServiceConfigurer clients) throws Exception {
            String finalSecret = "{bcrypt}"+new BCryptPasswordEncoder().encode("123456");
            // 配置两个客户端,一个用于password认证,一个用于client认证
            clients.inMemory().withClient("client_1")
                    .resourceIds(DEMO_RESOURCE_ID)
                    .authorizedGrantTypes("client_credentials")
                    .scopes("select")
                    .authorities("oauth2")
                    .secret(finalSecret)
                    .and()
                    .withClient("client_2")
                    .resourceIds(DEMO_RESOURCE_ID)
                    .authorizedGrantTypes("password", "refresh_token")
                    .scopes("select")
                    .authorities("oauth2")
                    .secret(finalSecret);
        }

        @Override
        public void configure(AuthorizationServerEndpointsConfigurer endpoints) throws Exception {
            endpoints
                    .tokenStore(new RedisTokenStore(redisConnectionFactory))
                    .authenticationManager(authenticationManager)
                    // 没有它,在使用refresh_token的时候会报错 IllegalStateException, UserDetailsService is required.
                    .userDetailsService(userDetailsService)
                    // 不加报错"method_not_allowed",
                    .allowedTokenEndpointRequestMethods(HttpMethod.GET,HttpMethod.GET);
        }

        @Override
        public void configure(AuthorizationServerSecurityConfigurer oauthServer) throws Exception {
            // 允许表单认证
            oauthServer.allowFormAuthenticationForClients();
        }
}我们配置了两个模式的客户端,在authorizedGrantTypes(…)中指定了模式类型,client_1为client模式,client_2为password模式。
两种模式的适用条件比较明显:不需要用户的时候,适用client模式,此时基本就是服务间接口交互;如果存在用户,且用户有权限的时候,那么就适合使用password模式。
这里面的细节我们一会再展开。现在我们定义好了资源,定义好了资源服务器和认证服务器,我们还需要什么呢?
用户啊!刚才我们不是用了password模式了吗,还没有配置测试用户,这里我们用spring security来在内存中配置两个用户。
@Configuration
@EnableWebSecurity
public class SecurityConfiguration extends WebSecurityConfigurerAdapter {

    @Bean
    @Override
    protected UserDetailsService userDetailsService(){
        BCryptPasswordEncoder bCryptPasswordEncoder = new BCryptPasswordEncoder();
        String finalPassword = "{bcrypt}" + bCryptPasswordEncoder.encode("123456");
        InMemoryUserDetailsManager manager = new InMemoryUserDetailsManager();
        manager.createUser(User.withUsername("user_1").password(finalPassword).authorities("ADMIN").build());
        manager.createUser(User.withUsername("user_2").password(finalPassword).authorities("USER").build());
        return manager;
    }

    @Bean
    PasswordEncoder passwordEncoder(){
        return PasswordEncoderFactories.createDelegatingPasswordEncoder();
    }

    /**
     * 这一步的配置是必不可少的,否则SpringBoot会自动配置一个AuthenticationManager,覆盖掉内存中的用户
    * */
    @Bean
    @Override
    public AuthenticationManager authenticationManagerBean() throws Exception {
        AuthenticationManager manager = super.authenticationManagerBean();
        return manager;
    }

    @Override
    protected void configure(HttpSecurity http) throws Exception {
        http
                .requestMatchers().anyRequest()
                .and()
                .authorizeRequests()
                .antMatchers("/oauth/**").permitAll();
    }

}我们看到,请求没有通过认证,说明oauth 2.0的配置起作用了。
接下来我们就要通过携带token的方式去请求资源了,我们需要请求token的端点/oauth/token。
注意我们用到了Redis来存储token,所以你需要打开Redis。
我们根据在身份认证服务器中的配置填上相应的参数,然后生产了对应的token,之后我们使用这个token来访问order受限资源:
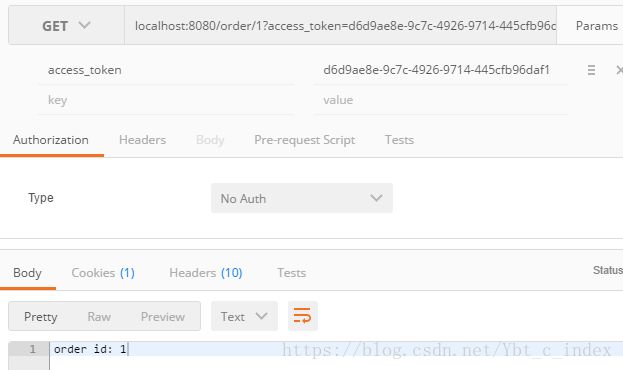
看到访问成功了。
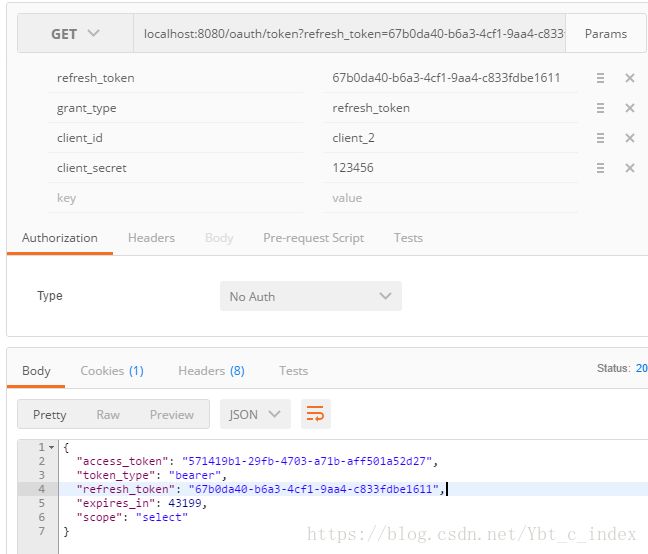
同理,我们在尝试password模式来生成token:
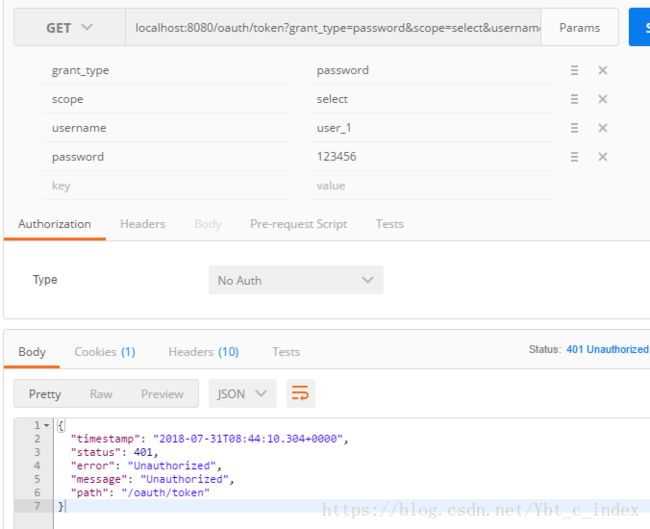
我们看到认证失败了,为什么会这样呢?
因为我们少了参数:

又出问题了,再仔细排查我们的资源服务器,发现不同的client对应着不同的模式:
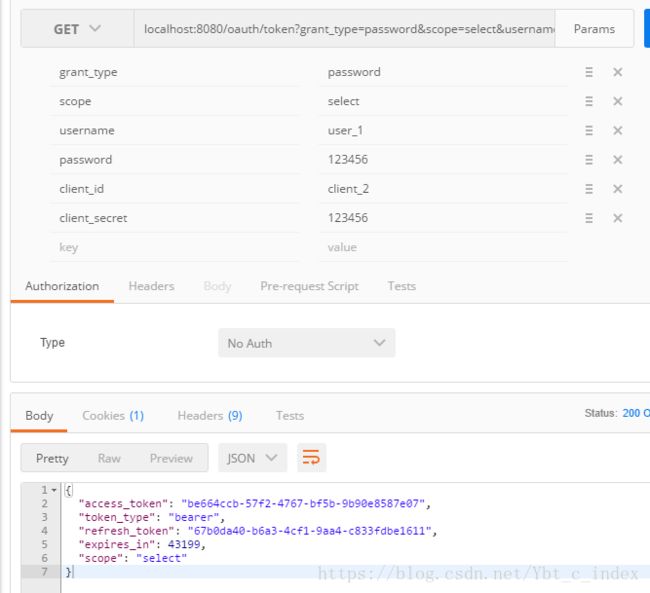
这下我们终于成功了。
注意这里需要把grant_type改为refresh_token模式。
好了,上面就把这个简单的Spring Security OAuth 2.0的demo讲完了。
接下来,我们需要深入的分析一下了。
身份认证服务器
我们首先来看一下生成token的流程:
我们先看一下@EnableAuthorizationServer,它让我们配置了一个身份认证服务器,而token的生成主要就是和这个身份认证服务器有关;我们看到它有三个configure()方法,我们分别看一下:
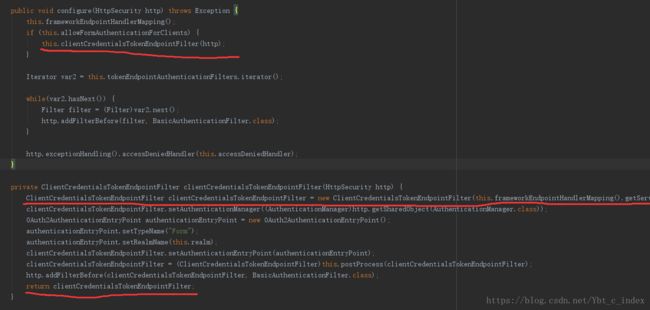
configure(AuthorizationServerSecurityConfigurer oauthServer):这个AuthorizationServerSecurityConfigurer主要用来配置AuthorizationServer安全认证的相关信息,创建ClientCredentialsTokenEndpointFilter核心过滤器。configure(ClientDetailsServiceConfigurer clients):这个主要是配置OAuth2的客户端的信息。configure(AuthorizationServerEndpointsConfigurer endpoints):这个主要配置AuthorizationServerEndpointsConfigurer众多相关类,包括配置身份认证器,配置认证方式,TokenStore,TokenGranter,OAuth2RequestFactory
我们首先看一下AuthorizationServerSecurityConfigurer的代码,其中配置了核心过滤器ClientCredentialsTokenEndpointFilter:
接着我们看一下核心过滤器中都做了什么:
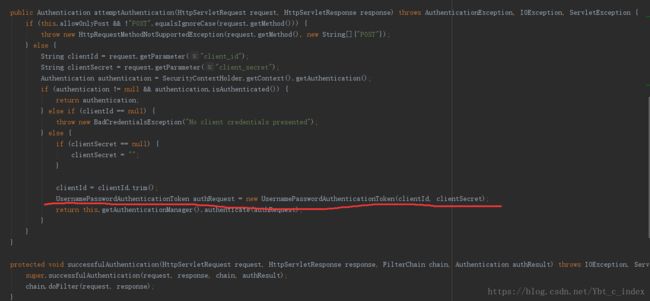
我们看到它将请求中获得的client_id和client_secret组装成了一个UsernamePasswordAuthenticationToken作为身份标识,看到这我们就比较熟悉了,后面就是spring security那套了,不多说。
经过了核心过滤器就表示身份信息已经得到了AuthenticationManager的验证,接下来就可以访问我们的token端点/oauth/token了:
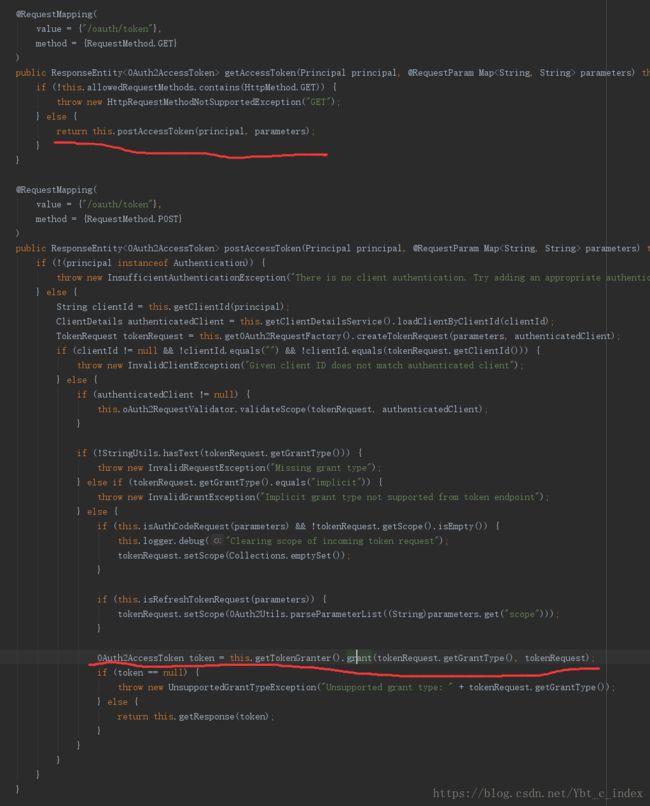
我们看到这个端点使用GET或POST都可以,接着在这个方法中生成了OAuth2AccessToken,并进行了响应。
接着我们看看用来生成OAuth2AccessToken的TokenGranter及它的实现类:


我们这里看一下ClientCredentialsTokenGranter:
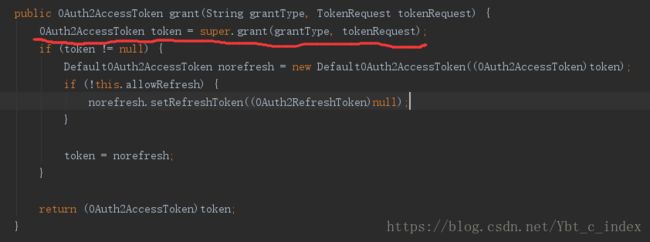
它的父类是AbstractTokenGranter:
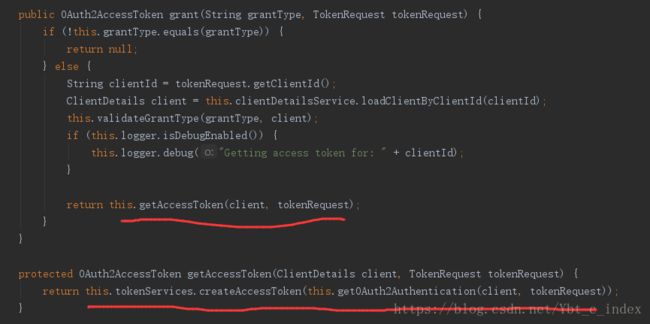
接着我们又发现生成AccessToken是由AuthorizationServerTokenServices接口完成的:

它的实现类只有一个,就是DefaultTokenServices:
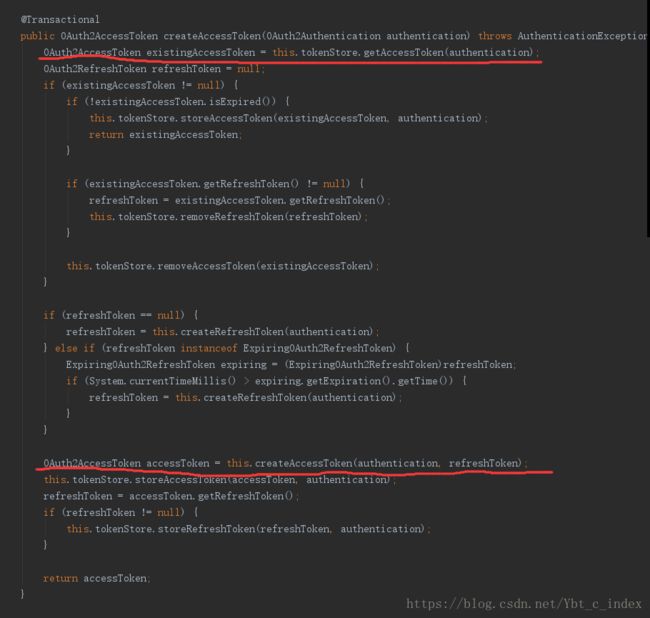
这里我们只过第一次生成token的过程。

到这里就清楚了,最后生成的构造器就是这样:
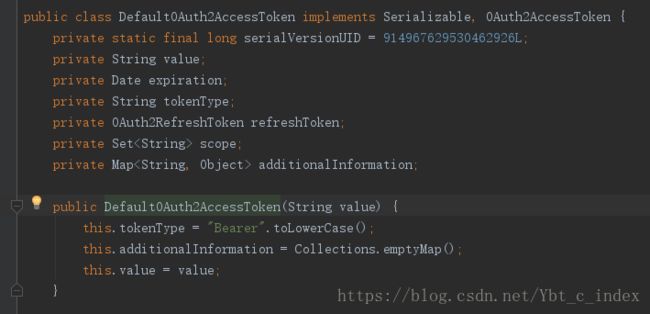
而生成后我们看到DefaultTokenServices调用了TokenStore中的storeAccessToken()方法,我们看一下它的实现类:
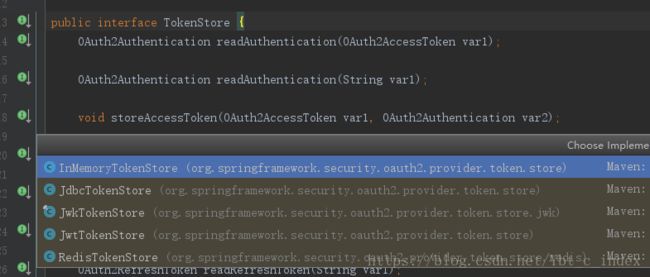
这个正和我们前面配置configure(AuthorizationServerEndpointsConfigurer endpoints)中设置tokenStore为RedisTokenStore对上了。
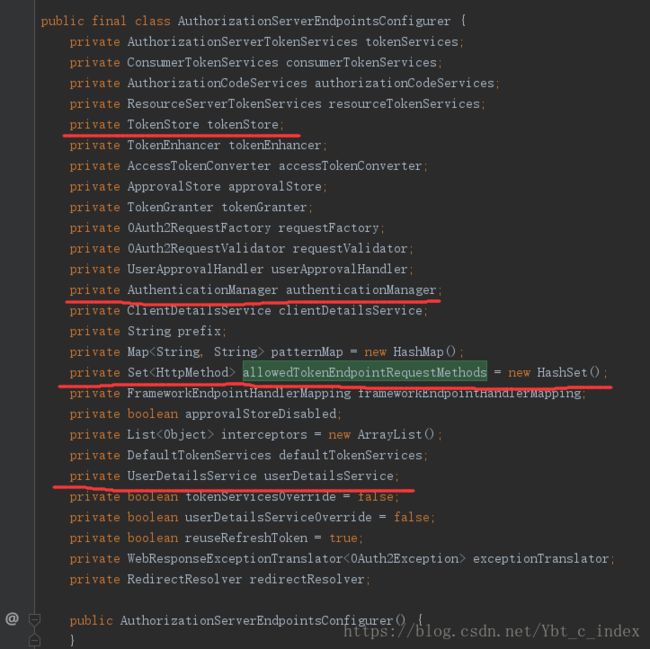
我们看一下AuthorizationServerEndpointsConfigurer中的相关配置,就可以看到我们刚才配置的内容,被我用红线标注了。
然后我们再看看ClientDetailsServiceConfigurer配置客户端。

而InMemoryClientDetailsServiceBuilder的父类为ClientDetailsServiceBuilder:
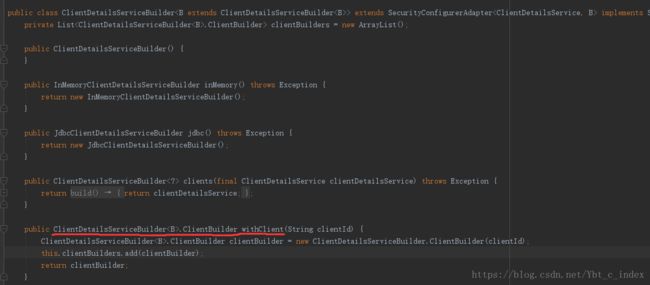
最后我们调用的相关方法都在其中的内部类ClientBuilder:

至此整个身份认证器的配置分析完毕,包括了相关配置以及生成token的整个流程。
资源服务器
最后,我们需要了解资源服务器如何认证token的,这就需要我们继续分析资源服务器的配置。
这里共配置了两个configure()方法:
configure(ResourceServerSecurityConfigurer resources):它与资源的安全配置相关。configure(HttpSecurity http):它与http安全配合有关,这里和spring security中的配置就是类似的,所以这里就不提了。
那我们只需要看看这个ResourceServerSecurityConfigurer到底干了些什么。
它的主要配置方法如下:
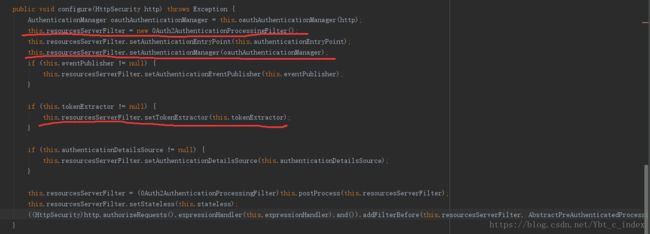
第一处表示创建了OAuth2核心过滤器OAuth2AuthenticationProcessingFilter;
第二处表示为上述过滤器提供了固定的AuthenticationManager——OAuth2AuthenticationManager,它没有将OAuth2AuthenticationManager添加到spring的容器中,否则可能会影响spring security的普通认证流程(非oauth2请求),只有被OAuth2AuthenticationProcessingFilter拦截的oauth2请求才会被特殊的身份认证器处理;
第三处表示设置了TokenExtractor的默认实现——BearerTokenExtractor(只有这一个实现类)。
我们看一下OAuth2AuthenticationProcessingFilter:
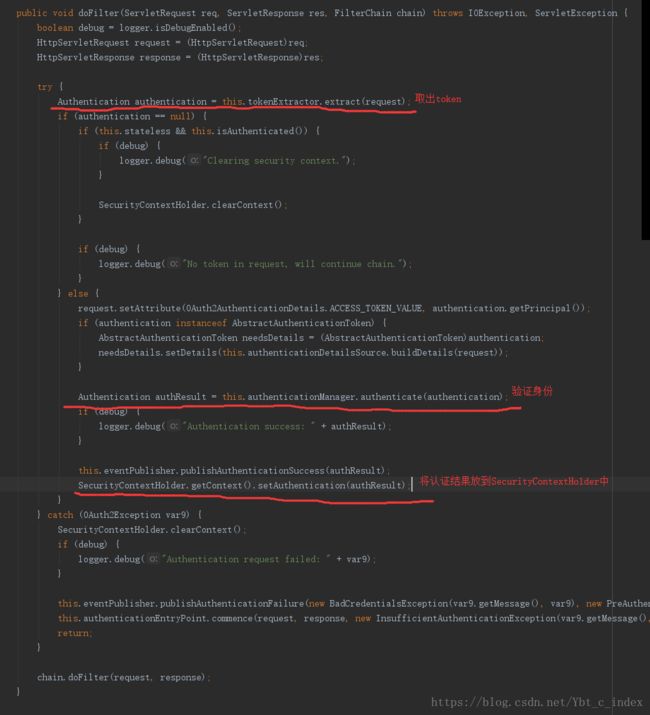
这里贴一下徐靖峰文章中提到的这个类中的源码注释:
A pre-authentication filter for OAuth2 protected resources. Extracts an OAuth2 token from the incoming request and uses it to populate the Spring Security context with an {@link OAuth2Authentication} (if used in conjunction with an {@link OAuth2AuthenticationManager}).
OAuth2保护资源的预先认证过滤器。如果与OAuth2AuthenticationManager结合使用,则会从到来的请求之中提取一个OAuth2 token,之后使用OAuth2Authentication来填充Spring Security上下文。
我们现在只需要看一下如何取出的token,以及如何进行的身份验证,身份验证我们在spring security中已经介绍过了,这里由于换了OAuth2AuthenticationManager,我们就先简单的看看它吧。
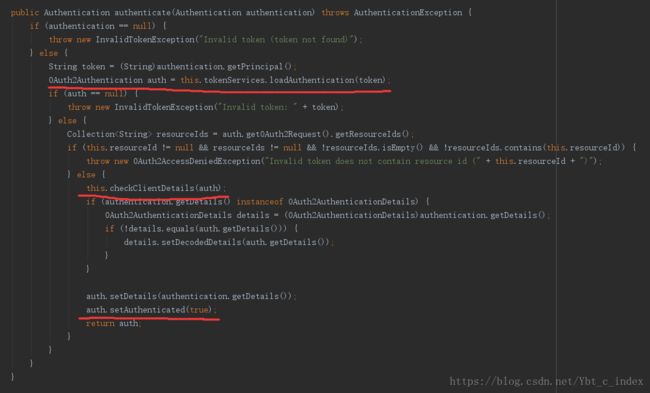
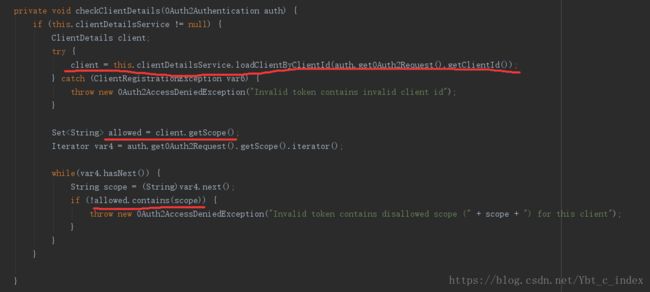
主要是验证client客户端的scope是否符合。
接下来我们就重点看看BearerTokenExtractor如何获取的token:
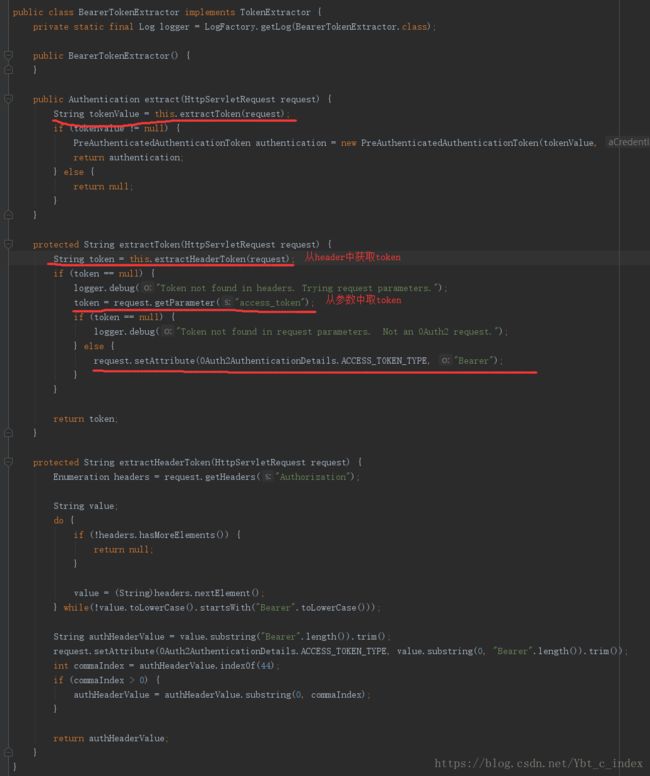
到这我们就把资源服务器如何验证token的过程分析完了,之后就可以正常获取想要的资源了。
到了这里,终于将spring security oauth 2.0 也简单的过了一遍,呼~
最后,如果你还想更深入的了解spring security oauth 2.0 的内容,可以看一下官方的例子,GitHub地址。

