deepin15.8 NDVIDIA GTX1060 安装CUDA9.1+cuDNN7并编译安装TensorFlow-gpu
一、引言
-
这里编译安装tensorflow是因为tensorflow目前正式发行版本最高只支持到cuda9.0,但是目前deepin安装cuda默认的版本是cuda9.1,所以采用源代码编译安装方式安装;
-
整个过程是一个比较复杂的流程,涉及到deepin安装与Ubuntu的不同而进行的特殊处理,遇到问题请多思考、搜索解决;
-
配置的主要复杂之处是NVIDIA驱动、cuda、cudnn、gcc、g++以及tensorflow的版本匹配,只要有一个不匹配就很麻烦;
-
需要的主要软件及其版本,具体每个怎么装后文有详述,这里是总览:
deepin操作系统,版本15.8 python3,版本3.6.5 NVIDIA显卡驱动,版本 390.67 CUDA Toolkit,版本9.1 cuDNN,版本7.1.3 NCCL(NVIDIA多GPU通信框架),版本2.1.15(for CUDA 9.1) gcc编译器,版本4.8 g++编译器,版本4.8 Bazel(谷歌的编译构造工具,用于构造tensorflow),版本0.10.0 TensorFlow源码,版本1.8.0 -
按照我的上述版本基本问题不大,如果想安装其他版本自己找资料解决,不保证能成功。
二、deepin上NVIDIA显卡驱动安装
- deepin的显卡驱动安装很简单,基本上只要装了deepin系统,有NVIDIA显卡就要解决这个问题。
- 主要是两步禁用开源驱动和安装驱动。
- 禁用开源驱动nouveau:
sudo gedit /etc/modprobe.d/blacklist.conf
在文本最后添加:
blacklist nouveau
options nouveau modeset=0
- 接下来装驱动,要先重启X-Server,关闭X-Server:
sudo service lightdm stop #这会关闭图形界面
按Ctrl-Alt+F2进入命令行界面,输入用户名和密码登录;
在终端输入:
sudo service lightdm start #启动X-Server图形界面
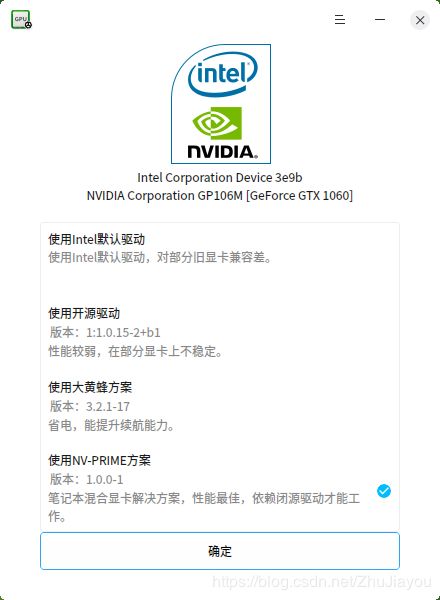
按Ctrl-Alt+F1进入图形界面。 - 找到deepin自带的“深度显卡驱动管理”,下载显卡驱动即可(安装时需重启系统);
- deepin有3种显卡驱动方案,我选择的是第3种NV-PRIME方案:

- 安装nvidia-smi:
sudo apt install nvidia-smi - 输入
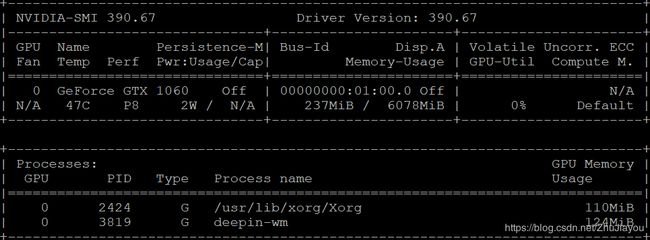
nvidia-smi查看显卡信息如下所示,说明安装驱动成功:

三、安装deepin源内版本的CUDA
- 这里需要注意安装libcupti-dev,网上很多教程没有提到;
- 输入命令:
sudo apt install nvidia-cuda-dev nvidia-cuda-toolkit nvidia-nsight nvidia-visual-profiler
sudo apt install libcupti-dev
- 输入
nvcc --version可看到CUDA版本信息为9.1; - 由于apt安装的CUDA是分散在/usr文件夹中各处的,而很多使用CUDA的软件像cudnn、编译安装TensorFlow等,需要指定CUDA的安装位置,所以必须用软链接将CUDA的文件集合到一个文件夹中,这里是/usr/local/cuda:
sudo mkdir /usr/local/cuda
sudo ln -sfn /usr/bin /usr/local/cuda/bin
sudo ln -sfn /usr/include /usr/local/cuda/include
sudo ln -sfn /usr/lib/x86_64-linux-gnu /usr/local/cuda/lib64
sudo ln -sfn /usr/local/cuda/lib64 /usr/local/cuda/lib
sudo mkdir  /usr/local/cuda/extras
sudo mkdir  /usr/local/cuda/extras/CUPTI
sudo ln -sfn /usr/include /usr/local/cuda/extras/CUPTI/include
sudo ln -sfn /usr/lib/x86_64-linux-gnu /usr/local/cuda/extras/CUPTI/lib64
sudo mkdir  /usr/local/cuda/nvvm
sudo ln -sfn /usr/lib/nvidia-cuda-toolkit/libdevice /usr/local/cuda/nvvm/libdevice
四、安装cuDNN和NCCL
- TensorFlow依赖这两个深度学习库;
- 这里的安装适用于64位系统;
- 下载cuDNN,需要注册NVIDIA开发者账户登陆,这里下载7.1.3 for CUDA 9.1版本 for linux的tar包(cudnn-9.1-linux-x64-v7.1.tgz),如果选择Ubuntu的是deb包;
- 解压下载的压缩包,并进入解压目录;
- 将cuDNN拷贝到CUDA目录:
sudo cp include/* /usr/local/cuda/include/
sudo cp lib64/libcudnn.so.7.1.3 lib64/libcudnn_static.a /usr/local/cuda/lib64/
cd /usr/lib/x86_64-linux-gnu
sudo ln -s libcudnn.so.7.1.3 libcudnn.so.7
sudo ln -s libcudnn.so.7 libcudnn.so
- 下载NCCL,这里选择2.1.15 for CUDA 9.1 O/S agnostic版本(nccl_2.1.15-1+cuda9.1_x86_64.txz);
- 解压下载的压缩包,并进入解压目录;
- 将NCCL拷贝到CUDA目录:
sudo mkdir -p /usr/local/cuda/nccl/lib /usr/local/cuda/nccl/include
sudo cp *.txt /usr/local/cuda/nccl
sudo cp include/*.h /usr/include/
sudo cp lib/libnccl.so.2.1.15 lib/libnccl_static.a /usr/lib/x86_64-linux-gnu/
sudo ln -s /usr/include/nccl.h /usr/local/cuda/nccl/include/nccl.h
cd /usr/lib/x86_64-linux-gnu
sudo ln -s libnccl.so.2.1.15 libnccl.so.2
sudo ln -s libnccl.so.2 libnccl.so
for i in libnccl*; do sudo ln -s /usr/lib/x86_64-linux-gnu/$i /usr/local/cuda/nccl/lib/$i; done
五、安装TensorFlow编译环境
- 安装Java:
sudo apt install openjdk-8-jdk - 安装gcc-4.8、g+±4.8:
sudo apt install gcc-4.8 g++-4.8 - 设置gcc-4.8、g+±4.8为默认C编译器:
cd /usr/bin
sudo rm gcc g++
sudo ln -s g++-4.8 g++
sudo ln -s gcc-4.8 gcc
- 下载bBazel 0.10.0 for Linux x86_64(bazel-0.10.0-installer-linux-x86_64.sh),安装:
sudo chmod +x bazel-0.10.0-installer-linux-x86_64.sh
./bazel-0.10.0-installer-linux-x86_64.sh --user
- 将Bazel目录加入环境变量:
sudo vim ~/.bashrc
export PATH="$PATH:$HOME/bin" #放在文件末尾
六、编译安装TenrsorFlow
- 从GitHub下载TensorFlow源码,这里下载1.8.0(tensorflow-1.8.0.tar.gz);
- 解压后,进入目录;
- 输入
./configure配置编译参数,这里给出我的配置,有注释的需要注意,其它的默认即可:
zjy@svpc:~/Downloads/tensorflow-1.8.0$ ./configure
WARNING: ignoring _JAVA_OPTIONS in environment.
You have bazel 0.10.0 installed.
#指定你的Python位置,这里使用python3可以通过which python3命令查看
Please specify the location of python. [Default is /usr/local/cuda/bin/python]: /usr/local/cuda/bin/python3

#设定你的Python各种库的位置
Found possible Python library paths:
  /usr/lib/python3/dist-packages
  /usr/local/lib/python3.6/dist-packages
Please input the desired Python library path to use.  Default is [/usr/lib/python3/dist-packages]

Do you wish to build TensorFlow with jemalloc as malloc support? [Y/n]:
jemalloc as malloc support will be enabled for TensorFlow.

Do you wish to build TensorFlow with Google Cloud Platform support? [Y/n]:
Google Cloud Platform support will be enabled for TensorFlow.

Do you wish to build TensorFlow with Hadoop File System support? [Y/n]:
Hadoop File System support will be enabled for TensorFlow.

Do you wish to build TensorFlow with Amazon S3 File System support? [Y/n]:
Amazon S3 File System support will be enabled for TensorFlow.

Do you wish to build TensorFlow with Apache Kafka Platform support? [Y/n]:
Apache Kafka Platform support will be enabled for TensorFlow.

Do you wish to build TensorFlow with XLA JIT support? [y/N]:
No XLA JIT support will be enabled for TensorFlow.

Do you wish to build TensorFlow with GDR support? [y/N]:
No GDR support will be enabled for TensorFlow.

Do you wish to build TensorFlow with VERBS support? [y/N]:
No VERBS support will be enabled for TensorFlow.

Do you wish to build TensorFlow with OpenCL SYCL support? [y/N]:
No OpenCL SYCL support will be enabled for TensorFlow.

#是否要有CUDA支持,肯定是y,编译出来的是gpu版
Do you wish to build TensorFlow with CUDA support? [y/N]: y
CUDA support will be enabled for TensorFlow.

#选择CUDA版本,这里是9.1
Please specify the CUDA SDK version you want to use, e.g. 7.0. [Leave empty to default to CUDA 9.0]: 9.1

#指定CUDA的安装位置,根据前面我们做好的软链接,这里填/usr/local/cuda,默认就是
Please specify the location where CUDA 9.1 toolkit is installed. Refer to README.md for more details. [Default is /usr/local/cuda]:

#指定cuDNN版本
Please specify the cuDNN version you want to use. [Leave empty to default to cuDNN 7.0]: 7.1.3

#指定cuDNN安装位置,根据前面的软链接,这里填/usr/local/cuda,默认就是
Please specify the location where cuDNN 7 library is installed. Refer to README.md for more details. [Default is /usr/local/cuda]:

Do you wish to build TensorFlow with TensorRT support? [y/N]:
No TensorRT support will be enabled for TensorFlow.

#指定NCCL版本
Please specify the NCCL version you want to use. [Leave empty to default to NCCL 1.3]: 2.1.15

#指定cuDNN安装位置,根据前面的软链接,这里填/usr/local/cuda/nccl
Please specify the location where NCCL 2 library is installed. Refer to README.md for more details. [Default is /usr/local/cuda]:/usr/local/cuda/nccl

#指定要编译的显卡CUDA计算能力,这个根据自己的显卡计算能力和需要进行编译,可以有多个,用逗号隔开,显卡计算能力可从给出问题中的链接中查到
Please specify a list of comma-separated Cuda compute capabilities you want to build with.
You can find the compute capability of your device at: https://developer.nvidia.com/cuda-gpus.
Please note that each additional compute capability significantly increases your build time and binary size. [Default is: 3.5,5.2]6.1

#这里选择默认的N
Do you want to use clang as CUDA compiler? [y/N]:
nvcc will be used as CUDA compiler.

#指定gcc位置,这里使用我们已经安装的gcc 4.8版本,已设为默认
Please specify which gcc should be used by nvcc as the host compiler. [Default is /usr/bin/gcc-4.8]:

Do you wish to build TensorFlow with MPI support? [y/N]:
No MPI support will be enabled for TensorFlow.

#这里建议保持默认,即为编译所使用的这个显卡优化性能
Please specify optimization flags to use during compilation when bazel option "--config=opt" is specified [Default is -march=native]:

Would you like to interactively configure ./WORKSPACE for Android builds? [y/N]:
Not configuring the WORKSPACE for Android builds.

Preconfigured Bazel build configs. You can use any of the below by adding "--config=<>" to your build command. See tools/bazel.rc for more details.
        --config=mkl            # Build with MKL support.
        --config=monolithic     # Config for mostly static monolithic build.
Configuration finished
- 确保已安装需要的python库:
pip3 install -U --user pip six numpy wheel mock
pip3 install -U --user keras_applications==1.0.5 --no-deps
pip3 install -U --user keras_preprocessing==1.0.3 --no-deps
- 编译TensorFlow-gpu:
bazel build --config=opt --config=cuda //tensorflow/tools/pip_package:build_pip_package - 编译时间两小时左右,如果在编译一个多小时后发生中断,并无详细输出信息,可能是系统缺少交换空间。如何增加交换空间,参考博客。我这里系统有16GB内存,发生了中断,又增加了64GB swap空间后成功编译。
- 或者不用增加交换空间,直接重新运行5中的编译命令,会接着编译,不用太长时间就可以完成。好像是TensorFlow-gpu1.8.0版本的一个BUG。
七、安装编译好的TensorFlow
- 输入:
./bazel-bin/tensorflow/tools/pip_package/build_pip_package /tmp/tensorflow_pkg
pip3 install --user /tmp/tensorflow_pkg/tensorflow*
- 到这里就装好了TensorFlow GPU版本,测试:
python3
>>>import tensorflow as tf
- 如果这里引入出错,ImportError: cannot import name main,并且普通用户输入pip3出错,参考博客。
八、主要参考
[1] https://blog.csdn.net/HappyCtest/article/details/86747306#Step_6_Tensorflow_92
[2] https://developer.nvidia.com/
[3] https://blog.csdn.net/qq_27366789/article/details/80559074
[4] https://blog.csdn.net/zibuyu1226/article/details/79212229
[5] https://blog.csdn.net/qq_36583984/article/details/80490634
[6] https://tensorflow.google.cn