SpringMVC + summernote 重写回调函数onImageUpload方法(2)
这次就不废话了,我在上文SpringMVC + summernote可视化编辑器整合(1)
已经把如何配置和安装及集合springMVC框架已经说过了。
今天我们具体来说一说如何重写 summernote富文本编辑器中的回调函数——onImageUpload方法
该方法主要是用作我们在编辑器中:
- 上传图片
- 直接copy进图片
在summernote官网的API和函数已说明: https://summernote.org/deep-dive/
onImageUpload
Override image upload handler(default: base64 dataURL on IMG tag). You can upload image to server or AWS S3: more…
默认使用base64数据URL,这对我们将文章信息存入数据库真是天大的影响。
我们存入文章的思路也就是将 文章中的 标签、图片的标签+src等内容 统一存入数据库的一个列名里罢了。
所以我们需要重写该方法,并在我们自己的后台处理文件中对上传的图片名和上传图纸进行编辑操作。
首先,我们看一下官方的重写方法介绍
// onImageUpload callback
$('#summernote').summernote({
  callbacks: {
    onImageUpload: function(files) {
      // upload image to server and create imgNode...
      $summernote.summernote('insertNode', imgNode);
    }
  }
});

// summernote.image.upload
$('#summernote').on('summernote.image.upload', function(we, files) {
  // upload image to server and create imgNode...
  $summernote.summernote('insertNode', imgNode);
});
一共两种,我们采用的是第一种方法进行重写,根据方法头,再根据summernote.js核心文件进行判断
    /**
     * insertImagesOrCallback
     * @param {File[]} files
     */
    this.insertImagesOrCallback = function (files) {
      var callbacks = options.callbacks;

      // If onImageUpload options setted
      if (callbacks.onImageUpload) {
        context.triggerEvent('image.upload', files);
      // else insert Image as dataURL
      } else {
        this.insertImages(files);
      }
    };
我们需要上传的参数files,是一个数组
So,直接将我的重写代码发上来:
    	$("#summernote_1").summernote({

		      focus:true,
		      maxHeight:null,
		      minHeight:500,
		      callbacks: {
			onImageUpload:
			function(files) {
		          		sendFile(files[0]);
		          		}
			}
	});
接下来是调用的 sendFile AJAX方法
    function sendFile(files) {
        data = new FormData();
        data.append("files", files);
        $.ajax({
            data: data,
            type: "POST",
            url: "/Aikido/akiadmin/uploadimg",  //将该请求发送到自己的Controller层的处理方法路径
            cache: false,
            contentType: false,
            processData: false,
            success: function(data) {
            	console.log(data);
                alert(data.fileName);
                $('#summernote_1').summernote('insertImage', 'http://localhost:8080/pic/'+data.fileName);
            },
            error: function (jqXHR, textStatus, errorThrown) {
                alert(textStatus + " " + errorThrown);
            }
        });
       }
如果你要使用我的代码,请注意修改成 自己的 URL 和
$('#summernote_1').summernote('insertImage', '本地存储图片路径'+data.fileName);关于本地存储图片/文件的路径,请看下面配置:
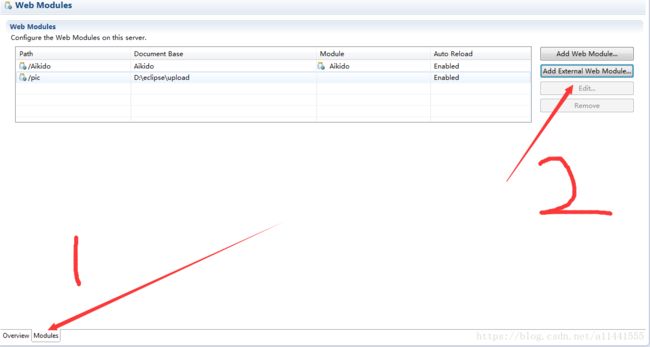
- 双击我们的Tomcat——

- 点击Modules,进入该页面,并点击Add External Web Module

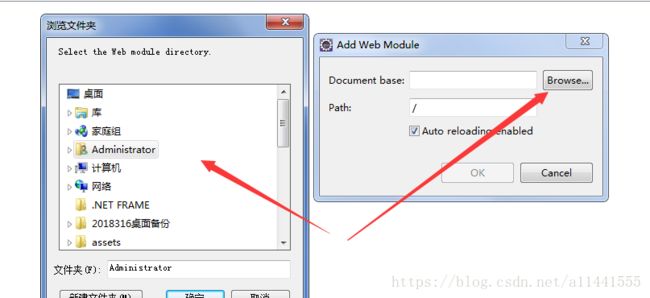
- 在跳出的弹窗中,选择自己想要存储或者访问的文件夹,并在path中填写自己定义的路径,本人定义的是/pic

- 之后在Modules中,就可以看到 /pic对应的本地文件路径,可以启动Tomcat服务器,直接 http://localhost:8080/pic/
- 对该路径进行访问
 在这一步,我们的上传图片的路径问题就已经解决完毕了。
接下来,我们继续对Control层的文件进行核心上传文件编写
1、创建目录和文件的方法
/**
	 * 创建目录和文件
	 * @param path
	 * @return
	 * @throws IOException
	 */
	private  File makefile(String path) throws IOException {
	    if (path == null || "".equals(path.trim()))
	        return null;
	    String dirPath = path.substring(0, path.lastIndexOf("\\"));
	    int index = path.lastIndexOf(".");
	    if (index > 0) { // 全路径,保存文件后缀
	        File dir = new File(dirPath);
	        if (!dir.exists()) { //先建目录
	            dir.mkdirs();
	            dir = null;
	        }
	        File file = new File(path);
	        if (!file.exists()) {//再建文件
	            file.createNewFile();
	        }
	        return file;
	    } else {
	        File dir = new File(dirPath); //直接建目录
	        if (!dir.exists()) {
	            dir.mkdirs();
	            dir = null;
	        }
	        return dir;
	    }
	}
2、调用makefile()方法,对前端AJAX传来的 form.data数据进行处理
	@RequestMapping("/uploadimg")
	public @ResponseBody Map imgResolver(
		@RequestParam("files") MultipartFile file ) throws IOException{
		String fileStr = file.getOriginalFilename();
	   String newfileStr = 	"aikidoimg" +UUID.randomUUID().toString() + fileStr.substring(fileStr.lastIndexOf("."));
//		String hz = fileStr.substring(fileStr.lastIndexOf("."));//获取后缀
//		System.out.println(file.getContentType());
//		image/png = png image/jpeg = jpg/JPG  image/gif = GIF/gif
	    File descimg = makefile("D:\\eclipse\\upload\\" +newfileStr);// 如果没有该目录,会创建目录和文件
		file.transferTo(descimg);
		System.out.println("文章上传图片function执行");
//		if(file.getContentType()=="image/png" || file.getContentType()=="image/jpeg"|| file.getContentType()=="image/gif"){
//
//		}

	   	Map map = new HashMap();
	   	map.put("fileName", newfileStr);//存储文件名
		return map;
	}
到这一步,对前面编辑框上传图片的处理功能,就已经完毕了。
但是我还需要在前端删除图片时,同步将本地的资源一并删除,缓解服务器存储压力。
请看我的下一篇文章SpringMVC + summernote 删除图片时移除本地资源文件(3)