Netty4.0源码解析:字节容器UnpooledHeapByteBuf
一、引言
Java NIO提供了ByteBuffer作为字节容器,供Channel读入和写入数据。但ByteBuffer使用过于繁琐,灵活性不够强。Netty实现了ByteBuf来替代JDK的ByteBuffer。
ByteBuf有以下几大优点:
1、它可以被用户自定义的缓冲区类型扩展
2、通过内置的复合缓冲区类型实现了透明的零拷贝
3、容量可以按需增长
4、读写切换无需调用ByteBuffer的filp方法
5、读和写采用了不同的索引
6、支持方法链式调用
7、支持引用计数
8、支持池化
ByteBuf常用实现类为:UnpooledHeapByteBuf、UnpooledUnsafeHeapByteBuf、UnpooledDirectByteBuf、UnpooledUnsafeDirectByteBuf。
ByteBuf和JDK的ByteBuffer类似,分为堆缓冲区和直接缓冲区。堆缓冲区直接将数据存储在JVM堆空间中,它能在没有使用池化的情况下快速的分配和释放。直接缓冲区是另外一种ByteBuf模式,它将缓冲区分配在堆外内存(非JVM运行时数据区),垃圾收集器不会管理这部分内存,它的优势在于网络数据传输,但是它的分配和释放都较为昂贵。
我们先从常用的UnpooledHeapByteBuf开始分析ByteBuf:
二、UnpooledHeapByteBuf
UnpooledHeapByteBuf是一个非池化的、内存空间分配在堆的ByteBuf。
实例化UnpooledHeapByteBuf通常是通过Unpooled静态工厂方法buffer,buffer方法有多个重载方法,可以指定缓冲区的初始大小,最大大小:
private static final ByteBufAllocator ALLOC = UnpooledByteBufAllocator.DEFAULT;
public static ByteBuf buffer() {
    return ALLOC.heapBuffer();
}
//省略其它重载方法...
Unpooled分配ByteBuf通过默认的ByteBufAllocator:UnpooledByteBufAllocator.DEFAULT进行分配。
UnpooledByteBufAllocator继承了AbstractByteBufAllocator,实现了ByteBufAllocatorMetricProvider接口,它采用单例模式。最终通过newHeapBuffer来实例化UnpooledHeapByteBuf
@Override
protected ByteBuf newHeapBuffer(int initialCapacity, int maxCapacity) {
    return PlatformDependent.hasUnsafe() ?
            new InstrumentedUnpooledUnsafeHeapByteBuf(this, initialCapacity, maxCapacity) :
            new InstrumentedUnpooledHeapByteBuf(this, initialCapacity, maxCapacity);
}
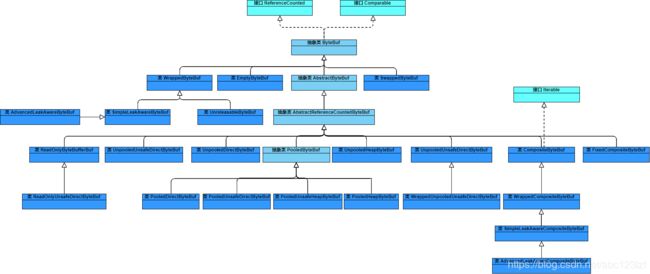
InstrumentedUnpooledUnsafeHeapByteBuf和InstrumentedUnpooledHeapByteBuf是UnpooledByteBufAllocator的内部类,它们分别继承了UnpooledUnsafeHeapByteBuf和UnpooledHeapByteBuf,继承关系如下:

如果类加载器持有sun.misc.Unsafe,那么默认实例化InstrumentedUnpooledUnsafeHeapByteBuf,对于HotSpot虚拟机来说一般都会实例化这个类。如果没有sun.misc.Unsafe,那么默认实例化InstrumentedUnpooledHeapByteBuf。
InstrumentedUnpooledUnsafeHeapByteBuf和InstrumentedUnpooledHeapByteBuf重写了UnpooledHeapByteBuf的allocateArray方法和freeArray方法。
UnpooledHeapByteBuf持有以下实例变量(包括父类):
//读索引
int readerIndex;
//写索引
int writerIndex;
//标记的读索引
private int markedReaderIndex;
//标记的写索引
private int markedWriterIndex;
//最大缓冲区容量(单位:字节)
private int maxCapacity;
//字节序包装器
private SwappedByteBuf swappedBuf;
//引用计数
private volatile int refCnt;
//缓冲区分配器
private final ByteBufAllocator alloc;
//缓冲区数组
byte[] array;
//临时的JDK ByteBuffer对象
private ByteBuffer tmpNioBuf;
1、构造方法
构造UnpooledHeapByteBuf需要指定一个ByteBuf分配器ByteBufAllocator实例、初始缓冲区大小(单位:字节)、最大缓冲区大小:
public UnpooledHeapByteBuf(ByteBufAllocator alloc, int initialCapacity, int maxCapacity) {
    super(maxCapacity);
    checkNotNull(alloc, "alloc"); //alloc不能为null
    if (initialCapacity > maxCapacity)
        throw new IllegalArgumentException(String.format(
                "initialCapacity(%d) > maxCapacity(%d)", initialCapacity, maxCapacity));
    this.alloc = alloc;
    setArray(allocateArray(initialCapacity)); //分配缓冲区
    setIndex(0, 0); //将读索引和写索引设为0
}
1、首先调用父类AbstractReferenceCountedByteBuf的构造方法:
protected AbstractReferenceCountedByteBuf(int maxCapacity) {
    super(maxCapacity);
    refCntUpdater.set(this, 1);
}
AbstractReferenceCountedByteBuf持有一个变量refCnt,代表引用计数,在构造时,将引用计数通过CAS将其设为1。
AbstractReferenceCountedByteBuf父类AbstractByteBuf的构造方法:
protected AbstractByteBuf(int maxCapacity) {
    if (maxCapacity < 0)
        throw new IllegalArgumentException("maxCapacity: " + maxCapacity + " (expected: >= 0)");
    this.maxCapacity = maxCapacity;
}
2、检查参数:alloc不能为null,初始容量不能大于最大容量
3、调用allocateArray分配缓冲区内存:
allocateArray在UnpooledHeapByteBuf中默认实现为直接构造一个byte数组并指定长度为initialCapacity,但在子类InstrumentedUnpooledHeapByteBuf和InstrumentedUnpooledUnsafeHeapByteBuf中重写了这个方法:
@Override
byte[] allocateArray(int initialCapacity) {
    byte[] bytes = super.allocateArray(initialCapacity);
    ((UnpooledByteBufAllocator) alloc()).incrementHeap(bytes.length);
    return bytes;
}
首先调用父类的allocateArray方法分配内存byte数组,如果该类是InstrumentedUnpooledUnsafeHeapByteBuf,那么这个方法实现为:
@Override
byte[] allocateArray(int initialCapacity) {
    return PlatformDependent.allocateUninitializedArray(initialCapacity);
}

public static byte[] allocateUninitializedArray(int size) {
    return UNINITIALIZED_ARRAY_ALLOCATION_THRESHOLD < 0 || UNINITIALIZED_ARRAY_ALLOCATION_THRESHOLD > size ?
            new byte[size] : PlatformDependent0.allocateUninitializedArray(size);
}
UNINITIALIZED_ARRAY_ALLOCATION_THRESHOLD的取值如下:
UNINITIALIZED_ARRAY_ALLOCATION_THRESHOLD = javaVersion() >= 9 && PlatformDependent0.hasAllocateArrayMethod() ?
                tryAllocateUninitializedArray : -1;
只有JDK版本为9以上并且持有jdk.internal.misc.Unsafe类才会采用非new的方式来构造byte数组,所以对于Java 8来说还是通过new byte[]的方式来分配内存。
byte数组分配完成后,随即会调用setArray方法将这个数组赋给成员变量array:
private void setArray(byte[] initialArray) {
    array = initialArray;
    tmpNioBuf = null;
}
最后将读指针和写指针都设为0。
2、数据的写入
一般通过ByteBuf的writeBytes方法往缓冲区中写入字节类型的数据,writeBytes有多个重载的方法,可支持通过不同类型的源往缓冲区中添加数据,比如byte数组、ByteBuf、InputStream、Channel通道。
我们先从最简单的byte数组写入缓冲区的方式开始介绍:
(1)byte数组的写入
@Override
public ByteBuf writeBytes(byte[] src, int srcIndex, int length) {
    ensureWritable(length);
    setBytes(writerIndex, src, srcIndex, length);
    writerIndex += length;
    return this;
}
可以分为三个步骤:
1、首先调用ensureWritable确保有足够的空间可供写入
@Override
public ByteBuf ensureWritable(int minWritableBytes) {
    if (minWritableBytes < 0)
        throw new IllegalArgumentException(String.format(
                "minWritableBytes: %d (expected: >= 0)", minWritableBytes));
    ensureWritable0(minWritableBytes);
    return this;
}

final void ensureWritable0(int minWritableBytes) {
    ensureAccessible(); //检查是否拥有权限
    if (minWritableBytes <= writableBytes()) //如果缓冲区空间充足,那么方法返回结束
        return;
    //如果缓冲区空间不足并且如果分配后超出了最大允许的容量,那么抛出异常
    if (minWritableBytes > maxCapacity - writerIndex)
        throw new IndexOutOfBoundsException(String.format(
                "writerIndex(%d) + minWritableBytes(%d) exceeds maxCapacity(%d): %s",
                writerIndex, minWritableBytes, maxCapacity, this));
    //计算出扩容后的缓冲区大小,指定最小大小为缓冲区已有的数据字节数+本次需要写入的字节数
    int newCapacity = calculateNewCapacity(writerIndex + minWritableBytes);
    capacity(newCapacity); //执行扩容
}
如果将byte数组中指定的内容全部加入到缓冲区后也不会越界,那么空间充足,方法返回。
如果空间不足并且扩容后超出最大允许的缓冲区大小(maxCapacity),那么抛出IndexOutOfBoundsException异常。
如果可以扩容,那么调用calculateNewCapacity计算分配后的缓冲区大小:
private int calculateNewCapacity(int minNewCapacity) {
    final int maxCapacity = this.maxCapacity;
    final int threshold = 1048576 * 4; //4MB
    if (minNewCapacity == threshold) //如果正好是4MB,那么方法返回
        return threshold;
    if (minNewCapacity > threshold) { //如果所需分配的容量仍然大于4MB
        int newCapacity = minNewCapacity / threshold * threshold;
        //如果容量超出最大允许的容量,那么返回maxCapacity,否则返回newCapacity+threshold
        if (newCapacity > maxCapacity - threshold)
            newCapacity = maxCapacity;
        else
            newCapacity += threshold;
        return newCapacity;
    }
    //如果小于4MB
    int newCapacity = 64;
    //从64字节开始不断加倍,直到大于minNewCapacity
    while (newCapacity < minNewCapacity) {
        newCapacity <<= 1;
    }
    //如果超出了最大允许的容量,那么返回maxCapacity,否则返回newCapacity
    return Math.min(newCapacity, maxCapacity);
}
计算完成后,调用capacity方法进行扩容:
@Override
public ByteBuf capacity(int newCapacity) {
    checkNewCapacity(newCapacity); //检查参数

    int oldCapacity = array.length;
    byte[] oldArray = array;
    if (newCapacity > oldCapacity) { //如果是扩容操作
        byte[] newArray = allocateArray(newCapacity); //分配新的数组
        System.arraycopy(oldArray, 0, newArray, 0, oldArray.length); //将旧数组数据拷贝到新数组
        setArray(newArray); //将新数组赋值给变量array
        freeArray(oldArray); //释放旧数组的空间
    } else if (newCapacity < oldCapacity) { //如果是减少缓冲区大小
        byte[] newArray = allocateArray(newCapacity); //分配新的数组
        int readerIndex = readerIndex(); //获取读索引
        if (readerIndex < newCapacity) { //如果读指针小于新容量
            int writerIndex = writerIndex(); //获取写索引
            if (writerIndex > newCapacity) //如果写索引大于新容量
                writerIndex(writerIndex = newCapacity); //设置新的写索引为newCapacity
            System.arraycopy(oldArray, readerIndex, newArray, readerIndex, writerIndex - readerIndex);
        } else { //否则将读指针设为newCapacity,即指向新数组最后一个元素
            setIndex(newCapacity, newCapacity);
        }
        setArray(newArray); //将新数组赋值给变量array
        freeArray(oldArray); //释放旧数组的空间
    }
    return this;
}
2、调用setBytes方法将byte数组内容添加到缓冲区。
@Override
public ByteBuf setBytes(int index, byte[] src, int srcIndex, int length) {
    checkSrcIndex(index, length, srcIndex, src.length); //检查索引是否越界
    //从缓冲区写索引开始,将数组src的srcIndex~srcIndex+length范围内的字节写入
    System.arraycopy(src, srcIndex, array, index, length);
    return this;
}
3、更新写索引的值。
(2)Channel通道的数据获取
在Netty中,客户端发送的数据通过Channel通道存储在ByteBuf缓冲区中,供ChannelHandler处理。在这个过程中就会调用到int writeBytes(ScatteringByteChanne, int)这个方法
@Override
public int writeBytes(ScatteringByteChannel in, int length) throws IOException {
    ensureWritable(length);
    int writtenBytes = setBytes(writerIndex, in, length);
    if (writtenBytes > 0)
        writerIndex += writtenBytes;
    return writtenBytes;
}
步骤大体上和byte数组差不多,主要体现在setBytes方法的不同
@Override
public int setBytes(int index, ScatteringByteChannel in, int length) throws IOException {
    ensureAccessible();
    try {
        return in.read((ByteBuffer) internalNioBuffer().clear().position(index).limit(index + length));
    } catch (ClosedChannelException ignored) {
        return -1;
    }
}

private ByteBuffer internalNioBuffer() {
    ByteBuffer tmpNioBuf = this.tmpNioBuf;
    if (tmpNioBuf == null)
         his.tmpNioBuf = tmpNioBuf = ByteBuffer.wrap(array);
    return tmpNioBuf;
}
从Channel获取数据需要JDK的ByteBuffer的支持,所以internalNioBuffer()方法将这个ByteBuf持有的缓冲区数组作为参数生成了一个临时的JDK ByteBuffer对象,即ByteBuf和ByteBuffer共享一个缓冲区数组,所有对ByteBuffer缓冲区的操作都会影响到ByteBuf的缓冲区。
然后,调用clear方法将ByteBuffer复位(不会清除缓冲区数据),接着调用position方法将索引更新到index位置,然后调用limit方法设置最多读取length长度的数据。
ByteBuffer设置完毕后,通过Channel的read方法将数据写入到ByteBuffer。
3、数据的读取
可以调用ByteBuf的readBytes方法将缓冲区中的数据写入到目标载体。readBytes方法有多个重载的方法,可以支持将缓冲区中的数据写入到byte数组、另外一个ByteBuf,ByteBuffer、GatheringByteChannel、OutputStream。
(1)写入到byte数组
我们以其中一个readBytes方法为例进行介绍:下面这个方法需要传入三个参数:需要写入的byte数组、从哪个地方开始写入以及从ByteBuf获取多少字节的数据。
@Override
public ByteBuf readBytes(byte[] dst, int dstIndex, int length) {
    checkReadableBytes(length);
    getBytes(readerIndex, dst, dstIndex, length);
    readerIndex += length;
    return this;
}
该方法的调用可以分为以下几个步骤:
- 调用checkReadableBytes方法检查ByteBuf可读的字节数是否小于length参数,如果满足这个条件,那么说明这个ByteBuf无法获取length长度的字节写入到byte数组,此时会抛出IndexOutOfBoundsException
- 调用getBytes方法将数据写入到byte数组:
@Override
public ByteBuf getBytes(int index, byte[] dst, int dstIndex, int length) {
    checkDstIndex(index, length, dstIndex, dst.length);
    System.arraycopy(array, index, dst, dstIndex, length);
    return this;
}
在getBytes方法中,首先会检查byte数组写入数据后是否会越界,如果会越界同样抛出IndexOutOfBoundsException,然后通过System.arraycopy快速复制缓冲区数据到目标数byte数组。
(2)写入到Channel通道
getBytes方法可以将ByteBuf的数据写入到GatheringByteChannel中。
@Override
public int getBytes(int index, GatheringByteChannel out, int length) throws IOException {
    ensureAccessible(); //检查调用者的权限
    return getBytes(index, out, length, false);
}

private int getBytes(int index, GatheringByteChannel out, int length, boolean internal) throws IOException {
    ensureAccessible();
    ByteBuffer tmpBuf;
    if (internal)
        tmpBuf = internalNioBuffer();
    else
        tmpBuf = ByteBuffer.wrap(array);
    return out.write((ByteBuffer) tmpBuf.clear().position(index).limit(index + length));
}
这里建立临时的ByteBuffer的过程和上面类似,这里不再赘述。构建好ByteBuffer后,通过Channel的write方法将缓冲区数据写入Channel通道。
4、UnpooledUnsafeHeapByteBuf
UnpooledUnsafeHeapByteBuf继承了UnpooledHeapByteBuf,其构造方法为包访问权限,在类加载器可以加载sun.misc.Unsafe的情况下,这个类只能通过Unpooled静态工厂方法实例化,它重写了直接通过下标获取缓冲区数据的方法(比如getByte(int index)/getShort(int index)/getLong(int index)等方法),还重写了分配缓冲区的内部方法allocateArray(我们之前已经提到过)。
getByte等方法获取缓冲区数据并不是直接通过array[i]这样获得,而是通过sun.misc.Unsafe的getByte方法直接通过地址获取:
static byte getByte(byte[] data, int index) {
    return UNSAFE.getByte(data, BYTE_ARRAY_BASE_OFFSET + index);
}
对于一个字节来说,可能通过array[i]这样获取速度更快,但是对于int、long等4字节、8字节的数据,采用sun.misc.Unsafe的方法获取效率更高。
