Android实现自由单选、复选按钮效果+样式美化
背景
Android开发中会遇到将单选按钮排布在多行的情况,一般只能通过自定义控件的形式,绘制单选按钮,网络上也有很多这样的文章,但一般情况下自定义的控件在界面美观性、效果方面稍有欠缺。
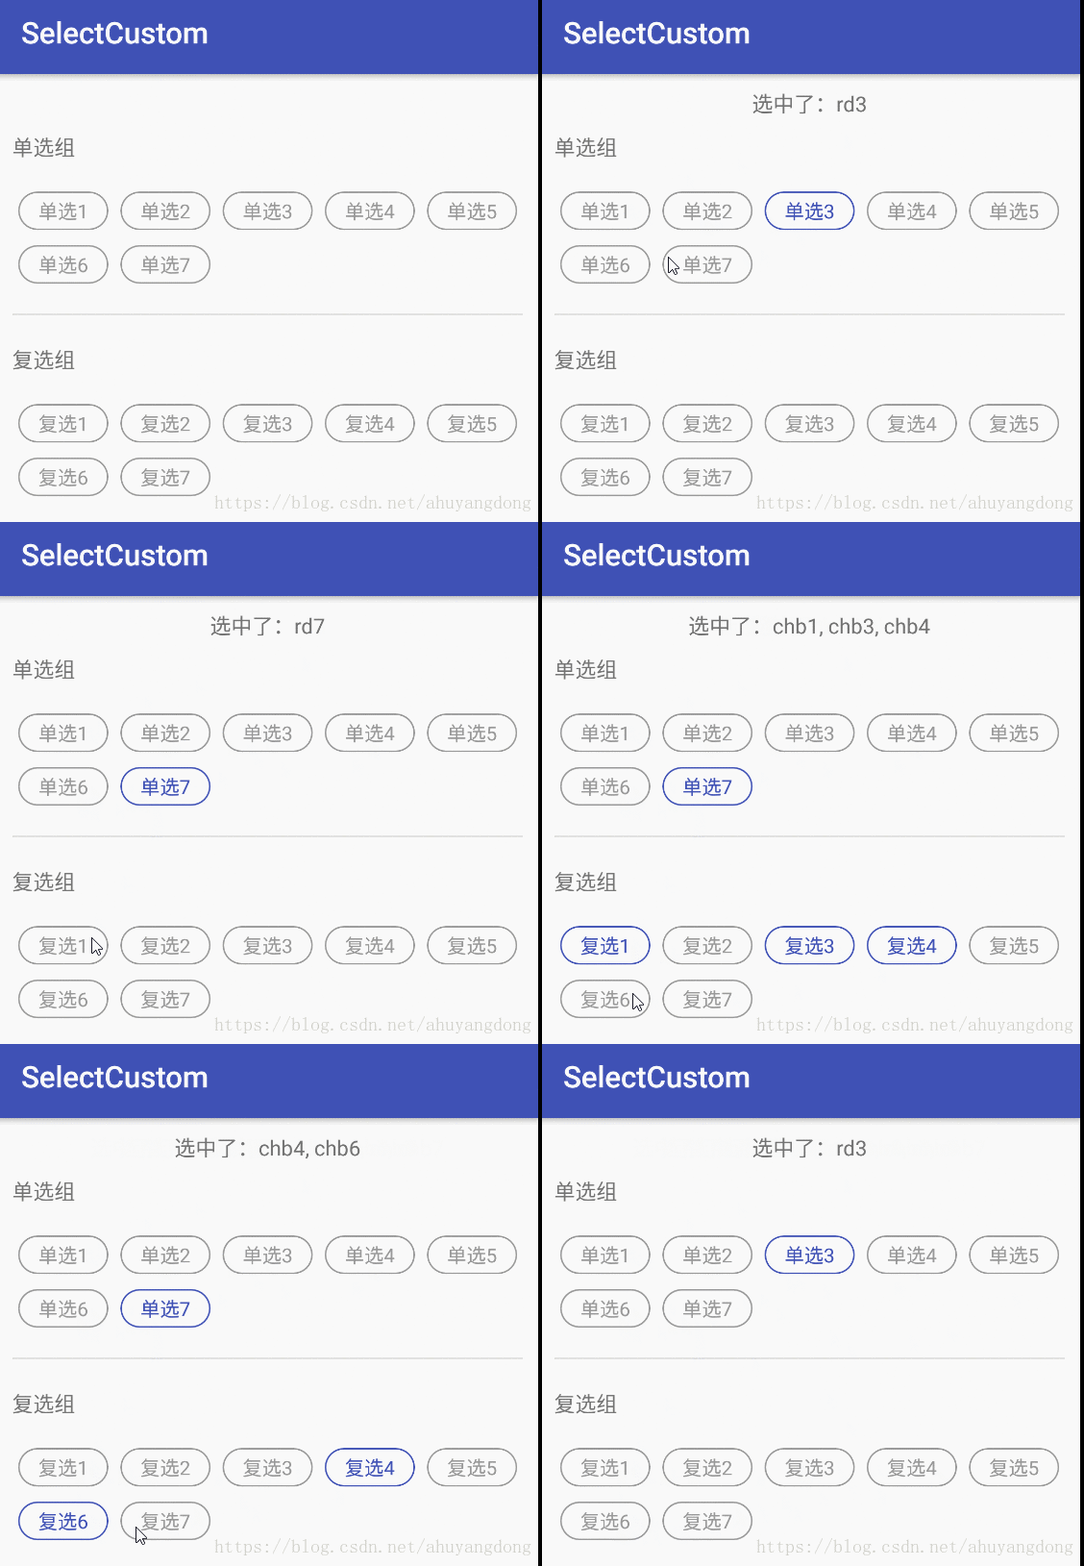
因此,我们打算用CheckBox+LinearLayout来实现一种多行单选按钮组的效果。
效果如下:
思路
Android中要实现单选按钮要用到RadioGroup+RadioButton的布局结构。
RadioGroup继承自LinearLayout,只能按单行或单列的形式排布RadioButton组,所以只能通过其他方法来解决。
RadioButton如果不放置在RadioGroup中,则功能类似于CheckBox,只是不能取消选择。
鉴于上述两个原因,单选组的实现中使用CheckBox控件,更利于封装和统一,因为封装的方法复选框也可以用。
单选组
示例中的单选组采用横向分布形式,第一行使用LinearLayout做横向布局,里面放置5个CheckBox;第二行使用LinearLayout做横向布局,里面放置2个CheckBox。
布局结构
- LinearLayout
- CheckBox
- CheckBox
- CheckBox
- CheckBox
- CheckBox
- LinearLayout
- CheckBox
- CheckBox
相关布局xml源码:
<LinearLayout
    android:layout_width="wrap_content"
    android:layout_height="wrap_content"
    android:layout_gravity="center_vertical"
    android:layout_marginTop="20dip">

    <CheckBox
        android:id="@+id/radio1"
        style="@style/select_style"
        android:tag="rd1"
        android:text="单选1" />

    <CheckBox
        android:id="@+id/radio2"
        style="@style/select_style"
        android:tag="rd2"
        android:text="单选2" />

    <CheckBox
        android:id="@+id/radio3"
        style="@style/select_style"
        android:tag="rd3"
        android:text="单选3" />

    <CheckBox
        android:id="@+id/radio4"
        style="@style/select_style"
        android:tag="rd4"
        android:text="单选4" />

    <CheckBox
        android:id="@+id/radio5"
        style="@style/select_style"
        android:tag="rd5"
        android:text="单选5" />

LinearLayout>

<LinearLayout
    android:layout_width="wrap_content"
    android:layout_height="wrap_content"
    android:layout_gravity="center_vertical"
    android:layout_marginTop="10dip">

    <CheckBox
        android:id="@+id/radio6"
        style="@style/select_style"
        android:tag="rd6"
        android:text="单选6" />

    <CheckBox
        android:id="@+id/radio7"
        style="@style/select_style"
        android:tag="rd7"
        android:text="单选7" />

LinearLayout>
单选控制
因为CheckBox本身是复选框,如果把一组CheckBox做成单选模式的话需要监听CheckBox的Click事件,这个地方用Click事件更合适一点,因为监听的是“被点击”而不是“值改变”。
单选控制要在Activity中注册事件:
/**
 * 单选项点击事件
 * @param checkBox
 */
@OnClick({R.id.radio1, R.id.radio2, R.id.radio3, R.id.radio4, R.id.radio5, R.id.radio6, R.id.radio7})
void changeRadios(CheckBox checkBox) {
    CommonUtil.unCheck(radios);
    checkBox.setChecked(true);
}
说明:
CommonUtil.unCheck(radios); 取消所有单选组CheckBox的选中状态;
checkBox.setChecked(true); 设置当前CheckBox选中,因为Radio是不能点击自己取消自己选中状态的,这样比较符合设计逻辑。
用到了ButterKnife框架赖绑定click事件,对一组View来说,绑定起来比较方便。
其中:
CommonUtil.unCheck方法:
/**
 * 取消checkbox选中状态
 *
 * @param checkBoxList 复选框列表
 */
public static void unCheck(List<CheckBox> checkBoxList) {
    for (CheckBox chb : checkBoxList) {
        chb.setChecked(false);
    }
}
获取选中值
因为单选效果是我们通过CheckBox虚拟出来的,所以按钮的选中值也得做出相应修改,这里定义了一个工具方法:
/**
 * 获取单选值
 *
 * @param checkBoxList
 * @return String 单选值
 */
public static String getOne(List<CheckBox> checkBoxList) {
    String tag = "";
    for (CheckBox chb : checkBoxList) {
        if (chb.getTag() == null) {
            continue;
        }
        if (chb.isChecked()) {
            tag = chb.getTag().toString();
            break;
        }
    }
    return tag;
}
说明:
CheckBox的值是通过tag属性来取得,在界面布局时给CheckBox已经加上了tag。
复选组
Android提供的CheckBox就可以提供复选功能,只是多数情况下我们需要使用一组CheckBox,并获取选中的所有值。
布局结构
借鉴单选组的构建方法,复选组的界面xml:
<LinearLayout
    android:layout_width="wrap_content"
    android:layout_height="wrap_content"
    android:layout_gravity="center_vertical"
    android:layout_marginTop="20dip">

    <CheckBox
        android:id="@+id/checkbox1"
        style="@style/select_style"
        android:tag="chb1"
        android:text="复选1" />

    <CheckBox
        android:id="@+id/checkbox2"
        style="@style/select_style"
        android:tag="chb2"
        android:text="复选2" />

    <CheckBox
        android:id="@+id/checkbox3"
        style="@style/select_style"
        android:tag="chb3"
        android:text="复选3" />

    <CheckBox
        android:id="@+id/checkbox4"
        style="@style/select_style"
        android:tag="chb4"
        android:text="复选4" />

    <CheckBox
        android:id="@+id/checkbox5"
        style="@style/select_style"
        android:tag="chb5"
        android:text="复选5" />

LinearLayout>

<LinearLayout
    android:layout_width="wrap_content"
    android:layout_height="wrap_content"
    android:layout_gravity="center_vertical"
    android:layout_marginTop="10dip">

    <CheckBox
        android:id="@+id/checkbox6"
        style="@style/select_style"
        android:tag="chb6"
        android:text="复选6" />

    <CheckBox
        android:id="@+id/checkbox7"
        style="@style/select_style"
        android:tag="chb7"
        android:text="复选7" />

LinearLayout>
获取选中值
提前将一系列CheckBox定义到一个集合中,然后通过遍历集合中已选中的CheckBox,就可以获得选中的值了,这里同样将value存放在tag中。
/**
 * 获取多选值
 *
 * @param checkBoxList
 * @return String 多个值结合,逗号分隔
 */
public static String getMany(List<CheckBox> checkBoxList) {
    StringBuffer sb = new StringBuffer();
    for (CheckBox chb : checkBoxList) {
        if (chb.getTag() == null) {
            continue;
        }
        if (chb.isChecked()) {
            if (sb.length() > 0) {
                sb.append(", ");
            }
            sb.append(chb.getTag().toString());
        }
    }
    return sb.toString();
}
样式美化
示例中去除了图标,定义了CheckBox的样式select_style:
<style name="select_style">
- "android:layout_width"
>60dip
- "android:layout_height">wrap_content
- "android:layout_marginLeft">4dip
- "android:layout_marginRight">4dip
- "android:paddingTop">4dip
- "android:paddingBottom">4dip
- "android:background">@drawable/select_selector
- "android:button">@null
- "android:gravity">center
- "android:textSize">13sp
- "android:textColor">@drawable/txt_select_selector
style>
实际使用过程可通过android:drawableLeft等属性为单选组、复选组添加小图标,满足项目需求。
Activity源码
package com.dommy.selectcustom;

import android.os.Bundle;
import android.support.v7.app.AppCompatActivity;
import android.widget.CheckBox;
import android.widget.TextView;
import android.widget.Toast;

import com.dommy.selectcustom.util.CommonUtil;

import java.util.List;

import butterknife.BindView;
import butterknife.BindViews;
import butterknife.ButterKnife;
import butterknife.OnClick;

public class MainActivity extends AppCompatActivity {
    @BindView(R.id.txt_value)
    TextView tvValue; // 选种值
    @BindViews({R.id.radio1, R.id.radio2, R.id.radio3, R.id.radio4, R.id.radio5, R.id.radio6, R.id.radio7})
    List<CheckBox> radios; // 单选组
    @BindViews({R.id.checkbox1, R.id.checkbox2, R.id.checkbox3, R.id.checkbox4, R.id.checkbox5, R.id.checkbox6, R.id.checkbox7})
    List<CheckBox> checkBoxes; // 多选组

    @Override
    protected void onCreate(Bundle savedInstanceState) {
        super.onCreate(savedInstanceState);
        setContentView(R.layout.activity_main);

        ButterKnife.bind(this);

        // 如果有初始状态需要显示,参见:
        // com.dommy.selectcustom.util.CommonUtil.checkOne()
        // com.dommy.selectcustom.util.CommonUtil.checkMany()
    }

    /**
     * 单选项点击事件
     * @param checkBox
     */
    @OnClick({R.id.radio1, R.id.radio2, R.id.radio3, R.id.radio4, R.id.radio5, R.id.radio6, R.id.radio7})
    void changeRadios(CheckBox checkBox) {
        CommonUtil.unCheck(radios);
        checkBox.setChecked(true);

        // 显示选中项值
        String checkedValues = CommonUtil.getOne(radios);
        tvValue.setText("选中了:" + checkedValues);
    }

    /**
     * 复选项点击事件
     * @param checkBox
     */
    @OnClick({R.id.checkbox1, R.id.checkbox2, R.id.checkbox3, R.id.checkbox4, R.id.checkbox5, R.id.checkbox6, R.id.checkbox7})
    void changeCheckBoxs(CheckBox checkBox) {
        // 显示选中项值
        String checkedValues = CommonUtil.getMany(checkBoxes);
        tvValue.setText("选中了:" + checkedValues);
    }
}
项目源码
https://github.com/ahuyangdong/SelectCustom
CSDN下载:
https://download.csdn.net/download/ahuyangdong/10722882
