Android基础知识之 - Service基础
- Android基础知识之 - Service基础
- 1.1 Service后台服务
- 1.1.1 不可交互的后台服务
- 1.1.2 可交互的后台服务
- 1.2 混合性交互的后台服务
- 1.3 前台服务
- 1.4 IntentService
- 1.5 AIDL跨进程服务
- 1.6 系统服务
- 1.1 Service后台服务
Android基础知识之 - Service基础
本篇博客其实是Android四大组件——Service后台服务、前台服务、IntentService、跨进程服务、无障碍服务、系统服务的加工版本,但添加了自己的思考
本篇博客的Service基础知识包括:Service后台服务、前台服务、IntentService、跨进程服务、系统服务
1.1 Service后台服务
Service后台服务有两种启动方式,startSevice()和bindService(),bindService可以返回一个代理对象,可以调用Service中的方法和获取返回结果等操作,而startService方式启动的Service一旦被启动就与所启动的Activity和BroadCast没有了任何关系,更不能和它们进行交互
1.1.1 不可交互的后台服务
当我们通过startService来启动服务的时候,所启动的Service就不能不可交互的后台服务
它的生命周期分别为onCreate、onStartCommond、onDestroy:
当我们首次startService的时候,首次创建Service就会回调onCreate()方法,然后回调onStartCommand()方法,再次startService()的时候,就只能执行一次onStartCommand(),服务一旦开启就需要通过stopService()或者stopSelf()方法,才能将服务关闭,这时就会回调onDestroy()方法
- 创建服务类
创建一个服务非常简单,只要继承Service,并实现onBind()方法
public class BackGroupService extends Service {

    @Nullable
    @Override
    public IBinder onBind(Intent intent) {
        Log.e("Service","onBind");
        return null;
    }

    @Override
    public void onCreate() {
        Log.e("Service","onCreate");
        super.onCreate();
    }

    @Override
    public int onStartCommand(Intent intent, int flags, int startId) {
        Log.e("Service","onStartCommand");
        new Thread(new Runnable() {
            @Override
            public void run() {
                while (true){
                    Log.e("Service","doSomething");
                    try {
                        Thread.sleep(2000);
                    } catch (InterruptedException e) {
                        e.printStackTrace();
                    }
                }
            }
        }).start();
        return super.onStartCommand(intent, flags, startId);
    }

    @Override
    public void onDestroy() {
        Log.e("Service","onDestroy");
        super.onDestroy();
    }
}- 配置服务
Service也是四大组件之一,所以必须在manifests中配置
<service android:name=".Service.BackGroupService"/>- 启动服务和停止服务
public class MainActivity extends AppCompatActivity implements View.OnClickListener {
    private Button bt_open, bt_close;
    private Intent intent;
    @Override
    protected void onCreate(Bundle savedInstanceState) {
        super.onCreate(savedInstanceState);
        setContentView(R.layout.activity_main);
        bt_open = findViewById(R.id.open);
        bt_close = findViewById(R.id.stop);
        bt_open.setOnClickListener(this);
        bt_close.setOnClickListener(this);
        intent = new Intent(this,BackGroupService.class);
    }

    @Override
    public void onClick(View v) {
        switch (v.getId()){
            case R.id.open:
                startService(intent);
                break;
            case R.id.stop:
                stopService(intent);
                break;
            default:
                break;
        }
    }
}
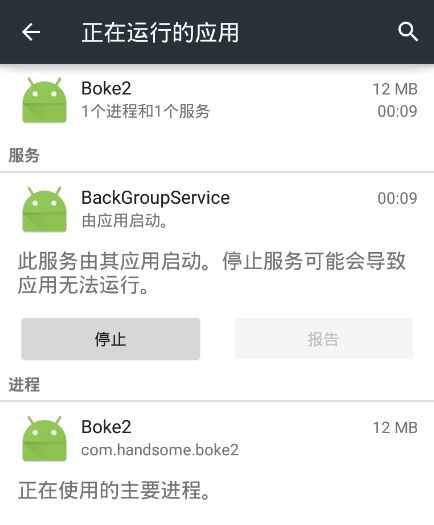
当你开启服务后,还有一种方法可以关闭服务,在设置中,通过应用->找到自己应用->停止

运行程序后,我们点击开始服务,然后再次点击开始服务,然后一段时间后关闭服务。我们以Log信息来验证普通Service的生命周期:onCreate->onStartCommand->onStartCommand->onDestroy
05-09 09:19:33.774 3729-3729/com.example.cxy.testservice E/Service: onCreate
05-09 09:19:33.775 3729-3729/com.example.cxy.testservice E/Service: onStartCommand
05-09 09:19:33.778 3729-4309/com.example.cxy.testservice E/Service: doSomething
05-09 09:19:34.054 3729-4223/com.example.cxy.testservice E/Service: doSomething
05-09 09:19:34.215 3729-3935/com.example.cxy.testservice E/Service: doSomething
05-09 09:19:34.244 3729-3946/com.example.cxy.testservice E/Service: doSomething
05-09 09:19:34.363 3729-3948/com.example.cxy.testservice E/Service: doSomething
05-09 09:19:34.378 3729-3729/com.example.cxy.testservice E/Service: onStartCommand
05-09 09:19:34.378 3729-4310/com.example.cxy.testservice E/Service: doSomething
05-09 09:19:34.394 3729-4224/com.example.cxy.testservice E/Service: doSomething
05-09 09:19:34.581 3729-3933/com.example.cxy.testservice E/Service: doSomething
05-09 09:19:34.746 3729-3915/com.example.cxy.testservice E/Service: doSomething
05-09 09:19:34.835 3729-3947/com.example.cxy.testservice E/Service: doSomething
05-09 09:19:34.883 3729-3916/com.example.cxy.testservice E/Service: doSomething
05-09 09:19:34.896 3729-3875/com.example.cxy.testservice E/Service: doSomething
05-09 09:19:34.957 3729-3729/com.example.cxy.testservice E/Service: onDestroy
05-09 09:19:35.007 3729-3899/com.example.cxy.testservice E/Service: doSomething
05-09 09:19:35.107 3729-4222/com.example.cxy.testservice E/Service: doSomething
05-09 09:19:35.174 3729-3905/com.example.cxy.testservice E/Service: doSomething
05-09 09:19:35.324 3729-3934/com.example.cxy.testservice E/Service: doSomething
可以看出首次启动服务会调用onCreate->onStartCommand,再次启动服务只调用onStartCommand,关闭服务回调onDestroy
其中你会发现即使我们的Service已经关闭,子线程进行的死循环操作是一直存在的,关闭该子线程死循环的方法是完全退出该应用程序
1.1.2 可交互的后台服务
可交互的后台服务是指前台页面可以调用后台服务的方法,可交互的后台服务实现步骤是和不可交互的后台服务实现步骤是一样的,区别在于启动的方式和获得Service的代理对象
- 创建服务类
和普通Service不同在于构建了Binder继承类作为Service的代理对象,onBind中返回这个代理对象的实例,返回给前台进行获取,即前台可以获取该代理对象执行后台服务的方法
public class BackGroupService extends Service {

    @Nullable
    @Override
    public IBinder onBind(Intent intent) {
        Log.e("Service","onBind");
        return new MyBinder();
    }

    /**
     * 代理类
     */
    public class MyBinder extends Binder {
        public void showToast(){
            Log.e("Service","showToast");
        }
        public void showList(){
            Log.e("Service","showList");
        }
    }

    /**
     * 解除绑定服务时调用
     * @param intent
     * @return
     */
    @Override
    public boolean onUnbind(Intent intent) {
        Log.e("Service","onUnbind");
        return super.onUnbind(intent);
    }

    @Override
    public void onCreate() {
        Log.e("Service","onCreate");
        super.onCreate();
    }

    @Override
    public void onDestroy() {
        Log.e("Service","onDestroy");
        super.onDestroy();
    }
}- 配置服务
<service android:name=".Service.BackGroupService"/>- 绑定服务和解除绑定服务
public class MainActivity extends AppCompatActivity implements View.OnClickListener {
    private Button bt_open, bt_close;
    private Intent intent;
    @Override
    protected void onCreate(Bundle savedInstanceState) {
        super.onCreate(savedInstanceState);
        setContentView(R.layout.activity_main);
        bt_open = findViewById(R.id.open);
        bt_close = findViewById(R.id.stop);
        bt_open.setOnClickListener(this);
        bt_close.setOnClickListener(this);
        intent = new Intent(this,BackGroupService.class);
    }

    @Override
    public void onClick(View v) {
        switch (v.getId()){
            case R.id.open:
                bindService(intent,conn,BIND_AUTO_CREATE);
                break;
            case R.id.stop:
                unbindService(conn);
                break;
            default:
                break;
        }
    }

    ServiceConnection conn = new ServiceConnection() {
        @Override
        public void onServiceConnected(ComponentName name, IBinder service) {
            // 拿到后台服务代理对象
            BackGroupService.MyBinder myBinder = (BackGroupService.MyBinder) service;
            // 调用后台服务的方法
            myBinder.showToast();
            myBinder.showList();
        }

        @Override
        public void onServiceDisconnected(ComponentName name) {

        }
    };
}
这里和startService的区别在于多了一个ServiceConnection对象,该对象是用户绑定后台服务后,可获取后台服务代理对象的回调,我们可以通过该回调,拿到后台服务的代理对象,并调用后台服务定义的方法,也就实现了后台服务和前台的交互
这里的new ServiceConnection(){}是客户端与服务端的链接,它实现两个方法onServiceConnected()和onServiceDisconnected(),它们两个的作用是:
- onServiceConnected():与服务端交互的接口方法,绑定服务的时候被回调,在这个方法中获取绑定Service传递过来的IBinder对象,通过这个IBinder对象,实现宿主和Service的交互
- onServiceDisconnected():当取消绑定的时候被回调,但正常情况下是不被调用的,它的调用实际是在Service服务被意外销毁时,例如内存资源不足是才被自动调用
可交互Service服务的启动用方法bindService,关闭用unbindService
BIND_AUTO_CREATE表示在活动和服务绑定后自动创建服务,这会使得BackGroupService的onCreate和onBind方法得到执行
- 运行代码
运行程序后,我们点击绑定服务,然后一段时间后解除绑定服务。我们以Log信息来验证Service的生命周期:onCreate->onBind->onUnBind->onDestroy,其中也可以看到我们调用后台服务的方法showToast和showList,因此不再执行onStartCommand的回调
05-09 09:49:23.235 5594-5594/com.example.cxy.testservice E/Service: onCreate
05-09 09:49:23.236 5594-5594/com.example.cxy.testservice E/Service: onBind
05-09 09:49:23.241 5594-5594/com.example.cxy.testservice E/Service: showToast
05-09 09:49:23.241 5594-5594/com.example.cxy.testservice E/Service: showList
05-09 09:49:32.476 5594-5594/com.example.cxy.testservice E/Service: onUnbind
05-09 09:49:32.476 5594-5594/com.example.cxy.testservice E/Service: onDestroy
1.2 混合性交互的后台服务
或许你会迷惑,startService和bindService之间有什么关系?其实简单的说两者之间是没有关联的,类似于双胞胎一样,只有纯粹的血缘关系。那么问题来了,这两个启动方式是否可以同时使用呢,答案是可以的
将上面两种启动方式结合起来就是混合性交互的后台服务了,即可以单独运行后台服务,也可以运行后台服务中提供的方法
这种情况下如何才能让服务销毁掉呢?根据Android系统的机制,一个服务只要被启动或者被绑定之后,就会一直处于运行状态,必须要让以上两种条件同时不满足,服务才能被销毁,所有,这种情况下要同时调用stopService()和unbindService()方法,onDestroy()方法才会执行
1.3 前台服务
由于后台服务优先级相对比较低,当系统出现内存不足的情况下,它就有可能会被回收掉,所以前台服务就是来弥补这个缺点的,它可以一直保持运行状态而不被系统回收。例如:墨迹天气在状态栏中的天气预报

- 创建服务类
前台服务创建很简单,其实就在Service的基础上创建一个Notification,然后使用Service的startForeground()方法即可启动为前台服务
public class ForegroundService extends Service {
    @Nullable
    @Override
    public IBinder onBind(Intent intent) {
        return null;
    }

    @RequiresApi(api = Build.VERSION_CODES.JELLY_BEAN)
    @Override
    public void onCreate() {
        super.onCreate();
        showNotification();
    }

    /**
     * 启动前台通知
     */
    @RequiresApi(api = Build.VERSION_CODES.JELLY_BEAN)
    private void showNotification() {
        // 创建点击跳转Intent
        Intent intent = new Intent(this,MainActivity.class);
        // 创建跳转PendingIntent
        PendingIntent pi = PendingIntent.getActivity(this,0,intent,0);
        // 创建通知详细信息并构建通知
        Notification notification = new Notification.Builder(this)
                .setContentTitle("2018年5月9日")
                .setContentText("今天天气晴朗,15到29度")
                .setWhen(System.currentTimeMillis())
                .setSmallIcon(R.mipmap.ic_launcher)
                .setLargeIcon(BitmapFactory.decodeResource(getResources(),R.mipmap.ic_launcher))
                .setContentIntent(pi)
                .build();
        // 获取通知服务
        NotificationManager nm = (NotificationManager) getSystemService(Context.NOTIFICATION_SERVICE);
        // 显示通知
        nm.notify(0,notification);
        // 启动为前台服务
        startForeground(0,notification);
    }
}- 配置服务
<service android:name=".Service.ForegroundService"/>- 启动前台服务
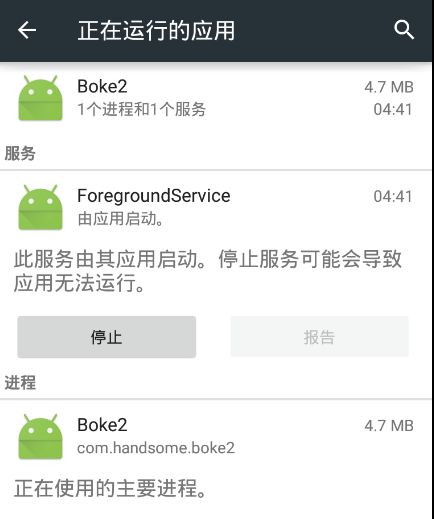
startService(new Intent(this, ForegroundService.class));当我们将该程序退出并杀掉的时候,通过设置->应用->选择正在运行中的应用,我们可以发现,我们的程序退出杀掉了,而服务还在进行着

1.4 IntentService
IntentService是专门用来解决Service中不能执行耗时操作这一问题的,创建一个IntentService也很简单,只要继承IntentService并覆写onHandlerIntent函数,在该函数中就可以执行耗时操作了
- 服务类
public class TheIntentService extends IntentService {

    public TheIntentService() {
        super("TheIntentService"); // 调用父类的有参构造函数
    }

    @Override
    protected void onHandleIntent(@Nullable Intent intent) {
        // 在这里执行耗时操作
        Log.e("TheIntentService","onHandleIntent");
    }

    @Override
    public void onDestroy() {
        super.onDestroy();
        Log.e("TheIntentService","onDestroy");
    }
}
这里首先提供一个无参的构造函数,并且必须在其内部调用父类的有参构造函数,然后在子类中去实现onHandleIntent()这个抽象方法,在这里可以去处理一些具体的逻辑,而不用担心ANR问题,因为这个方法已经是在子类中运行了,这个服务在运行结束后应该会自动停止,所有我们重写了onDestroy()方法
- 运行代码
点击开启服务,服务执行完毕后自动停止服务
05-09 11:50:50.326 7113-7308/com.example.cxy.testservice E/TheIntentService: onHandleIntent
05-09 11:50:50.329 7113-7113/com.example.cxy.testservice E/TheIntentService: onDestroy
1.5 AIDL跨进程服务
1.6 系统服务
系统服务提供了很多便捷服务,可以查询Wifi、网络状态、查询电量、查询音量、查询包名、查询Application信息等等等相关多的服务,具体大家可以自信查询文档,这里举例几个常见的服务
- 判断Wifi是否开启
WifiManager wm = (WifiManager) getSystemService(WIFI_SERVICE);
boolean enabled = wm.isWifiEnabled();
需要权限
<uses-permission android:name="android.permission.ACCESS_WIFI_STATE"/>
<uses-permission android:name="android.permission.CHANGE_WIFI_STATE"/>- 获取系统最大音量
AudioManager am = (AudioManager) getSystemService(AUDIO_SERVICE);
int max = am.getStreamMaxVolume(AudioManager.STREAM_SYSTEM);- 获取当前音量
AudioManager am = (AudioManager) getSystemService(AUDIO_SERVICE);
int current = am.getStreamMaxVolume(AudioManager.STREAM_RING);- 判断网络是否有连接
ConnectivityManager cm = (ConnectivityManager) getSystemService(CONNECTIVITY_SERVICE);
NetworkInfo info = cm.getActiveNetworkInfo();
boolean isAvailable = info.isAvailable();
需要权限
<uses-permission android:name="android.permission.ACCESS_NETWORK_STATE"/>