ProxySQL 配置详解及读写分离(+GTID)等功能说明 (完整篇)2

原文链接: https://www.cnblogs.com/kevingrace/p/10329714.html

2) 从数据库mysql-slave1 (172.16.60.212)的配置操作

与主服务器配置大概一致,除了server_id不一致外,从服务器还可以在配置文件里面添加:"read_only=on" ,

使从服务器只能进行读取操作,此参数对超级用户无效,并且不会影响从服务器的复制;

[root@mysql-slave1 ~]# >/etc/my.cnf

[root@mysql-slave1 ~]# vim /etc/my.cnf

[mysqld]

datadir = /var/lib/mysql

socket = /var/lib/mysql/mysql.sock


symbolic-links = 0


log-error = /var/log/mysqld.log

pid-file /var/run/mysqld/mysqld.pid


#GTID:

server_id = 2

gtid_mode = on

enforce_gtid_consistency = on


#binlog

log_bin = master-bin

log-slave-updates = 1

binlog_format = row

sync-master-info = 1

sync_binlog = 1


#relay log

skip_slave_start = 1

read_only = on


配置完成之后,别忘了重启Mysql

[root@mysql-slave1 ~]# systemctl restart mysqld


接着登录mysql,做主从同步

[root@mysql-slave1 ~]# mysql -p123456

........

mysql> show databases;

+--------------------+

| Database           |

+--------------------+

| information_schema |

| mysql              |

| performance_schema |

test               |

+--------------------+

4 rows in set (0.00 sec)


在从数据库里,使用change master 配置主从复制

mysql> stop slave;

Query OK, 0 rows affected, 1 warning (0.00 sec)


mysql> change master to master_host='172.16.60.211',master_user='slave',master_password='slave@123',master_auto_position=1;

Query OK, 0 rows affected, 2 warnings (0.24 sec)


mysql> start slave;

Query OK, 0 rows affected (0.02 sec)


mysql> show slave status \G;

*************************** 1. row ***************************

               Slave_IO_State: Waiting for master to send event

                  Master_Host: 172.16.60.211

                  Master_User: slave

                  Master_Port: 3306

                Connect_Retry: 60

              Master_Log_File: master-bin.000002

          Read_Master_Log_Pos: 2069

               Relay_Log_File: mysql-slave1-relay-bin.000002

                Relay_Log_Pos: 2284

        Relay_Master_Log_File: master-bin.000002

             Slave_IO_Running: Yes

            Slave_SQL_Running: Yes

............

............

           Retrieved_Gtid_Set: fc39b161-22ca-11e9-a638-005056ac6820:1-8

            Executed_Gtid_Set: 2afbc2f5-22cb-11e9-b9c0-00505688047c:1-2,

fc39b161-22ca-11e9-a638-005056ac6820:1-8

                Auto_Position: 1

         Replicate_Rewrite_DB:

                 Channel_Name:

           Master_TLS_Version:

1 row in set (0.00 sec)


ERROR:

No query specified


查看从库的gtid

mysql> show global variables like '%gtid%';

+----------------------------------+------------------------------------------------------------------------------------+

| Variable_name                    | Value                                                                              |

+----------------------------------+------------------------------------------------------------------------------------+

| binlog_gtid_simple_recovery      | ON                                                                                 |

| enforce_gtid_consistency         | ON                                                                                 |

| gtid_executed                    | 2afbc2f5-22cb-11e9-b9c0-00505688047c:1-2,

fc39b161-22ca-11e9-a638-005056ac6820:1-8 |

| gtid_executed_compression_period | 1000                                                                               |

| gtid_mode                        | ON                                                                                 |

| gtid_owned                       |                                                                                    |

| gtid_purged                      | 2afbc2f5-22cb-11e9-b9c0-00505688047c:1-2                                           |

| session_track_gtids              | OFF                                                                                |

+----------------------------------+------------------------------------------------------------------------------------+

8 rows in set (0.01 sec)


接着查看从数据库的数据,发现kevin库已经同步过来了!

mysql> show databases;

+--------------------+

| Database           |

+--------------------+

| information_schema |

| kevin              |

| mysql              |

| performance_schema |

| sys                |

+--------------------+

5 rows in set (0.00 sec)


mysql> select * from kevin.haha;

+----+----------+

id | name     |

+----+----------+

|  1 | congcong |

|  2 | huihui   |

|  3 | grace    |

+----+----------+

3 rows in set (0.00 sec)


3) 从数据库mysql-slave2 (172.16.60.213)的配置操作

[root@mysql-slave2 ~]# >/etc/my.cnf

[root@mysql-slave2 ~]# vim /etc/my.cnf

[mysqld]

datadir = /var/lib/mysql

socket = /var/lib/mysql/mysql.sock


symbolic-links = 0


log-error = /var/log/mysqld.log

pid-file /var/run/mysqld/mysqld.pid


#GTID:

server_id = 3

gtid_mode = on

enforce_gtid_consistency = on


#binlog

log_bin = master-bin

log-slave-updates = 1

binlog_format = row

sync-master-info = 1

sync_binlog = 1


#relay log

skip_slave_start = 1

read_only = on


重启mysqld

[root@mysql-slave2 ~]#  systemctl restart mysqld 


登录mysql,做主从复制

[root@mysql-slave2 ~]# mysql -p123456

.........

mysql> stop slave;

Query OK, 0 rows affected, 1 warning (0.00 sec)


mysql> change master to master_host='172.16.60.211',master_user='slave',master_password='slave@123',master_auto_position=1;

Query OK, 0 rows affected, 2 warnings (0.17 sec)


mysql> start slave;

Query OK, 0 rows affected (0.01 sec)


mysql> show slave status \G;

*************************** 1. row ***************************

               Slave_IO_State: Waiting for master to send event

                  Master_Host: 172.16.60.211

                  Master_User: slave

                  Master_Port: 3306

                Connect_Retry: 60

              Master_Log_File: master-bin.000002

          Read_Master_Log_Pos: 2069

               Relay_Log_File: mysql-slave2-relay-bin.000002

                Relay_Log_Pos: 2284

        Relay_Master_Log_File: master-bin.000002

             Slave_IO_Running: Yes

            Slave_SQL_Running: Yes

..........

..........

           Retrieved_Gtid_Set: fc39b161-22ca-11e9-a638-005056ac6820:1-8

            Executed_Gtid_Set: 26e410b4-22cb-11e9-be44-005056880888:1-2,

fc39b161-22ca-11e9-a638-005056ac6820:1-8

                Auto_Position: 1

         Replicate_Rewrite_DB:

                 Channel_Name:

           Master_TLS_Version:

1 row in set (0.00 sec)


ERROR:

No query specified


查看从库的gtid

mysql> show global variables like '%gtid%';

+----------------------------------+------------------------------------------------------------------------------------+

| Variable_name                    | Value                                                                              |

+----------------------------------+------------------------------------------------------------------------------------+

| binlog_gtid_simple_recovery      | ON                                                                                 |

| enforce_gtid_consistency         | ON                                                                                 |

| gtid_executed                    | 26e410b4-22cb-11e9-be44-005056880888:1-2,

fc39b161-22ca-11e9-a638-005056ac6820:1-8 |

| gtid_executed_compression_period | 1000                                                                               |

| gtid_mode                        | ON                                                                                 |

| gtid_owned                       |                                                                                    |

| gtid_purged                      | 26e410b4-22cb-11e9-be44-005056880888:1-2                                           |

| session_track_gtids              | OFF                                                                                |

+----------------------------------+------------------------------------------------------------------------------------+

8 rows in set (0.01 sec)


接着查看从数据库的数据,发现kevin库已经同步过来了!

mysql> show databases;

+--------------------+

| Database           |

+--------------------+

| information_schema |

| kevin              |

| mysql              |

| performance_schema |

| sys                |

+--------------------+

5 rows in set (0.00 sec)


mysql> select * from kevin.haha;

+----+----------+

id | name     |

+----+----------+

|  1 | congcong |

|  2 | huihui   |

|  3 | grace    |

+----+----------+

3 rows in set (0.00 sec)


4)再回到主数据库mysql-master (172.16.60.211)上


查看master状态,发现已经有两个slave节点正常存在同步关系了

mysql> show slave hosts;

+-----------+------+------+-----------+--------------------------------------+

| Server_id | Host | Port | Master_id | Slave_UUID                           |

+-----------+------+------+-----------+--------------------------------------+

|         3 |      | 3306 |         1 | 26e410b4-22cb-11e9-be44-005056880888 |

|         2 |      | 3306 |         1 | 2afbc2f5-22cb-11e9-b9c0-00505688047c |

+-----------+------+------+-----------+--------------------------------------+

2 rows in set (0.00 sec)


5)测试数据同步

在主数据库mysql-master (172.16.60.211)上更新数据

mysql> insert into kevin.haha values(10,"heifei"),(11,"huoqiu"),(12,"chengxihu");

Query OK, 3 rows affected (0.05 sec)

Records: 3  Duplicates: 0  Warnings: 0


然后在两个slave从数据库上查看,发现已正常同步过来了

mysql> select * from kevin.haha;

+----+-----------+

id | name      |

+----+-----------+

|  1 | congcong  |

|  2 | huihui    |

|  3 | grace     |

| 10 | heifei    |

| 11 | huoqiu    |

| 12 | chengxihu |

+----+-----------+

6 rows in set (0.00 sec)

4. 安装配置ProxySQL
已经在上面第一步中介绍了安装方法,这里采用rpm包方式安装,安装过程省略........

4.1 ProxySQL实现读写分离

向ProxySQL中添加MySQL节点

1

2

3

4

5

6

7

8

9

10

11

12

13

14

15

16

17

18

19

20

21

22

23

24

25

26

27

28

29

30

31

32

33

34

35

36

37

38

39

40

41

42

43

44

45

46

47

48

49

50

51

52

53

54

55

56

57

58

59

60

61

62

63

64

65

66

67

68

69

70

71

使用insert语句添加主机到mysql_servers表中,其中:hostgroup_id 为10表示写组,为20表示读组。


[root@mysql-proxy ~]# mysql -uadmin -padmin -P6032 -h127.0.0.1

............

MySQL [(none)]> insert into mysql_servers(hostgroup_id,hostname,port) values(10,'172.16.60.211',3306);

Query OK, 1 row affected (0.000 sec)


MySQL [(none)]> insert into mysql_servers(hostgroup_id,hostname,port) values(10,'172.16.60.212',3306);

Query OK, 1 row affected (0.000 sec)


MySQL [(none)]> insert into mysql_servers(hostgroup_id,hostname,port) values(10,'172.16.60.213',3306);

Query OK, 1 row affected (0.000 sec)


==========================================================================================================

如果在插入过程中,出现报错:

ERROR 1045 (#2800): UNIQUE constraint failed: mysql_servers.hostgroup_id, mysql_servers.hostname, mysql_servers.port


说明可能之前就已经定义了其他配置,可以清空这张表 或者 删除对应host的配置

MySQL [(none)]> select * from mysql_servers;

MySQL [(none)]> delete from mysql_servers;

Query OK, 6 rows affected (0.000 sec)

=========================================================================================================


查看这3个节点是否插入成功,以及它们的状态。

MySQL [(none)]> select * from mysql_servers\G;

*************************** 1. row ***************************

       hostgroup_id: 10

           hostname: 172.16.60.211

               port: 3306

             status: ONLINE

             weight: 1

        compression: 0

    max_connections: 1000

max_replication_lag: 0

            use_ssl: 0

     max_latency_ms: 0

            comment:

*************************** 2. row ***************************

       hostgroup_id: 10

           hostname: 172.16.60.212

               port: 3306

             status: ONLINE

             weight: 1

        compression: 0

    max_connections: 1000

max_replication_lag: 0

            use_ssl: 0

     max_latency_ms: 0

            comment:

*************************** 3. row ***************************

       hostgroup_id: 10

           hostname: 172.16.60.213

               port: 3306

             status: ONLINE

             weight: 1

        compression: 0

    max_connections: 1000

max_replication_lag: 0

            use_ssl: 0

     max_latency_ms: 0

            comment:

6 rows in set (0.000 sec)


ERROR: No query specified


如上修改后,加载到RUNTIME,并保存到disk

MySQL [(none)]> load mysql servers to runtime;

Query OK, 0 rows affected (0.006 sec)


MySQL [(none)]> save mysql servers to disk;

Query OK, 0 rows affected (0.348 sec)

监控后端MySQL节点
添加Mysql节点之后,还需要监控这些后端节点。对于后端是主从复制的环境来说,这是必须的,因为ProxySQL需要通过每个节点的read_only值来自动调整
它们是属于读组还是写组。

首先在后端master主数据节点上创建一个用于监控的用户名(只需在master上创建即可,因为会复制到slave上),这个用户名只需具有USAGE权限即可。如果还需
要监控复制结构中slave是否严重延迟于master(这个俗语叫做"拖后腿",术语叫做"replication lag"),则还需具备replication client权限。

1

2

3

4

5

6

7

8

9

10

11

12

13

14

15

16

17

18

19

20

21

22

23

24

25

26

27

28

29

30

31

32

33

34

35

36

37

38

39

40

41

42

43

44

45

46

47

48

49

50

51

52

53

54

55

56

57

58

59

60

61

62

63

64

65

66

67

68

69

70

71

72

73

74

75

76

77

78

79

80

81

82

83

84

85

86

87

88

89

90

91

92

93

94

95

96

97

98

99

100

101

102

103

104

105

106

107

108

109

110

111

112

113

114

115

116

117

在mysql-master主数据库节点行执行:

[root@mysql-master ~]# mysql -p123456

..........


mysql> create user monitor@'172.16.60.%' identified by 'P@ssword1!';

Query OK, 0 rows affected (0.03 sec)


mysql> grant replication client on *.* to monitor@'172.16.60.%';

Query OK, 0 rows affected (0.02 sec)


mysql> flush privileges;

Query OK, 0 rows affected (0.02 sec)


然后回到mysql-proxy代理层节点上配置监控

[root@mysql-proxy ~]# mysql -uadmin -padmin -P6032 -h127.0.0.1

..........

MySQL [(none)]> set mysql-monitor_username='monitor';

Query OK, 1 row affected (0.000 sec)


MySQL [(none)]> set mysql-monitor_password='P@ssword1!';

Query OK, 1 row affected (0.000 sec)


修改后,加载到RUNTIME,并保存到disk

MySQL [(none)]> load mysql variables to runtime;

Query OK, 0 rows affected (0.001 sec)


MySQL [(none)]> save mysql variables to disk;

Query OK, 94 rows affected (0.079 sec)


验证监控结果:ProxySQL监控模块的指标都保存在monitor库的log表中。


以下是连接是否正常的监控(对connect指标的监控):

注意:可能会有很多connect_error,这是因为没有配置监控信息时的错误,配置后如果connect_error的结果为NULL则表示正常。

MySQL [(none)]> select * from mysql_server_connect_log;

+---------------+------+------------------+-------------------------+---------------+

hostname      | port | time_start_us    | connect_success_time_us | connect_error |

+---------------+------+------------------+-------------------------+---------------+

| 172.16.60.211 | 3306 | 1548665195883957 | 762                     | NULL          |

| 172.16.60.212 | 3306 | 1548665195894099 | 399                     | NULL          |

| 172.16.60.213 | 3306 | 1548665195904266 | 483                     | NULL          |

| 172.16.60.211 | 3306 | 1548665255883715 | 824                     | NULL          |

| 172.16.60.212 | 3306 | 1548665255893942 | 656                     | NULL          |

| 172.16.60.211 | 3306 | 1548665495884125 | 615                     | NULL          |

| 172.16.60.212 | 3306 | 1548665495894254 | 441                     | NULL          |

| 172.16.60.213 | 3306 | 1548665495904479 | 638                     | NULL          |

| 172.16.60.211 | 3306 | 1548665512917846 | 487                     | NULL          |

| 172.16.60.212 | 3306 | 1548665512928071 | 994                     | NULL          |

| 172.16.60.213 | 3306 | 1548665512938268 | 613                     | NULL          |

+---------------+------+------------------+-------------------------+---------------+

20 rows in set (0.000 sec)


以下是对心跳信息的监控(对ping指标的监控)

MySQL [(none)]> select * from mysql_server_ping_log;

+---------------+------+------------------+----------------------+------------+

hostname      | port | time_start_us    | ping_success_time_us | ping_error |

+---------------+------+------------------+----------------------+------------+

| 172.16.60.211 | 3306 | 1548665195883407 | 98                   | NULL       |

| 172.16.60.212 | 3306 | 1548665195885128 | 119                  | NULL       |

...........

| 172.16.60.213 | 3306 | 1548665415889362 | 106                  | NULL       |

| 172.16.60.213 | 3306 | 1548665562898295 | 97                   | NULL       |

+---------------+------+------------------+----------------------+------------+

110 rows in set (0.001 sec)


read_only日志此时也为空(正常来说,新环境配置时,这个只读日志是为空的)

MySQL [(none)]> select * from mysql_server_read_only_log;

Empty set (0.000 sec)


replication_lag的监控日志为空

MySQL [(none)]> select * from mysql_server_replication_lag_log;

Empty set (0.000 sec)


指定写组的id为10,读组的id为20。

MySQL [(none)]> insert into mysql_replication_hostgroups values(10,20,1);

Query OK, 1 row affected (0.000 sec)


在该配置加载到RUNTIME生效之前,先查看下各mysql server所在的组。

MySQL [(none)]> select hostgroup_id,hostname,port,status,weight from mysql_servers;

+--------------+---------------+------+--------+--------+

| hostgroup_id | hostname      | port | status | weight |

+--------------+---------------+------+--------+--------+

| 10           | 172.16.60.211 | 3306 | ONLINE | 1      |

| 10           | 172.16.60.212 | 3306 | ONLINE | 1      |

| 10           | 172.16.60.213 | 3306 | ONLINE | 1      |

+--------------+---------------+------+--------+--------+

3 rows in set (0.000 sec)


3个节点都在hostgroup_id=10的组中。

现在,将刚才mysql_replication_hostgroups表的修改加载到RUNTIME生效。

MySQL [(none)]> load mysql servers to runtime;

Query OK, 0 rows affected (0.003 sec)


MySQL [(none)]> save mysql servers to disk;

Query OK, 0 rows affected (0.361 sec)


一加载,Monitor模块就会开始监控后端的read_only值,当监控到read_only值后,就会按照read_only的值将某些节点自动移动到读/写组。

例如,此处所有节点都在id=10的写组,slave1和slave2都是slave,它们的read_only=1,这两个节点将会移动到id=20的组。

如果一开始这3节点都在id=20的读组,那么移动的将是Master节点,会移动到id=10的写组。


现在看结果

MySQL [(none)]> select hostgroup_id,hostname,port,status,weight from mysql_servers;

+--------------+---------------+------+--------+--------+

| hostgroup_id | hostname      | port | status | weight |

+--------------+---------------+------+--------+--------+

| 10           | 172.16.60.211 | 3306 | ONLINE | 1      |

| 20           | 172.16.60.212 | 3306 | ONLINE | 1      |

| 20           | 172.16.60.213 | 3306 | ONLINE | 1      |

+--------------+---------------+------+--------+--------+

3 rows in set (0.000 sec)


MySQL [(none)]> select * from mysql_server_read_only_log;

+---------------+------+------------------+-----------------+-----------+-------+

hostname      | port | time_start_us    | success_time_us | read_only | error |

+---------------+------+------------------+-----------------+-----------+-------+

| 172.16.60.212 | 3306 | 1548665728919212 | 1684            | 1         | NULL  |

| 172.16.60.211 | 3306 | 1548665728918753 | 3538            | 0         | NULL  |

| 172.16.60.213 | 3306 | 1548665728919782 | 3071            | 1         | NULL  |

配置mysql_users
上面的所有配置都是关于后端MySQL节点的,现在可以配置关于SQL语句的,包括:发送SQL语句的用户、SQL语句的路由规则、SQL查询的缓存、SQL语句的重写等等。本小节是SQL请求所使用的用户配置,例如root用户。这要求我们需要先在后端MySQL节点添加好相关用户。这里以root和sqlsender两个用户名为例.

1

2

3

4

5

6

7

8

9

10

11

12

13

14

15

16

17

18

19

20

21

22

23

24

25

26

27

28

29

30

31

32

33

34

35

36

37

38

39

40

41

42

43

44

45

46

47

48

49

50

51

52

53

54

55

56

57

58

59

60

61

62

63

64

65

66

67

68

69

70

71

72

73

74

75

76

77

78

79

80

81

82

83

84

85

86

87

88

89

90

91

92

93

94

95

96

97

98

99

100

101

102

103

104

105

106

107

108

109

110

111

112

113

114

115

116

117

118

119

120

121

122

123

124

125

126

127

128

129

首先,在mysql-master主数据库节点上执行:(只需master执行即可,会复制给两个slave)

[root@mysql-master ~]# mysql -p123456

.........

mysql> grant all on *.* to root@'172.16.60.%' identified by 'passwd';

Query OK, 0 rows affected, 1 warning (0.04 sec)


mysql> grant all on *.* to sqlsender@'172.16.60.%' identified by 'P@ssword1!';

Query OK, 0 rows affected, 1 warning (0.03 sec)


mysql> flush privileges;

Query OK, 0 rows affected (0.03 sec)


然后回到mysql-proxy代理层节点,配置mysql_users表,将刚才的两个用户添加到该表中。

admin> insert into mysql_users(username,password,default_hostgroup) values('root','passwd',10);

Query OK, 1 row affected (0.001 sec)


admin> insert into mysql_users(username,password,default_hostgroup) values('sqlsender','P@ssword1!',10);

Query OK, 1 row affected (0.000 sec)


admin> load mysql users to runtime;

Query OK, 0 rows affected (0.001 sec)


admin> save mysql users to disk;

Query OK, 0 rows affected (0.108 sec)


mysql_users表有不少字段,最主要的三个字段为username、password和default_hostgroup:

-  username:前端连接ProxySQL,以及ProxySQL将SQL语句路由给MySQL所使用的用户名。

-  password:用户名对应的密码。可以是明文密码,也可以是hash密码。如果想使用hash密码,可以先在某个MySQL节点上执行

   select password(PASSWORD),然后将加密结果复制到该字段。

-  default_hostgroup:该用户名默认的路由目标。例如,指定root用户的该字段值为10时,则使用root用户发送的SQL语句默认

   情况下将路由到hostgroup_id=10组中的某个节点。


admin> select * from mysql_users\G

*************************** 1. row ***************************

              username: root

              password: passwd

                active: 1

               use_ssl: 0

     default_hostgroup: 10

        default_schema: NULL

         schema_locked: 0

transaction_persistent: 1

          fast_forward: 0

               backend: 1

              frontend: 1

       max_connections: 10000

*************************** 2. row ***************************

              username: sqlsender

              password: P@ssword1!

                active: 1

               use_ssl: 0

     default_hostgroup: 10

        default_schema: NULL

         schema_locked: 0

transaction_persistent: 1

          fast_forward: 0

               backend: 1

              frontend: 1

       max_connections: 10000

2 rows in set (0.000 sec)


虽然这里没有详细介绍mysql_users表,但上面标注了"注意本行"的两个字段必须要引起注意。只有active=1的用户才是有效的用户。

至于transaction_persistent字段,当它的值为1时,表示事务持久化:当某连接使用该用户开启了一个事务后,那么在事务提交/回滚之前,

所有的语句都路由到同一个组中,避免语句分散到不同组。在以前的版本中,默认值为0,不知道从哪个版本开始,它的默认值为1。

我们期望的值为1,所以在继续下面的步骤之前,先查看下这个值,如果为0,则执行下面的语句修改为1。


MySQL [(none)]> update mysql_users set transaction_persistent=1 where username='root';

Query OK, 1 row affected (0.000 sec)


MySQL [(none)]> update mysql_users set transaction_persistent=1 where username='sqlsender';

Query OK, 1 row affected (0.000 sec)


MySQL [(none)]> load mysql users to runtime;

Query OK, 0 rows affected (0.001 sec)


MySQL [(none)]> save mysql users to disk;

Query OK, 0 rows affected (0.123 sec)


然后,分别使用root用户和sqlsender用户测试下它们是否能路由到默认的hostgroup_id=10(它是一个写组)读、写数据。

下面是通过转发端口6033连接的,连接的是转发到后端真正的数据库!

[root@mysql-proxy ~]# mysql -uroot -ppasswd -P6033 -h127.0.0.1 -e "select @@server_id"

+-------------+

| @@server_id |

+-------------+

|           1 |

+-------------+

[root@mysql-proxy ~]# mysql -uroot -ppasswd -P6033 -h127.0.0.1 -e "create database proxy_test"

[root@mysql-proxy ~]# mysql -uroot -ppasswd -P6033 -h127.0.0.1 -e "show databases;"

+--------------------+

| Database           |

+--------------------+

| information_schema |

| kevin              |

| mysql              |

| performance_schema |

| proxy_test         |

| sys                |

+--------------------+

[root@mysql-proxy ~]# mysql -usqlsender -pP@ssword1! -P6033 -h127.0.0.1 -e 'use proxy_test;create table t(id int);'

[root@mysql-proxy ~]# mysql -usqlsender -pP@ssword1! -P6033 -h127.0.0.1 -e 'show tables from proxy_test;'

+----------------------+

| Tables_in_proxy_test |

+----------------------+

| t                    |

+----------------------+

[root@mysql-proxy ~]# mysql -usqlsender -pP@ssword1! -P6033 -h127.0.0.1 -e 'show databases;'           

+--------------------+

| Database           |

+--------------------+

| information_schema |

| kevin              |

| mysql              |

| performance_schema |

| proxy_test         |

| sys                |

+--------------------+


然后再删除上面这个测试库

[root@mysql-proxy ~]# mysql -usqlsender -pP@ssword1! -P6033 -h127.0.0.1 -e 'drop database proxy_test;'

[root@mysql-proxy ~]# mysql -usqlsender -pP@ssword1! -P6033 -h127.0.0.1 -e 'show databases;'         

+--------------------+

| Database           |

+--------------------+

| information_schema |

| kevin              |

| mysql              |

| performance_schema |

| sys                |

+--------------------+

读写分离:配置路由规则
ProxySQL的路由规则非常灵活,可以基于用户、基于schema以及基于每个语句实现路由规则的定制。本案例作为一个入门配置,实现一个最简单的语句级路由规则,从而实现读写分离。

必须注意: 这只是实验,实际的路由规则绝不应该仅根据所谓的读、写操作进行分离,而是从各项指标中找出压力大、执行频繁的语句单独写规则、做缓存等等。和查询规则有关的表有两个:mysql_query_rules和mysql_query_rules_fast_routing,后者是前者的扩展表,1.4.7之后才支持该快速路由表。本案例只介绍第一个表。插入两个规则,目的是将select语句分离到hostgroup_id=20的读组,但由于select语句中有一个特殊语句SELECT...FOR UPDATE它会申请写锁,所以应该路由到hostgroup_id=10的写组.

1

2

3

4

5

6

7

8

9

10

11

12

13

14

15

16

17

18

19

20

21

22

23

24

25

26

27

28

29

30

31

32

33

34

35

36

37

38

39

40

41

42

43

44

45

46

47

48

49

50

51

52

53

54

55

56

57

58

59

60

61

62

63

64

65

66

67

68

69

70

71

72

73

74

75

76

77

78

79

[root@mysql-proxy ~]# mysql -uadmin -padmin -P6032 -h127.0.0.1                       

............

MySQL [(none)]> insert into mysql_query_rules(rule_id,active,match_digest,destination_hostgroup,apply) VALUES (1,1,'^SELECT.*FOR UPDATE$',10,1), (2,1,'^SELECT',20,1);

Query OK, 2 rows affected (0.000 sec)


MySQL [(none)]> load mysql query rules to runtime;

Query OK, 0 rows affected (0.000 sec)


MySQL [(none)]> save mysql query rules to disk;

Query OK, 0 rows affected (0.272 sec)


需要注意: select ... for update规则的rule_id必须要小于普通的select规则的rule_id,因为ProxySQL是根据rule_id的顺序进行规则匹配的。


再来测试下,读操作是否路由给了hostgroup_id=20的读组, 如下发现server_id为2和3的节点 (即slave从节点)在读组内

[root@mysql-proxy ~]# mysql -uroot -ppasswd -P6033 -h127.0.0.1 -e 'select @@server_id'

+-------------+

| @@server_id |

+-------------+

|           3 |

+-------------+

[root@mysql-proxy ~]# mysql -uroot -ppasswd -P6033 -h127.0.0.1 -e 'select @@server_id'

+-------------+

| @@server_id |

+-------------+

|           3 |

+-------------+

[root@mysql-proxy ~]# mysql -uroot -ppasswd -P6033 -h127.0.0.1 -e 'select @@server_id'

+-------------+

| @@server_id |

+-------------+

|           2 |

+-------------+


读操作已经路由给读组,再看看写操作。这里以事务持久化进行测试。

[root@mysql-proxy ~]# mysql -uroot -ppasswd -P6033 -h127.0.0.1 -e 'start transaction;select @@server_id;commit;select @@server_id;'

+-------------+

| @@server_id |

+-------------+

|           1 |

+-------------+

+-------------+

| @@server_id |

+-------------+

|           3 |

+-------------+

[root@mysql-proxy ~]# mysql -uroot -ppasswd -P6033 -h127.0.0.1 -e 'start transaction;select @@server_id;commit;select @@server_id;'

+-------------+

| @@server_id |

+-------------+

|           1 |

+-------------+

+-------------+

| @@server_id |

+-------------+

|           2 |


显然,一切都按照预期进行。最后,如果想查看路由的信息,可查询stats库中的stats_mysql_query_digest表。

以下是该表的一个输出格式示例(和本案例无关)。

[root@mysql-proxy ~]# mysql -uadmin -padmin -P6032 -h127.0.0.1                       

............

MySQL [(none)]> SELECT hostgroup hg, sum_time, count_star, digest_text FROM stats_mysql_query_digest ORDER BY sum_time DESC;

+----+----------+------------+----------------------------------+

| hg | sum_time | count_star | digest_text                      |

+----+----------+------------+----------------------------------+

| 10 | 283841   | 1          | drop database proxy_test         |

| 10 | 161020   | 1          | create table t(id int)           |

| 10 | 36002    | 1          | create database proxy_test       |

| 20 | 2719     | 5          | select @@server_id               |

| 10 | 1250     | 3          | select @@server_id               |

| 10 | 1102     | 2          | show databases                   |

| 10 | 789      | 2          | start transaction                |

| 10 | 655      | 1          | SELECT DATABASE()                |

| 10 | 629      | 1          | show databases                   |

| 10 | 564      | 1          | show tables from proxy_test      |

| 10 | 286      | 2          | commit                           |

| 10 | 0        | 8          | select @@version_comment limit ? |

| 10 | 0        | 5          | select @@version_comment limit ? |

+----+----------+------------+----------------------------------+

13 rows in set (0.002 sec)

测试读写分离效果

1

2

3

4

5

6

7

8

9

10

11

12

13

14

15

16

17

18

19

20

21

22

23

24

25

26

27

28

29

30

31

32

33

34

35

36

37

38

39

40

41

42

43

44

45

46

47

48

49

50

51

52

53

54

55

56

57

58

59

60

61

62

63

64

65

66

67

68

69

70

71

72

73

74

75

76

77

由于读写操作都记录在proxysql的stats_mysql_query_digest表内。

为了测试读写分离的效果,可以先清空此表中之前的记录 (即之前在实现读写分配路由配置之前的记录)


下面这个命令是专门清空stats_mysql_query_digest表的  (使用"delete from stats_mysql_query_digest"  清空不掉!)

MySQL [(none)]> SELECT 1 FROM stats_mysql_query_digest_reset LIMIT 1;

+---+

| 1 |

+---+

| 1 |

+---+

1 row in set (0.002 sec)


MySQL [(none)]> select hostgroup,username,digest_text,count_star from stats_mysql_query_digest;             

Empty set (0.001 sec)


在mysql-proxy代理层节点,通过proxysql进行数据写入,并查看

[root@mysql-proxy ~]# mysql -uroot -ppasswd -P6033 -h127.0.0.1 -e 'select * from kevin.haha;'

+----+-----------+

id | name      |

+----+-----------+

|  1 | congcong  |

|  2 | huihui    |

|  3 | grace     |

| 11 | huoqiu    |

| 12 | chengxihu |

| 21 | zhongguo  |

+----+-----------+

[root@mysql-proxy ~]# mysql -uroot -ppasswd -P6033 -h127.0.0.1 -e 'delete from kevin.haha where id > 3;'

[root@mysql-proxy ~]# mysql -uroot -ppasswd -P6033 -h127.0.0.1 -e 'insert into kevin.haha values(21,"zhongguo"),(22,"xianggang"),(23,"taiwan");'

[root@mysql-proxy ~]# mysql -uroot -ppasswd -P6033 -h127.0.0.1 -e 'update kevin.haha set name="hangzhou" where id=22 ;'                

[root@mysql-proxy ~]# mysql -uroot -ppasswd -P6033 -h127.0.0.1 -e 'select * from kevin.haha;'                                          

+----+----------+

id | name     |

+----+----------+

|  1 | congcong |

|  2 | huihui   |

|  3 | grace    |

| 21 | zhongguo |

| 22 | hangzhou |

| 23 | taiwan   |

+----+----------+


在mysql-master主数据库和mysql-slave1、mysql-slave2从数据上查看

[root@mysql-master ~]# mysql -p123456

.........

mysql> select * from kevin.haha;

+----+----------+

id | name     |

+----+----------+

|  1 | congcong |

|  2 | huihui   |

|  3 | grace    |

| 21 | zhongguo |

| 22 | hangzhou |

| 23 | taiwan   |

+----+----------+

6 rows in set (0.00 sec)


发现在客户端通过proxysql插件更新的数据,已经写到mysql-master主数据库上,并同步到mysql-slave1和mysql-slave2两个从数据库上了!


最后在proxysql管理端查看读写分离

[root@mysql-proxy ~]# mysql -uadmin -padmin -h127.0.0.1 -P6032           

............

............

MySQL [(none)]> select hostgroup,username,digest_text,count_star from stats_mysql_query_digest;

+-----------+----------+------------------------------------------------+------------+

| hostgroup | username | digest_text                                    | count_star |

+-----------+----------+------------------------------------------------+------------+

| 10        | root     | insert into kevin.haha values(?,?),(?,?),(?,?) | 1          |

| 10        | root     | delete from kevin.haha where id > ?            | 1          |

| 10        | root     | update kevin.haha set name=? where id=?        | 1          |

| 20        | root     | select * from kevin.haha                       | 2          |

| 10        | root     | select @@version_comment limit ?               | 5          |

+-----------+----------+------------------------------------------------+------------+

5 rows in set (0.001 sec)


从上述结果就可以看出proxysql实现的读写分离配置是成功的,读请求是转发到group20的读组内,写请求转发到group10的写组内!!

4.2 负载均衡测试  (加权轮询)
如上已经配置好一主(mysql-master,在hostgroup10写组内)、两从(mysql-slave1和mysql-slave2,在hostgroup20读组内) ,并且已经在"mysql_query_rules"表中配置了路由规则,即写操作转发到hostgroup10组,读操作转发到hostgroup20组.

1

2

3

4

5

6

7

8

9

10

11

12

13

14

15

16

17

18

19

20

21

22

23

24

25

26

27

28

29

30

31

32

33

34

35

36

37

38

39

40

41

42

43

44

45

46

47

48

49

50

51

52

53

54

55

56

57

58

59

60

61

62

63

64

65

66

67

68

69

70

71

72

73

74

75

76

77

78

79

80

81

82

83

84

85

86

87

88

89

90

91

92

93

94

95

96

97

98

99

100

101

102

103

104

105

106

107

108

109

110

111

112

113

114

115

116

117

118

119

120

121

122

123

124

125

126

127

128

129

130

131

132

133

134

135

136

137

138

139

140

141

142

143

144

145

146

147

148

149

150

151

152

153

154

155

156

157

158

159

160

161

162

163

164

165

166

167

MySQL [(none)]> select * from mysql_query_rules;           

+---------+--------+----------+------------+--------+-------------+------------+------------+--------+----------------------+---------------+----------------------+--------------+---------+-----------------+-----------------------+-----------+-----------+---------+---------+-------+-------------------+----------------+------------------+-----------+--------+-------------+-----------+-----+-------+---------+

| rule_id | active | username | schemaname | flagIN | client_addr | proxy_addr | proxy_port | digest | match_digest         | match_pattern | negate_match_pattern | re_modifiers | flagOUT | replace_pattern | destination_hostgroup | cache_ttl | reconnect | timeout | retries | delay | next_query_flagIN | mirror_flagOUT | mirror_hostgroup | error_msg | OK_msg | sticky_conn | multiplex | log | apply | comment |

+---------+--------+----------+------------+--------+-------------+------------+------------+--------+----------------------+---------------+----------------------+--------------+---------+-----------------+-----------------------+-----------+-----------+---------+---------+-------+-------------------+----------------+------------------+-----------+--------+-------------+-----------+-----+-------+---------+

| 1       | 1      | NULL     | NULL       | 0      | NULL        | NULL       | NULL       | NULL   | ^SELECT.*FOR UPDATE$ | NULL          | 0                    | CASELESS     | NULL    | NULL            | 10                    | NULL      | NULL      | NULL    | NULL    | NULL  | NULL              | NULL           | NULL             | NULL      | NULL   | NULL        | NULL      | NULL | 1     | NULL    |

| 2       | 1      | NULL     | NULL       | 0      | NULL        | NULL       | NULL       | NULL   | ^SELECT              | NULL          | 0                    | CASELESS     | NULL    | NULL            | 20                    | NULL      | NULL      | NULL    | NULL    | NULL  | NULL              | NULL           | NULL             | NULL      | NULL   | NULL        | NULL      | NULL | 1     | NULL    |

+---------+--------+----------+------------+--------+-------------+------------+------------+--------+----------------------+---------------+----------------------+--------------+---------+-----------------+-----------------------+-----------+-----------+---------+---------+-------+-------------------+----------------+------------------+-----------+--------+-------------+-----------+-----+-------+---------+

2 rows in set (0.000 sec)


由于hostgroup10写组内只要一个节点(mysql-master节点),hostgroup20读组内有两个节点(mysql-slave1、mysql-slave2)

所以这里只能测试读节点的负载均衡


[root@mysql-proxy ~]# mysql -uroot -ppasswd -P6033 -h127.0.0.1 -e "select @@hostname"

+--------------+

| @@hostname   |

+--------------+

| mysql-slave1 |

+--------------+

[root@mysql-proxy ~]# mysql -uroot -ppasswd -P6033 -h127.0.0.1 -e "select @@hostname"

+--------------+

| @@hostname   |

+--------------+

| mysql-slave1 |

+--------------+

[root@mysql-proxy ~]# mysql -uroot -ppasswd -P6033 -h127.0.0.1 -e "select @@hostname"

+--------------+

| @@hostname   |

+--------------+

| mysql-slave1 |

+--------------+

[root@mysql-proxy ~]# mysql -uroot -ppasswd -P6033 -h127.0.0.1 -e "select @@hostname"

+--------------+

| @@hostname   |

+--------------+

| mysql-slave2 |

+--------------+

[root@mysql-proxy ~]# mysql -uroot -ppasswd -P6033 -h127.0.0.1 -e "select @@hostname"

+--------------+

| @@hostname   |

+--------------+

| mysql-slave2 |

+--------------+

[root@mysql-proxy ~]# mysql -uroot -ppasswd -P6033 -h127.0.0.1 -e "select @@hostname"

+--------------+

| @@hostname   |

+--------------+

| mysql-slave2 |

+--------------+


再实验下mysql -e跟多条语句,看看如何

[root@mysql-proxy ~]# mysql -uroot -ppasswd -P6033 -h127.0.0.1 -e "select @@hostname;select @@hostname;select @@hostname"

+--------------+

| @@hostname   |

+--------------+

| mysql-slave1 |

+--------------+

+--------------+

| @@hostname   |

+--------------+

| mysql-slave1 |

+--------------+

+--------------+

| @@hostname   |

+--------------+

| mysql-slave1 |

+--------------+

[root@mysql-proxy ~]# mysql -uroot -ppasswd -P6033 -h127.0.0.1 -e "select @@hostname;select @@hostname;select @@hostname"

+--------------+

| @@hostname   |

+--------------+

| mysql-slave2 |

+--------------+

+--------------+

| @@hostname   |

+--------------+

| mysql-slave2 |

+--------------+

+--------------+

| @@hostname   |

+--------------+

| mysql-slave2 |

+--------------+

[root@mysql-proxy ~]# mysql -uroot -ppasswd -P6033 -h127.0.0.1 -e "select @@hostname;select @@hostname;select @@hostname"

+--------------+

| @@hostname   |

+--------------+

| mysql-slave1 |

+--------------+

+--------------+

| @@hostname   |

+--------------+

| mysql-slave1 |

+--------------+

+--------------+

| @@hostname   |

+--------------+

| mysql-slave1 |

+--------------+

[root@mysql-proxy ~]# mysql -uroot -ppasswd -P6033 -h127.0.0.1 -e "select @@hostname;select @@hostname;select @@hostname"

+--------------+

| @@hostname   |

+--------------+

| mysql-slave2 |

+--------------+

+--------------+

| @@hostname   |

+--------------+

| mysql-slave2 |

+--------------+

+--------------+

| @@hostname   |

+--------------+

| mysql-slave2 |

+--------------+


由以上结果可能会猜想并可印证:

在一个client的一个链接周期内,所有query路由到同一台后端!

即在同一个client的链接周期内,query路由不会转发到同组内的不同后端节点机上,只能转发到同一台后端节点机上!


但是这只是个假象!!!   是因为正好用到了select @ 语句。

如官网所介绍:  sends a query that implicitly disables multiplexing. For example, if you run “SELECT @a” , ProxySQL will disable

multiplexing for that client and will always use the same backend connection


最后可以知道: proxysql的负载方式目前仅为加权轮询一种(经验证所确认),并无其他机制!


===============================================================================

可以编写一个负载均衡的shell测试脚本:

[root@mysql-proxy ~]# which mysql

/usr/bin/mysql

[root@mysql-proxy ~]# vim /opt/test_proxysql_lb.sh

#!/bin/bash


i=0

while(($i<200))

do

        /usr/bin/mysql -uroot -ppasswd -P6033 -h127.0.0.1 -e "select @@hostname;" >> /tmp/test_proxy_sql_lb.txt

        let "i++"

        echo "$i"

        sleep 0.1

done


执行测试脚本:

[root@mysql-proxy ~]# sh -x /opt/test_proxysql_lb.sh > /dev/null 2>&1


执行后检查结果

[root@mysql-proxy ~]# grep "mysql-slave1" /tmp/test_proxy_sql_lb.txt|wc -l

86

[root@mysql-proxy ~]# grep "mysql-slave2" /tmp/test_proxy_sql_lb.txt|wc -l

114


以上查询结果符合预期

4.3 开启ProxySQL的Web统计功能

1

2

3

4

5

6

7

8

9

10

11

12

13

14

15

16

17

18

19

20

21

22

23

24

25

26

27

28

首先打开web功能

[root@mysql-proxy ~]#  mysql -uadmin -padmin -h127.0.0.1 -P6032 

............

............

MySQL [(none)]> update global_variables set variable_value='true' where variable_name='admin-web_enabled';

Query OK, 1 row affected (0.001 sec)


MySQL [(none)]> LOAD ADMIN VARIABLES TO RUNTIME;

Query OK, 0 rows affected (0.001 sec)


MySQL [(none)]> SAVE ADMIN VARIABLES TO DISK;

Query OK, 31 rows affected (0.070 sec)


然后查看端口和登录web界面的用户名和密码,用户名和密码与stat账户一致:

MySQL [(none)]> select * from global_variables where variable_name LIKE 'admin-web%' or variable_name LIKE 'admin-stats%';

+-----------------------------------+----------------+

| variable_name                     | variable_value |

+-----------------------------------+----------------+

| admin-stats_credentials           | stats:stats    |                #账户密码

| admin-stats_mysql_connections     | 60             |

| admin-stats_mysql_connection_pool | 60             |

| admin-stats_mysql_query_cache     | 60             |

| admin-stats_system_cpu            | 60             |

| admin-stats_system_memory         | 60             |

| admin-web_enabled                 | true           |

| admin-web_port                    | 6080           |                     #端口

+-----------------------------------+----------------+

8 rows in set (0.003 sec)

查看web端口是否正常打开

1

2

3

[root@mysql-proxy ~]# lsof -i:6080

COMMAND    PID USER   FD   TYPE   DEVICE SIZE/OFF NODE NAME

proxysql 22324 root   27u  IPv4 23010645      0t0  TCP *:6080 (LISTEN)

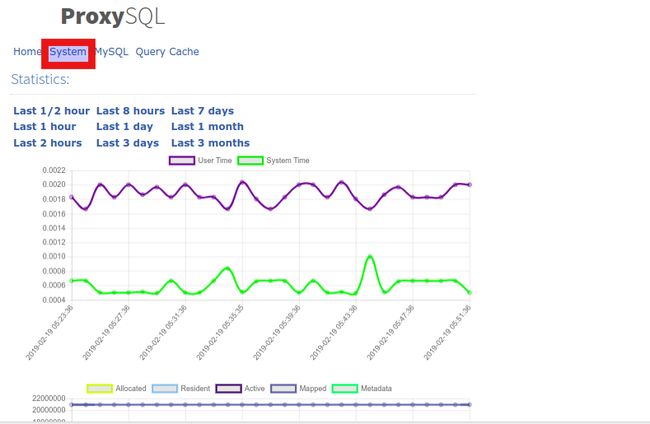
访问http://172.16.60.214:6080并使用stats:stats登录即可查看一些统计信息。

ProxySQL 配置详解及读写分离(+GTID)等功能说明 (完整篇)2_第1张图片

4.4  scheduler打印proxysql状态到日志

1

2

3

4

5

6

7

8

9

10

11

12

13

14

15

16

17

18

19

20

21

22

23

24

25

26

27

[root@mysql-proxy ~]# mkdir -p /opt/proxysql/log

[root@mysql-proxy ~]# vim /opt/proxysql/log/status.sh

#!/bin/bash

DATE=`date "+%Y-%m-%d %H:%M:%S"`

echo "{\"dateTime\":\"$DATE\",\"status\":\"running\"}" >> /opt/proxysql/log/status_log


[root@mysql-proxy ~]# chmod 777 /opt/proxysql/log/status.sh


然后在proxysql插入一条scheduler (定义每分钟打印一次,即60000毫秒)

[root@mysql-proxy ~]# mysql -uadmin -padmin -h127.0.0.1 -P6032

............

............

MySQL [(none)]> insert into scheduler(active,interval_ms,filename) values (1,60000,'/opt/proxysql/log/status.sh');

Query OK, 1 row affected (0.000 sec)


MySQL [(none)]> LOAD SCHEDULER TO RUNTIME;

Query OK, 0 rows affected (0.001 sec)


MySQL [(none)]> SAVE SCHEDULER TO DISK;

Query OK, 0 rows affected (0.105 sec)


然后查看日志就可以看到proxysql 的运行结果了:

[root@mysql-proxy ~]# tail -f /opt/proxysql/log/status_log

{"dateTime":"2019-02-19 14:24:03","status":"running"}

{"dateTime":"2019-02-19 14:25:03","status":"running"}

{"dateTime":"2019-02-19 14:26:03","status":"running"}

{"dateTime":"2019-02-19 14:27:03","status":"running"}


***************当你发现自己的才华撑不起野心时,就请安静下来学习吧***************
你可能感兴趣的:(ProxySQL 配置详解及读写分离(+GTID)等功能说明 (完整篇)2)