1.ATX 文档 - iOS 真机如何安装 WebDriverAgent
2.python脚本
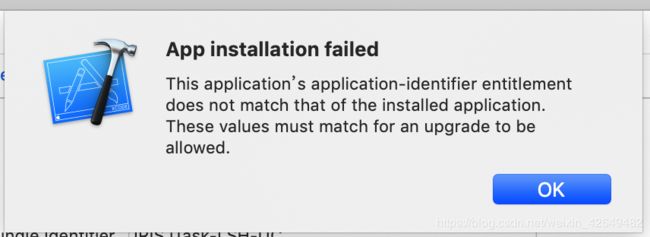
This application’s application-identifier entitlement does not match that of the installed applicati
application-identifier有冲突 卸载重新运行解决
xcrun: error: unable to find utility "xcodebuild", not a developer tool or in PATH
解决办法
opened Xcode.
Preferences
Locations
Selected the Command Lin Tools: (选择xcode版本)
作者:petter102
链接:https://www.jianshu.com/p/ff1d99fe1d17
來源:
著作权归作者所有,任何形式的转载都请联系作者获得授权并注明出处。
python-wda
[图片上传失败...(image-707524-1545569833470)] [图片上传失败...(image-26d8d9-1545569833470)] [图片上传失败...(image-f863-1545569833470)]
Facebook WebDriverAgent Python Client Library (not official)
Most functions finished.
Implemented apis describe in https://github.com/facebook/WebDriverAgent/wiki/Queries
This library has been used in project atx https://github.com/NetEaseGame/AutomatorX
Installation
-
You need to start WebDriverAgent by yourself
Follow the instructions in https://github.com/facebook/WebDriverAgent
It is better to start with Xcode to prevent CodeSign issues.
But it is also ok to start WDA with command line.
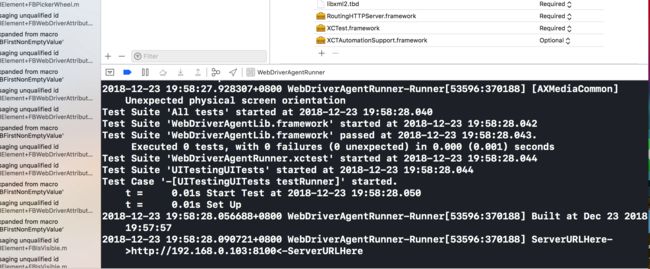
xcodebuild -project WebDriverAgent.xcodeproj -scheme WebDriverAgentRunner -destination 'platform=iOS Simulator,name=iPhone 6' testWDA在真机上运行需要一些配置,可以参考这篇文章 ATX 文档 - iOS 真机如何安装 WebDriverAgent
-
Install python wda client
pip install --pre facebook-wda
TCP connection over USB (optional)
You can use wifi network, it is very convinient, but not very stable enough.
I found a tools named iproxy which can forward device port to localhost, it's source code is here https://github.com/libimobiledevice/libusbmuxd
The usage is very simple iproxy
Something you need to know
function window_size() return UIKit size, While screenshot() image size is Native Resolution
[图片上传失败...(image-36fd39-1545569833470)]
when use screenshot, the image size is pixels size. eg(1080 x 1920) But this size is different with c.session().window_size()
use session.scale to get UIKit scale factor
Configuration
import wda

wda.DEBUG = False # default False
wda.HTTP_TIMEOUT = 60.0 # default 60.0 seconds
How to use
Create a client
import wda

# Enable debug will see http Request and Response
# wda.DEBUG = True
c = wda.Client('http://localhost:8100')

# get env from $DEVICE_URL if no arguments pass to wda.Client
# http://localhost:8100 is the default value if $DEVICE_URL is empty
c = wda.Client()
A wda.WDAError will be raised if communite with WDA went wrong.
Client
# Show status
print c.status()

# Wait WDA ready
c.wait_ready(timeout=300) # 等待300s,默认120s

# Press home button
c.home()

# Hit healthcheck
c.healthcheck()

# Get page source
c.source() # format XML
c.source(accessible=True) # default false, format JSON
Take screenshot, only can save format png
c.screenshot('screen.png')
Open app
with c.session('com.apple.Health') as s:
    print s.orientation
Same as
s = c.session('com.apple.Health')
print s.orientation
s.close()
For web browser like Safari you can define page whit which will be opened:
s = c.session('com.apple.mobilesafari', ['-u', 'https://www.google.com/ncr'])
print s.orientation
s.close()
Session operations
# Current bundleId and sessionId
print s.bundle_id, s.id

# Screenshot return PIL.Image
# Requires pillow, installed by "pip install pillow"
s.screenshot().save("s.png")

# Sometimes screenshot rotation is wrong, but we can rotate it to the right direction
# Refs: https://pillow.readthedocs.io/en/3.1.x/reference/Image.html#PIL.Image.Image.transpose
from PIL import Image
s.screenshot().transpose(Image.ROTATE_90).save("correct.png")

# One of
print(s.orientation) # expect PORTRAIT or LANDSCAPE

# Change orientation
s.orientation = wda.LANDSCAPE # there are many other directions

# Deactivate App for some time
s.deactivate(5.0) # 5s

# Get width and height
print(s.window_size())
# Expect tuple output (width, height)
# For example: (414, 736)

# Get UIKit scale factor, the first time will take about 1s, next time use cached value
print(s.scale)
# Example output: 3

# Simulate touch
s.tap(200, 200)

# Very like tap, but support float and int argument
s.click(200, 200)
s.click(0.5, 0.5) # click center of screen
s.click(0.5, 200) # click center of x, and y(200)

# Double touch
s.double_tap(200, 200)

# Simulate swipe, utilizing drag api
s.swipe(x1, y1, x2, y2, 0.5) # 0.5s
s.swipe_left()
s.swipe_right()
s.swipe_up()
s.swipe_down()

# tap hold
s.tap_hold(x, y, 1.0)

# Hide keyboard (not working in simulator), did not success using latest WDA
s.keyboard_dismiss()
Find element
Note: if element not found,
WDAElementNotFoundErrorwill be raised
# For example, expect: True or False
# using id to find element and check if exists
s(id="URL").exists # return True or False

# using id or other query conditions
s(id='URL')
s(name='URL')
s(text="URL") # text is alias of name
s(nameContains='UR')
s(label='Address')
s(labelContains='Addr')
s(name='URL', index=1) # find the second element. index starts from 0

# combines search conditions
# attributes bellow can combines
# :"className", "name", "label", "visible", "enabled"
s(className='Button', name='URL', visible=True, labelContains="Addr")
More powerful findding method
s(xpath='//Button[@name="URL"]')
s(classChain='**/Button[`name == "URL"`]')
s(predicate='name LIKE "UR*"')
s('name LIKE "U*L"') # predicate is the first argument, without predicate= is ok
Element operations (eg: tap, scroll, set_text etc...)
Exmaple search element and tap
# Get first match Element object
# The function get() is very important.
# when elements founded in 10 seconds(:default:), Element object returns
# or WDAElementNotFoundError raises
e = s(text='Dashboard').get(timeout=10.0)
# s(text='Dashboard') is Selector
# e is Element object
e.tap() # tap element
Some times, I just hate to type
.get()
Using python magic tricks to do it again.
#   using python magic function "__getattr__", it is ok with out type "get()"
s(text='Dashboard').tap()
# same as
s(text='Dashboard').get().tap()
Note: Python magic tricks can not used on get attributes
# Accessing attrbutes, you have to use get()
s(text='Dashboard').get().value

# Not right
# s(text='Dashboard').value # Bad, always return None
Click element if exists
s(text='Dashboard').click_exists() # return immediately if not found
s(text='Dashboard').click_exists(timeout=5.0) # wait for 5s
Other Element operations
# Check if elements exists
print s(text="Dashboard").exists

# Find all matches elements, return Array of Element object
s(text='Dashboard').find_elements()

# Use index to find second element
s(text='Dashboard')[1].exists

# Use child to search sub elements
s(text='Dashboard').child(className='Cell').exists

# Default timeout is 10 seconds
# But you can change by
s.set_timeout(10.0)

# do element operations
e.tap()
e.click() # alias of tap
e.clear_text()
e.set_text("Hello world")
e.tap_hold(2.0) # tapAndHold for 2.0s

e.scroll() # scroll to make element visiable

# directions can be "up", "down", "left", "right"
# swipe distance default to its height or width according to the direction
e.scroll('up')

# Set text
e.set_text("Hello WDA") # normal usage
e.set_text("Hello WDA\n") # send text with enter
e.set_text("\b\b\b") # delete 3 chars

# Wait element gone
s(text='Dashboard').wait_gone(timeout=10.0)

# Swipe
s(className="Image").swipe("left")

# Pinch
s(className="Map").pinch(2, 1) # scale=2, speed=1
s(className="Map").pinch(0.1, -1) # scale=0.1, speed=-1 (I donot very understand too)

# properties (bool)
e.accessible
e.displayed
e.enabled

# properties (str)
e.text # ex: Dashboard
e.className # ex: XCUIElementTypeStaticText
e.value # ex: github.com

# Bounds return namedtuple
rect = e.bounds # ex: Rect(x=144, y=28, width=88.0, height=27.0)
rect.x # expect 144
Alert
print s.alert.exists
print s.alert.text
s.alert.accept() # Actually do click first alert button
s.alert.dismiss() # Actually do click second alert button
s.alert.wait(5) # if alert apper in 5 second it will return True,else return False (default 20.0)
s.alert.wait() # wait alert apper in 2 second

s.alert.buttons()
# example return: ["设置", "好"]

s.alert.click("设置")
TODO
longTap not done pinch(not found in WDA)
TouchID
- Match Touch ID
- Do not match Touch ID
How to handle alert message automaticly (need more tests)
For example
import wda

s = wda.Client().session()

def _alert_callback(session):
    session.alert.accept()

s.set_alert_callback(_alert_callback)

# do operations, when alert popup, it will auto accept
s(type="Button").click()
iOS Build-in Apps
苹果自带应用
| Name | Bundle ID |
|---|---|
| iMovie | com.apple.iMovie |
| Apple Store | com.apple.AppStore |
| Weather | com.apple.weather |
| 相机Camera | com.apple.camera |
| iBooks | com.apple.iBooks |
| Health | com.apple.Health |
| Settings | com.apple.Preferences |
| Watch | com.apple.Bridge |
| Maps | com.apple.Maps |
| Game Center | com.apple.gamecenter |
| Wallet | com.apple.Passbook |
| 电话 | com.apple.mobilephone |
| 备忘录 | com.apple.mobilenotes |
| 指南针 | com.apple.compass |
| 浏览器 | com.apple.mobilesafari |
| 日历 | com.apple.mobilecal |
| 信息 | com.apple.MobileSMS |
| 时钟 | com.apple.mobiletimer |
| 照片 | com.apple.mobileslideshow |
| 提醒事项 | com.apple.reminders |
| Desktop | com.apple.springboard (Start this will cause your iPhone reboot) |
第三方应用 Thirdparty
| Name | Bundle ID |
|---|---|
| 腾讯QQ | com.tencent.mqq |
| 微信 | com.tencent.xin |
| 部落冲突 | com.supercell.magic |
| 钉钉 | com.laiwang.DingTalk |
| Skype | com.skype.tomskype |
| Chrome | com.google.chrome.ios |
Another way to list apps installed on you phone is use ideviceinstaller install with brew install ideviceinstaller
List apps with command
$ ideviceinstaller -l
Tests
测试的用例放在tests/目录下,使用iphone SE作为测试机型,系统语言应用。调度框架pytest
Reference
Source code
- Router
- Alert
Articles
- https://testerhome.com/topics/5524 By diaojunxiam


