zabbix配置(八)之批量端口监控
一,客户端配置
如图1所示,配置调用的配置文件(前面已经在配置文件中开启了调用的配置文件参数(包括))
[root @ host~] #vim /usr/local/zabbix/etc/zabbix_agentd.conf.d/tcpportlisten.conf
[root @ ip-10-0-3-61~] #cat /usr/local/zabbix/etc/zabbix_agentd.conf.d/tcpportlisten.conf
UserParameter = tcpportlisten,/usr/local/zabbix/share/zabbix/alertscripts/check_port1.sh
2,编写执行脚本
[root @ host~] #cd /usr/local/zabbix/share/zabbix/alertscripts/
[root @ host alertscripts] #vim check_port1.sh
[root @ host alertscripts] #cat check_port1.sh
#!/usr/bin/python
__author__ = 'Yunson'
import os
import json

data = {}
tcp_list = []
port_list = []
t = ["20903","8080"]
tt = []
command = "sudo netstat -tnlp|egrep -i tcp|awk {'print $4'}|awk -F':' '{if ($NF~/^[0-9]*$/) print $NF}'|sort|uniq"
lines = os.popen(command).readlines()
for line in lines:
    port = line.split()
    port_list.append(port[0])
for i in port_list:
    if i in t:
      tt.append(i)
for port in list(set(tt)):
    port_dict = {}
    port_dict['{#TCP_PORT}'] = port
    tcp_list.append(port_dict)

data['data'] = tcp_list
jsonStr = json.dumps(data, sort_keys=True, indent=4)
print jsonStr
[root @ host alertscripts]#./ check_port1.sh
{
“data”:[
{
“{#TCP_PORT}”:“10050”
},
{
“{#TCP_PORT}”:“10051”
},
{
“{#TCP_PORT} “:”111“
},
{
”{#TCP_PORT}“:”20902“
},
{
”{#TCP_PORT}“:”22“
},
{
”{#TCP_PORT}“:”25“
},
{
”{# TCP_PORT}“:”80“
},
{
”{#TCP_PORT}“:”8005“
},
{
“{#TCP_PORT}”:“8009”
},
{
“{#TCP_PORT}”:“8080”
},
{
“{#TCP_PORT}”:“9000”
}
]
}
3,重启ZABBIX
[root @ host alertscripts] #pkill zabbix_agentd
[root @ host alertscripts] #netstat -tnlp | grep zabbix
tcp 0 0 0.0.0.0:10051 0.0.0.0:* LISTEN 16074 / zabbix_server
[root @ host alertscripts]#/usr/local/zabbix/sbin/zabbix_agentd
[root @ host alertscripts] #netstat -tnlp | grep zabbix tcp 0 0 grep zabbix tcp 0 0 grep zabbix
tcp 0 0 0.0.0.0:10050 0.0.0.0:* LISTEN 30866 / zabbix_agentd
tcp 0 0 0.0.0.0:10051 0.0.0.0:* LISTEN 16074 / zabbix_server
4、命令行测试
[root@host ~]# /usr/local/zabbix/bin/zabbix_get -s 10.0.3.116 -p 10050 -k tcpportlisten
{
"data": [
{
"{#TCP_PORT}": "8084"
},
{
"{#TCP_PORT}": "8081"
},
{
"{#TCP_PORT}": "8082"
},
{
"{#TCP_PORT}": "8083"
},
{
"{#TCP_PORT}": "13321"
},
{
"{#TCP_PORT}": "13322"
},
{
"{#TCP_PORT}": "80"
}
]
}
二,在网页界面配置ZABBIX监控
1,创建模板Ports Discovery监控模板
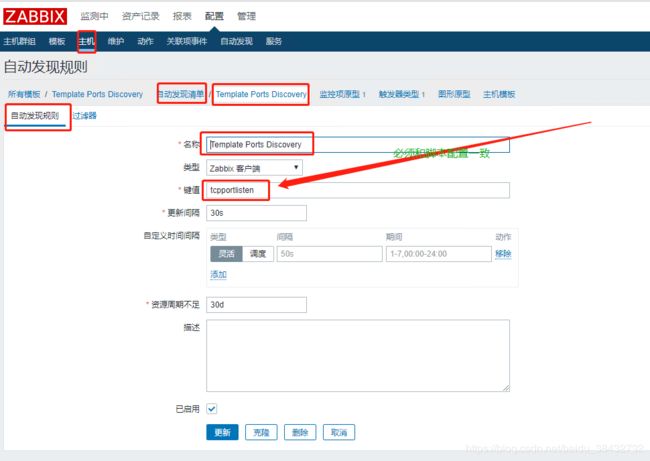
2,创建自动发现
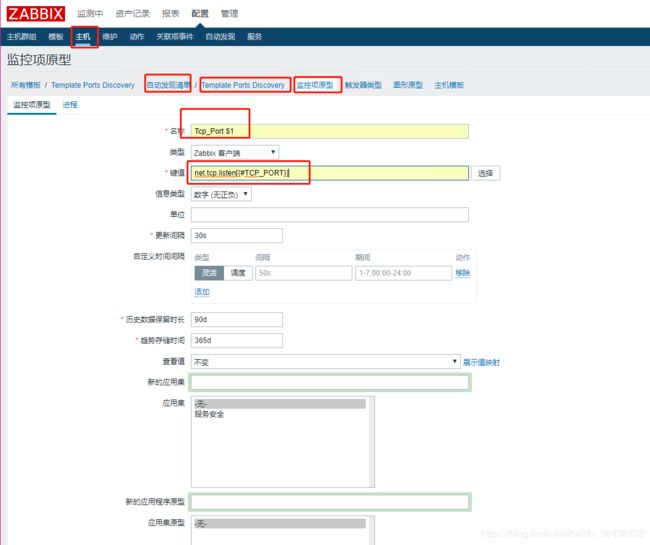
3,创建监控原型项
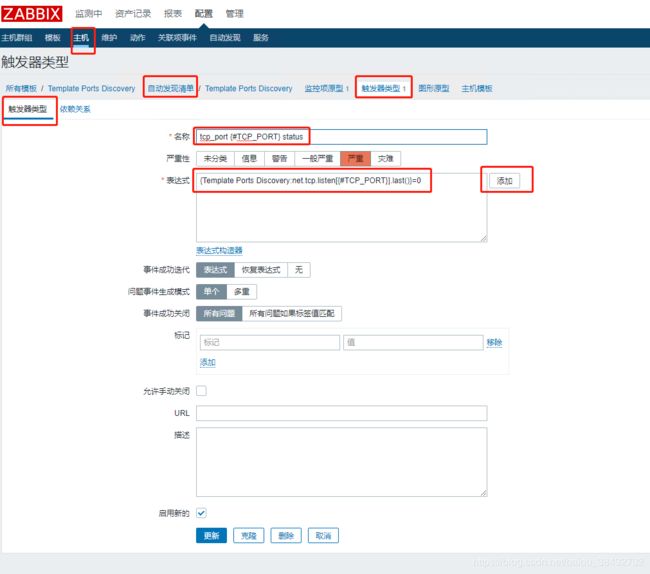
4,构建触发器类型
5,添加到实例主机
6、出现报错
解决办法:
[root@host alertscripts]# chmod +s /bin/netstat
ubuntu系统遇到此问题的第二种显示方式
解决办法
在zabbix客户端的hosts文件配置
vim /etc/hosts
10.0.3.80 ip-10.0.3.80
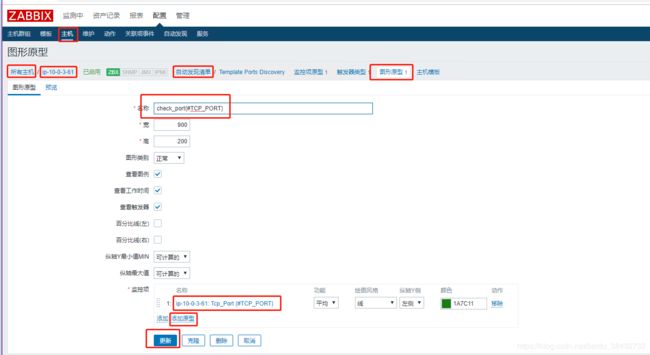
,创建图形原型
6,验收如下
三,若需要监控特定的端口我们可以见脚本改成以下内容
[root@host alertscripts]# vim prot.py

#!/usr/bin/python
__author__ = 'Yan'
import os
import json

data = {}
tcp_list = []
port_list = []
t = ['3306','8080','2002','2003','10066']
tt = []
command = "sudo netstat -tnlp|egrep -i tcp|awk {'print $4'}|awk -F':' '{if ($NF~/^[0-9]*$/) print $NF}'|sort|uniq"
lines = os.popen(command).readlines()
for line in lines:
    port = line.split()
    port_list.append(port[0])
for i in port_list:
    if i in t:
      tt.append(i)
for port in list(set(tt)):
    port_dict = {}
    port_dict['{#TCP_PORT}'] = port
    tcp_list.append(port_dict)

data['data'] = tcp_list
jsonStr = json.dumps(data, sort_keys=True, indent=4)
print jsonStr
我们只需要在的的的Port_list中添加想要监控的端口号即可!注意格式,以逗号隔开!


