android开发工作用到技术总结
本期用工作算是告一段落,下面就对工作中用的技术进行一些总结。
一、实现listview中item如下图效果。如设计图所示,当点击item后,item上弹出一个半透明的视图层。主要是用的popupwindow来实现的。但使用pupupwindow会有一些点要注意。
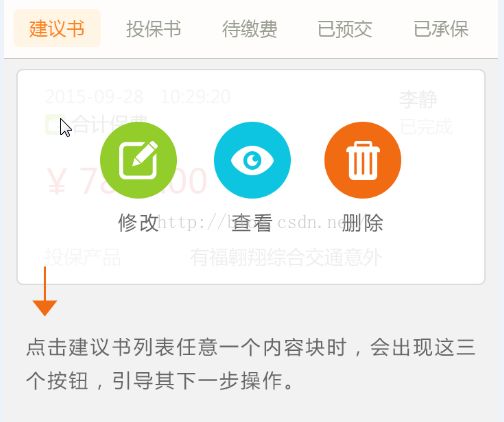
1.popupwindow的显示位置设置,让popupwindow正好覆盖在item上。
2.因为popupwindow是在最上层弹出,当某一item只露出一半时,此时popupwindow出现覆盖在标题导航栏上,或在最下面只露出一半时,会显示不能覆盖到对应的item上的情况。别的一些就是Popupwindow的常用知识了,就不详细述说。
实现过程:
a.在listview的item的oncliclistener()回调方法中,创建popupwindow,并设置显示位置,里视图的显示。
listView.setOnItemClickListener(new OnItemClickListener() {
			@Override
			public void onItemClick(AdapterView arg0, View arg1, int arg2, long arg3) {

					int positionMove = -1;
					int[] initListViewPos = new int[] { -1, -1 };
					arg0.getLocationOnScreen(initListViewPos);
					int[] location = { -1, -1 };
					arg1.getLocationOnScreen(location);

					int newListPos = arg0.getHeight() + initListViewPos[1] - arg1.getHeight();
					if ((newListPos) < location[1]) {
						// 当一个item在最下面,没有完全显示时,让他往上移动,算的头晕,数学不好
						positionMove = newListPos;
						listView.setSelectionFromTop(arg2, arg0.getHeight() - arg1.getHeight());
						initPop(location, arg1, arg2, positionMove);
					} else if (location[1] <= initListViewPos[1]) {
						// 当最上面的item没有完全显示时,让其下滑
						positionMove = initListViewPos[1];
						listView.setSelectionFromTop(arg2, 0);
						initPop(location, arg1, arg2, positionMove);
					} else {
						initPop(location, arg1, arg2, positionMove);
					}

			}
		});
下面是initPop();方法。
/**
	 * 当点击listview的item时,则在当前item上弹出一个弹框,正好盖着当前Item
	 *
	 * @param location
	 *            item的xy坐标
	 * @param itemView
	 *            item的view
	 * @param position
	 *            item在listview中的位置
	 * @param positionMove
	 */
	public void initPop(int[] location, View itemView, int position, int positionMove) {

		int width = itemView.getWidth();
		int height = itemView.getHeight();
		Resources resources = getResources();
		Drawable backColor = resources.getDrawable(R.color.proposal_item_defbg);
		View porposalView = getLayoutInflater().inflate(R.layout.insure_manager_proposalpopup, null);
		porposalPopup = new PopupWindow(porposalView, width, height);

		RelativeLayout rel_show = (RelativeLayout) porposalView.findViewById(R.id.rel_show);
		RelativeLayout rel_modify = (RelativeLayout) porposalView.findViewById(R.id.rel_modify);
		RelativeLayout rel_delete = (RelativeLayout) porposalView.findViewById(R.id.rel_delete);
		rel_show.setOnClickListener(this);
		rel_modify.setOnClickListener(this);
		rel_delete.setOnClickListener(this);

		porposalPopup.setTouchable(true);
		porposalPopup.setFocusable(true);
		porposalPopup.setOutsideTouchable(true);
		porposalPopup.setBackgroundDrawable(backColor);

		if (positionMove > 0) {
			porposalPopup.showAtLocation(itemView, Gravity.NO_GRAVITY, location[0], positionMove);
		} else {
			porposalPopup.showAtLocation(itemView, Gravity.NO_GRAVITY, location[0], location[1]);
		}

}二、在需求中,有一个关系设置,当选择是本人时,要保障投保人的信息复制到被保人上,并且当投保人信息更改时,被保人信息同步变动。如两个EditText中的信息同步变动,性别,出生日期等 。。。

1.要实现同步变动,可以用如下代码。同时,另一个otherNameEditText也要有同样的设置。(当然,不用setOnfocusChangeListener()也行,直接setTextWatcher()就行了,只是我比较懒,开始写了,后面也不影响结果,就没有去掉,最重要的是些知识点的最后一步,判断相等。)
holderName.setOnFocusChangeListener(new OnFocusChangeListener() { public void onFocusChange(View v, boolean hasFocus) { if (hasFocus) { holderName.addTextChangedListener(setTextextWatcher(holderNameStr)); holderName.removeTextChangedListener(textWatcher); }}(代码格式有问题,csdn编辑器有点问题,我手动修改了一下,明白上面代码意思就行。)private TextWatcher textWatcher;
private TextWatcher setTextextWatcher(final String mapKey) {
return textWatcher = new TextWatcher() {
@Override
public void onTextChanged(CharSequence s, int start, int before, int count) {
endMap.put(mapKey, s.toString().trim() + "");
toBeSame(mapKey);
}
@Override
public void beforeTextChanged(CharSequence s, int start, int count, int after) {
}
@Override
public void afterTextChanged(Editable s) {
}
};
}String a = nameEditText.getText().toString.trim;
String b= otherEditText.getText().toString.trim();
if(a,b都不为空,且a,b不相等){
才设置改变另一个EditText的值。
}
三、在二中,可以看到上下有不同的控件,当要把上面的控件信息复制到下面时,如果一个一个去写,稍麻烦,这时就可以用泛型,如下面方法 。
/**
	 * 设置控件的值,并把mapkey mapvalue放入到map里。
	 *
	 * @param t
	 *            控件泛型T
	 * @param mapKey
	 *            map保存的mapkey
	 * @param viewValue
	 *            设置控件显示出来的value值
	 * @param mapValue
	 *            map保存的mapvalue值
	 * @param startMap
	 *            初始map(只有为修改时会有)
	 * @param endMap
	 *            提交时map
	 */
	private  void setViewMapData(T t, String mapKey, String viewValue, String mapValue, Map startMap,
			Map endMap) {
		LogUtil.debug(ProposalCusInfoActivity.this,
				"mapKey--mapValue--viewValue--" + mapKey + "--" + mapValue + "--" + viewValue);
		if (t instanceof RadioButton) {
			((RadioButton) t).setChecked(true);
		} else {
			if (t instanceof EditText) {
				((EditText) t).setText(viewValue);
			} else {
				if (t instanceof TextView) {
					((TextView) t).setText(viewValue);
				}
			}
		}