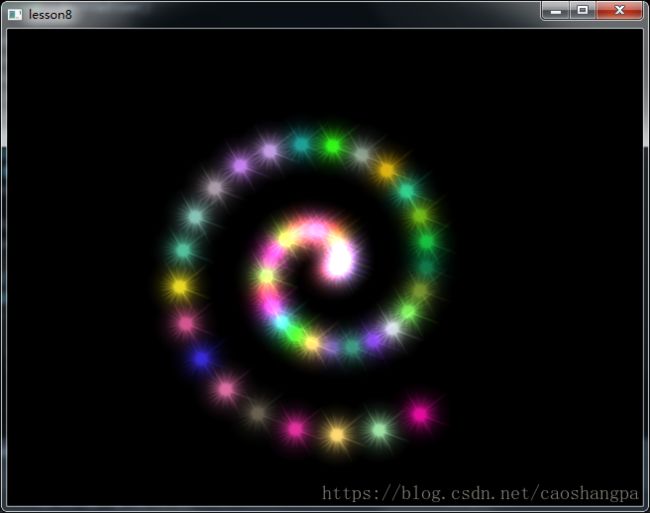
Qt5版NeHe OpenGL教程之八:3D空间中移动图像
欢迎进入第八课。到现在为止,您应该很好的理解OpenGL了。您已经学会了设置一个OpenGL窗口的每个细节。学会在旋转的物体上贴图并打上光线以及混色(透明)处理。
这一课应该算是第一课中级教程。您将学到如下的知识:在3D场景中移动位图,并去除位图上的黑色象素(使用混色)。接着为黑白纹理上色,最后您将学会创建丰富的色彩,并把上过不同色彩的纹理相互混合,得到简单的动画效果。
lesson8.h
#ifndef LESSON8_H
#define LESSON8_H

#include
#include
#include

typedef struct		// 为星星创建一个结构
{
    int r, g, b;	// 星星的颜色
    GLfloat dist;	// 星星距离中心的距离
    GLfloat angle;	// 当前星星所处的角度,自转角度
}stars;				// 结构命名为stars

const int starCount = 50; // 星星的个数

class QPainter;
class QOpenGLContext;
class QOpenGLPaintDevice;

class Lesson8 : public QWindow, QOpenGLFunctions_1_1
{
    Q_OBJECT
public:
    explicit Lesson8(QWindow *parent = 0);
    ~Lesson8();

    virtual void render(QPainter *);
    virtual void render();
    virtual void initialize();

public slots:
    void renderNow();

protected:
    void exposeEvent(QExposeEvent *);
    void resizeEvent(QResizeEvent *);
    void keyPressEvent(QKeyEvent *); // 键盘事件

private:
    void loadGLTexture();

private:
    QOpenGLContext *m_context;

    bool m_twinkle; // twinkle用来跟踪闪烁效果是否启用
    QVector m_stars;
    GLfloat	m_zoom;	// 星星离观察者的距离
    GLfloat m_tilt;	// 星星的倾角
    GLfloat	m_spin;	// 闪烁星星的公转角度
    GLuint	m_texture[1]; // 存放一个纹理
};

#endif // LESSON8_H
lesson8.cpp
#include "lesson8.h"

#include
#include
#include
#include
#include
#include

Lesson8::Lesson8(QWindow *parent) :
    QWindow(parent)
  , m_context(0)
  , m_twinkle(false)
  , m_zoom(-15.0f)
  , m_tilt(90.0f)
  , m_spin(0.0f)
{
    setSurfaceType(QWindow::OpenGLSurface);
}

Lesson8::~Lesson8()
{
    glDeleteTextures(1, &m_texture[0]);
}

void Lesson8::render(QPainter *painter)
{
    Q_UNUSED(painter);
}

void Lesson8::render()
{
    glClear(GL_COLOR_BUFFER_BIT|GL_DEPTH_BUFFER_BIT);

    glViewport(0,0,(GLint)width(),(GLint)height()); // 重置当前视口
    glMatrixMode(GL_PROJECTION);                    // 选择投影矩阵
    glLoadIdentity();                               // 重置投影矩阵为单位矩阵
    gluPerspective(45.0f,(GLdouble)width()/(GLdouble)height(),0.1f,100.0f);

    glMatrixMode(GL_MODELVIEW);// 选择模型视图矩阵
    glLoadIdentity();          // 重置模型视图矩阵为单位矩阵

    glBindTexture(GL_TEXTURE_2D, m_texture[0]);    // 选择纹理

    for (int i = 0, iend = starCount;isetFormat(requestedFormat());
        m_context->create();

        needsInitialize = true;
    }

    m_context->makeCurrent(this);

    if (needsInitialize) {
        initializeOpenGLFunctions();
        initialize();
    }

    render();

    m_context->swapBuffers(this);
}

void Lesson8::loadGLTexture()
{
    QImage image(":/image/Star.bmp");
    image = image.convertToFormat(QImage::Format_RGB888);
    image = image.mirrored();
    glGenTextures(1, &m_texture[0]);// 创建一个纹理
    // 创建一个线性滤波纹理
    glBindTexture(GL_TEXTURE_2D, m_texture[0]);
    glTexParameteri(GL_TEXTURE_2D,GL_TEXTURE_MAG_FILTER,GL_LINEAR);
    glTexParameteri(GL_TEXTURE_2D,GL_TEXTURE_MIN_FILTER,GL_LINEAR);
    glTexImage2D(GL_TEXTURE_2D, 0, GL_RGB, image.width(), image.height(),
                 0, GL_RGB, GL_UNSIGNED_BYTE, image.bits());
}

void Lesson8::exposeEvent(QExposeEvent *event)
{
    Q_UNUSED(event);

    if (isExposed())
    {
        renderNow();
    }
}

void Lesson8::resizeEvent(QResizeEvent *event)
{
    Q_UNUSED(event);

    if (isExposed())
    {
        renderNow();
    }
}

void Lesson8::keyPressEvent(QKeyEvent *event)
{
    int key=event->key();
    switch(key)
    {
    case Qt::Key_T:
    {
        m_twinkle=!m_twinkle; // 控制闪烁
        break;
    }
    case Qt::Key_Up:
    {
        m_tilt-=0.5f;
        break;
    }
    case Qt::Key_Down:
    {
        m_tilt+=0.5f;
        break;
    }
    case Qt::Key_Right:
    {
        m_zoom-=0.2f;
        break;
    }
    case Qt::Key_Left:
    {
        m_zoom+=0.2f;
        break;
    }

    }
    if(key==Qt::Key_T||key==Qt::Key_Up||key==Qt::Key_Down||key==Qt::Key_Right||key==Qt::Key_Left)
    {
        renderNow();
    }

}
main.cpp
#include
#include
int main(int argc, char *argv[])
{
    QGuiApplication app(argc, argv);

    QSurfaceFormat format;
    format.setSamples(16);

    Lesson8 window;
    window.setFormat(format);
    window.resize(640, 480);
    window.show();

    return app.exec();
}
按键控制
T键:打开和关闭星星闪烁效果
Left和Right:控制星星的远近
Up和Down:控制星星的倾角
Qt5版本NeHe OpenGL教程6-10课源码链接:https://download.csdn.net/download/caoshangpa/10420544
