Spring Aop 动态代理详解(jdk与cglib)
前面通过四篇文章讲了代理
包括静态代理,jdk动态代理,cglib动态代理,jdk与cglib动态代理比较,比较详细的了解了两者的用法以及源码,知道了两者的机制,接下来我们要分析的spring aop 算是一个动态代理的具体例子,实际去看看动态代理是如何使用的
本文的目标
1、spring aop在什么情况下使用jdk动态代理,什么时候使用cglib动态代理
2、增强逻辑是如何生成的
例子
注:本文的例子是基于springboot搭建的
pom文件,添加如下依赖
       org.springframework.boot
       spring-boot-starter-aop
目标类Hello
@Component
public class Hello {
    public void sayHello(){
        System.out.println("hello");
    }
}
切面类AspectJTest,主要有前置、后置和环绕通知
@Aspect
@Component
public class AspectJTest {
    @Pointcut("execution(* *.sayHello(..))")
    public void one(){

    }
    @Before("one()")
    public void beforeHello(){
        System.out.println("beforeHello");
    }

    @After("one()")
    public void afterHello(){
        System.out.println("afterHello");
    }


    @Around("one()")
    public Object aroundHello(ProceedingJoinPoint joinPoint) throws Throwable {
        System.out.println("beforeHello1");
        Object o = joinPoint.proceed();
        System.out.println("afterHello1");
        return o;
    }
}
测试ControllerTest
@Controller
public class ControllerTest {

    @Autowired
    private Hello hello;

    @RequestMapping("/mytest")
    @ResponseBody
    public String test(){
        hello.sayHello();
        return "success";
    }

}
启动类
@SpringBootApplication
public class LcnManagerApplication {
    public static void main(String[] args) {

        SpringApplication.run(LcnManagerApplication.class, args);

    }
}
启动后访问http://localhost:8080/mytest
打印结果

以上是spring aop 基于注解的写法
下面我们一步一步去分析
由于我们使用的是spring boot ,仅仅添加了一个starter ,我们查看auto包下的spring.factories 文件发现配置了Aop自动配置类
org.springframework.boot.autoconfigure.EnableAutoConfiguration=\
org.springframework.boot.autoconfigure.aop.AopAutoConfiguration
我们的入口就在这个类AopAutoConfiguration,其代码如下
@Configuration
//我们加入了aop依赖,这几个类都是存在的
@ConditionalOnClass({ EnableAspectJAutoProxy.class, Aspect.class, Advice.class,
		AnnotatedElement.class })
//我们配置文件中没有配置spring.aop.auto属性,但是matchIfMissing为true还是可以加载此配置类的
@ConditionalOnProperty(prefix = "spring.aop", name = "auto", havingValue = "true", matchIfMissing = true)
public class AopAutoConfiguration {

	@Configuration
	@EnableAspectJAutoProxy(proxyTargetClass = false)
    //我们没有配置spring.aop.proxy-target-class,但是matchIfMissing为false此配置类不加载
	@ConditionalOnProperty(prefix = "spring.aop", name = "proxy-target-class", havingValue = "false", matchIfMissing = false)
	public static class JdkDynamicAutoProxyConfiguration {

	}

	@Configuration
	@EnableAspectJAutoProxy(proxyTargetClass = true)
    //我们没有配置spring.aop.proxy-target-class,但是matchIfMissing为true加载此配置类
	@ConditionalOnProperty(prefix = "spring.aop", name = "proxy-target-class", havingValue = "true", matchIfMissing = true)
	public static class CglibAutoProxyConfiguration {

	}

}
这是个配置类,有两个注解管控次配置类是否生效@ConditionalOnClass与@ConditionalOnProperty
1、@ConditionalOnClass注解表明,只有{EnableAspectJAutoProxy.class, Aspect.class, Advice.class, AnnotatedElement.class
这几个类都存在的情况下,才能生效,我们再pom文件中加入了aop依赖,这几个类都是存在的
2、@ConditionalOnProperty注解表明,只有配置文件中存在某个参数,并且匹配上才能加载此类
这里有几个参数:
prefix:配置前缀
name:配置名
havingValue:如果name属性存在,则和此值比较,相同返回true
matchIfMissing:如果配置中没有指定的name属性,是否允许加载此配置类,true表示允许,false表示不允许。
eg:我们实际解释下@ConditionalOnProperty(prefix = "spring.aop", name = "auto", havingValue = "true", matchIfMissing = true)
首先判断配置文件中是否存在spring.aop.auto属性,如果存在,其值是否为havingValue,如果和havingValue一致则加载此配置,如果不一致则不加载;如果配置文件中spring.aop.auto属性都没有,则看matchIfMissing属性的值,如果为true则加载此配置类,如果为false则不加载此配置类。
此处两个注解都是true所以AopAutoConfiguration配置类加载
AopAutoConfiguration加载后,内部有两个静态内部类,其主要用于启用@EnableAspectJAutoProxy注解,区别在于参数proxyTargetClass不一致。
两个内部类的@ConditionalOnProperty注解参数不一样,最终加载的是CglibAutoProxyConfiguration 配置,启动注解@EnableAspectJAutoProxy并且参数proxyTargetClass 为true。
注:所以我们再使用aop时(springboot),不一定需要显示的用@EnableAspectJAutoProxy注解
我肯看下@EnableAspectJAutoProxy,代码如下
@Import(AspectJAutoProxyRegistrar.class)
public @interface EnableAspectJAutoProxy {

	//是否开启基于类(cglib)的代理,默认为false(false表示基于jdk的代理),
	boolean proxyTargetClass() default false;

	//是否暴露代理,默认为false
	boolean exposeProxy() default false;

}这个注解有两个参数,重点关注proxyTargetClass这在我们传递的参数是true,所以在spring boot中默认开启的是基于类的cglib代理模式。
我们继续看AspectJAutoProxyRegistrar类,主要作用就是根据@EnableAspectJAutoProxy注解,用BeanDefinitionRegistry 注册AnnotationAwareAspectJAutoProxyCreator类
class AspectJAutoProxyRegistrar implements ImportBeanDefinitionRegistrar {

	//根据@EnableAspectJAutoProxy的proxytargetclass属性注册、升级、配置
       //AnnotationAwareAspectJAutoProxyCreator
	@Override
	public void registerBeanDefinitions(
			AnnotationMetadata importingClassMetadata, BeanDefinitionRegistry registry) {
        //注册
		AopConfigUtils.registerAspectJAnnotationAutoProxyCreatorIfNecessary(registry);
        //获取@EnableAspectJAutoProxy注解上的属性
		AnnotationAttributes enableAspectJAutoProxy =
				AnnotationConfigUtils.attributesFor(importingClassMetadata, EnableAspectJAutoProxy.class);
        //设置属性
		if (enableAspectJAutoProxy != null) {
			if (enableAspectJAutoProxy.getBoolean("proxyTargetClass")) {
				AopConfigUtils.forceAutoProxyCreatorToUseClassProxying(registry);
			}
			if (enableAspectJAutoProxy.getBoolean("exposeProxy")) {
				AopConfigUtils.forceAutoProxyCreatorToExposeProxy(registry);
			}
		}
	}

}
我们一步一步看
1、注册或升级AnnotationAwareAspectJAutoProxyCreator
通过类的名称我们可以想象出,此类是代理的创建者,基本上也是这样aop的实现基本都是靠此类完成的,我们跟进代码
public static BeanDefinition registerAspectJAnnotationAutoProxyCreatorIfNecessary(BeanDefinitionRegistry registry) {
		return registerAspectJAnnotationAutoProxyCreatorIfNecessary(registry, null);
}


public static BeanDefinition registerAspectJAnnotationAutoProxyCreatorIfNecessary(
			BeanDefinitionRegistry registry, @Nullable Object source) {
        //我们看到注册的类是AnnotationAwareAspectJAutoProxyCreator
        return registerOrEscalateApcAsRequired(AnnotationAwareAspectJAutoProxyCreator.class,
 registry, source);
	}


private static BeanDefinition registerOrEscalateApcAsRequired(
			Class cls, BeanDefinitionRegistry registry, @Nullable Object source) {

		Assert.notNull(registry, "BeanDefinitionRegistry must not be null");
        //如果已经注册过,并且与当前注册的不一致要根据优先级来确定用哪个
		if (registry.containsBeanDefinition(AUTO_PROXY_CREATOR_BEAN_NAME)) {
			BeanDefinition apcDefinition = registry.getBeanDefinition(AUTO_PROXY_CREATOR_BEAN_NAME);
			if (!cls.getName().equals(apcDefinition.getBeanClassName())) {
				int currentPriority = findPriorityForClass(apcDefinition.getBeanClassName());
				int requiredPriority = findPriorityForClass(cls);
				if (currentPriority < requiredPriority) {
					apcDefinition.setBeanClassName(cls.getName());
				}
			}
			return null;
		}
        //根据AnnotationAwareAspectJAutoProxyCreator构造beandefinition,然后注册
		RootBeanDefinition beanDefinition = new RootBeanDefinition(cls);
		beanDefinition.setSource(source);
		beanDefinition.getPropertyValues().add("order", Ordered.HIGHEST_PRECEDENCE);
		beanDefinition.setRole(BeanDefinition.ROLE_INFRASTRUCTURE);
		registry.registerBeanDefinition(AUTO_PROXY_CREATOR_BEAN_NAME, beanDefinition);
		return beanDefinition;
	}
以上代码重要的就是根据AnnotationAwareAspectJAutoProxyCreator构造beandefinition,然后用BeanDefinitionRegistry 注册到容器中
2、为AnnotationAwareAspectJAutoProxyCreator的beandefinition设置proxytargetclass与exposeProxy属性
public static void forceAutoProxyCreatorToUseClassProxying(BeanDefinitionRegistry registry) {
		if (registry.containsBeanDefinition(AUTO_PROXY_CREATOR_BEAN_NAME)) {
			BeanDefinition definition = registry.getBeanDefinition(AUTO_PROXY_CREATOR_BEAN_NAME);
			definition.getPropertyValues().add("proxyTargetClass", Boolean.TRUE);
		}
	}

	public static void forceAutoProxyCreatorToExposeProxy(BeanDefinitionRegistry registry) {
		if (registry.containsBeanDefinition(AUTO_PROXY_CREATOR_BEAN_NAME)) {
			BeanDefinition definition = registry.getBeanDefinition(AUTO_PROXY_CREATOR_BEAN_NAME);
			definition.getPropertyValues().add("exposeProxy", Boolean.TRUE);
		}
	}
其实就是set属性,前面说过了proxytargetclass为true,exposeProxy为false
下面开始讲解AnnotationAwareAspectJAutoProxyCreator
首先看下AnnotationAwareAspectJAutoProxyCreator类的层次结构
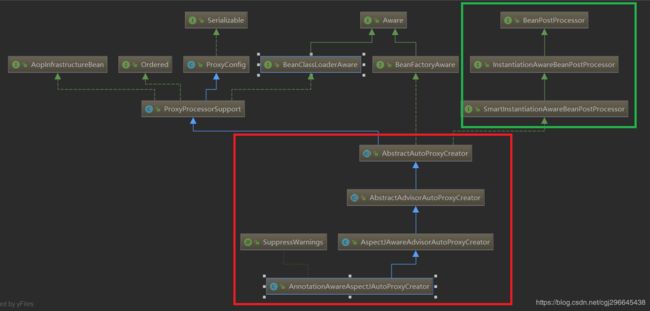
红色框是自动代理的创建类的继承逻辑,基本上Aop的操作都在里面,又实现了接口BeanPostProcessor与接口InstantiationAwareBeanPostProcessor,使得该类在实例化前后与初始化前后做了一些操作(先进行实例化,然后再初始化),这些操作完成了代理生成、增强逻辑的生成等。
实例化前后和初始化前后的方法都在类AbstractAutoProxyCreator中
我们先从postProcessBeforeInstantiation开始,代码如下
其中advisedBeans是个map,value为false时表示不需要代理,为true表示可以代理
public Object postProcessBeforeInstantiation(Class beanClass, String beanName) throws BeansException {
		Object cacheKey = getCacheKey(beanClass, beanName);

		if (!StringUtils.hasLength(beanName) || !this.targetSourcedBeans.contains(beanName)) {
			if (this.advisedBeans.containsKey(cacheKey)) {
				return null;
			}
            //目标类是否为基础设施类,基础类不代理,或者设定了bean不需要代理。
			if (isInfrastructureClass(beanClass) || shouldSkip(beanClass, beanName)) {
				this.advisedBeans.put(cacheKey, Boolean.FALSE);
				return null;
			}
		}

		//如果我们有设定自己的目标资源,则按照自己的直接创建代理
		TargetSource targetSource = getCustomTargetSource(beanClass, beanName);
		if (targetSource != null) {
			if (StringUtils.hasLength(beanName)) {
				this.targetSourcedBeans.add(beanName);
			}
			Object[] specificInterceptors = getAdvicesAndAdvisorsForBean(beanClass, beanName, targetSource);
			Object proxy = createProxy(beanClass, beanName, specificInterceptors, targetSource);
			this.proxyTypes.put(cacheKey, proxy.getClass());
			return proxy;
		}

		return null;
	}
可以看到在实例化之前主要做了两件事,第一件事判断当前的bean是否需要代理,代码如下
protected boolean isInfrastructureClass(Class beanClass) {
        //这些类不做代理
		boolean retVal = Advice.class.isAssignableFrom(beanClass) ||
				Pointcut.class.isAssignableFrom(beanClass) ||
				Advisor.class.isAssignableFrom(beanClass) ||
				AopInfrastructureBean.class.isAssignableFrom(beanClass);
		if (retVal && logger.isTraceEnabled()) {
			logger.trace("Did not attempt to auto-proxy infrastructure class [" + beanClass.getName() + "]");
		}
		return retVal;
	}
protected boolean shouldSkip(Class beanClass, String beanName) {
// 获取所有增强其,判断是否需要跳过,一般我们不用
List candidateAdvisors = findCandidateAdvisors();
for (Advisor advisor : candidateAdvisors) {
if (advisor instanceof AspectJPointcutAdvisor &&
((AspectJPointcutAdvisor) advisor).getAspectName().equals(beanName)) {
return true;
}
}
//调用父类,这里直接返回了false
return super.shouldSkip(beanClass, beanName);
} 第二件事,我们自己定义了TargetSource则按我们定义的取创建代理
我们具体的逻辑在这里没有看到
接下来是postProcessAfterInstantiation方法,这个方法直接返回true,没有更过的业务
同样postProcessBeforeInitialization也没有做太多的处理直接返回的bean
重要的逻辑都在postProcessAfterInitialization方法中
public Object postProcessAfterInitialization(@Nullable Object bean, String beanName) throws BeansException {
		if (bean != null) {
			Object cacheKey = getCacheKey(bean.getClass(), beanName);
			if (!this.earlyProxyReferences.contains(cacheKey)) {
                //如果适合被代理,需要封装
				return wrapIfNecessary(bean, beanName, cacheKey);
			}
		}
		return bean;
	}
protected Object wrapIfNecessary(Object bean, String beanName, Object cacheKey) {
//targetSourcedBeans存在beanname,即我们定义了自己的targetsource则直接返回
if (StringUtils.hasLength(beanName) && this.targetSourcedBeans.contains(beanName)) {
return bean;
}
//如果不需要代理也直接返回
if (Boolean.FALSE.equals(this.advisedBeans.get(cacheKey))) {
return bean;
}
//如果是个基础设施类,或者应该跳过,也直接返回
if (isInfrastructureClass(bean.getClass()) || shouldSkip(bean.getClass(), beanName)) {
this.advisedBeans.put(cacheKey, Boolean.FALSE);
return bean;
}
// 获取所有的增强拦截器
Object[] specificInterceptors = getAdvicesAndAdvisorsForBean(bean.getClass(), beanName, null);
//拦截器不为空,存在增强
if (specificInterceptors != DO_NOT_PROXY) {
this.advisedBeans.put(cacheKey, Boolean.TRUE);
//创建代理
Object proxy = createProxy(
bean.getClass(), beanName, specificInterceptors, new SingletonTargetSource(bean));
this.proxyTypes.put(cacheKey, proxy.getClass());
return proxy;
}
this.advisedBeans.put(cacheKey, Boolean.FALSE);
return bean;
}从上面代码可以看出,要创建代理需要分为两部分
1、获取增强拦截器
2、根据获取的增强拦截器去创建代理
我们先看如何获取增强拦截器的,方法getAdvicesAndAdvisorsForBean
protected Object[] getAdvicesAndAdvisorsForBean(
			Class beanClass, String beanName, @Nullable TargetSource targetSource) {
        //获取所有增强
		List advisors = findEligibleAdvisors(beanClass, beanName);
        //为空则返回DO_NOT_PROXY
		if (advisors.isEmpty()) {
			return DO_NOT_PROXY;
		}
		return advisors.toArray();
	}
protected List findEligibleAdvisors(Class beanClass, String beanName) {
//获取增强
List candidateAdvisors = findCandidateAdvisors();
//获取当前bean能应用的增强
List eligibleAdvisors = findAdvisorsThatCanApply(candidateAdvisors, beanClass, beanName);
extendAdvisors(eligibleAdvisors);
if (!eligibleAdvisors.isEmpty()) {
eligibleAdvisors = sortAdvisors(eligibleAdvisors);
}
return eligibleAdvisors;
} 重要的方法是findCandidateAdvisors与findAdvisorsThatCanApply
protected List findCandidateAdvisors() {
		// 从父类中加载xml配置形式的aop.
		List advisors = super.findCandidateAdvisors();
		// 注解方式时,这里可以获取bean注解增强.
		if (this.aspectJAdvisorsBuilder != null) {
			advisors.addAll(this.aspectJAdvisorsBuilder.buildAspectJAdvisors());
		}
		return advisors;
	}
其中buildAspectJAdvisors是重点,其对注解的获取,增强器的获取都在其中
public List buildAspectJAdvisors() {
	List aspectNames = this.aspectBeanNames;
	if (aspectNames == null) {
		synchronized (this) {
			aspectNames = this.aspectBeanNames;
			if (aspectNames == null) {
				List advisors = new ArrayList<>();
				aspectNames = new ArrayList<>();
                //获取在容器中的beanname
				String[] beanNames = BeanFactoryUtils.beanNamesForTypeIncludingAncestors(
						this.beanFactory, Object.class, true, false);
                //遍历所有的beanname
				for (String beanName : beanNames) {
					if (!isEligibleBean(beanName)) {
						continue;
					}
                    //根据beanname获取beantype
					Class beanType = this.beanFactory.getType(beanName);
					if (beanType == null) {
						continue;
					}
                    //beantype存在Aspect注解
					if (this.advisorFactory.isAspect(beanType)) {
						aspectNames.add(beanName);
						AspectMetadata amd = new AspectMetadata(beanType, beanName);
						if (amd.getAjType().getPerClause().getKind() == PerClauseKind.SINGLETON) {
							MetadataAwareAspectInstanceFactory factory =
									new BeanFactoryAspectInstanceFactory(this.beanFactory, beanName);
                            //解析增强方法
							List classAdvisors = this.advisorFactory.getAdvisors(factory);
							if (this.beanFactory.isSingleton(beanName)) {
                                //记录在缓存
								this.advisorsCache.put(beanName, classAdvisors);
							}
							else {
								this.aspectFactoryCache.put(beanName, factory);
							}
							advisors.addAll(classAdvisors);
						}
						else {
							// Per target or per this.
							if (this.beanFactory.isSingleton(beanName)) {
								throw new IllegalArgumentException("Bean with name '" + beanName +
										"' is a singleton, but aspect instantiation model is not singleton");
							}
							MetadataAwareAspectInstanceFactory factory =
									new PrototypeAspectInstanceFactory(this.beanFactory, beanName);
							this.aspectFactoryCache.put(beanName, factory);
							advisors.addAll(this.advisorFactory.getAdvisors(factory));
						}
					}
				}
				this.aspectBeanNames = aspectNames;
				return advisors;
			}
		}
	}

	if (aspectNames.isEmpty()) {
		return Collections.emptyList();
	}
     //组装返货
	List advisors = new ArrayList<>();
	for (String aspectName : aspectNames) {
		List cachedAdvisors = this.advisorsCache.get(aspectName);
		if (cachedAdvisors != null) {
			advisors.addAll(cachedAdvisors);
		}
		else {
			MetadataAwareAspectInstanceFactory factory = this.aspectFactoryCache.get(aspectName);
			advisors.addAll(this.advisorFactory.getAdvisors(factory));
		}
	}
return advisors;
}
可以看到具体的逻辑的
1、首先获取所有的beanname
2、根据beanname获取对应的class(beantype)
3、根据class判断类中是否存在Aspect注解
4、对存在Aspect的类获取增强器
获取增强器的方法是getAdvisors,代码如下
public List getAdvisors(MetadataAwareAspectInstanceFactory aspectInstanceFactory) {
        //获取标记了Aspect注解的类
		Class aspectClass = aspectInstanceFactory.getAspectMetadata().getAspectClass();
        //获取标记了Aspect注解的类名
		String aspectName = aspectInstanceFactory.getAspectMetadata().getAspectName();
		validate(aspectClass);


		MetadataAwareAspectInstanceFactory lazySingletonAspectInstanceFactory =
				new LazySingletonAspectInstanceFactoryDecorator(aspectInstanceFactory);

		List advisors = new ArrayList<>();
        //获取除标注Pointcut的所有方法
		for (Method method : getAdvisorMethods(aspectClass)) {
            //获取增强器
			Advisor advisor = getAdvisor(method, lazySingletonAspectInstanceFactory, advisors.size(), aspectName);
			if (advisor != null) {
				advisors.add(advisor);
			}
		}

		// 配置了增强延时初始化
		if (!advisors.isEmpty() && lazySingletonAspectInstanceFactory.getAspectMetadata().isLazilyInstantiated()) {
			Advisor instantiationAdvisor = new SyntheticInstantiationAdvisor(lazySingletonAspectInstanceFactory);
			advisors.add(0, instantiationAdvisor);
		}

		// 获取DeclareParents注解
		for (Field field : aspectClass.getDeclaredFields()) {
			Advisor advisor = getDeclareParentsAdvisor(field);
			if (advisor != null) {
				advisors.add(advisor);
			}
		}

		return advisors;
	}
然后继续看getAdvisor
public Advisor getAdvisor(Method candidateAdviceMethod, MetadataAwareAspectInstanceFactory aspectInstanceFactory,
			int declarationOrderInAspect, String aspectName) {

		validate(aspectInstanceFactory.getAspectMetadata().getAspectClass());
        //切点信息获取
		AspectJExpressionPointcut expressionPointcut = getPointcut(
				candidateAdviceMethod, aspectInstanceFactory.getAspectMetadata().getAspectClass());
		if (expressionPointcut == null) {
			return null;
		}
        //根据切点信息生成增强器
		return new InstantiationModelAwarePointcutAdvisorImpl(expressionPointcut, candidateAdviceMethod,
				this, aspectInstanceFactory, declarationOrderInAspect, aspectName);
	}
1、切点信息获取
private AspectJExpressionPointcut getPointcut(Method candidateAdviceMethod, Class candidateAspectClass) {
        //获取方法上的注解
		AspectJAnnotation aspectJAnnotation =
				AbstractAspectJAdvisorFactory.findAspectJAnnotationOnMethod(candidateAdviceMethod);
		if (aspectJAnnotation == null) {
			return null;
		}
        //封装
		AspectJExpressionPointcut ajexp =
				new AspectJExpressionPointcut(candidateAspectClass, new String[0], new Class[0]);
        //为ajexp 设置表达式,比如我们这得是one()
		ajexp.setExpression(aspectJAnnotation.getPointcutExpression());
		if (this.beanFactory != null) {
			ajexp.setBeanFactory(this.beanFactory);
		}
		return ajexp;
	}
//只搜索这些注解
private static final Class[] ASPECTJ_ANNOTATION_CLASSES = new Class[] {
			Pointcut.class, Around.class, Before.class, After.class, AfterReturning.class, AfterThrowing.class};
protected static AspectJAnnotation findAspectJAnnotationOnMethod(Method method) {
		for (Class clazz : ASPECTJ_ANNOTATION_CLASSES) {
			AspectJAnnotation foundAnnotation = findAnnotation(method, (Class) clazz);
			if (foundAnnotation != null) {
				return foundAnnotation;
			}
		}
		return null;
	}
//获取指定方法上的注解,并用AspectJAnnotation封装
private static AspectJAnnotation findAnnotation(Method method, Class toLookFor) {
A result = AnnotationUtils.findAnnotation(method, toLookFor);
if (result != null) {
return new AspectJAnnotation<>(result);
}
else {
return null;
}
}2、根据切点信息生成增强器
new InstantiationModelAwarePointcutAdvisorImpl(expressionPointcut, candidateAdviceMethod,
				this, aspectInstanceFactory, declarationOrderInAspect, aspectName)
public InstantiationModelAwarePointcutAdvisorImpl(AspectJExpressionPointcut declaredPointcut,
Method aspectJAdviceMethod, AspectJAdvisorFactory aspectJAdvisorFactory,
MetadataAwareAspectInstanceFactory aspectInstanceFactory, int declarationOrder, String aspectName) {
this.declaredPointcut = declaredPointcut;
this.declaringClass = aspectJAdviceMethod.getDeclaringClass();
this.methodName = aspectJAdviceMethod.getName();
this.parameterTypes = aspectJAdviceMethod.getParameterTypes();
this.aspectJAdviceMethod = aspectJAdviceMethod;
this.aspectJAdvisorFactory = aspectJAdvisorFactory;
this.aspectInstanceFactory = aspectInstanceFactory;
this.declarationOrder = declarationOrder;
this.aspectName = aspectName;
if (aspectInstanceFactory.getAspectMetadata().isLazilyInstantiated()) {
// Static part of the pointcut is a lazy type.
Pointcut preInstantiationPointcut = Pointcuts.union(
aspectInstanceFactory.getAspectMetadata().getPerClausePointcut(), this.declaredPointcut);
// Make it dynamic: must mutate from pre-instantiation to post-instantiation state.
// If it's not a dynamic pointcut, it may be optimized out
// by the Spring AOP infrastructure after the first evaluation.
this.pointcut = new PerTargetInstantiationModelPointcut(
this.declaredPointcut, preInstantiationPointcut, aspectInstanceFactory);
this.lazy = true;
}
else {
// A singleton aspect.
this.pointcut = this.declaredPointcut;
this.lazy = false;
//真正实例化
this.instantiatedAdvice = instantiateAdvice(this.declaredPointcut);
}
}可以看到封装只是简单地赋值
private Advice instantiateAdvice(AspectJExpressionPointcut pointcut) {
		Advice advice = this.aspectJAdvisorFactory.getAdvice(this.aspectJAdviceMethod, pointcut,
				this.aspectInstanceFactory, this.declarationOrder, this.aspectName);
		return (advice != null ? advice : EMPTY_ADVICE);
	}
public Advice getAdvice(Method candidateAdviceMethod, AspectJExpressionPointcut expressionPointcut,
MetadataAwareAspectInstanceFactory aspectInstanceFactory, int declarationOrder, String aspectName) {
Class candidateAspectClass = aspectInstanceFactory.getAspectMetadata().getAspectClass();
validate(candidateAspectClass);
AspectJAnnotation aspectJAnnotation =
AbstractAspectJAdvisorFactory.findAspectJAnnotationOnMethod(candidateAdviceMethod);
if (aspectJAnnotation == null) {
return null;
}
// If we get here, we know we have an AspectJ method.
// Check that it's an AspectJ-annotated class
if (!isAspect(candidateAspectClass)) {
throw new AopConfigException("Advice must be declared inside an aspect type: " +
"Offending method '" + candidateAdviceMethod + "' in class [" +
candidateAspectClass.getName() + "]");
}
if (logger.isDebugEnabled()) {
logger.debug("Found AspectJ method: " + candidateAdviceMethod);
}
AbstractAspectJAdvice springAdvice;
//根据不同的注解类型创建不同的增强器
switch (aspectJAnnotation.getAnnotationType()) {
case AtPointcut:
if (logger.isDebugEnabled()) {
logger.debug("Processing pointcut '" + candidateAdviceMethod.getName() + "'");
}
return null;
case AtAround:
springAdvice = new AspectJAroundAdvice(
candidateAdviceMethod, expressionPointcut, aspectInstanceFactory);
break;
case AtBefore:
springAdvice = new AspectJMethodBeforeAdvice(
candidateAdviceMethod, expressionPointcut, aspectInstanceFactory);
break;
case AtAfter:
springAdvice = new AspectJAfterAdvice(
candidateAdviceMethod, expressionPointcut, aspectInstanceFactory);
break;
case AtAfterReturning:
springAdvice = new AspectJAfterReturningAdvice(
candidateAdviceMethod, expressionPointcut, aspectInstanceFactory);
AfterReturning afterReturningAnnotation = (AfterReturning) aspectJAnnotation.getAnnotation();
if (StringUtils.hasText(afterReturningAnnotation.returning())) {
springAdvice.setReturningName(afterReturningAnnotation.returning());
}
break;
case AtAfterThrowing:
springAdvice = new AspectJAfterThrowingAdvice(
candidateAdviceMethod, expressionPointcut, aspectInstanceFactory);
AfterThrowing afterThrowingAnnotation = (AfterThrowing) aspectJAnnotation.getAnnotation();
if (StringUtils.hasText(afterThrowingAnnotation.throwing())) {
springAdvice.setThrowingName(afterThrowingAnnotation.throwing());
}
break;
default:
throw new UnsupportedOperationException(
"Unsupported advice type on method: " + candidateAdviceMethod);
}
// Now to configure the advice...
springAdvice.setAspectName(aspectName);
springAdvice.setDeclarationOrder(declarationOrder);
String[] argNames = this.parameterNameDiscoverer.getParameterNames(candidateAdviceMethod);
if (argNames != null) {
springAdvice.setArgumentNamesFromStringArray(argNames);
}
springAdvice.calculateArgumentBindings();
return springAdvice;
}从函数中可以看到spring会根据不同的注解生成不同的增强器,对应关系如下
@Around AspectJAroundAdvice
@Before AspectJMethodBeforeAdvice
@After AspectJAfterAdvice
@AfterReturning AspectJAfterReturningAdvice
@AfterThrowing AspectJAfterThrowingAdvice
我们只分析我们例子中用到的
AspectJAroundAdvice代码如下,可以看到其实现了MethodInterceptor接口,是个标准的增强器
public class AspectJAroundAdvice extends AbstractAspectJAdvice implements MethodInterceptor, Serializable {


	@Override
	public Object invoke(MethodInvocation mi) throws Throwable {
		if (!(mi instanceof ProxyMethodInvocation)) {
			throw new IllegalStateException("MethodInvocation is not a Spring ProxyMethodInvocation: " + mi);
		}
		ProxyMethodInvocation pmi = (ProxyMethodInvocation) mi;
                //ProceedingJoinPoint 这是@Around注解方法的参数
		ProceedingJoinPoint pjp = lazyGetProceedingJoinPoint(pmi);
		JoinPointMatch jpm = getJoinPointMatch(pmi);
		return invokeAdviceMethod(pjp, jpm, null, null);
	}


}
protected Object invokeAdviceMethod(JoinPoint jp, @Nullable JoinPointMatch jpMatch,
@Nullable Object returnValue, @Nullable Throwable t) throws Throwable {
return invokeAdviceMethodWithGivenArgs(argBinding(jp, jpMatch, returnValue, t));
}
protected Object invokeAdviceMethodWithGivenArgs(Object[] args) throws Throwable {
Object[] actualArgs = args;
if (this.aspectJAdviceMethod.getParameterCount() == 0) {
actualArgs = null;
}
try {
ReflectionUtils.makeAccessible(this.aspectJAdviceMethod);
// 利用反射调用增强方法,这里的actualArgs就是@Around注解方法的参数ProceedingJoinPoint
return this.aspectJAdviceMethod.invoke(this.aspectInstanceFactory.getAspectInstance(), actualArgs);
}
catch (IllegalArgumentException ex) {
throw new AopInvocationException("Mismatch on arguments to advice method [" +
this.aspectJAdviceMethod + "]; pointcut expression [" +
this.pointcut.getPointcutExpression() + "]", ex);
}
catch (InvocationTargetException ex) {
throw ex.getTargetException();
}
}AspectJAfterAdvice代码如下,也同样实现了MethodInterceptor,先去执行目标方法再去执行增强方法
public class AspectJAfterAdvice extends AbstractAspectJAdvice
		implements MethodInterceptor, AfterAdvice, Serializable {

	@Override
	public Object invoke(MethodInvocation mi) throws Throwable {
		try {
            //先去执行目标方法
			return mi.proceed();
		}
		finally {
            //再调用增强方法
			invokeAdviceMethod(getJoinPointMatch(), null, null);
		}
	}
}
AspectJMethodBeforeAdvice代码如下,和以上两种不太一样这里没有实现MethodInterceptor,而是实现了MethodBeforeAdvice该方法只有一个before方法,调用before方法执行增强逻辑
public class AspectJMethodBeforeAdvice extends AbstractAspectJAdvice implements MethodBeforeAdvice, Serializable {

	@Override
	public void before(Method method, Object[] args, @Nullable Object target) throws Throwable {
		invokeAdviceMethod(getJoinPointMatch(), null, null);
	}
}
但是又是何时调用的before方法呢,其实这里有个包装类MethodBeforeAdviceInterceptor代码如下,实现了MethodInterceptor接口
public class MethodBeforeAdviceInterceptor implements MethodInterceptor, BeforeAdvice, Serializable {

	private final MethodBeforeAdvice advice;

	public MethodBeforeAdviceInterceptor(MethodBeforeAdvice advice) {
		Assert.notNull(advice, "Advice must not be null");
		this.advice = advice;
	}

	@Override
	public Object invoke(MethodInvocation mi) throws Throwable {
        //执行增强
		this.advice.before(mi.getMethod(), mi.getArguments(), mi.getThis());
        //执行目标方法
		return mi.proceed();
	}
}
可以看到这个类的invoke方法是先执行了增强,然后再执行了目标方法
直到这里spring 已经把所有的增强器都创建出来了,相当于在前面几篇文章中我们手写的几个类HelloInvocationHandler,CglibProxyIntercepter。
3、根据当前的bean寻找匹配的增强器
在上篇的篇幅我们通过扫描所有的标注了@Aspect的注解的类,解析类中的标注了通知类型的注解,spring通过注解类型创建了不同的增强器,这里的增强器是整个容器所有的,全部的,还需要为当前的bean寻找匹配的,比如为Hello类中的sayHello方法匹配增强器@Around(one())标注的方法,具体做法是拿到你execution(* *.sayHello(..))表达式,去匹配类中的方法匹配返回true
简单看下代码
public static List findAdvisorsThatCanApply(List candidateAdvisors, Class clazz) {
		if (candidateAdvisors.isEmpty()) {
			return candidateAdvisors;
		}
		List eligibleAdvisors = new ArrayList<>();
		for (Advisor candidate : candidateAdvisors) {
			if (candidate instanceof IntroductionAdvisor && canApply(candidate, clazz)) {
				eligibleAdvisors.add(candidate);
			}
		}
		boolean hasIntroductions = !eligibleAdvisors.isEmpty();
		for (Advisor candidate : candidateAdvisors) {
			if (candidate instanceof IntroductionAdvisor) {
				// already processed
				continue;
			}
            //查看是否匹配
			if (canApply(candidate, clazz, hasIntroductions)) {
				eligibleAdvisors.add(candidate);
			}
		}
		return eligibleAdvisors;
	}
4、创建代理
接下来就是要创建代理了
Object proxy =
    createProxy(bean.getClass(), beanName, specificInterceptors, new SingletonTargetSource(bean));
protected Object createProxy(Class beanClass, @Nullable String beanName,
@Nullable Object[] specificInterceptors, TargetSource targetSource) {
if (this.beanFactory instanceof ConfigurableListableBeanFactory) {
AutoProxyUtils.exposeTargetClass((ConfigurableListableBeanFactory) this.beanFactory, beanName, beanClass);
}
ProxyFactory proxyFactory = new ProxyFactory();
//获取当前对象的属性到proxyFactory
proxyFactory.copyFrom(this);
//如果是jdk代理,判断是否设置了preserveTargetClass
if (!proxyFactory.isProxyTargetClass()) {
//如果设置了preserveTargetClass为true,采用cglib代理
if (shouldProxyTargetClass(beanClass, beanName)) {
proxyFactory.setProxyTargetClass(true);
}
else {
//否则为proxyFactory添加接口属性
evaluateProxyInterfaces(beanClass, proxyFactory);
}
}
//构建增强
Advisor[] advisors = buildAdvisors(beanName, specificInterceptors);
//设置增强
proxyFactory.addAdvisors(advisors);
//添加代理类
proxyFactory.setTargetSource(targetSource);
//定制
customizeProxyFactory(proxyFactory);
proxyFactory.setFrozen(this.freezeProxy);
if (advisorsPreFiltered()) {
proxyFactory.setPreFiltered(true);
}
//创建代理
return proxyFactory.getProxy(getProxyClassLoader());
}这里重点在构建增强器与获取代理,这里有个疑问我们不是已经构造了所有的增强器了吗,为什么还有构建?
构建Advisor
protected Advisor[] buildAdvisors(@Nullable String beanName, @Nullable Object[] specificInterceptors) {
// 获取注册的通用拦截器
Advisor[] commonInterceptors = resolveInterceptorNames();
List这里为什么还要封装呢,因为我们前面分析的增强器,有些是注解式的,有些是从xml加载的,有些可能是Advisor有些可能是advice类型的这里为了统一
public Advisor wrap(Object adviceObject) throws UnknownAdviceTypeException {
		if (adviceObject instanceof Advisor) {
			return (Advisor) adviceObject;
		}
		if (!(adviceObject instanceof Advice)) {
			throw new UnknownAdviceTypeException(adviceObject);
		}
		Advice advice = (Advice) adviceObject;
		if (advice instanceof MethodInterceptor) {
			// So well-known it doesn't even need an adapter.
			return new DefaultPointcutAdvisor(advice);
		}
		for (AdvisorAdapter adapter : this.adapters) {
			// Check that it is supported.
			if (adapter.supportsAdvice(advice)) {
				return new DefaultPointcutAdvisor(advice);
			}
		}
		throw new UnknownAdviceTypeException(advice);
	}
创建代理proxyFactory.getProxy
public Object getProxy(@Nullable ClassLoader classLoader) {
		return createAopProxy().getProxy(classLoader);
	}
protected final synchronized AopProxy createAopProxy() {
if (!this.active) {
activate();
}
return getAopProxyFactory().createAopProxy(this);
}public AopProxy createAopProxy(AdvisedSupport config) throws AopConfigException {
if (config.isOptimize() || config.isProxyTargetClass() || hasNoUserSuppliedProxyInterfaces(config)) {
Class targetClass = config.getTargetClass();
if (targetClass == null) {
throw new AopConfigException("TargetSource cannot determine target class: " +
"Either an interface or a target is required for proxy creation.");
}
if (targetClass.isInterface() || Proxy.isProxyClass(targetClass)) {
return new JdkDynamicAopProxy(config);
}
return new ObjenesisCglibAopProxy(config);
}
else {
return new JdkDynamicAopProxy(config);
}
}这里通过代理工厂去创建AopProxy的,AopProxy分为两种,一种是jdkProxy,一种是cglibproxy,基本上知道点spring的都会知道这个,或者听说过。什么 aop 底层用的jdk动态代理啊,什么时候用cglib代理啊等等
还记得开始的注解参数proxytargetclass 最为重要,完全控制着用什么代理
1、如果目标对象实现了接口,默认情况下会使用jdk代理
2、目标类没有实现接口,则使用cglib动态代理
然后我们看下,两者创建代理类的步骤是否和咱们前几篇讲的一致
JdkDynamicAopProxy
public Object getProxy(@Nullable ClassLoader classLoader) {
		if (logger.isDebugEnabled()) {
			logger.debug("Creating JDK dynamic proxy: target source is " + this.advised.getTargetSource());
		}
		Class[] proxiedInterfaces = AopProxyUtils.completeProxiedInterfaces(this.advised, true);
		findDefinedEqualsAndHashCodeMethods(proxiedInterfaces);
		return Proxy.newProxyInstance(classLoader, proxiedInterfaces, this);
	}
可以看到其创建代理的步骤完全按照jdk创建动态代理的步骤一样,传入classloader,实现的接口,和增强逻辑,增强逻辑为this对象,则表明此类实现了InvocationHandler并实现了invoke方法,事实确实是这样
final class JdkDynamicAopProxy implements AopProxy, InvocationHandler, Serializable {invoke方法如下
public Object invoke(Object proxy, Method method, Object[] args) throws Throwable {
MethodInvocation invocation;
Object oldProxy = null;
boolean setProxyContext = false;
TargetSource targetSource = this.advised.targetSource;
Object target = null;
try {
//equals方法
if (!this.equalsDefined && AopUtils.isEqualsMethod(method)) {
return equals(args[0]);
}
//hashcode方法
else if (!this.hashCodeDefined && AopUtils.isHashCodeMethod(method)) {
return hashCode();
}
else if (method.getDeclaringClass() == DecoratingProxy.class) {
return AopProxyUtils.ultimateTargetClass(this.advised);
}
else if (!this.advised.opaque && method.getDeclaringClass().isInterface() &&
method.getDeclaringClass().isAssignableFrom(Advised.class)) {
return AopUtils.invokeJoinpointUsingReflection(this.advised, method, args);
}
Object retVal;
if (this.advised.exposeProxy) {
oldProxy = AopContext.setCurrentProxy(proxy);
setProxyContext = true;
}
target = targetSource.getTarget();
Class targetClass = (target != null ? target.getClass() : null);
// 获取当前方法的拦截器链
Listinvoke方法获取了当前方法的拦截器链,然后封装为ReflectiveMethodInvocation,通过ReflectiveMethodInvocation的proceed方法进行拦截器链(增强链)依次调用.
public Object proceed() throws Throwable {
		//	如果拦截器链已经都执行完则执行目标方法
		if (this.currentInterceptorIndex == this.interceptorsAndDynamicMethodMatchers.size() - 1) {
			return invokeJoinpoint();
		}
        //获取拦截器中的下一个拦截器
		Object interceptorOrInterceptionAdvice =
				this.interceptorsAndDynamicMethodMatchers.get(++this.currentInterceptorIndex);
//动态匹配
if (interceptorOrInterceptionAdvice instanceof InterceptorAndDynamicMethodMatcher) {
			// Evaluate dynamic method matcher here: static part will already have
			// been evaluated and found to match.
			InterceptorAndDynamicMethodMatcher dm =
					(InterceptorAndDynamicMethodMatcher) interceptorOrInterceptionAdvice;
			if (dm.methodMatcher.matches(this.method, this.targetClass, this.arguments)) {
				return dm.interceptor.invoke(this);
			}
			else {
				// Dynamic matching failed.
				// Skip this interceptor and invoke the next in the chain.
				return proceed();
			}
		}
		else {
			//普通拦截器去执行拦截器的invoke方法
			return ((MethodInterceptor) interceptorOrInterceptionAdvice).invoke(this);
		}
	}
这里的步骤是
1、判断拦截器是否都执行完,都执行完就去执行目标方法
2、获取下一个拦截器
3、执行拦截器的invoke方法
CglibAopProxy
public Object getProxy(@Nullable ClassLoader classLoader) {
		if (logger.isDebugEnabled()) {
			logger.debug("Creating CGLIB proxy: target source is " + this.advised.getTargetSource());
		}

		try {
			Class rootClass = this.advised.getTargetClass();
			Assert.state(rootClass != null, "Target class must be available for creating a CGLIB proxy");

			Class proxySuperClass = rootClass;
			if (ClassUtils.isCglibProxyClass(rootClass)) {
				proxySuperClass = rootClass.getSuperclass();
				Class[] additionalInterfaces = rootClass.getInterfaces();
				for (Class additionalInterface : additionalInterfaces) {
					this.advised.addInterface(additionalInterface);
				}
			}

			// Validate the class, writing log messages as necessary.
			validateClassIfNecessary(proxySuperClass, classLoader);

			// cglib动态代理最重要的类
			Enhancer enhancer = createEnhancer();

			if (classLoader != null) {
				enhancer.setClassLoader(classLoader);
				if (classLoader instanceof SmartClassLoader &&
						((SmartClassLoader) classLoader).isClassReloadable(proxySuperClass)) {
					enhancer.setUseCache(false);
				}
			}
			enhancer.setSuperclass(proxySuperClass);
			enhancer.setInterfaces(AopProxyUtils.completeProxiedInterfaces(this.advised));
			enhancer.setNamingPolicy(SpringNamingPolicy.INSTANCE);
			enhancer.setStrategy(new ClassLoaderAwareUndeclaredThrowableStrategy(classLoader));
            //获取所有拦截器
			Callback[] callbacks = getCallbacks(rootClass);
			Class[] types = new Class[callbacks.length];
			for (int x = 0; x < types.length; x++) {
				types[x] = callbacks[x].getClass();
			}
			// fixedInterceptorMap only populated at this point, after getCallbacks call above
			enhancer.setCallbackFilter(new ProxyCallbackFilter(
					this.advised.getConfigurationOnlyCopy(), this.fixedInterceptorMap, this.fixedInterceptorOffset));
			enhancer.setCallbackTypes(types);

			// 构建代理
			return createProxyClassAndInstance(enhancer, callbacks);
		}
		catch (CodeGenerationException | IllegalArgumentException ex) {
			throw new AopConfigException("Could not generate CGLIB subclass of " + this.advised.getTargetClass() +
					": Common causes of this problem include using a final class or a non-visible class",
					ex);
		}
		catch (Throwable ex) {
			// TargetSource.getTarget() failed
			throw new AopConfigException("Unexpected AOP exception", ex);
		}
	}
以上函数完成了Enhancer 的构建,属性设置,以及代理的创建。其中最重要的是获取拦截器
private Callback[] getCallbacks(Class rootClass) throws Exception {
// Parameters used for optimization choices...
boolean exposeProxy = this.advised.isExposeProxy();
boolean isFrozen = this.advised.isFrozen();
boolean isStatic = this.advised.getTargetSource().isStatic();
// 用DynamicAdvisedInterceptor封装advise
Callback aopInterceptor = new DynamicAdvisedInterceptor(this.advised);
// Choose a "straight to target" interceptor. (used for calls that are
// unadvised but can return this). May be required to expose the proxy.
Callback targetInterceptor;
if (exposeProxy) {
targetInterceptor = (isStatic ?
new StaticUnadvisedExposedInterceptor(this.advised.getTargetSource().getTarget()) :
new DynamicUnadvisedExposedInterceptor(this.advised.getTargetSource()));
}
else {
targetInterceptor = (isStatic ?
new StaticUnadvisedInterceptor(this.advised.getTargetSource().getTarget()) :
new DynamicUnadvisedInterceptor(this.advised.getTargetSource()));
}
// Choose a "direct to target" dispatcher (used for
// unadvised calls to static targets that cannot return this).
Callback targetDispatcher = (isStatic ?
new StaticDispatcher(this.advised.getTargetSource().getTarget()) : new SerializableNoOp());
Callback[] mainCallbacks = new Callback[] {
//加入拦截器数组
aopInterceptor, // for normal advice
targetInterceptor, // invoke target without considering advice, if optimized
new SerializableNoOp(), // no override for methods mapped to this
targetDispatcher, this.advisedDispatcher,
new EqualsInterceptor(this.advised),
new HashCodeInterceptor(this.advised)
};
Callback[] callbacks;
// If the target is a static one and the advice chain is frozen,
// then we can make some optimizations by sending the AOP calls
// direct to the target using the fixed chain for that method.
if (isStatic && isFrozen) {
Method[] methods = rootClass.getMethods();
Callback[] fixedCallbacks = new Callback[methods.length];
this.fixedInterceptorMap = new HashMap<>(methods.length);
// TODO: small memory optimization here (can skip creation for methods with no advice)
for (int x = 0; x < methods.length; x++) {
List这里用DynamicAdvisedInterceptor封装了advise,作为Callback 返回,我们知道在cglib设置增强(Callback )的时候是设置的实现了MethodInterceptor接口的增强类,可以看出DynamicAdvisedInterceptor也同样实现了MethodInterceptor并且有intercept去调用拦截器
public Object intercept(Object proxy, Method method, Object[] args, MethodProxy methodProxy) throws Throwable {
Object oldProxy = null;
boolean setProxyContext = false;
Object target = null;
TargetSource targetSource = this.advised.getTargetSource();
try {
if (this.advised.exposeProxy) {
oldProxy = AopContext.setCurrentProxy(proxy);
setProxyContext = true;
}
target = targetSource.getTarget();
Class targetClass = (target != null ? target.getClass() : null);
//获取拦截器链
ListCglibMethodInvocation集成ReflectiveMethodInvocation,proceed方法是一样的,都是同样的步骤去调用拦截器-->根据拦截器链一个一个去掉用
关于咱们这个例子中是如何执行的呢?
我们的执行结果是这样的
beforeHello1
beforeHello
hello
afterHello1
afterHello
执行顺序是
1、执行@Around 的前环绕
2、执行@Before
3、执行目标方法
4、执行@Around的后环绕
5、执行@After
这里有个疑问为什么不止@before在前,而是@Around的前环绕之前呢?
首先我们对我们的增强器肯定排序了
排序的代码在ReflectiveAspectJAdvisorFactory#getAdvisors方法中,这在前面已经解析过了
具体的排序是在getAdvisorMethods方法中
private List getAdvisorMethods(Class aspectClass) {
		final List methods = new ArrayList<>();
		ReflectionUtils.doWithMethods(aspectClass, method -> {
			// Exclude pointcuts
			if (AnnotationUtils.getAnnotation(method, Pointcut.class) == null) {
				methods.add(method);
			}
		});
        //对方法排序
		methods.sort(METHOD_COMPARATOR);
		return methods;
	}
排序规则
private static final Comparator METHOD_COMPARATOR;

	static {
		Comparator adviceKindComparator = new ConvertingComparator<>(
				new InstanceComparator<>(
						Around.class, Before.class, After.class, AfterReturning.class, AfterThrowing.class),
				(Converter) method -> {
					AspectJAnnotation annotation =
						AbstractAspectJAdvisorFactory.findAspectJAnnotationOnMethod(method);
					return (annotation != null ? annotation.getAnnotation() : null);
				});
		Comparator methodNameComparator = new ConvertingComparator<>(Method::getName);
		METHOD_COMPARATOR = adviceKindComparator.thenComparing(methodNameComparator);
	}
可以看到顺序是
Around.class, Before.class, After.class, AfterReturning.class, AfterThrowing.class
所以优先去执行@Around再去执行@Before再去执行的@After
我们有了执行顺序,到底是怎么执行的呢
先去执行@Around对应的增强类是AspectJAroundAdvice,这个类通过反射去调用了切面类的标注的@Around方法,打印beforeHello1,然后调用ProceedingJoinPoint的proceed方法,这个proceed又会调用下一个拦截器@Before对应的MethodBeforeAdviceInterceptor拦截器,然后MethodBeforeAdviceInterceptor调用AspectJMethodBeforeAdvice的before方法打印beforeHello,然后调用MethodInvocation的proceed方法,又会到下一个拦截器,以此类推完成所有的调用,在中间完成对目标方法的调用,然后完成。
总结:
spring Aop 的代码看完了,有前面几篇动态代理的基础这相对比较好理解,下面梳理下所有的步骤
spring 启动后去扫描容器中的类,找到带有注解@Aspect的类,解析标注了@Aspect注解的类,跟不不同的方法注解生成不同的增强器,并且按照特定顺序排好序。这些增强器再根据当前的bean找到能适用于当前bean的增强器。然后根据参数proxytargetclass的值来创建代理,创建代理后把增强器链花,代理去依次调用。