Android深入理解RemoteViews
1 前言
RemoteViews可以理解为一种远程的View,其实他和远程的Service是一样的,RemoteViews表示的是一种View的结构,他可以在其他的进程中显示,最常用的就是通知栏和桌面小组件。
2 RemoteViews应用
2.1 在通知栏上的应用
2.1.1 什么是通知
通知是在常规UI界面之外向用户展示消息的工具,当系统发出通知时,它会以图表的形式显示在状态栏中。
2.1.2 如何发送一个通知
(1)获取NotificationManager通知管理类;
(2)使用Notification.Builder构建器构建Notification对象,必要属性有三项:①小图标,通过setSmallIcon()方法设置;
②标题,通过setContentTitle()方法设置;③内容,通过setContentText()方法设置;
(3)调用manager.notify()发出通知。
2.1.3 基本的Builder方法
(1)方法介绍
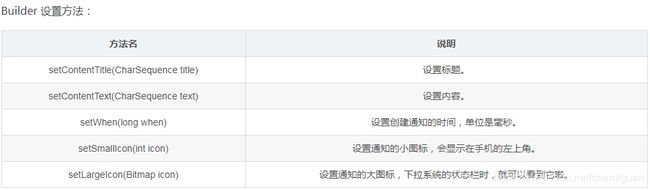
(2)必要属性有三项
①小图标,通过setSmallIcon()方法设置
②标题,通过setContentTitle()方法设置
③内容,通过setContentText()方法设置
(3) 让通知常驻通知栏
//让通知常驻通知栏
builder.setOngoing(true);
Notification n = builder.build();
n.flags = Notification.FLAG_NO_CLEAR;
2.1.5 解决Android 8.0不能弹出通知
if (Build.VERSION.SDK_INT >= Build.VERSION_CODES.O) {
        String channelId = "001";
        NotificationChannel channel = new NotificationChannel(channelId, "my_channel", NotificationManager.IMPORTANCE_DEFAULT);
        // 是否在桌面icon右上角展示小红点
        channel.enableLights(true);
        // 小红点颜色
        channel.setLightColor(Color.GREEN);
        // 是否在久按桌面图标时显示此渠道的通知
        channel.setShowBadge(true);
        manager.createNotificationChannel(channel);

        // Notification.Builder需要多设置一个
        builder.setChannelId(channelId);
}
Notification Android8.0中无法发送通知,提示:No Channel found for pkg
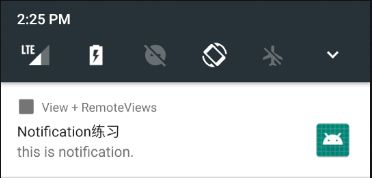
2.1.5 发送默认通知
    private void sendDefaultNotification() {
        // 1、获取NotificationManager通知管理类
        NotificationManager manager = (NotificationManager) getSystemService(Context.NOTIFICATION_SERVICE);
        // 2、使用Notification.Builder构建器构建Notification对象
        Notification.Builder builder = new Notification.Builder(this);
        builder.setContentTitle("Notification练习");
        builder.setContentText("this is notification.");
        builder.setTicker("滚动消息......");
        builder.setSmallIcon(R.drawable.ic_launcher);
        builder.setLargeIcon(BitmapFactory.decodeResource(getResources(), R.drawable.ic_launcher));
        builder.setWhen(System.currentTimeMillis());
        builder.setOngoing(true);
//        // 设置通知可以自动取消:builder.setAutoCancel(true)
//        notification.flags = Notification.FLAG_AUTO_CANCEL;
//        // 让通知常驻通知栏:builder.setOngoing(true)
//        notification.flags = Notification.FLAG_NO_CLEAR;

        // 设置点击通知执行意图
        Intent intent = new Intent(this, DemoActivity_2.class);
//        PendingIntent pendingIntent = PendingIntent.getActivity(this, 0, intent, PendingIntent.FLAG_UPDATE_CURRENT);
        PendingIntent pendingIntent = PendingIntent.getActivity(this, 0, intent, PendingIntent.FLAG_ONE_SHOT);
        builder.setContentIntent(pendingIntent);

        // Android 8.0不能弹出通知解决方法
        if (Build.VERSION.SDK_INT >= Build.VERSION_CODES.O) {
            String channelId = "001";
            NotificationChannel channel = new NotificationChannel(channelId, "my_channel", NotificationManager.IMPORTANCE_DEFAULT);
            // 是否在桌面icon右上角展示小红点
            channel.enableLights(true);
            // 小红点颜色
            channel.setLightColor(Color.GREEN);
            // 是否在久按桌面图标时显示此渠道的通知
            channel.setShowBadge(true);
            manager.createNotificationChannel(channel);

            // Notification.Builder需要多设置一个
            builder.setChannelId(channelId);
        }

        Notification notification = builder.build();
        // 3、调用manager.notify()发出通知
        manager.notify(NOTIFICATION_DEFAULT_ID, notification);
    }
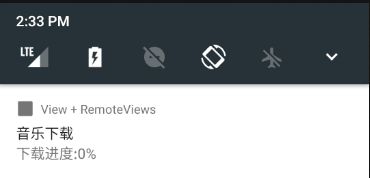
2.1.6 更新通知界面内容
(1)原理:使用相同的Id再次发送一个内容不同的通知即可。
(2)效果
(3)例子
    private int mProgress = 0;

    private void updateDefaultNotification() {
        NotificationManager manager = (NotificationManager) getSystemService(Context.NOTIFICATION_SERVICE);
        Notification.Builder builder = new Notification.Builder(this);
        builder.setContentTitle("音乐下载")
                .setContentText("下载进度:" + mProgress + "%")
                .setSmallIcon(R.drawable.ic_launcher);
        if (android.os.Build.VERSION.SDK_INT >= android.os.Build.VERSION_CODES.O) {
            String channelId = "002";
            NotificationChannel channel = new NotificationChannel(channelId, "download_channel", NotificationManager.IMPORTANCE_DEFAULT);
            manager.createNotificationChannel(channel);
            builder.setChannelId(channelId);
        }
        Notification notification = builder.build();
        manager.notify(NOTIFICATION_DEFAULT_ID, notification);
        mProgress += 10;
    }
2.1.7 点击通知执行意图
Intent intent = new Intent(this,Main2Activity.class);
PendingIntent pi = PendingIntent.getActivity(this,0,intent,PendingIntent.FLAG_UPDATE_CURRENT);
// 给通知添加点击意图
builder.setContentIntent(pi);
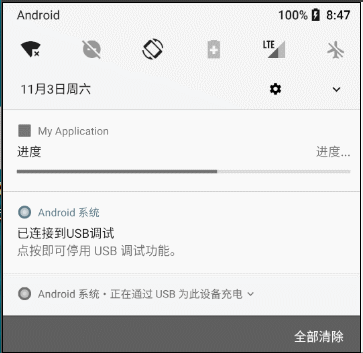
2.1.8 实现进度条的通知
(1)方法
setProgress(100, 10, false); // 带有进度条
setProgress(0, 0, false);        // 取消进度条
setProgress(100, 10, true);      // 不确定性进度条
(2)效果
(3)例子
    private void sendProgressNotification() {
        final NotificationManager manager = (NotificationManager) getSystemService(Context.NOTIFICATION_SERVICE);
        final Notification.Builder builder = new Notification.Builder(this);
        builder.setSmallIcon(R.drawable.ic_launcher)
                .setContentTitle("进度")
                .setContentText("进度...")
                .setProgress(100, 10, true);

        if (android.os.Build.VERSION.SDK_INT >= android.os.Build.VERSION_CODES.O) {
            String channelId = "003";
            NotificationChannel channel = new NotificationChannel(channelId, "download_channel", NotificationManager.IMPORTANCE_DEFAULT);
            manager.createNotificationChannel(channel);
            builder.setChannelId(channelId);
        }

        Notification notification = builder.build();
        manager.notify(NOTIFICATION_PROGRESS_ID, notification);
        // 每隔1秒更新进度条进度,启动工作线程
        new Thread() {
            @Override
            public void run() {
                new Handler(Looper.getMainLooper()).postDelayed(new Runnable() {
                    @Override
                    public void run() {
                        try {
                            Thread.sleep(2000);
                        } catch (InterruptedException e) {
                            e.printStackTrace();
                        }

                        for (int i = 1; i <= 10; i++) {
                            try {
                                Thread.sleep(1000);
                            } catch (InterruptedException e) {
                                e.printStackTrace();
                            }

                            // 发通知:带有进度条
                            builder.setProgress(100, i * 10, false);
                            Notification n = builder.build();
                            manager.notify(NOTIFICATION_PROGRESS_ID, n);
                        }

                        // 更新通知内容
                        manager.cancel(NOTIFICATION_PROGRESS_ID);  // 清除通知
                        builder.setProgress(0, 0, false); // 取消进度条
                        builder.setContentText("音乐下载完毕");
                        Notification n = builder.build();
                        manager.notify(NOTIFICATION_PROGRESS_ID, n);
                    }
                }, 2000);
            }
        }.start();
    }
2.1.9 自定义通知的UI界面
(1)效果

(2)例子
private void sendCustomNotification() {
        NotificationManager manager = (NotificationManager) getSystemService(Context.NOTIFICATION_SERVICE);

        Notification.Builder builder = new Notification.Builder(this);
        builder.setSmallIcon(R.drawable.ic_launcher);
        builder.setTicker("hello world");
        builder.setWhen(System.currentTimeMillis());
        builder.setOngoing(true);

        // 设置整个通知栏点击通知执行意图
        Intent intent = new Intent(this, DemoActivity_1.class);
        intent.putExtra("sid", "" + NOTIFICATION_CUSTOM_ID);
        PendingIntent pendingIntent = PendingIntent.getActivity(this, 0, intent, PendingIntent.FLAG_UPDATE_CURRENT);
        System.out.println(pendingIntent);
        builder.setContentIntent(pendingIntent);

        // 给RemoteViews中的TextView设置文本内容
        RemoteViews remoteViews = new RemoteViews(getPackageName(), R.layout.layout_notification);
        remoteViews.setTextViewText(R.id.msg, "自定义通知: " + NOTIFICATION_CUSTOM_ID);
        remoteViews.setImageViewResource(R.id.icon, R.drawable.icon1);
        // 给RemoteViews中的TextView添加点击事件,TextView添加点击意图
        PendingIntent openActivity2PendingIntent = PendingIntent.getActivity(this, 0, new Intent(this, DemoActivity_2.class), PendingIntent.FLAG_UPDATE_CURRENT);
        remoteViews.setOnClickPendingIntent(R.id.open_activity2, openActivity2PendingIntent);
        if (Build.VERSION.SDK_INT >= Build.VERSION_CODES.N) {
            builder.setCustomContentView(remoteViews);
        } else {
            builder.setContent(remoteViews);
        }

        // Android 8.0不能弹出通知解决方法
        if (Build.VERSION.SDK_INT >= Build.VERSION_CODES.O) {
            String channelId = "005";
            NotificationChannel channel = new NotificationChannel(channelId, "download_channel", NotificationManager.IMPORTANCE_DEFAULT);
            manager.createNotificationChannel(channel);
            builder.setChannelId(channelId);
        }

        Notification notification = builder.build();
        manager.notify(NOTIFICATION_CUSTOM_ID, notification);
    }
2.1.10 学习链接
Android中的Notification
2.2 RemoteViews在桌面小部件的应用
Android桌面小部件是我们经常看到的,比如时钟、天气、音乐播放器等等。 它可以让 App 的某些功能直接展示在桌面上,极大的增加了用户的关注度。 误区:当App的小部件被放到了桌面之后,并不代表我们的App就可以一直在手机后台运行了;虽然它还是能被杀掉,但是用户能看的见它了啊,用户可以点击就打开我们的 APP。
2.2.1 Android桌面小部件可以做什么?
(1)展示:每隔N秒/分钟,刷新一次数据;
(2)交互:点击操作App的数据;
(3)打开App:打开主页或指定页面。
2.2.2 实现桌面小部件需要什么?
(1)先声明Widget的一些属性。 在res新建xml文件夹,创建appwidget-provider标签的 xml 文件;
(2)创建桌面要显示的布局。在layout创建app_widget.xml;
(3)然后来管理Widget状态。实现一个继承 AppWidgetProvider 的类;
(4)最后在AndroidManifest.xml里,将AppWidgetProvider类和xml属性注册到一块;
(5)通常我们会加一个Service来控制Widget的更新时间,后面再讲为什么。
2.2.3 声明 Widget 的属性
(1)在res/xml中定义一个appwidget_provider_info.xml
(2)属性说明
(3)重点
①桌面其实是按照“格子”排列的。 看 Google 给的图。上面我们代码定义 110dp 也就是说,它占了2*2的空间:

②updatePeriodMillis属性,更新widget的时间间隔(ms)。
官方给提供了小部件的自动更新时间,但是却给了限制,你更新的时间必须大于30分钟,如果小于30分钟,那默认就是30分钟。
可以我们就是要5分钟更新啊,怎么办呢?所以就不能使用这个默认更新,我们要自己来通过发送广播控制更新时间,也就是一开始总步骤里面第4步,加一个 Service 来控制 Widget 的更新时间,这个在最后一步添加。
2.2.4 创建布局文件 widget.xml
2.2.5 实现一个继承AppWidgetProvide 的类管理Widget状态
(1)Widget声明周期

(2)同一个小部件是可以添加多次的,所以更新控件的时候,要把所有的都更新。
(3)onReceive() 用来接收广播,它并不在生命周期里。但是,其实 onReceive() 是掌控生命周期的。 如下是onReceive()父类的源码,右边是每个广播对应的方法。 上面生命周期的图,也比较清楚。
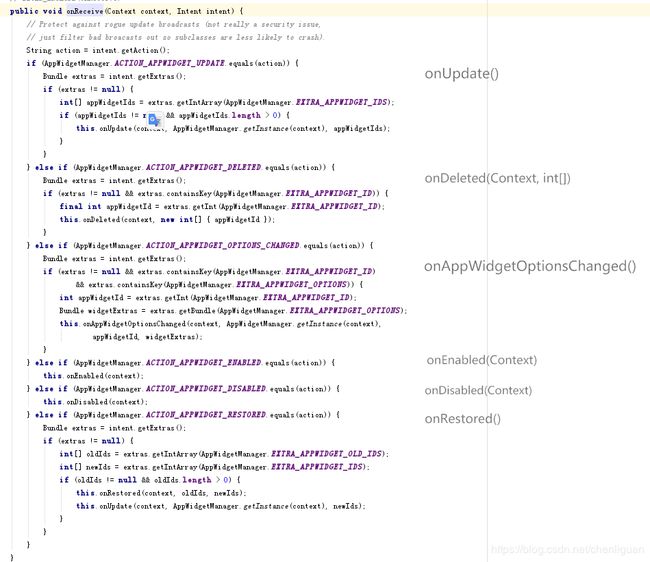
(4)例子
public class MyAppWidgetProvider extends AppWidgetProvider {
    public static final String TAG = "MyAppWidgetProvider";
    public static final String CLICK_ACTION = "com.seniorlibs.view.remoteviews.action.CLICK";

    public MyAppWidgetProvider() {
        super();
    }

    /**
     * 接收窗口小部件点击时发送的广播
     */
    @Override
    public void onReceive(final Context context, Intent intent) {
        super.onReceive(context, intent);
        Log.i(TAG, "onReceive : action = " + intent.getAction());

        final String action = intent.getAction();
        // 这里判断是action
        if (CLICK_ACTION.equals(action)) {
            clickAction(context);
        }
    }

    /**
     * 被点击了要干啥,这里是做一个动画效果
     *
     * @param context
     */
    private void clickAction(final Context context) {
        Toast.makeText(context, "clicked it", Toast.LENGTH_SHORT).show();

        new Thread(new Runnable() {
            @Override
            public void run() {
                Bitmap srcbBitmap = BitmapFactory.decodeResource(context.getResources(), R.drawable.icon1);
                AppWidgetManager appWidgetManager = AppWidgetManager.getInstance(context);
                for (int i = 0; i < 37; i++) {
                    float degree = (i * 10) % 360;
                    RemoteViews remoteViews = new RemoteViews(context.getPackageName(), R.layout.widget);
                    remoteViews.setImageViewBitmap(R.id.imageView1, rotateBitmap(context, srcbBitmap, degree));
                    Intent intentClick = new Intent();
                    intentClick.setAction(CLICK_ACTION);
                    PendingIntent pendingIntent = PendingIntent.getBroadcast(context, 0, intentClick, 0);
                    remoteViews.setOnClickPendingIntent(R.id.imageView1, pendingIntent);
                    appWidgetManager.updateAppWidget(new ComponentName(context, MyAppWidgetProvider.class),remoteViews);
                    SystemClock.sleep(30);
                }
            }
        }).start();
    }

    /**
     * 每次窗口小部件被点击更新都调用一次该方法
     */
    @Override
    public void onUpdate(Context context, AppWidgetManager appWidgetManager, int[] appWidgetIds) {
        super.onUpdate(context, appWidgetManager, appWidgetIds);
        Log.i(TAG, "onUpdate");

        final int counter = appWidgetIds.length;
        Log.i(TAG, "counter = " + counter);
        for (int appWidgetId : appWidgetIds) {
            onWidgetUpdate(context, appWidgetManager, appWidgetId);
        }
    }

    /**
     * 窗口小部件更新,在onUpdate()中调用
     *
     * @param context
     * @param appWidgeManger
     * @param appWidgetId
     */
    private void onWidgetUpdate(Context context, AppWidgetManager appWidgeManger, int appWidgetId) {
        Log.i(TAG, "appWidgetId = " + appWidgetId);
        RemoteViews remoteViews = new RemoteViews(context.getPackageName(), R.layout.widget);

        // "窗口小部件"点击事件发送的Intent广播
        Intent intentClick = new Intent();
        intentClick.setAction(CLICK_ACTION);
        PendingIntent pendingIntent = PendingIntent.getBroadcast(context, 0, intentClick, 0);
        remoteViews.setOnClickPendingIntent(R.id.imageView1, pendingIntent);
        appWidgeManger.updateAppWidget(appWidgetId, remoteViews);
    }

    /**
     * 每删除一次窗口小部件就调用一次
     */
    @Override
    public void onDeleted(Context context, int[] appWidgetIds) {
        super.onDeleted(context, appWidgetIds);
    }

    /**
     * 当最后一个该窗口小部件删除时调用该方法
     */
    @Override
    public void onDisabled(Context context) {
        super.onDisabled(context);
    }

    /**
     * 当该窗口小部件第一次添加到桌面时调用该方法
     */
    @Override
    public void onEnabled(Context context) {
        super.onEnabled(context);
    }

    /**
     * 当小部件大小改变时
     */
    @Override
    public void onAppWidgetOptionsChanged(Context context, AppWidgetManager appWidgetManager, int appWidgetId, Bundle newOptions) {
        super.onAppWidgetOptionsChanged(context, appWidgetManager, appWidgetId, newOptions);
    }

    /**
     * 当小部件从备份恢复时调用该方法
     */
    @Override
    public void onRestored(Context context, int[] oldWidgetIds, int[] newWidgetIds) {
        super.onRestored(context, oldWidgetIds, newWidgetIds);
    }

    private Bitmap rotateBitmap(Context context, Bitmap srcbBitmap, float degree) {
        Matrix matrix = new Matrix();
        matrix.reset();
        matrix.setRotate(degree);
        return Bitmap.createBitmap(srcbBitmap, 0, 0, srcbBitmap.getWidth(), srcbBitmap.getHeight(), matrix, true);
    }
}
2.2.6 在AndroidManifest.xml里,将AppWidgetProvider类和xml属性注册到一块
// 下面的代码有两个Action,其中第一个是识别小部件的动作,第二个就是他的标识,必须存在,这是系统的规范
2.2.7 通常会加一个Service来控制Widget的更新时间
当每隔 N 秒/分钟,就发送一次这个广播。 那到底在哪发呢?也就是我们刚开始说的,用 Service 来控制时间。
参考把你的程序放到桌面——Android桌面部件Widget的第4点。
2.2 8 学习链接
把你的程序放到桌面——Android桌面部件Widget
3 PendingIntent概述
3.1 概述
PendingIntent表示处于一种等待的意图,即特定,等待的意思,就是说你要在某种条件下才会触发,所以我们很容易的就联想到RemoteViews了。
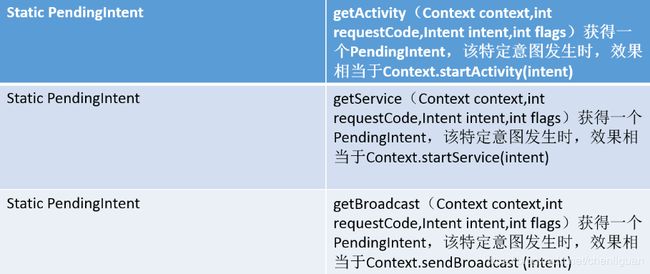
3.2 PendingIntent有三种待定的意图,就是Activity、Service,广播
3.3 PendingIntent的匹配规则
(1)如果两个PendingIntent内部的Intent相同并且requstCode也相同的话,那么PendingIntent就是相同的;
(2)Intent的匹配规则是:如果两个Intent的ComponentName的匹配过程,只要Intent之间的ComponentName和intent-filter相同,那么这两个intent就相同,需要注意的是Extras不参与匹配过程,只要intent之间的name和intent-filter相同就行。
// 包名  包名 + 类名
intent.setComponent(new ComponentName("com.example.otherapp", "com.example.otherapp.MainActivity2"));
关于ComponentName的使用
3.4 flags的参数含义
3.4.1 FLAG_CANCEL_CURRENT
设置两个PendingIntent的flags均为FLAG_CANCEL_CURRENT,PendingIntent如果已经存在,那么就会被cancel,然后系统创建一个新的PendingIntent。即,此时随着p2的创建,p1里面的Intent内容会失效。因此,点击第一个Notification时候,无效点击。当点击第二个Notification的时候,跳转到下一个Activity,并在下一个Activity的tv中显示BBB。
3.4.2 FLAG_UPDATE_CURRENT
设置两个PendingIntent的flags均为FLAG_UPDATE_CURRENT,使用该flags时,后创建的PendingIntent在遇到已经存在的相同的PendingIntent时,会去更新原先PendingIntent中封装的intent的extra内容。即,p2会把p1的intent的extra内容更新为自己的extra,都可以点击跳转到下一个Activity,并在下一个Activity的tv中显示BBB。
3.4.3 FLAG_ONE_SHOT
设置两个PendingIntent的flags均为FLAG_ONE_SHOT,后续通知中的PendingIntent会和第一条通知保持完全一致,包括其中的Extras,单击任何一条通知后,剩下的通知均无法再打开,当所有的通知都被清除后,会再次重复这个过程。即,如果先点击通知2,会跳转到下一个Activity,并在下一个Activity的tv中显示AAA;再点击通知1,无效点击。如果先点击通知1,会跳转到下一个Activity,并在下一个Activity的tv中显示AAA,再点击通知2,无效点击。
3.4.4 FLAG_NO_CREAT
当前描述的PendingIntent不会主动去创建,如果当前PendingIntent之前不存在,那么getActivity等方法都会直接返回null,即获取PendingIntent失败,这个标记位很少见,他无法单独使用,因此在日常开发当中,并没有太多的意义,这里就不过多的介绍了。
3.4.5 例子-测试PendingIntent的flags参数
(1)ActivityA
    private void testPendingIntentFlags() {
        Intent intentA = new Intent(this, ReceivePendingIntentFlagsActivity.class);
        intentA.putExtra("name", "AAA");
        Intent intentB = new Intent(this, ReceivePendingIntentFlagsActivity.class);
        intentB.putExtra("name", "BBB");
        PendingIntent p1 = PendingIntent.getActivity(this, 0, intentA, PendingIntent.FLAG_ONE_SHOT);
        PendingIntent p2 = PendingIntent.getActivity(this, 0, intentB, PendingIntent.FLAG_ONE_SHOT);

        Log.e(TAG, "两个intent是否相等(equals)" + intentA.equals(intentB));//false
        Log.e(TAG, "两个PendingIntent是否相等:" + p1.equals(p2)); // true
        Log.e(TAG, "两个intent是否相等(filterEquals):" + intentA.filterEquals(intentB)); // true

        NotificationManager manager = (NotificationManager) getSystemService(NOTIFICATION_SERVICE);
        Notification.Builder builder1 = new Notification.Builder(this);
        builder1.setContentTitle("title");
        builder1.setContentText("Content Text");
        builder1.setSmallIcon(R.drawable.ic_launcher);
        builder1.setOngoing(true);
        builder1.setContentIntent(p1);
        // Android 8.0不能弹出通知解决方法
        if (Build.VERSION.SDK_INT >= Build.VERSION_CODES.O) {
            String channelId = "006";
            NotificationChannel channel = new NotificationChannel(channelId, "download_channel", NotificationManager.IMPORTANCE_DEFAULT);
            manager.createNotificationChannel(channel);
            builder1.setChannelId(channelId);
        }
        Notification notification1 = builder1.build();
        manager.notify(1, notification1);

        Notification.Builder builder2 = new Notification.Builder(this);
        builder2.setContentTitle("title2");
        builder2.setContentText("Content Text2");
        builder2.setSmallIcon(R.drawable.ic_yellow);
        builder2.setOngoing(true);
        builder2.setContentIntent(p2);
        if (Build.VERSION.SDK_INT >= Build.VERSION_CODES.O) {
            String channelId = "007";
            NotificationChannel channel = new NotificationChannel(channelId, "download_channel", NotificationManager.IMPORTANCE_DEFAULT);
            manager.createNotificationChannel(channel);
            builder2.setChannelId(channelId);
        }
        Notification notification2 = builder2.build();
        manager.notify(2, notification2);
    }
(2)ActivityB
public class ReceivePendingIntentFlagsActivity extends Activity {
    @Override
    protected void onCreate(Bundle savedInstanceState) {
        super.onCreate(savedInstanceState);
        setContentView(R.layout.activity_receive_pending_intent_flags);

        TextView tvReceive = findViewById(R.id.tv_receive);
        tvReceive.setText(getIntent().getStringExtra("name"));
    }
}
(3)参考链接
构造PendingIntent时第四个参数flags的设置以及在Notification中的不同作用
4 RemoteViews的内部机制
4.1 RemoteViews基础
RemoteViews的作用在其他进程中显示并且更新View的界面,为了更好的理解他的内部机制,我们来看一下他的主要功能,首先我们看一下他的构造方法。
 public RemoteViews(String packageName, int layoutId) {
        this(getApplicationInfo(packageName, UserHandle.myUserId()), layoutId);
}
他接受两个参数,第一个表示当前的包名,第二个是加载的布局,这个很好理解,RemoteViews目前并不能支持所有的View类型,我们看下他支持哪些:
Layout
FrameLayout LinearLayout RelativeLayout GridLayout

View
AnalogClock,Button,Chronometer,ImageButton,ImageView,ProgressBar,TextView,ViewFlipper
ListView,GridView,stackView,AdapterViewFlipper,ViewStub
4.2 RemoteViews会通过Binder与SystemService进程中的NotificationManagerService通信原理分析
4.2.1 原理分析
由于RemoteViews主要用于通知栏和通知栏和桌面小部件,分别由NotificationManager和AppWidgetProvider管理,而NotificationManager和AppWidgetProvider通过Binder分别和SystemService进程中的NotificationManagerService和AppWidgetService通信。由此可见,通知栏和小部件的布局文件实际上是在NotificationManagerService和AppWidgetService中被加载的,这就是我们的进程构成了跨进程通信的原理。
4.2.2 架构图
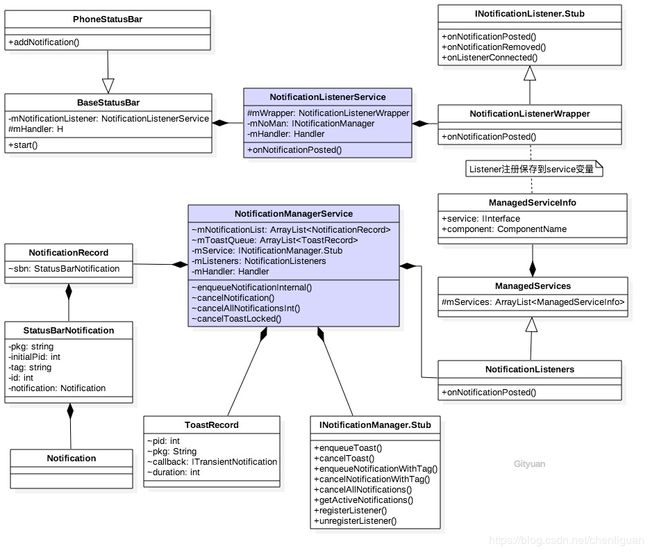
(1)核心类图
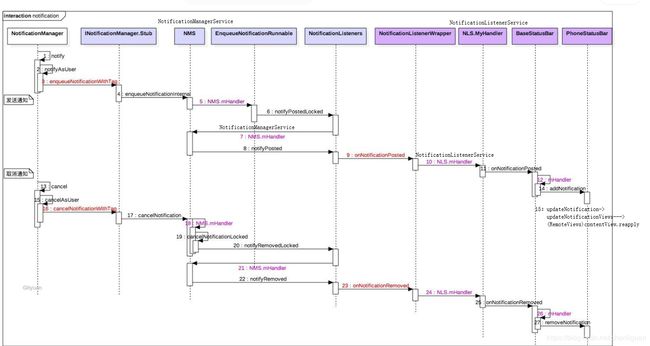
(2)Notification处理UML流程图
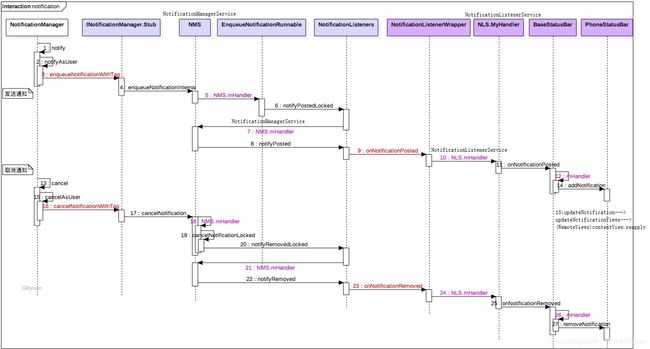
4.3 RemoteViews会通过Binder与SystemService进程中的NotificationManagerService通信的源码分析
4.3.1 NotificationManager.notify()
public void notify(int id, Notification notification) {
    notify(null, id, notification);
}

public void notify(String tag, int id, Notification notification) {
    notifyAsUser(tag, id, notification, new UserHandle(UserHandle.myUserId()));
}

public void notifyAsUser(String tag, int id, Notification notification, UserHandle user) {
    int[] idOut = new int[1];
    // 获取通知的代理对象
    INotificationManager service = getService();
    String pkg = mContext.getPackageName();
    // 将包名和userId保存到通知的extras
    Notification.addFieldsFromContext(mContext, notification);
    ...
    fixLegacySmallIcon(notification, pkg);
    // 对于Android 5.0之后的版本,smallIcon不可为空
    if (mContext.getApplicationInfo().targetSdkVersion > Build.VERSION_CODES.LOLLIPOP_MR1) {
        if (notification.getSmallIcon() == null) {
            throw new IllegalArgumentException(...);
        }
    }
    final Notification copy = Builder.maybeCloneStrippedForDelivery(notification);
    try {
        // binder调用,进入system_server进程【4.3.2】
        service.enqueueNotificationWithTag(pkg, mContext.getOpPackageName(), tag, id,
                copy, idOut, user.getIdentifier());
    } catch (RemoteException e) {
        throw e.rethrowFromSystemServer();
    }
}
在App端调用NotificationManager类的notify()方法,最终通过binder调用INotificationManager.Stub.enqueueNotificationWithTag(),最终会进入system_server进程的 NotificationManagerService,执行enqueueNotificationWithTag()方法。
4.3.2 NotificationManagerService.enqueueNotificationInternal()
public void enqueueNotificationWithTag(String pkg, String opPkg, String tag, int id, Notification notification, int[] idOut, int userId) throws RemoteException {
	 enqueueNotificationInternal(pkg, opPkg, Binder.getCallingUid(),  Binder.getCallingPid(), tag, id, notification, idOut, userId);
}
void enqueueNotificationInternal(final String pkg, final String opPkg, final int callingUid, final int callingPid, final String tag, final int id, final Notification notification, int[] idOut, int incomingUserId) {
    // 检查发起者是系统进程或者同一个app,否则抛出异常
    checkCallerIsSystemOrSameApp(pkg);
    final boolean isSystemNotification = isUidSystem(callingUid) || ("android".equals(pkg));
    final boolean isNotificationFromListener = mListeners.isListenerPackage(pkg);
    // 除了系统通知和已注册的监听器允许入队列,其他通知都会限制数量上限,默认是一个package上限50个
    ...

    // 将通知信息封装到StatusBarNotification对象
    final StatusBarNotification n = new StatusBarNotification(pkg, opPkg, id, tag, callingUid, callingPid, 0, notification, user);
    // 创建记录通知实体的对象NotificationRecord
    final NotificationRecord r = new NotificationRecord(getContext(), n);
    // 将通知异步发送到handler线程-system_server的主线程【4.3.3】
    mHandler.post(new EnqueueNotificationRunnable(userId, r));
}
这个过程主要功能:①创建NotificationRecord对象,里面包含了notification相关信息;②采用异步方式,将任务交给mHandler线程来处理,mHandler是WorkerHandler类的实例对象;
接下来看看WorkerHandler到底运行在哪个线程,这需要从NotificationManagerService服务初始化过程来说起:
(1)SystemServer.startOtherServices()
// 该过程运行在system_server进程的主线程
private void startOtherServices() {
    //【(2)】
    mSystemServiceManager.startService(NotificationManagerService.class);
    ...
}
(2)SystemServiceManager.startService()
public  T startService(Class serviceClass) {
    final String name = serviceClass.getName();
    Constructor constructor = serviceClass.getConstructor(Context.class);
    // 创建NotificationManagerService对象
    final T service = constructor.newInstance(mContext);
    // 注册该服务
    mServices.add(service);
    // 调用NotificationManagerService的onStart方法,【(3)】
    service.onStart();
    return service;
}
该过程先创建NotificationManagerService,然后再调用其onStart方法
(3)NotificationManagerService.onStart()
public void onStart() {
    ...
    mHandler = new WorkerHandler(); //运行在system_server的主线程
    mRankingThread.start(); //线程名为"ranker"的handler线程
    mRankingHandler = new RankingHandlerWorker(mRankingThread.getLooper());
    ...
    //用于记录所有的listeners的MangedServices对象
    mListeners = new NotificationListeners();
    ...
    publishBinderService(Context.NOTIFICATION_SERVICE, mService);
    publishLocalService(NotificationManagerInternal.class, mInternalService);
}
到此,我们可以得知onStart()过程创建的mHandler运行在system_server的主线程。那么上面的执行流便进入了system_server主线程。
4.3.3 NotificationManagerService.EnqueueNotificationRunnable
private class EnqueueNotificationRunnable implements Runnable {

    public void run() {
        synchronized (mNotificationList) {
            // 此处r为NotificationRecord对象
            final StatusBarNotification n = r.sbn;
            final Notification notification = n.getNotification();
            ...

            // 从通知列表mNotificationList查看是否存在该通知
            int index = indexOfNotificationLocked(n.getKey());
            if (index < 0) {
                mNotificationList.add(r);
                mUsageStats.registerPostedByApp(r);
            } else {
                old = mNotificationList.get(index);
                mNotificationList.set(index, r);
                mUsageStats.registerUpdatedByApp(r, old);
                //确保通知的前台服务属性不会被丢弃
                notification.flags |=  old.getNotification().flags & Notification.FLAG_FOREGROUND_SERVICE;
                r.isUpdate = true;
            }
            mNotificationsByKey.put(n.getKey(), r);

            // 如果是前台服务的通知,则添加不允许被清除和正在运行的标签
            if ((notification.flags & Notification.FLAG_FOREGROUND_SERVICE) != 0) {
                notification.flags |= Notification.FLAG_ONGOING_EVENT  | Notification.FLAG_NO_CLEAR;
            }

            applyZenModeLocked(r);
            mRankingHelper.sort(mNotificationList);

            if (notification.getSmallIcon() != null) {
                StatusBarNotification oldSbn = (old != null) ? old.sbn : null;
                // 当设置小图标,则通知NotificationListeners处理 【4.3.4】
                mListeners.notifyPostedLocked(n, oldSbn);
            } else {
                if (old != null && !old.isCanceled) {
                    mListeners.notifyRemovedLocked(n);
                }
            }
            // 处理该通知,主要是是否发声,震动,Led灯
            buzzBeepBlinkLocked(r);
        }
    }
}
这里的mListeners是指NotificationListeners对象
4.3.4 NotificationManagerService.NotificationListeners.notifyPostedLocked()
public class NotificationListeners extends ManagedServices {
  public void notifyPostedLocked(StatusBarNotification sbn, StatusBarNotification oldSbn) {
    TrimCache trimCache = new TrimCache(sbn);
    // 遍历整个ManagedServices中的所有ManagedServiceInfo
    for (final ManagedServiceInfo info : mServices) {
        boolean sbnVisible = isVisibleToListener(sbn, info);
        boolean oldSbnVisible = oldSbn != null ? isVisibleToListener(oldSbn, info) : false;
        if (!oldSbnVisible && !sbnVisible) {
            continue;
        }
        final NotificationRankingUpdate update = makeRankingUpdateLocked(info);
        // 通知变得不可见,则移除老的通知
        if (oldSbnVisible && !sbnVisible) {
            final StatusBarNotification oldSbnLightClone = oldSbn.cloneLight();
            mHandler.post(new Runnable() {
                public void run() {
                    notifyRemoved(info, oldSbnLightClone, update);
                }
            });
            continue;
        }

        final StatusBarNotification sbnToPost = trimCache.ForListener(info);
        mHandler.post(new Runnable() {
            public void run() {
                notifyPosted(info, sbnToPost, update); //【4.3.5】
            }
        });
    }
  }
    ...
}
这里是在system_server进程中第二次采用异步方式来处理。
4.3.5 NotificationManagerService.notifyPosted()
private void notifyPosted(final ManagedServiceInfo info, final StatusBarNotification sbn, NotificationRankingUpdate rankingUpdate) {
    final INotificationListener listener = (INotificationListener)info.service;
    StatusBarNotificationHolder sbnHolder = new StatusBarNotificationHolder(sbn);
    try {
        // 【4.3.6】
        listener.onNotificationPosted(sbnHolder, rankingUpdate);
    } catch (RemoteException ex) {
        ...
    }
}
此处的listener来自于ManagedServiceInfo的service成员变量,listener数据类型是NotificationListenerWrapper的代理对象,详见下面的分析,总结在(14)。
此处sbnHolder的数据类型为StatusBarNotificationHolder,继承于IStatusBarNotificationHolder.Stub对象,经过binder调用进入到systemui进程的 便是IStatusBarNotificationHolder.Stub.Proxy对象。
(1)SystemServer.startOtherServices()
private void startOtherServices() {
    startSystemUi(context);
    ...
}
static final void startSystemUi(Context context) {
    Intent intent = new Intent();
    intent.setComponent(new ComponentName("com.android.systemui",  "com.android.systemui.SystemUIService"));
    intent.addFlags(Intent.FLAG_DEBUG_TRIAGED_MISSING);
    // 启动服务SystemUIService,运行在进程com.android.systemui,接下来进入systemui进程【(2)】
    context.startServiceAsUser(intent, UserHandle.SYSTEM);
}
(2)SystemUIService
public class SystemUIService extends Service {
    // 服务启动后,先执行其onCreate()方法
    public void onCreate() {
        super.onCreate();
        //【(3)】
        ((SystemUIApplication) getApplication()).startServicesIfNeeded();
    }
    ...
}
(3)SystemUIApplication.startServicesIfNeeded()
// SERVICES常量值
private final Class[] SERVICES = new Class[] {
    com.android.systemui.tuner.TunerService.class,
    com.android.systemui.keyguard.KeyguardViewMediator.class,
    com.android.systemui.recents.Recents.class,
    com.android.systemui.volume.VolumeUI.class,
    Divider.class,
    com.android.systemui.statusbar.SystemBars.class,  // SystemBars【(4)】
    com.android.systemui.usb.StorageNotification.class,
    com.android.systemui.power.PowerUI.class,
    com.android.systemui.media.RingtonePlayer.class,
    com.android.systemui.keyboard.KeyboardUI.class,
    com.android.systemui.tv.pip.PipUI.class,
    com.android.systemui.shortcut.ShortcutKeyDispatcher.class
};

public void startServicesIfNeeded() {
    startServicesIfNeeded(SERVICES); //【(4)】
}
(4)SystemUIApplication.startServicesIfNeeded()
private void startServicesIfNeeded(Class[] services) {
    if (mServicesStarted) {
        return;
    }

    if (!mBootCompleted) {
        if ("1".equals(SystemProperties.get("sys.boot_completed"))) {
            mBootCompleted = true;
        }
    }

    final int N = services.length;
    for (int i=0; i cl = services[i];
        try {
            // 初始化对象
            Object newService = SystemUIFactory.getInstance().createInstance(cl);
            mServices[i] = (SystemUI) ((newService == null) ? cl.newInstance() : newService);
        } catch (Exception ex) {
            ...
        }

        mServices[i].mContext = this;
        mServices[i].mComponents = mComponents;
        // 此处以SystemBars为例来展开【(5)】
        mServices[i].start();

        if (mBootCompleted) {
            mServices[i].onBootCompleted();
        }
    }
    mServicesStarted = true;
}
(5)SystemBars.start()
public void start() {
    mServiceMonitor = new ServiceMonitor(TAG, DEBUG, mContext, Settings.Secure.BAR_SERVICE_COMPONENT, this);
    mServiceMonitor.start();  // 当远程服务不存在,则执行下面的onNoService
}

public void onNoService() {
    //【6】
    createStatusBarFromConfig();
}
(6)SystemBars.createStatusBarFromConfig()
private void createStatusBarFromConfig() {
    //config_statusBarComponent是指PhoneStatusBar
    final String clsName = mContext.getString(R.string.config_statusBarComponent);
    Class cls = null;
    try {
        cls = mContext.getClassLoader().loadClass(clsName);
    } catch (Throwable t) {
        ...
    }
    try {
        mStatusBar = (BaseStatusBar) cls.newInstance();
    } catch (Throwable t) {
        ...
    }
    mStatusBar.mContext = mContext;
    mStatusBar.mComponents = mComponents;
    // config_statusBarComponent的定义位于文件config.xml中,其值为PhoneStatusBar。【(7)】
    mStatusBar.start();
}
(7)PhoneStatusBar.start()
public void start() {
    ...
    super.start(); //此处调用BaseStatusBar【(8)】
}
(8)BaseStatusBar.start()
NotificationListenerService mNotificationListener = new NotificationListenerService() {
	public void onNotificationPosted(final StatusBarNotification sbn, final RankingMap rankingMap) {

	}
}

public void start() {
  ...
  // 安装通知的初始化状态【(9)】
  mNotificationListener.registerAsSystemService(mContext,
      new ComponentName(mContext.getPackageName(), getClass().getCanonicalName()),  UserHandle.USER_ALL);
  ...
  createAndAddWindows(); // 添加状态栏
  ...
}
(9)NotificationListenerService.registerAsSystemService()
public void registerAsSystemService(Context context, ComponentName componentName, int currentUser) throws RemoteException {
    if (mWrapper == null) {
        mWrapper = new NotificationListenerWrapper();
    }
    mSystemContext = context;
    // 获取NotificationManagerService的接口代理对象
    INotificationManager noMan = getNotificationInterface();
    // 运行在主线程的handler
    mHandler = new MyHandler(context.getMainLooper());
    mCurrentUser = currentUser;
    // 经过binder调用,向system_server中的NotificationManagerService注册监听器【(10)】
    noMan.registerListener(mWrapper, componentName, currentUser);
}

 protected class NotificationListenerWrapper extends INotificationListener.Stub {
        @Override
        public void onNotificationPosted(IStatusBarNotificationHolder sbnHolder, NotificationRankingUpdate update) {

        }
}
经过binder调用,向system_server中的NotificationManagerService注册监听器:NotificationListenerService.NotificationListenerWrapper子类。
(10)NotificationManagerService.registerListener()
private final IBinder mService = new INotificationManager.Stub() {
    ...
    public void registerListener(final INotificationListener listener, final ComponentName component, final int userid) {
        enforceSystemOrSystemUI("INotificationManager.registerListener");
        // 此处的mListeners是NotificationManagerService.NotificationListeners,而NotificationListeners extends ManagedServices
        // INotificationListener便是NotificationListenerWrapper代理对象 【(11)】
        mListeners.registerService(listener, component, userid);
    }
}
此处的mListeners是NotificationManagerService.NotificationListeners,而NotificationListeners extends ManagedServices。
INotificationListener便是NotificationListenerWrapper代理对象。
(11)ManagedServices.registerService()
public void registerService(IInterface service, ComponentName component, int userid) {
    // registerServiceImpl【(12)】
    ManagedServiceInfo info = registerServiceImpl(service, component, userid);
    if (info != null) {
        onServiceAdded(info);
    }
}
(12)ManagedServices.registerServiceImpl()
private ManagedServiceInfo registerServiceImpl(final IInterface service, final ComponentName component, final int userid) {
     // 将NotificationListenerWrapper对象保存到ManagedServiceInfo.service
     ManagedServiceInfo info = new ServiceInfo(service, component, userid, true, null, Build.VERSION_CODES.LOLLIPOP);
     //【(13)】
     return registerServiceImpl(info);
 }
将NotificationListenerWrapper对象保存到ManagedServiceInfo.service。
(13)ManagedServices.registerServiceImpl()
private ManagedServiceInfo registerServiceImpl(ManagedServiceInfo info) {
     synchronized (mMutex) {
         try {
             info.service.asBinder().linkToDeath(info, 0);
             mServices.add(info);
             return info;
         } catch (RemoteException e) {

         }
     }
     return null;
 }
(14)总结
final INotificationListener listener = (INotificationListener)info.service;
前面4.3.5中通过(INotificationListener)得到的listener便是运行在systemui中的NotificationListenerWrapper的代理对象。
4.3.6 NotificationListenerService.NotificationListenerWrapper.onNotificationPosted()
protected class NotificationListenerWrapper extends INotificationListener.Stub {

    public void onNotificationPosted(IStatusBarNotificationHolder sbnHolder, NotificationRankingUpdate update) {
        StatusBarNotification sbn;
        try {
            sbn = sbnHolder.get(); // 向system_server进程来获取sbn对象
        } catch (RemoteException e) {
            return;
        }

        synchronized (mLock) {
            applyUpdateLocked(update);
            if (sbn != null) {
                SomeArgs args = SomeArgs.obtain();
                args.arg1 = sbn;
                args.arg2 = mRankingMap;
                //【4.3.7】
                mHandler.obtainMessage(MyHandler.MSG_ON_NOTIFICATION_POSTED, args).sendToTarget();
            } else {
                mHandler.obtainMessage(MyHandler.MSG_ON_NOTIFICATION_RANKING_UPDATE, mRankingMap).sendToTarget();
            }
        }
    }
    ...
}
此时运行在systemui进程,sbnHolder是IStatusBarNotificationHolder的代理端。 此处mHandler = new MyHandler(getMainLooper()),也就是运行在systemui主线程的handler。
4.3.7 NotificationListenerService.MyHandler.onNotificationPosted()
private final class MyHandler extends Handler {
    ...
    public void handleMessage(Message msg) {
        ...
        switch (msg.what) {
            case MSG_ON_NOTIFICATION_POSTED: {
                SomeArgs args = (SomeArgs) msg.obj;
                StatusBarNotification sbn = (StatusBarNotification) args.arg1;
                RankingMap rankingMap = (RankingMap) args.arg2;
                args.recycle();
                onNotificationPosted(sbn, rankingMap);
            } break;
            case ...
        }
    }
}

public void onNotificationPosted(StatusBarNotification sbn, RankingMap rankingMap) {
	onNotificationPosted(sbn);
}

// 在子类中实现
public void onNotificationPosted(StatusBarNotification sbn) {
	// optional
}
由4.3.5的(8)中,在BaseStatusBar类中通过定义NotificationListenerService mNotificationListener = new NotificationListenerService() { }监听NotificationListenerService的回调。所以,在BaseStatusBar.NotificationListenerService.onNotificationPosted()中实现,如:【4.3.8】。
4.3.8 BaseStatusBar.NotificationListenerService.onNotificationPosted()
private final NotificationListenerService mNotificationListener = new NotificationListenerService() {

    public void onNotificationPosted(final StatusBarNotification sbn, final RankingMap rankingMap) {
        if (sbn != null) {
            mHandler.post(new Runnable() {
                public void run() {
                    ...
                    String key = sbn.getKey();
                    boolean isUpdate = mNotificationData.get(key) != null;

                    if (isUpdate) {
                        // 【4.3.9】
                        updateNotification(sbn, rankingMap);
                    } else {
                        addNotification(sbn, rankingMap, null );
                    }
                }
            });
        }
    }
}
4.3.9 PhoneStatusBar.updateNotification()
public void updateNotification(StatusBarNotification notification, RankingMap ranking) {
	Entry entry = mNotificationData.get(key);
	...
	updateNotificationViews(entry, notification);
	...
}
4.3.10 PhoneStatusBar.updateNotificationViews()
private void updateNotificationViews(Entry entry, StatusBarNotification sbn) {
	RemoteViews contentView = entry.cachedContentView;
	...
	// Reapply the RemoteViews
    contentView.reapply(mContext, entry.getContentView(), mOnClickHandler);
    ...
}
接着具体分析:RemoteViews.reapply()如何加载布局
4.4 RemoteViews的apply()/reapply()加载布局
public class RemoteViews implements Parcelable, Filter {
    ......
	public void reapply(Context context, View v, OnClickHandler handler) {
	    RemoteViews rvToApply = getRemoteViewsToApply(context);
        View result;
	    // 通过LayoutInflater 去加载RemoteViews中的布局文件,RemoteViews中的布局文件可以通过getLayoutId这个方法获得
	    LayoutInflater inflater = (LayoutInflater)context.getSystemService(Context.LAYOUT_INFLATER_SERVICE);
        inflater = inflater.cloneInContext(inflationContext);
        inflater.setFilter(this);
        result = inflater.inflate(rvToApply.getLayoutId(), parent, false);

        // 加载完布局之后会通过performApply去执行一些更新操作
 		RemoteViews rvToApply = getRemoteViewsToApply(context);
	    rvToApply.performApply(result, parent, handler);

        return result;
   	 }

	 private void performApply(View v, ViewGroup parent, OnClickHandler handler) {
        if (mActions != null) {
            handler = handler == null ? DEFAULT_ON_CLICK_HANDLER : handler;
            final int count = mActions.size();
            // 遍历mActions 这个列表并执行每一个Action对象的apply方法
            for (int i = 0; i < count; i++) {
                Action a = mActions.get(i);
                a.apply(v, parent, handler);
            }
        }
	 }
}
4.5 RemoteViews是如何更新远程View的?
4.5.1 RemoteViews提供的set方法访问远程View
RemoteViews也没有提供findViewById方法,因此无法直接访问里面的View元素,而必须通过RemoteViews所提供的一系列set方法来完成,当然这是因为RemoteViews在远程进程中显示,所以没办法直接findViewById,关于set方法,可以看下这表:
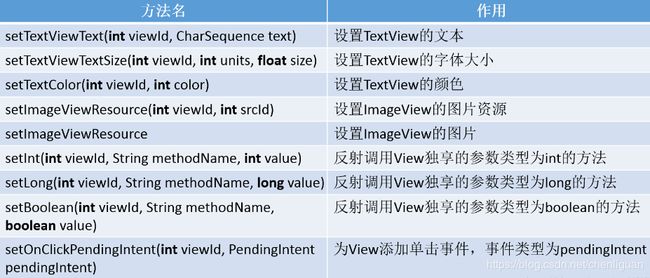
从这张表可以看出,原本可以直接调用View的方法,现在都需要通过set来完成,而从这些方法的声明来看,很像是通过反射来完成的,事实上也是如此。
(1)setTextViewText()
public class RemoteViews implements Parcelable, Filter {
	public void setTextViewText(int viewId, CharSequence text) {
        setCharSequence(viewId, "setText", text);
    }
}
(2)setCharSequence()
// 上述ID中,viewId是被操作的View的id,setText是一个方法名,text是给TextView要设置的文
public void setCharSequence(int viewId, String methodName, CharSequence value) {
	addAction(new ReflectionAction(viewId, methodName, ReflectionAction.CHAR_SEQUENCE, value));
}
(3)从setCharSequence的实现来看,他的内部并没有对View进行直接的处理,然是添加了一个ReflectionAction独享,ReflectionAction继承自Action,是用反射调用的:
private final class ReflectionAction extends Action {
       ReflectionAction(int viewId, String methodName, int type, Object value) {
            this.viewId = viewId;
            this.methodName = methodName;
            this.type = type;
            this.value = value;
        }

	    @Override
        public void apply(View root, ViewGroup rootParent, OnClickHandler handler) {
            final View view = root.findViewById(viewId);
            if (view == null) return;

            Class param = getParameterType();
            if (param == null) {
                throw new ActionException("bad type: " + this.type);
            }

            try {
                getMethod(view, this.methodName, param).invoke(view, wrapArg(this.value));
            } catch (ActionException e) {
                throw e;
            } catch (Exception ex) {
                throw new ActionException(ex);
            }
        }
   }
(4)再看addAction的实现:
private void addAction(Action a) {
        if (mActions == null) {
            mActions = new ArrayList();
        }
        mActions.add(a);

        // update the memory usage stats
        a.updateMemoryUsageEstimate(mMemoryUsageCounter);
}
从上述代码可以得知RemoteViews内部有一个mActions 成员,他是一个ArrayList,外界每一次调用一个set方法,他都能保存下来并未对view进行实际的操作。
(5)除了ReflectionAction 还有Action,等,这里我们拿TextViewSizeAction来分析,具体实现如下:
private class TextViewSizeAction extends Action {
        public TextViewSizeAction(int viewId, int units, float size) {
            this.viewId = viewId;
            this.units = units;
            this.size = size;
        }

        public TextViewSizeAction(Parcel parcel) {
            viewId = parcel.readInt();
            units = parcel.readInt();
            size  = parcel.readFloat();
        }

        public void writeToParcel(Parcel dest, int flags) {
            dest.writeInt(TAG);
            dest.writeInt(viewId);
            dest.writeInt(units);
            dest.writeFloat(size);
        }

        @Override
        public void apply(View root, ViewGroup rootParent, OnClickHandler handler) {
            final TextView target = (TextView) root.findViewById(viewId);
            if (target == null) return;
            target.setTextSize(units, size);
        }

        public String getActionName() {
            return "TextViewSizeAction";
        }

        int units;
        float size;

        public final static int TAG = 13;
    }
之所以不用反射来实现,是因为setTextView这个方法有2个参数,因此无法复用ReflectionAction,因为ReflectionAction 的反射调用只需要一个参数,这里就不一一分析了。
(6)关于单击事件,RemoteView中只支持PendingIntent,是不支持其他模式的,我们这里需要注意的就是setOnClickPendingIntent,setPendingIntentTemplate,以及setonClickFillinIntent的区别,首先setOnClickPendingIntent用于给普通view设置单击事件,但是不能给ListView之类的View设置,如果需要,就用后两者。
4.5.2 跨进程通信修改View的原理
首先RemoteViews会通过Binder传递到SystemServer进程,这是因为RemoteViews实现了Parcelable接口,因此它可以跨进程传输,系统会根据RemoteViews中的包名等信息去得到该应用的资源。然后会通过Layoutinflater去加载RemoteViews中的布局文件,在SystemServer进程中加载后的布局文件是一个普通的View,只不过相对于我们的进程他是一个RemoteViews而已。接着系统会对View执行一系列界面更新任务,这些任务就是之前我们通过set方法来提交的。set方法对View所做的更新并不是立刻执行的,在RemoteViews内部会记录所有的更新操作,具体的执行时机要等到RemoteViews被加载以后才能执行,这样RemoteViews就可以在SystemServer进程中显示了。
从理论上来说,系统完全可以通过Binder去支持所有的View和View操作,但是这样做的话代价太大,因为View的方法太多了,另外就是大量的IPC操作会影响效率。为了解决这个问题,系统并没有通过Binder去直接支持View的跨进程访问,而是提供了一个Action,Action代表一个View操作,Action同样实现了Parcelable接口。这个过程可以参看下面的图片,系统首先调用set()将Vew操作封装到Action对象,并调用notify()将这些对象跨进程传输到远程进程,远程进程通过RemoteViews的apply方法来进行View的更新操作,RemoteViews的apply方法内部则会去遍历所有的Action对象并调用它们的apply方法,具体的View更新操作是由Acton对apply方法来完成的。
上述做法的好处:首先不需要定义大量的Binder,其次通过在远程进程中批量执行RemoteViews的修改操作从而避免了大量的IPC视作这就提高了程序的性能。

4.6 学习链接
NotificationManagerService原理分析-基于Android 7.0
完全理解 Android 中的 RemoteViews
5 RemoteViews的意义
6 学习链接
Android开发艺术探索第五章——理解RemoteView