ubunt16.04上使用tensorflow1.0运行github上的seann999/ssd_tensorflow
此文章按照安装顺序书写。
电脑配置:显卡:GTX1070; CPU:i7-6700k; 内存:8g
系统环境:Ubuntu16.04 LTS 64位
CUDA:8.0; CUDNN:5.1;OPENCV:3.2;BAZEL:0.4.4;Tensorflow:1.0rc2;Python:2.7
安装ubuntu16.04
ubutnu官网(官网地址)下载ubuntu16.04LTS镜像文件。如:

UltraISO 官网(官网地址)下载uiso9_cn.exe。如:

点击上述exe文件,安装UltraISO。
用UltraISO制作ubuntu16.04的U盘启动盘。参考:http://jingyan.baidu.com/article/466506581a1d3df548e5f856.html
将启动盘插入电脑,开机按del键(不同类型电脑可能不一样)进入BIOS界面,设置为U盘启动。即:将出现的U盘选项移动至最前面(note:不是UEFI开头的U盘)
出现界面后选择Try Ubuntu without installing(当然也可以Install Ubuntu 直接安装),等待一下出现主界面后,点击桌面上的 Install Ubuntu 16.04 LTS 图标开始正式安装。可参考:http://www.linuxidc.com/Linux/2016-04/130520.htm
- 选择语言:中文(简体)。
- 准备安装Ubuntu:不要选择“为图形或无线硬件,以及MP3和其他媒体安装第三方软件”。
- 安装类型:选择“其他选项”
- 选择新建分区表。分区如下:1:boot主分区,ext4日志文件类型,220MB(可以大点,因为可能会出现更新的时候空间不足的问题),挂载“/boot”;2:root主分区,ext4日志文件类型,30720MB,挂载“/”。3:swap逻辑分区,交换空间类型,20480MB。4:tmp逻辑分区,ext4日志文件类型,10240MB,挂载“/tmp”。5:home逻辑分区,ext4日志文件类型,剩余磁盘大小,挂载“/home”。安装启动引导器的设备:选择一整个要安装的磁盘,类似/dev/sda(不是单独的一个个挂载分区),之后选择“现在安装”,完成安装。
至此,ubuntu16.04安装完毕。
更新软件源
参考http://blog.csdn.net/xierhacker/article/details/53035989
1:搜索“软件和更新”

2:点击出现如下界面
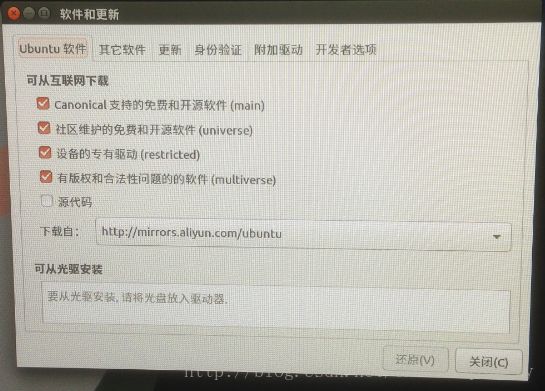
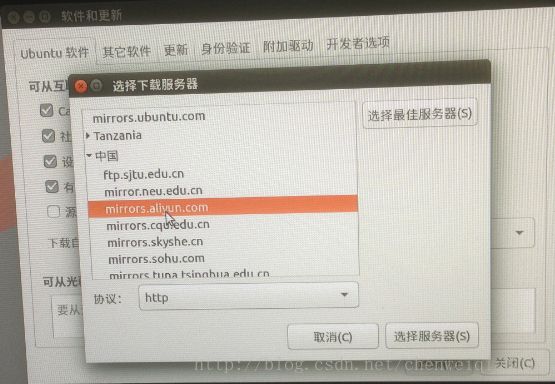
3:点击“下载自”旁边的框框,选择“其他站点…”

4:选择“中国”下的站点,如图本人选择的是阿里云软件源。
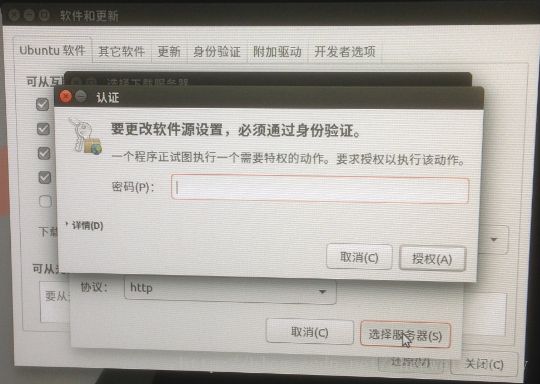
5:点击“选择服务器”后,会出现身份认证,输入密码。
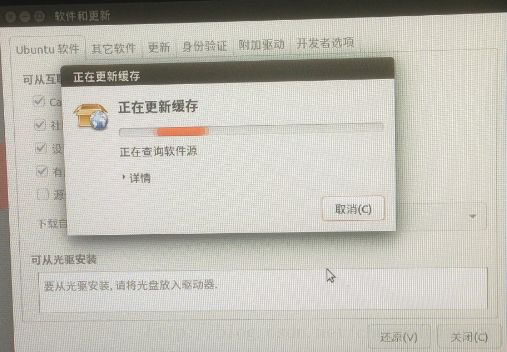
6:点击左上角的“X”退出,退出的时候会出现如下界面,选择“重新载入”

7:如图就是更新软件源的过程,完成后会自行退出。
安装nvidia驱动
本人在每次刚装完系统(还没做出任何更改,且没有安装nvidia驱动)后,输入
$ lsmod | grep nouveau会有输出,且禁用不成功。对于此现象,本人先去附加驱动(要更新软件源之后才有可安装的附加驱动)下点击安装nvidia专有驱动,安装成功后输入
$ sudo apt-get remove --purge nvidia-*卸载nvidia驱动。之后按照如下步骤进行。
参考http://www.cnblogs.com/czaoth/p/6132485.htm
1:输入 $ sudo apt-get remove --purge nvidia-* 卸载nvidia驱动
2:禁用nouveau。
- 终端运行:$ lsmod | grep nouveau,如果有输出则代表nouveau正在加载。
禁用方法:终端输入:
$ gedit /etc/modprobe.d/blacklist-nouveau.conf。在此文件中输入以下内容:blacklist nouveau
options nouveau modeset=0终端运行:
$ sudo update-initramfs –u- 设置完毕后,终端再次运行:
$ lsmod | grep nouveau检查是否禁用成功,如果运行后没有任何输出,则代表禁用成功。
3:重启电脑,到达登录界面时,alt+ctrl+f1,进入text mode,登录账户。
4:输入 $ sudo service lightdm stop 关闭图形化界面
5:安装NVIDIA显卡驱动,步骤:
sudo add-apt-repository ppa:graphics-drivers/ppa
sudo apt-get update
sudo apt-get install nvidia-367
sudo apt-get install mesa-common-dev
sudo apt-get install freeglut3-dev
6:输入 $ sudo service lightdm start 重新启动图形化界面。
7:若安装成功,终端输入$ cat /proc/driver/nvidia/version 会输出NVIDIA Driver的版本号。
至此,nvidia驱动安装完毕。
安装cuda8.0
一定!!要根据官方文档进行安装。Installation Guide for Linux和CUDA Quick Start Guide。
可参考:http://blog.csdn.net/masa_fish/article/details/51882183本人在安装过程中,试过cuda8.0中接受安装nvidia和openGL,但是安装完毕后发现./nbody无法成功生成并运行。果断卸了跟cuda一起安装的nvidia驱动,改用上述安装nvidia驱动的办法重新安装nvidia驱动,成功。
1:System Requirements
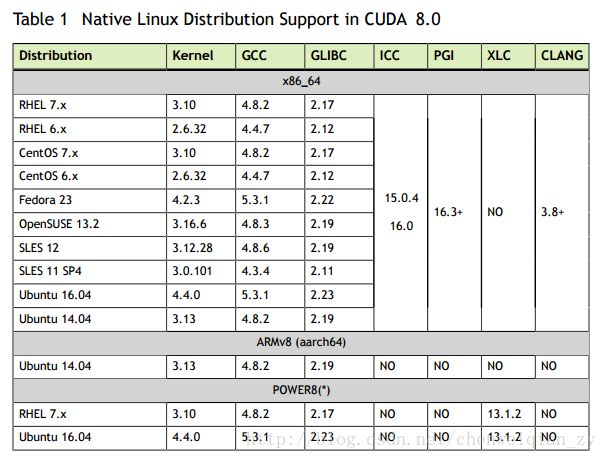
上图可以看到要求的gcc版本是5.3,而ubuntu16.04LTS自带的gcc版本是5.4。不过没有关系的,不必降级,可以安装成功的。2:PRE-INSTALLATION ACTIONS
2.1:Verify You Have a CUDA-Capable GPU
终端输入:
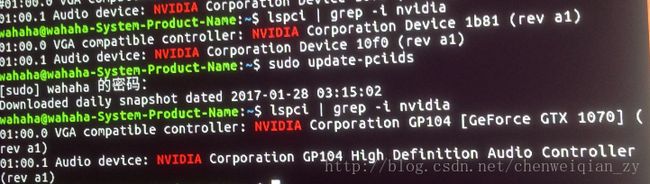
$ lspci | grep -i nvidia
正常显示如下:

不正常显示的时候,输入以下命令,可正常显示。
终端输入:$ sudo update-pciids过程如下:
2.2:Verify You Have a Supported Version of Linux
终端输入:
$ uname -m && cat /etc/*release
You should see output similar to the following, modified for your particular system:
x86_64
Red Hat Enterprise Linux Workstation release 6.0 (Santiago)2.3: Verify the System Has gcc Installed
终端输入:
$ gcc --version查看gcc版本信息2.4: Verify the System has the Correct Kernel
Headers and Development Packages Installed终端输入:
$ uname -r查看kernel版本信息终端输入:
$ sudo apt-get install linux-headers-$(uname -r)安装对应版本的kernel header和development package
3:Choose an Installation Method
CUDA提供两种安装方式:package manager安装和runfile安装
本人选择的是runfile安装,所以以下只介绍runfile安装方法4:Download the NVIDIA CUDA Toolkit
cuda官网下载,根据系统信息选择对应的版本,runfile安装的话最后一项要选择 runfile文件
CUDA 8.0 下载链接5: Handle Conflicting Installation Methods
Use the following command to uninstall a Toolkit runfile installation:
$ sudo /usr/local/cuda-X.Y/bin/uninstall_cuda_X.Y.plUse the following command to uninstall a Driver runfile installation:
$ sudo /usr/bin/nvidia-uninstallUse the following commands to uninstall a RPM/Deb installation:
$ sudo apt-get --purge remove6:RUNFILE INSTALLATION
- 6.1:Disabling Nouveau
The Nouveau drivers are loaded if the following command prints anything:
终端输入:
$ lsmod | grep nouveauThe method about Disable the Nouveau drivers
Create a file at /etc/modprobe.d/blacklist-nouveau.conf with the following contents:
blacklist nouveau
options nouveau modeset=0Regenerate the kernel initramfs:
终端输入:
$ sudo update-initramfs -u
设置完毕可以再次运行 $ lsmod | grep nouveau 检查是否禁用成功,如果运行后没有任何输出,则代表禁用成功。
- 6.2:重启电脑,到达登录界面时,alt+ctrl+f1,进入text mode,登录账户
- 6.3:输入
$ sudo service lightdm stop关闭图形化界面 6.4:切换到cuda安装文件的路径,运行
$ sudo sh cuda__linux.run 本人下载的是cuda 8.0.44,所以运行
$sudo sh cuda_8.0.44_linux.run按照提示一步步操作
The installer will prompt for the following:
‣ EULA Acceptance
‣ CUDA Driver installation
‣ CUDA Toolkit installation, location, and /usr/local/cuda symbolic link
‣ CUDA Samples installation and location遇到提示是否安装nvidia驱动,选择no,否则前面的nvidia驱动就白装了。
当然你也可以选择安装nvidia驱动,在过程中,会遇到提示是否安装openGL ,选择no(如果你的电脑是双显,且主显是非NVIDIA的GPU需要选择no,否则可以yes)
其他都选择yes,遇到路径安装时选择默认
安装成功后,会显示installed,否则会显示failed。
6.5:输入
$ sudo service lightdm start重新启动图形化界面。返回到图形化登录界面,输入密码登录。
如果能够成功登录,则表示不会遇到循环登录的问题,基本说明CUDA的安装成功了。6.6:Device Node Verification
重启电脑,检查路径/dev下有无存在名为nvidia*(以nvidia开头)的多个文件(device files)
官方说法为:Check that the device files/dev/nvidia* exist and have the correct (0666) file permissions.
如果没有的话,可以参考官方文档里的指导步骤,进行添加。
6.7:Uninstallation
To uninstall the CUDA Toolkit, run the uninstallation script provided in the bin directory of the toolkit. By default, it is located in /usr/local/cuda-8.0/bin:终端输入:
$ sudo /usr/local/cuda-8.0/bin/uninstall_cuda_8.0.plTo uninstall the NVIDIA Driver, run nvidia-uninstall:
终端输入:
$ sudo /usr/bin/nvidia-uninstallTo enable the Nouveau drivers, remove the blacklist file created in the Disabling Nouveau section, and regenerate the kernel initramfs/initrd again as described in that section.
7:POST-INSTALLATION ACTIONS
7.1:Environment Setup
终端中输入
$ sudo gedit /etc/profile
在打开的文件末尾,添加以下两行句子:export PATH=/usr/local/cuda-8.0/bin${PATH:+:${PATH}} export LD_LIBRARY_PATH=/usr/local/cuda-8.0/lib64\ ${LD_LIBRARY_PATH:+:${LD_LIBRARY_PATH}}保存文件。
这里有与官方安装文档稍有不同,需要说明:
官方文档里说只需在终端中运行上述两条export语句即可,但如果不将它们不写入/etc/profile文件的话,这样的环境变量在你退出终端后就消失了,不起作用了,所以写入才是永久的做法。
7.2:重启电脑,检查上述的环境变量是否设置成功。
终端输入:
$ env在输出的环境变量中检查有无上述7.1中设置的变量,如果有则代表设置成功。
7.3:Install Writable Samples
In order to modify, compile, and run the samples, the samples must be installed with write permissions. A convenience installation script is provided:
终端输入:
$ cuda-install-samples-8.0.sh ~7.4:检查 NVIDIA Driver是否安装成功
终端输入 :
$ cat /proc/driver/nvidia/version会输出NVIDIA Driver的版本号7.5:检查 CUDA Toolkit是否安装成功
终端输入 :
$ nvcc -V会输出CUDA的版本信息7.6:Compiling the Examples
- changing to ~/NVIDIA_CUDA-8.0_Samples
- 终端输入:
$ make - 编译需要时间。等待一段时候后, The resulting binaries will be placed under ~/NVIDIA_CUDA-8.0_Samples/bin.
7.7:Running the Binaries
切换路径,终端输入:
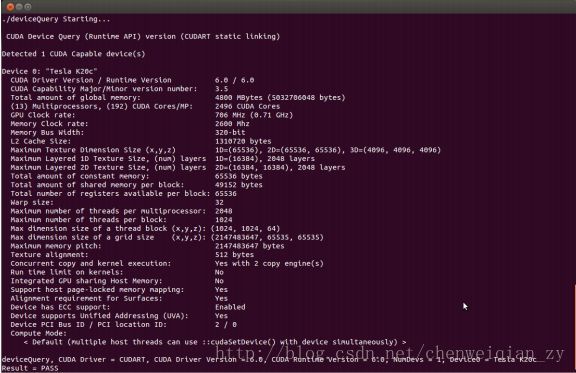
$ cd ~/NVIDIA_CUDA-8.0_Samples/bin/x86_64/linux/release1.验证CUDA是否安装配置成功:
终端输入:
$ ./deviceQuery如果CUDA安装配置成功,则会出现类似下图中的显示
2.验证系统和 CUDA-capable device的连接情况:
终端输入:
$ ./bandwidthTest如果连接成功,则会出现类似下图中的显示

7.8:Install a writable copy of the samples then build and run the nbody sample
$ cuda-install-samples-8.0.sh ~
$ cd ~/NVIDIA_CUDA-8.0_Samples/5_Simulations/nbody
$ make
$ ./nbody
如出现类似下图中的显示,则表示成功

至此,cuda8.0安装完毕。
安装cudnn5.1
1:Download cuDNN v5.1
cuDNN v5.1下载链接
下载之前,要注册账号登陆。下载页面如下:

选择“cuDNN v5.1 Library for Linux”进行下载。
2:Install cuDNN v5.1
切换到cuDNN v5.1安装文件的路径,输入以下命令。tar xvzf cudnn-8.0-linux-x64-v5.1.tgz sudo cp -P cuda/include/cudnn.h /usr/local/cuda/include/ sudo cp -P cuda/lib64/libcudnn* /usr/local/cuda/lib64/ sudo chmod a+r /usr/local/cuda/include/cudnn.h /usr/local/cuda/lib64/libcudnn*3:Install other dependencies
终端输入:
$ sudo apt-get install libcupti-dev
至此,cuDNN v5.1安装完毕。
安装opencv3.2
opencv下载官方教程
- 1:Required Packages
The packages can be installed using a terminal and the following commands or by using Synaptic Manager:
[compiler] sudo apt-get install build-essential
[required] sudo apt-get install cmake git libgtk2.0-dev pkg-config libavcodec-dev libavformat-dev libswscale-dev
[optional] sudo apt-get install python-dev python-numpy libtbb2 libtbb-dev libjpeg-dev libpng-dev libtiff-dev libjasper-dev libdc1394-22-dev- 2:Getting the OpenCV from the Git Repository
In Linux it can be achieved with the following command in Terminal:
cd ~/(进入opencv下载存放的目录)
git clone https://github.com/opencv/opencv.git
3:Building OpenCV from Source Using CMake, Using the Command Line
- 3.1:Create a temporary directory, which we denote as , where you want to put the generated Makefiles, project files as well the object files and output binaries.
- 3.2:Enter the and type
cmake [] to the OpenCV source directory> For example:
cd ~/opencv mkdir release cd release cmake -D CMAKE_BUILD_TYPE=RELEASE -D CMAKE_INSTALL_PREFIX=/usr/local ..- 3.3:Enter the created temporary directory () and proceed with:
make
sudo make install
Note:make的时候可能会出现nvcc warning:(类似下面这句)The’compute_xx’,’sm_xx’and’sm_xx’ architectures are deprecated,and may be removed in a future release.
解决办法:找到3.2步骤cmake后产生的OpencvConfig.cmake文件,找到如下代码
# Version Compute Capability from which OpenCV has been compiled is remembered

set(OpenCV_COMPUTE_CAPABILITIES "-gencode;arch=compute_20,code=sm_20;-gencode;arch=compute_30,code=sm_30;-gencode;arch=compute_35,code=sm_35;-gencode;arch=compute_37,code=sm_37;-gencode;arch=compute_50,code=sm_50;-gencode;arch=compute_52,code=sm_52;-gencode;arch=compute_60,code=sm_60;-gencode;arch=compute_61,code=sm_61;-D_FORCE_INLINES")
找到nvcc warning中出现的compute和sm一整句一整句的删掉,警告就可以解除了。
4:验证opencv是否安装成功
终端输入:
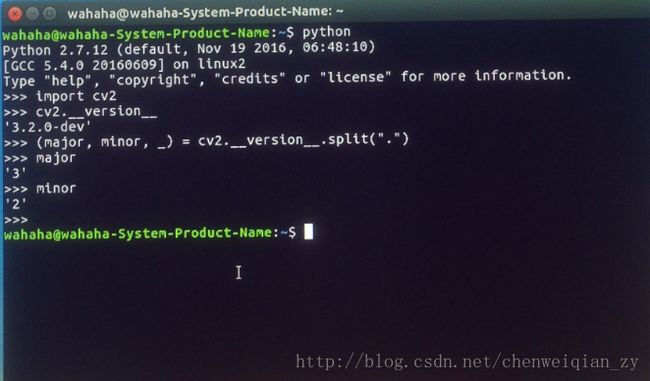
$ python进入python
在python中输入以下语句
>>> import cv2
>>> cv2.__version__
>>> (major, minor, _) = cv2.__version__.split(".")
>>> major
>>> minor
若出现类似下图的显示,则表示成功
至此,opencv安装完毕。
安装tensorflow1.0rc2
本人选择的是源码安装。官方文档链接
1:Pip installation
$ sudo apt-get install python-pip python-dev2:Clone the TensorFlow repository
$ git clone https://github.com/tensorflow/tensorflow3:Install Bazel
本人选择的是 Install with Installer安装方式。
官方教程链接3.1:Install JDK 8
$ sudo add-apt-repository ppa:webupd8team/java
$ sudo apt-get update
$ sudo apt-get install oracle-java8-installer
3.2:Install other required packages
$ sudo apt-get install pkg-config zip g++ zlib1g-dev unzip3.3:Download Bazel
Download the Bazel installer for your operating system.
本人下载的是Release 0.4.4。3.4:Run the installer
切换到bazel安装文件的路径,Run the installer:$ chmod +x bazel-version-installer-os.sh $ ./bazel-version-installer-os.sh --user例如本人下载的是Release 0.4.4版本:
$ chmod +x bazel-0.4.4-installer-linux-x86_64.sh
$ ./bazel-0.4.4-installer-linux-x86_64.sh --user
执行第二条之后,会显示如下界面:
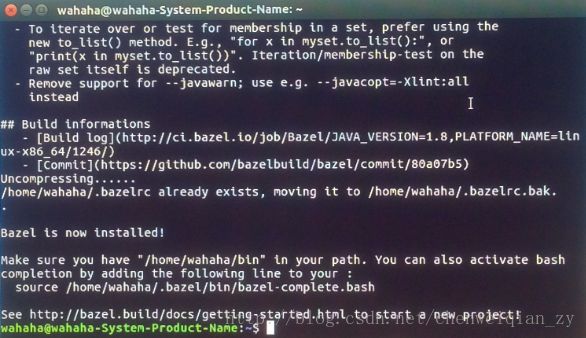
- 3.5:Set up your environment
将以下两条命令加入到你的 ~/.bashrc 文件中
在3.4图片显示中看到的
source /home/wahaha/.bazel/bin/bazel-complete.bash
和
$ export PATH="$PATH:$HOME/bin"
例如本人加入的是:
source /home/wahaha/.bazel/bin/bazel-complete.bash $ export PATH="$PATH:$/home/wahaha/bin"- 3.6:Install other dependencies
$ sudo apt-get install python-numpy python-dev python-wheel python-mock- 4:Install dependencies
防止在后面configure the installation过程中出现error(因为之前没看具体哪一个缺失),所以将以下的依赖都装上。
sudo apt-get install libprotobuf-dev libleveldb-dev libsnappy-dev libopencv-dev libhdf5-serial-dev protobuf-compiler

sudo apt-get install --no-install-recommends libboost-all-dev

sudo apt-get install libopenblas-dev liblapack-dev libatlas-base-dev

sudo apt-get install libgflags-dev libgoogle-glog-dev liblmdb-dev

sudo apt-get install build-essential

sudo apt-get install cmake git libgtk2.0-dev pkg-config libavcodec-dev libavformat-dev libswscale-dev

sudo apt-get install python-dev python-numpy libtbb2 libtbb-dev libjpeg-dev libpng-dev libtiff-dev libjasper-dev libdc1394-22-dev

sudo apt-get install --assume-yes libopencv-dev libdc1394-22 libdc1394-22-dev libjpeg-dev libpng12-dev libtiff5-dev libjasper-dev libavcodec-dev libavformat-dev libswscale-dev libxine2-dev libgstreamer0.10-dev libgstreamer-plugins-base0.10-dev libv4l-dev libtbb-dev libqt4-dev libfaac-dev libmp3lame-dev libopencore-amrnb-dev libopencore-amrwb-dev libtheora-dev libvorbis-dev libxvidcore-dev x264 v4l-utils unzip

sudo apt-get install ffmpeg libopencv-dev libgtk-3-dev python-numpy python3-numpy libdc1394-22 libdc1394-22-dev libjpeg-dev libpng12-dev libtiff5-dev libjasper-dev libavcodec-dev libavformat-dev libswscale-dev libxine2-dev libgstreamer1.0-dev libgstreamer-plugins-base1.0-dev libv4l-dev libtbb-dev qtbase5-dev libfaac-dev libmp3lame-dev libopencore-amrnb-dev

sudo apt-get install swig
5:Configure the installation
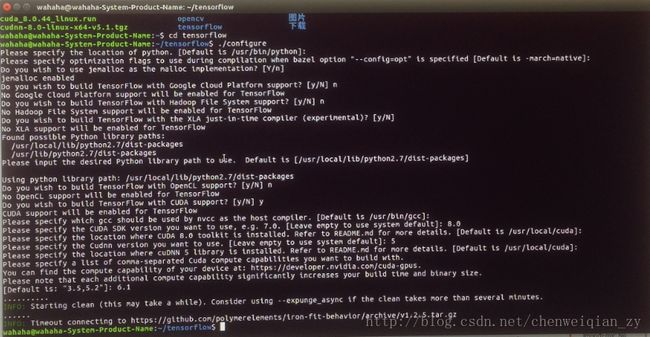
切换到第一步下载的tensorflow目录下终端运行:
$ ./configure随后会出现一步步的安装选项,下图为本人的配置。
但是这个配置最后因为一点问题,有些没连接上,一直是timeout。直到后面才发现这个问题。有待解决!!
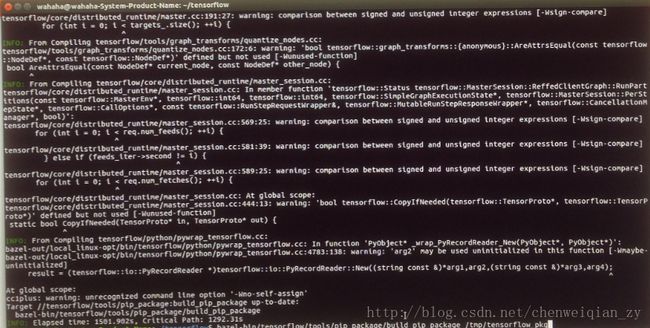
- 6:Create the pip package and install
第一步:
# To build with support for CUDA:
$ bazel build -c opt --config=cuda //tensorflow/tools/pip_package:build_pip_package
运行之后,可出现类似下图的显示
第二步:
$ bazel-bin/tensorflow/tools/pip_package/build_pip_package /tmp/tensorflow_pkg运行之后,可出现类似下图的显示

在tmp/tensorflow_pkg文件夹内出现如下类似文件

第三步:
安装第二步生成的whl文件。
# The name of the .whl file will depend on your platform.
$ sudo pip install /tmp/tensorflow_pkg/tensorflow-1.0.0rc2-py2-none-any.whl
例如,本人运行的是:
$ sudo pip install /tmp/tensorflow_pkg/tensorflow-1.0.0rc2-cp27-cp27mu-linux_x86_64.whl安装成功最后会显示:successfully installed tensorflow-1.0.0cr2
- 7:验证tensorflow是否安装成功
终端输入:
$ python进入python
在python中输入以下语句
>>> import tensorflow 若没有出现错误,而是显示>>>,则表示成功。可以自己跑简单例子试一下。
至此 ,tensorflow1.0安装成功。
安装配置seann999/ssd_tensorflow
github上的源码地址
1:下载源码
从github上下载zip文件ssd_tensorflow-master.zip至documents文件夹内,并解压生成ssd_tensorflow-master。2:关于vgg16.npy的操作
从MEGA上下载vgg16.npy,并将其移动到ssd_tensorflow-master/vgg文件夹内。3:下载coco tools 并安装
从https://github.com/pdollar/coco上下载coco-master.zip至documents文件夹内,并解压生成coco-master。安装coco tools
先要安装cython依赖
sudo apt-get install cython之后,run “make” under coco/PythonAPI
但是直接运行make可能会安装不成功,可以采用以下句子:python setup.py build_ext install rm -rf build
4:下载coco数据集到documents文件夹内
5:安装依赖
pip install matplotlib
sudo apt-get install python-tk
sudo pip install scikit-image
6:修改源码上的一些代码
由于tensorflow版本更新的问题,导致有些语句消失或者改变。
这里列出需要修改的地方,共有6处。1:ssd_tensorflow-master/vgg/ssd_base.py (第35行附近)
red, green, blue = tf.split(3, 3, rgb_scaled)
改为:
red, green, blue = tf.split(rgb_scaled, 3, 3)2:ssd_tensorflow-master/vgg/ssd_base.py (第40行附近)
bgr = tf.concat(3, [
blue - VGG_MEAN[0],
green - VGG_MEAN[1],
red - VGG_MEAN[2],
])
改为:
bgr = tf.concat( [
blue - VGG_MEAN[0],
green - VGG_MEAN[1],
red - VGG_MEAN[2],
], 3)3:ssd_tensorflow-master/model.py (第56行附近)
formatted_outs = tf.concat(1, outfs) # all (~20000 for MS COCO settings) boxes are now lined up for each image
改为:
formatted_outs = tf.concat(outfs, 1) # all (~20000 for MS COCO settings) boxes are now lined up for each image4:ssd_tensorflow-master/model.py(第82行附近)
class_loss = tf.nn.sparse_softmax_cross_entropy_with_logits(pred_labels, true_labels) * posandnegs
改为:
class_loss = tf.nn.sparse_softmax_cross_entropy_with_logits(labels=true_labels, logits=pred_labels) * posandnegs5:ssd_tensorflow-master/model.py(第69行附近)
re = tf.select(condition, l2, l1)
改为:
re = tf.where(condition, l2, l1)6:trainer.py(第247行附近)
summary_writer = tf.train.SummaryWriter(FLAGS.model_dir)
改为:
summary_writer = tf.summary.FileWriter(FLAGS.model_dir)
7:修改coco_loader.py里的数据路径
将其修改成自己存放数据的路径。8:终端进入ssd_tensorflow-master文件内,执行
python trainer.py若出现3个窗口,matches,matches2,outputs,且在运行,就成功了!