10.玩转Spring Boot 集成Mybatis
玩转Spring Boot 集成Mybatis
Spring Boot 提供了JDBC与JPA的支持,由于本人比较喜欢用Mybatis,所以基本上都是用的Mybatis其余的都很少用,也算是对Mybatis的偏爱吧,下面说说Spring Boot怎么跟Mybatis集成开发。
首先创建工程
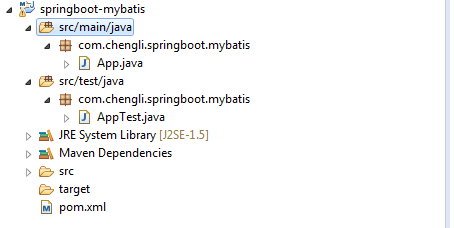
创建工程名称为:springboot-mybatis,创建完后如下图:
1.使用mybatis-spring集成
(1)在pom.xml中添加Spring Boot、Mybatis以及mysql驱动包的依赖,添加后代码如下:
	4.0.0
	com.chengli
	springboot-mybatis
	0.0.1-SNAPSHOT
	jar
	springboot-mybatis
	http://maven.apache.org

		org.springframework.boot
		spring-boot-starter-parent
		1.4.2.RELEASE


		UTF-8
		1.8


			org.springframework.boot
			spring-boot-starter-web


			org.springframework.boot
			spring-boot-starter-jdbc


			org.mybatis
			mybatis
			3.4.1


			org.mybatis
			mybatis-spring
			1.3.0


			mysql
			mysql-connector-java
(2)新建application.properties文件,在文件加入以下内容:
spring.datasource.driver-class-name=com.mysql.jdbc.Driver
spring.datasource.url=jdbc:mysql://localhost:3306/springboot?useUnicode=true&characterEncoding=utf8
spring.datasource.username=root
spring.datasource.password=root
(3)新建Mybatis的config类,代码如下:
package com.chengli.springboot.mybatis.config;

import javax.sql.DataSource;

import org.apache.ibatis.annotations.Mapper;
import org.apache.ibatis.session.SqlSessionFactory;
import org.mybatis.spring.SqlSessionFactoryBean;
import org.mybatis.spring.annotation.MapperScan;
import org.springframework.context.annotation.Bean;
import org.springframework.context.annotation.Configuration;
import org.springframework.core.io.support.PathMatchingResourcePatternResolver;
import org.springframework.jdbc.datasource.DataSourceTransactionManager;
import org.springframework.transaction.PlatformTransactionManager;
import org.springframework.transaction.annotation.EnableTransactionManagement;

@Configuration
@MapperScan(basePackages = { "com.chengli.springboot.mybatis" },annotationClass=Mapper.class)
@EnableTransactionManagement
public class MybatisConfig {
	@Bean
	public SqlSessionFactory sqlSessionFactory(DataSource dataSource) throws Exception {
		SqlSessionFactoryBean sqlSessionFactoryBean = new SqlSessionFactoryBean();
		sqlSessionFactoryBean.setDataSource(dataSource);
		sqlSessionFactoryBean.setMapperLocations(new PathMatchingResourcePatternResolver().getResources("classpath:mapper/*.xml"));

		return sqlSessionFactoryBean.getObject();
	}

	@Bean
	public PlatformTransactionManager transactionManager(DataSource dataSource) {
		return new DataSourceTransactionManager(dataSource);
	}

}
注意:@Configuration注解声明该类为一个配置类,@MapperScan注解用于扫描Mapper,类似Spring的@ComponentScan,这里我指定了扫描的根包,annotationClass指定使用@Mapper的注解类。setMapperLocations设置了XML路径,如果全部基于注解的话这里可以不用配置,我比较喜好将SQL放到XML中管理, 所以这里使用了XML。@EnableTransactionManagement注解开启注解事务,使用transactionManager创建了事务管理器,事务在这里不做叙述,在后面的博文中专门来讲事务。
(4)新建用户Mapper类,代码如下:
package com.chengli.springboot.mybatis.dao;

import org.apache.ibatis.annotations.Mapper;

import com.chengli.springboot.mybatis.pojo.User;

@Mapper
public interface UserMapper {
	User selectById(Long id);

	int deleteById(Long id);
}
(5)新建用户实体,代码如下:
package com.chengli.springboot.mybatis.pojo;

public class User {
	private Long id;
	private String name;
	private String sex;
	private Integer age;

	public Long getId() {
		return id;
	}

	public void setId(Long id) {
		this.id = id;
	}

	public String getName() {
		return name;
	}

	public void setName(String name) {
		this.name = name;
	}

	public String getSex() {
		return sex;
	}

	public void setSex(String sex) {
		this.sex = sex;
	}

	public Integer getAge() {
		return age;
	}

	public void setAge(Integer age) {
		this.age = age;
	}

}
delete from user where id = #{id,jdbcType=BIGINT}
package com.chengli.springboot.mybatis.service;

import com.chengli.springboot.mybatis.pojo.User;

public interface UserService {
	User selectById(Long id);

	void deleteById(Long id);
}


package com.chengli.springboot.mybatis.service.impl;

import org.springframework.beans.factory.annotation.Autowired;
import org.springframework.stereotype.Service;
import org.springframework.transaction.annotation.Transactional;

import com.chengli.springboot.mybatis.dao.UserMapper;
import com.chengli.springboot.mybatis.pojo.User;
import com.chengli.springboot.mybatis.service.UserService;

@Service
public class UserServiceImpl implements UserService {
	@Autowired
	private UserMapper userMapper;

	@Override
	public User selectById(Long id) {
		return userMapper.selectById(id);
	}

	@Override
	@Transactional
	public void deleteById(Long id) {
		userMapper.deleteById(id);
	}

}
(8)在来一个启动入口类
package com.chengli.springboot.mybatis;

import org.springframework.beans.factory.annotation.Autowired;
import org.springframework.boot.SpringApplication;
import org.springframework.boot.autoconfigure.SpringBootApplication;
import org.springframework.web.bind.annotation.PathVariable;
import org.springframework.web.bind.annotation.RequestMapping;
import org.springframework.web.bind.annotation.RestController;

import com.chengli.springboot.mybatis.service.UserService
import com.chengli.springboot.mybatis.pojo.User;

@SpringBootApplication
@RestController
public class MainConfig {
	@Autowired
	private UserService userService;

	public static void main(String[] args) {
		SpringApplication.run(MainConfig.class, args);
	}

	@RequestMapping("/get/user/{id}")
	public User getUserById(@PathVariable Long id) {
		return userService.selectById(id);
	}
}
(8)到这里就大功告成了,启动在浏览器上输入显示如下:
2.使用mybatis-spring-boot-starter集成
使用mybatis-spring-boot-starter集成Mybatis比较简单,目前依赖的Spring Boot 1.3.3版本,使用mybatis-spring-boot-starter集成配置不灵活,不建议使用,这里就不在叙述了。
3.Mybatis添加插件
有时候需要往Mybatis里面添加插件,例如分页啊,在上面的代码中,我们在创建SqlSessionFactoryBean的时候,就可以添加插件了,具体代码如下:
@Bean
	public SqlSessionFactory sqlSessionFactory(DataSource dataSource) throws Exception {
		SqlSessionFactoryBean sqlSessionFactoryBean = new SqlSessionFactoryBean();
		sqlSessionFactoryBean.setDataSource(dataSource);
		sqlSessionFactoryBean.setMapperLocations(new PathMatchingResourcePatternResolver().getResources("classpath:mapper/*.xml"));

		//添加Mybatis插件,例如分页,在之类创建你插件添加进去即可,这里我就不做叙述了。
		//sqlSessionFactoryBean.setPlugins(new Interceptor[]{你的插件});

		return sqlSessionFactoryBean.getObject();
	}
完整的示例代码放在QQ交流群中 springboot-mybatis.zip
有兴趣的朋友可以加群探讨相互学习:
Spring Boot QQ交流群:599546061

