Nginx网络架构实战学习笔记(一):Nginx简介、安装、信号控制、nginx虚拟主机配置、日志管理、location 语法、Rewrite语法详解
文章目录
- nginx简介
- nginx安装
- nginx信号控制
- nginx虚拟主机配置
- 日志管理
- location 语法
- 精准匹配的一般匹配
- 正则匹配
- 总结
- Rewrite语法详解
nginx简介
Nginx (“engine x”) 是一个高性能的 HTTP 和 反向代理 服务器,也是一个 IMAP/POP3/SMTP 代理服务器。 Nginx 是由 Igor Sysoev 为俄罗斯访问量第二的 Rambler.ru 站点开发的
国内用户:自学it网,新浪,赶集,酷6 …
nginx安装
下载地址: http://nginx.org/download/nginx-1.4.2.tar.gz
安装准备: nginx依赖于pcre库,要先安装pcre
yum install pcre pcre-devel
cd /usr/local/src/
wget http://nginx.org/download/nginx-1.4.2.tar.gz
tar zxvf nginx-1.4.2.tar.gz
cd nginx-1.4.2
./configure --prefix=/usr/local/nginx
make && make install
启动:
cd /ulsr/local/nginx, 看到如下4个目录
./
…conf 配置文件
… html 网页文件
…logs 日志文件
…sbin 主要二进制程序
[root@localhost nginx]# ./sbin/nginx
nginx: [emerg] bind() to 0.0.0.0:80 failed (98: Address already in use)
…
nginx: [emerg] bind() to 0.0.0.0:80 failed (98: Address already in use)
nginx: [emerg] still could not bind()
不能绑定80端口,80端口已经被占用
(有时是自己装了apache,nginx等,还有更多情况是操作系统自带了apache并作为服务启动)
解决: 把占用80端口的软件或服务关闭即可.
nginx信号控制
| TERM, INT | Quick shutdown |
|---|---|
| QUIT | Graceful shutdown 优雅的关闭进程,即等请求结束后再关闭 |
| HUP | Configuration reload ,Start the new worker processes with |
| a new configuration Gracefully shutdown the old worker processes | a new configuration Gracefully shutdown the old worker processes |
| 改变配置文件,平滑的重读配置文件 | 改变配置文件,平滑的重读配置文件 |
| USR1 | Reopen the log files 重读日志,在日志按月/日分割时有用 |
| USR2 | Upgrade Executable on the fly 平滑的升级 |
| WINCH | Gracefully shutdown the worker processes 优雅关闭旧的进程(配合USR2来进行升级) |
具体语法:
Kill -信号选项 nginx的主进程号
Kill -HUP 4873
Kill -信号控制 cat /xxx/path/log/nginx.pid
Kil; -USR1 cat /xxx/path/log/nginx.pid
解释:
- kill -QUIT xxx
- kill -HUP xxx同在不关闭nginx的情况下重新读取配置文件
比如location 是 a.html 修改为 b.html,通过 kill -HUP xxx,可以再不关闭nginx的情况下,直接切换页面,但是中间需要几秒钟才会自动切换。
因为nginx是一个master下面有好几个worker(如果关闭master进程id,worker也会自动关闭),相当于,开启一个基于后来的配置文件的worker,慢慢的关闭关闭了原来基于原来的配置文件的worker,一个好处就是不需要关闭原来的进程。 - kill -USR1 xxx 修改日志输出的文件
在linux中文件真正是存储在idnode中的,不是以真正的文件名来存储的,所以即使修改了文件名字,还是会不断的往里面写日志,这个时候,就算将原来的aceess.log文件名字修改还是回写,再新建一个aceess.log也不会往新的里面写数据,可以通过kill -USER1 xxx的方式,将会写到新的日志文件中。 - kill -USR2 xxx
- kill -WINCH xxx
两个配合使用,平滑的升级,升级nginx直接将新的“nginx”二进制脚本复制到sbin目录中,通过kill -USER2可以新的新的版本进程控制旧的,kill -WINCH,旧的执行完了自动关闭。 - Kill -USR1
cat /xxx/path/log/nginx.pid
nginx的pid在/xxx/path/log/nginx.pid,通过类似上面的命令可以省去查找pid的过程。
kill -HUP --------------./sbin/nginx -s reload (重读配置文件,软重启)
kill -USR1 --------------./sbin/nginx -s reopen
kill -QUIT --------------./sbin/nginx -s quit
直接关闭 --------------./sbin/nginx -s stop
./sbin/nginx -t 查看配置文件配置是否正确
nginx虚拟主机配置
Nginx配置段

// 全局区
worker_processes 1; // 有1个工作的子进程,可以自行修改,但太大无益,因为要争夺CPU,一般设置为 CPU数*核数

Event {
// 一般是配置nginx连接的特性
// 如1个word能同时允许多少连接
 worker_connections  1024; // 这是指 一个子进程最大允许连1024个连接
}

http {  //这是配置http服务器的主要段
     Server1 { // 这是虚拟主机段

            Location {  //定位,把特殊的路径或文件再次定位 ,如image目录单独处理
            }             /// 如.php单独处理

     }

     Server2 {
     }
}
例子1: 基于域名的虚拟主机
    server {
        listen 80;  #监听端口
        server_name a.com; #监听域名
// 可以监听ip,也可以监听域名
//https://blog.csdn.net/cheng_kohui/article/details/82930464
//总的来说作用就是根据不同的域名来唯一规定一个服务,配置不同的域名(域名指向相同的hosts,即本虚
//拟主机)达到不需要设置端口的目的(端口默认80)
//如果设置为具体的ip的话,ip就是本虚拟主机的ip,配置不同的服务需要修改端口。通过网上查阅资料,
//设置ip是没有意义的不如直接写成_ 或者localhost
        location / {
                root /var/www/a.com;
//根目录定位(相对路径是在nginx的根目录,也可以是绝对路径)
                index index.html;
//基于上面的目录的文件
        }
    }
例子2: 基于端口的虚拟主机配置
    server {
        listen 8080;
        server_name 192.168.1.204;

        location / {
                root /var/www/html8080;
                index index.html;
        }
    }
日志管理
我们观察nginx的server段,可以看到如下类似信息
#access_log logs/host.access.log main;
这说明 该server, 它的访问日志的文件是 logs/host.access.log ,
使用的格式”main”格式.
除了main格式,你可以自定义其他格式.
main格式是什么?
log_format main '$remote_addr - r e m o t e u s e r [ remote_user [ remoteuser[time_local] “KaTeX parse error: Expected 'EOF', got '#' at position 16: request" ' #̲ …status b o d y b y t e s s e n t " body_bytes_sent " bodybytessent"http_referer” ’
# ‘“ h t t p u s e r a g e n t " " http_user_agent" " httpuseragent""http_x_forwarded_for”’;
main格式是我们定义好一种日志的格式,并起个名字,便于引用.
以上面的例子, main类型的日志,记录的 remote_addr… http_x_forwarded_for等选项.
1: 日志格式 是指记录哪些选项
默认的日志格式: main
log_format main '$remote_addr - r e m o t e u s e r [ remote_user [ remoteuser[time_local] “KaTeX parse error: Double superscript at position 40: … '̲status b o d y b y t e s s e n t " body_bytes_sent " bodybytessent"http_referer” ’
‘“ h t t p u s e r a g e n t " " http_user_agent" " httpuseragent""http_x_forwarded_for”’;
如默认的main日志格式,记录这么几项
远程IP- 远程用户/用户时间 请求方法(如GET/POST) 请求体body长度
referer来源信息windows电脑等信息
http-user-agent用户代理/蜘蛛 ,被转发的请求的原始IP
比如输入https://www.baidu.com/robots.txt 能够看到详细蜘蛛信息,Disallow: /baidu是不允许被谁爬取
http_x_forwarded_for:在经过代理时,代理把你的本来IP加在此头信息中,传输你的原始IP
2: 声明一个独特的log_format并命名
log_format  mylog '$remote_addr- "$request" '
                 '$status $body_bytes_sent "$http_referer" '
                    '"$http_user_agent" "$http_x_forwarded_for"';
在下面的server/location,我们就可以引用 mylog
在server段中,这样来声明
//Nginx允许针对不同的server做不同的Log ,(有的web服务器不支持,如lighttp)

//在location的下一行,跟locatin是同级的关系,添加如下一行
access_log logs/access_8080.log mylog;
声明log   log位置          log格式;
将上方的log_format main “xxxxxxx” 打开,否则会报错。
然后执行./sbin/nginx -s reload
在logs下面的目录下就会出现对应的日志了
实际应用: shell+定时任务+nginx信号管理,完成日志按日期存储
分析思路:
凌晨00:00:01,把昨天的日志重命名,放在相应的目录下
再USR1信息号控制nginx重新生成新的日志文件
//查看昨天的时间
date -d yesterday
//设置当前的时间
date -s '2018-09-20 19:00:38'
//使时间生效
clock -w
//输出时间
date -d yesterday +%Y%m%d
//执行了上一行命令,命令行会显示,如果是%y显示的是190920
20190920
//穿件data目录专门用来放日志
mkdir /data
cd /data
vim runlog.sh
runlog.sh
#!/bin/bash
base_path='/usr/local/nginx/logs'
log_path=$(date -d yesterday +"%Y%m")
day=$(date -d yesterday +"%d")
//按照当前的月份创建目录
mkdir -p $base_path/$log_path
//将原来的文件名字,修改为以昨天的时间命名的日志名字
mv $base_path/access.log $base_path/$log_path/access_$day.log
#echo $base_path/$log_path/access_$day.log
//通过-USRE1修改日志输出文件
kill -USR1 `cat /usr/local/nginx/logs/nginx.pid`
cd /data
crontab -e
//输入如下,意思是每一分钟执行一次
*/1**** sh /data/runlog.sh
定时任务
Crontab 编辑定时任务
01 00 * * * /xxx/path/b.sh 每天0时1分(建议在02-04点之间,系统负载小)
location 语法
location 语法
location 有”定位”的意思, 根据Uri来进行不同的定位.
在虚拟主机的配置中,是必不可少的,location可以把网站的不同部分,定位到不同的处理方式上.
比如, 碰到.php, 如何调用PHP解释器? --这时就需要location
location 的语法
location [=||*|^~] patt {
}
中括号可以不写任何参数,此时称为一般匹配
也可以写参数
因此,大类型可以分为3种
location = patt {} [精准匹配]
location patt{} [一般匹配]
location ~ patt{} [正则匹配]
精准匹配的一般匹配
如何发挥作用?:
首先看有没有精准匹配,如果有,则停止匹配过程.
location = patt {
    config A
}
如果 $uri == patt,匹配成功,使用configA
举个:
   location = / {
              root   /var/www/html/;
             index  index.htm index.html;
        }

  location / {
             root   /usr/local/nginx/html;
            index  index.html index.htm;
  }
如果访问 http://xxx.com/
结果返回的是第二个location的index.htm,为什么?
定位流程是
默认访问http://xxx.com/相当于
因为精准匹配是= / 这个只是一个目录不知道具体的访问路径是什么所以根据第一个精准匹配匹配到了/index.htm,这个时候通过/index.htm再次匹配,经过第二个匹配得到了/usr/local/nginx/html/index.htm
1: 精准匹配中 ”/” ,得到index页为 index.htm
2: 再次访问 /index.htm , 此次内部转跳uri已经是”/index.htm” ,
根目录为/usr/local/nginx/html
3: 最终结果,访问了 /usr/local/nginx/html/index.htm
如果将上面的改为:
   location = /index.htm {
              root   /var/www/html/;
             index  index.htm index.html;
        }

  location /index.htm {
             root   /usr/local/nginx/html;
            index  index.html index.htm;
  }
地址栏访问:http://xxx.com/index.htm
就会去访问第一个匹配的index.htm
地址栏如果访问:http://xxx.com/
因为上面没有匹配的规则,就会自动定位到默认的/usr/local/nginx/html/index.html
再进行改造
   location = /index.htm {
              root   /var/www/html/;
             index  index.htm index.html;
        }

   location = / {
              root   /var/www/html/;
             index  index.htm index.html;
        }
  location /index.htm {
             root   /usr/local/nginx/html;
            index  index.html index.htm;
  }
地址栏访问:http://xxx.com/
先匹配到第二个location,然后匹配成为http://xxx.com/index.htm内部再转换为/index.htm,再次去成功匹配第一个location,最后返回的还是第一个location
注意如果上面的location不写root选项,因为找不到root就会默认匹配父类,即nginx服务器的root定位,最后也会定位到/usr/local/nginx/html/index.html
即
   location = /index.htm {
              root   /var/www/html/;
             index  index.htm index.html;
        }

   location = / {
             // root   /var/www/html/;
             index  index.htm index.html;
        }
  location /index.htm {
             root   /usr/local/nginx/html;
            index  index.html index.htm;
  }
访问http://xxx.com/
会一次匹配到/usr/local/nginx/html/index.html ,nginx默认服务器的地址。
再来:
   location = /index.htm {
              root   /var/www/html/;
             index  index.htm index.html;
        }

   location = / {
              root   /var/www/html/;
             index  index.html index.htm;
        }
  location /index.htm {
             root   /usr/local/nginx/html;
            index  index.html index.htm;
  }
如果把第二个精准匹配的location变成 index index.html index.htm;就会使得地址变成/index.html,第一个精准匹配匹配不到,所以匹配到了第三个location,所以显示的是第三个location的inex.html,从这里可以看出不精准的匹配,即第三个location, 只要/index.htm是我们访问地址的前几位就能匹配到。
正则匹配
再来看,正则也来参与.
location / {
root /usr/local/nginx/html;
index index.html index.htm;
}
location ~ image {
root /var/www;
index index.html;
}
如果我们访问 http://xx.com/image/logo.png
此时, “/” 与”/image/logo.png” 匹配
同时,”image”正则 与”image/logo.png”也能匹配,谁发挥作用?
正则表达式的成果将会使用.
其实是先匹配普通的匹配,匹配成功,之后再看正则,如果有正则的匹配匹配成功,就会覆盖前面的普通匹配。
图片真正会访问 /var/www/image/logo.png
location / {
             root   /usr/local/nginx/html;
             index  index.html index.htm;
         }

location /foo {
            root /var/www/html;
             index index.html;
}
我们访问 http://xxx.com/foo
对于uri “/foo”, 两个location的patt,都能匹配他们
即 ‘/’能从左前缀匹配 ‘/foo’, ‘/foo’也能左前缀匹配’/foo’,
此时, 真正访问 /var/www/html/index.html
原因:’/foo’匹配的更长,因此使用之.;
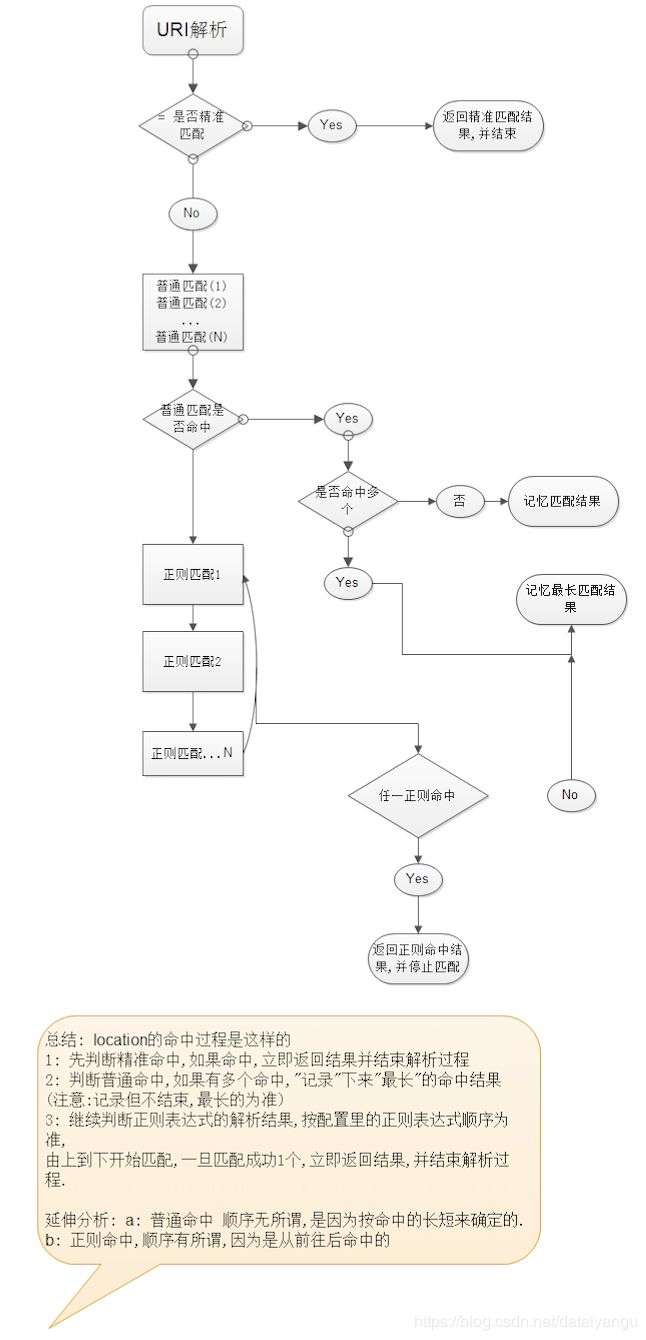
总结
Rewrite语法详解
rewrite 重写
重写中用到的指令:
if (条件) {} 设定条件,再进行重写
set #设置变量
return #返回状态码
break #跳出rewrite
rewrite #重写
If 语法格式:
If 空格 (条件) {
重写模式
}
条件又怎么写?
答:3种写法
1: “=”来判断相等, 用于字符串比较
2: “~” 用正则来匹配(此处的正则区分大小写)
~* 不区分大小写的正则
3: -f -d -e来判断是否为文件,为目录,是否存在.
例子:
//如果远端访问本机,就返回403
 if  ($remote_addr = 192.168.1.100) {
                return 403;
 }


//如果没有break,第一次重定向到了ie.html,第二次还是通过ie访问,就会无限循环下去,导致报错。
//这里是判断是否是ie
 if ($http_user_agent ~ MSIE) {
 //这里的正则,把所有的请求都重定向到ie.html页面
                rewrite ^.*$ /ie.htm;
                break; #(不break会循环重定向)
 }

//如果文件名不存在
 if (!-e $document_root$fastcgi_script_name) {
                rewrite ^.*$ /404.html break;
 }
//注, 此处还要加break,

//以 xx.com/dsafsd.html这个不存在页面为例,
//我们观察访问日志, 日志中显示的访问路径,依然是GET /dsafsd.html HTTP/1.1
//提示: 服务器内部的rewrite和302跳转不一样.
//跳转的话URL都变了,变成重新http请求404.html, 而内部rewrite, 上下文没变,
//就是说 fastcgi_script_name 仍然是 dsafsd.html,因此 会循环重定向.
set 是设置变量用的, 可以用来达到多条件判断时作标志用.
达到apache下的 rewrite_condition的效果
如下: 判断IE并重写,且不用break; 我们用set变量来达到目的
避免上面为了避免循环重定向需要break的另一种解决方法。
if ($http_user_agent ~* msie) {
                set $isie 1;
}

if ($fastcgi_script_name = ie.html) {
                set $isie 0;
}

if ($isie 1) {
                rewrite ^.*$ ie.html;
}
Rewrite语法
Rewrite 正则表达式 定向后的位置 模式
Goods-3.html ---->Goods.php?goods_id=3
goods-([\d]+).html —> goods.php?goods_id =$1
location /ecshop {
index index.php;
rewrite goods-([\d]+).html$ /ecshop/goods.php?id=KaTeX parse error: Undefined control sequence: \d at position 22: …rite article-([\̲d̲]+)\.html /ecshop/article.php?id=$1;
rewrite category-(\d+)-b(\d+).html /ecshop/category.php?id=$1&brand=$2;
rewrite category-(\d+)-b(\d+)-min(\d+)-max(\d+)-attr([\d.]+).html /ecshop/category.php?id=$1&brand=$2&price_min=$3&price_max=$4&filter_attr=$5;
rewrite category-(\d+)-b(\d+)-min(\d+)-max(\d+)-attr([\d+.])-(\d+)-([-]+)-([-]+).html /ecshop/category.php?id=$1&brand=$2&price_min=$3&price_max=$4&filter_attr=$5&page=$6&sort=$7&order=$8;
}
注意:用url重写时, 正则里如果有”{}”,正则要用双引号包起来