Elasticsearch5.6.1导入数据并通过Kibana5.6.1展示和查询数据案例学习(上篇)
本文主要是通过Elastic官网提供的三个数据集,导入到Elasticsearch5.6.1,并通过Kibana5.6.1展示数据和查询数据。
关于Elasticsearch5.6.1的环境搭建,请参考我另一篇博文。
ElasticSearch5.6.1环境搭建与运行
http://blog.csdn.net/deliciousion/article/details/78055724
有关ElasticSearch的可视化工具Kibana介绍与安装,请参阅我的另一篇博文。
Kibana5.6.1的环境塔建与运行
http://blog.csdn.net/deliciousion/article/details/78057459
下面三个地址可以分别获取到三个数据集:accounts.json、shakespeare.json、logs.jsonl(logs.jsonl.gz解压得到)
accounts.json
https://github.com/elastic/elasticsearch/blob/master/docs/src/test/resources/accounts.json
shakespeare.json
https://download.elastic.co/demos/kibana/gettingstarted/shakespeare.json
logs.jsonl
https://download.elastic.co/demos/kibana/gettingstarted/logs.jsonl.gz
这三个文件中的数据实际上都是JSON格式的数据,也是Elasticsearch完美支持的数据格式。
下面accounts.json里内容的冰山一角,这个就是标准是JSON格式数据。
{"index":{"_id":"1"}}
{"account_number":1,"balance":39225,"firstname":"Amber","lastname":"Duke","age":32,"gender":"M","address":"880 Holmes Lane","employer":"Pyrami","email":"[email protected]","city":"Brogan","state":"IL"}
{"index":{"_id":"6"}}
{"account_number":6,"balance":5686,"firstname":"Hattie","lastname":"Bond","age":36,"gender":"M","address":"671 Bristol Street","employer":"Netagy","email":"[email protected]","city":"Dante","state":"TN"}
{"index":{"_id":"13"}}
本文主要是从下面几个方面进行演示。
1.三个数据集的导入。
2.查看数据集。
1.三个数据集的导入。导入accounts.json
下面是accounts.json每条数据的数据结构
{
    "account_number": INT,
    "balance": INT,
    "firstname": "String",
    "lastname": "String",
    "age": INT,
    "gender": "M or F",
    "address": "String",
    "employer": "String",
    "email": "String",
    "city": "String",
    "state": "String"
}bank是索引名称,account是类型名,_bulk表示批量导入。
genfumihiros-MacBook-Air:data_set smallruan$ pwd
/Users/smallruan/ELK/data_set
genfumihiros-MacBook-Air:data_set smallruan$ ls
accounts.json		logs.jsonl		shakespeare.json
genfumihiros-MacBook-Air:data_set smallruan$ curl -X POST http://127.0.0.1:9200/bank/account/_bulk?pretty --data-binary @accounts.jsontook表示导入总共用的时间,单位是毫秒,所以本次导入共用时2214毫秒,相当于2秒左右。
errors表示是否有错误,false表示没有错误。
items里面的就是一条一条的数据导入信息。
对于每一条导入的数据都能清晰的看到具体导入的信息。
_index导入的索引。
_type导入的类型
_id导入的文档id
_version版本号,每更新一次,版本号加1
result表明数据操作的结果,这里的结果为created表示新建。
_shards数据的分片情况
created表明是否为新建数据,true表示这一条数据是新建的。
status整个操作的状态值,201表示正常。
{
  "took" : 2214,
  "errors" : false,
  "items" : [
    {
      "index" : {
        "_index" : "bank",
        "_type" : "account",
        "_id" : "1",
        "_version" : 1,
        "result" : "created",
        "_shards" : {
          "total" : 2,
          "successful" : 2,
          "failed" : 0
        },
        "created" : true,
        "status" : 201
      }
    },
    {
      "index" : {
        "_index" : "bank",
        "_type" : "account",
        "_id" : "6",
        "_version" : 1,
        "result" : "created",
        "_shards" : {
          "total" : 2,
          "successful" : 2,
          "failed" : 0
        },
        "created" : true,
        "status" : 201
      }
    },
    {
      "index" : {
        "_index" : "bank",
        "_type" : "account",
        "_id" : "13",
        "_version" : 1,
        "result" : "created",
        "_shards" : {
          "total" : 2,
          "successful" : 2,
          "failed" : 0
        },
        "created" : true,
        "status" : 201
      }
    },
    {
      "index" : {
        "_index" : "bank",
        "_type" : "account",
        "_id" : "18",
        "_version" : 1,
        "result" : "created",
        "_shards" : {
          "total" : 2,
          "successful" : 2,
          "failed" : 0
        },
        "created" : true,
        "status" : 201
      }
    },
    {
      "index" : {
        "_index" : "bank",
        "_type" : "account",
        "_id" : "20",
        "_version" : 1,
        "result" : "created",
        "_shards" : {
          "total" : 2,
          "successful" : 2,
          "failed" : 0
        },
        "created" : true,
        "status" : 201
      }
    },
 (....内容太多此处省略)
}
导入shakespeare.json
下面是shakespeare.json第条数据的数据结构
{
    "line_id": INT,
    "play_name": "String",
    "speech_number": INT,
    "line_number": "String",
    "speaker": "String",
    "text_entry": "String",
}curl
curl -XPUT 'http://127.0.0.1:9200/shakespeare?pretty' -H 'Content-Type: application/json' -d'
{
 "mappings" : {
  "_default_" : {
   "properties" : {
    "speaker" : {"type": "keyword" },
    "play_name" : {"type": "keyword" },
    "line_id" : { "type" : "integer" },
    "speech_number" : { "type" : "integer" }
   }
  }
 }
}
'PUT /shakespeare
{
"mappings" : {
"_default_" : {
"properties" : {
"speaker" : {"type": "keyword" },
"play_name" : {"type": "keyword" },
"line_id" : { "type" : "integer" },
"speech_number" : { "type" : "integer" }
}
}
}
}genfumihiros-MacBook-Air:data_set smallruan$ pwd
/Users/smallruan/ELK/data_set
genfumihiros-MacBook-Air:data_set smallruan$ ls
accounts.json logs.jsonl shakespeare.json
genfumihiros-MacBook-Air:data_set smallruan$ curl -H 'Content-Type: application/x-ndjson' -XPOST 'http://127.0.0.1:9200/shakespeare/_bulk?pretty' --data-binary @shakespeare.json{
"took" : 26225,
"errors" : false,
"items" : [
{
"index" : {
"_index" : "shakespeare",
"_type" : "act",
"_id" : "0",
"_version" : 1,
"result" : "created",
"_shards" : {
"total" : 2,
"successful" : 2,
"failed" : 0
},
"created" : true,
"status" : 201
}
},
{
"index" : {
"_index" : "shakespeare",
"_type" : "scene",
"_id" : "1",
"_version" : 1,
"result" : "created",
"_shards" : {
"total" : 2,
"successful" : 2,
"failed" : 0
},
"created" : true,
"status" : 201
}
},
{
"index" : {
"_index" : "shakespeare",
"_type" : "line",
"_id" : "2",
"_version" : 1,
"result" : "created",
"_shards" : {
"total" : 2,
"successful" : 2,
"failed" : 0
},
"created" : true,
"status" : 201
}
},
(......此处省略十多万条数据)
{
"index" : {
"_index" : "shakespeare",
"_type" : "line",
"_id" : "111395",
"_version" : 1,
"result" : "created",
"_shards" : {
"total" : 2,
"successful" : 2,
"failed" : 0
},
"created" : true,
"status" : 201
}
}
]
}导入最后一个数据文件logs.jsonl。同样也是先建mapping映射,导入数据,因为该数据含有地图的坐标数据,我们需要用特定的数据格式进行存放。
logs.jsonl中的数据结构如下:
{
    "memory": INT,
    "geo.coordinates": "geo_point"
    "@timestamp": "date"
}curl
curl -XPUT 'http://127.0.0.1:9200/logstash-2015.05.18?pretty' -H 'Content-Type: application/json' -d'
{
  "mappings": {
    "log": {
      "properties": {
        "geo": {
          "properties": {
            "coordinates": {
              "type": "geo_point"
            }
          }
        }
      }
    }
  }
}
'
curl -XPUT 'http://127.0.0.1:9200/logstash-2015.05.19?pretty' -H 'Content-Type: application/json' -d'
{
"mappings": {
"log": {
"properties": {
"geo": {
"properties": {
"coordinates": {
"type": "geo_point"
}
}
}
}
}
}
}
'curl -XPUT 'http://127.0.0.1:9200/logstash-2015.05.20?pretty' -H 'Content-Type: application/json' -d'
{
"mappings": {
"log": {
"properties": {
"geo": {
"properties": {
"coordinates": {
"type": "geo_point"
}
}
}
}
}
}
}
'PUT /logstash-2015.05.18
{
"mappings": {
"log": {
"properties": {
"geo": {
"properties": {
"coordinates": {
"type": "geo_point"
}
}
}
}
}
}
}PUT /logstash-2015.05.19
{
"mappings": {
"log": {
"properties": {
"geo": {
"properties": {
"coordinates": {
"type": "geo_point"
}
}
}
}
}
}
}PUT /logstash-2015.05.20
{
"mappings": {
"log": {
"properties": {
"geo": {
"properties": {
"coordinates": {
"type": "geo_point"
}
}
}
}
}
}
}genfumihiros-MacBook-Air:data_set smallruan$ pwd
/Users/smallruan/ELK/data_set
genfumihiros-MacBook-Air:data_set smallruan$ ls
accounts.json logs.jsonl shakespeare.json
genfumihiros-MacBook-Air:data_set smallruan$ curl -H 'Content-Type: application/x-ndjson' -XPOST 'http://127.0.0.1:9200/_bulk?pretty' --data-binary @logs.jsonl{
"took" : 37730,
"errors" : false,
"items" : [
{
"index" : {
"_index" : "logstash-2015.05.18",
"_type" : "log",
"_id" : "AV7Lp_3zSxwd4khFwKvg",
"_version" : 1,
"result" : "created",
"_shards" : {
"total" : 2,
"successful" : 2,
"failed" : 0
},
"created" : true,
"status" : 201
}
},
{
"index" : {
"_index" : "logstash-2015.05.18",
"_type" : "log",
"_id" : "AV7Lp_3zSxwd4khFwKvh",
"_version" : 1,
"result" : "created",
"_shards" : {
"total" : 2,
"successful" : 2,
"failed" : 0
},
"created" : true,
"status" : 201
}
},
(后面省略)2.查看数据集
导入数据后,我们可以通过下面的URL简单的查看下刚才添加的索引以及导入数据的情况。
http://127.0.0.1:9200/_cat/indices?v
通过URL可以看到刚刚添加5个索引,通过上面的信息,我们知道。
account.json文件导入了1000条数据。
shakespeare.json文件导入了111396条数据。
log.jsonl文件分别导入3个索引,4000多条数据。
通过kibana查看数据
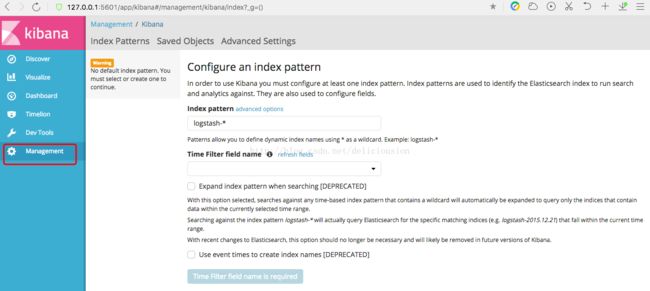
在kibana中查看数据要定义索引模式,具体操作如下。
通过5601端口进入kibana主页 http://127.0.0.1:5601,进入左侧菜单中的Management管理页
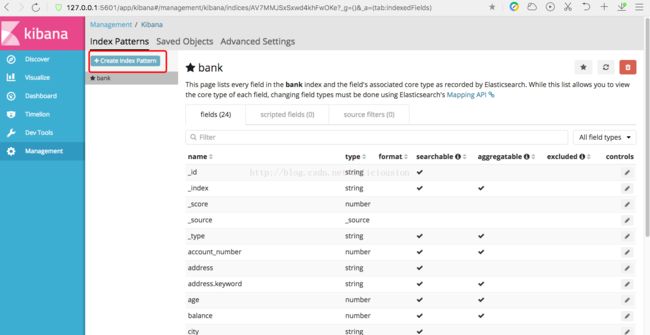
在Index pattern中输入bank,再点击Create创建索引模式。
创建索引后,会在Index Patterns列表中有刚刚添加的bank索引,然后右边会有bank的字段信息。包括字段名,字段类型等信息。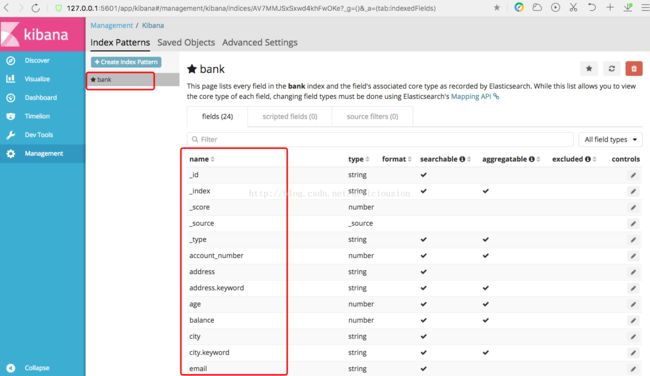
以同样的方式添加shakespeare索引。
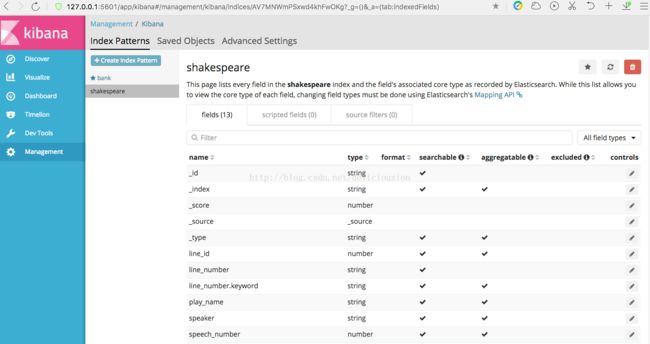
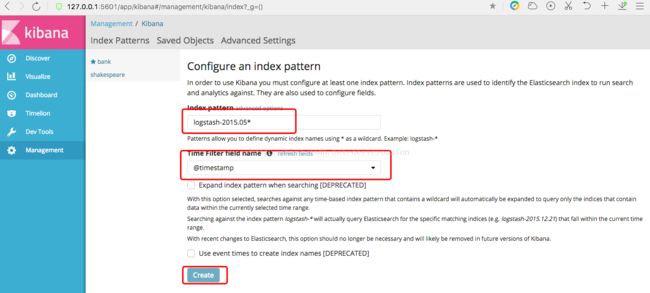
最后,以通配符的方式一次添加logstash-2015.05.18、logstash-2015.05.19、logstash-2015.05.20三个索引。
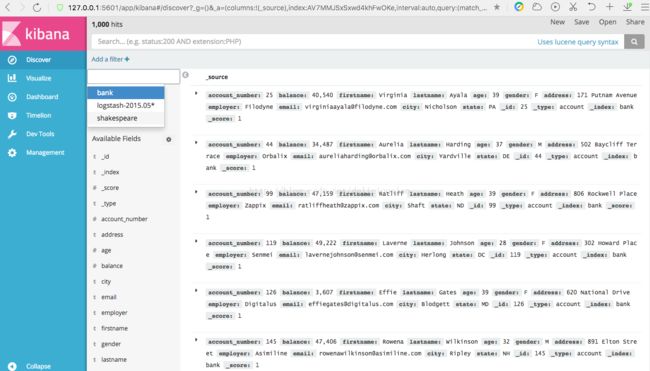
添加完之后,我们从左边菜单的Discover中查看数据,如下图所示,默认为显示第一个索引的数据,下面看到的是bank索引的数据,左上角可以看到数据的条数,1000hits,表示有1000条数据。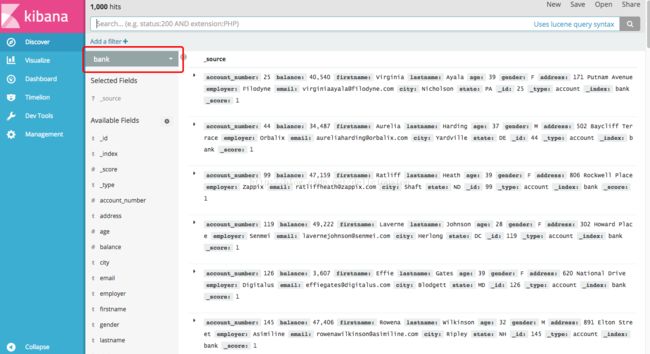
上图红框点开后,是个列表,可以查看其它索引的数据,比如下面是shakespeare索引的数据。
从左上角处可以看到shakespeare索引的文档数为111396。
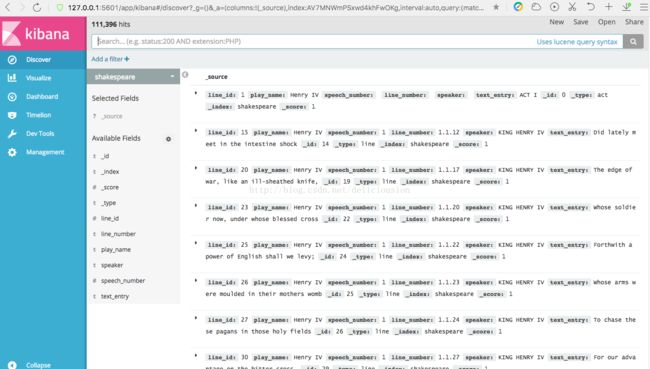
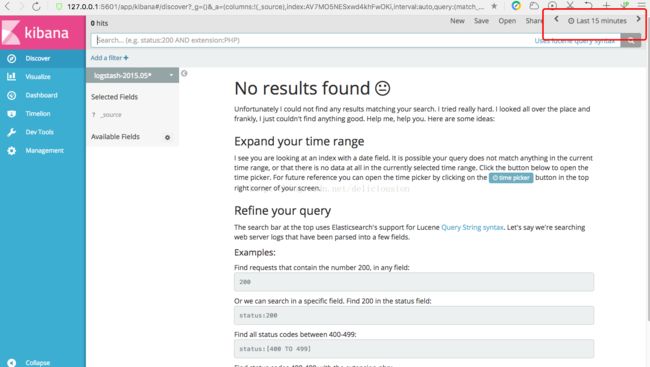
通过,索引列表,点击logstash-2015.05* 这个索引,我们会发现没有数据,再观察右上角,会发现有个last 15 minutes,原因是我们建立索引模式的时候,是以时间为基础建立的,这个与bank和shakespeare两个索引不一样,这个索引还选了一个时间戳作为参考,读者可自行回顾。
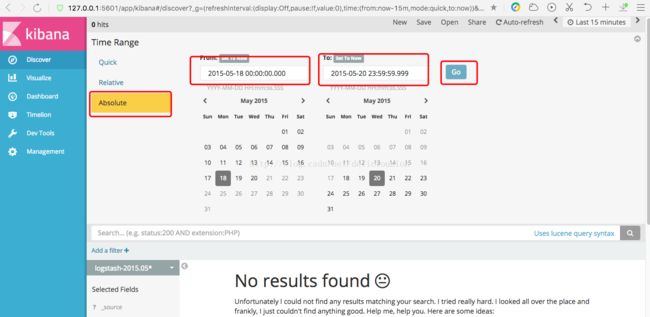
而我们添加的数据集是2015年5月18-20日的数据,查找15分钟内的数据,肯定没有结果,所以我们要调一下时间,把那个时间段的数据显示出来,具体操作如下。
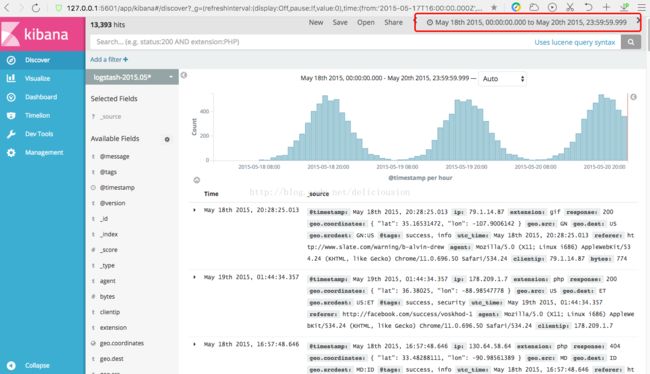
时间设置好,我们就可以看到2015年5月18日到20日的数据了,在实际应用场景中,我们经常会使用时间戳这种索引模式来查看日志信息。
3.数据的查询与筛选
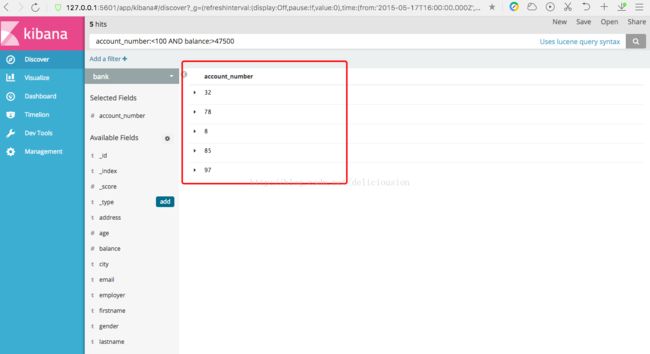
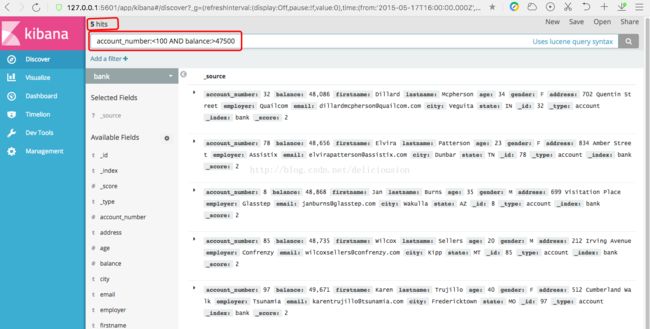
从新打开bank索引的数据Discover页面,找到顶部的搜索栏。在搜索栏中输入下面的搜索语句。然后点击右边的搜索按钮。
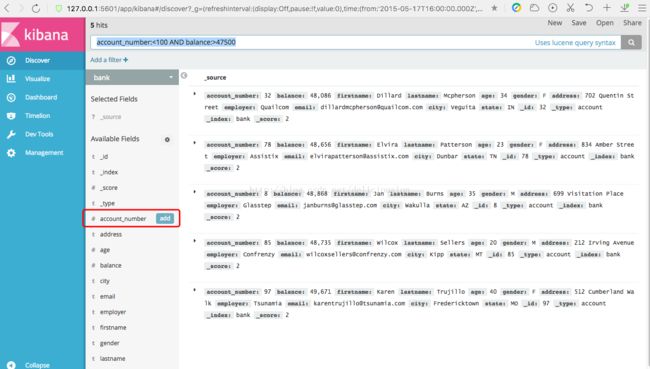
account_number:<100 AND balance:>47500bank索引的数据,对应的是一些银行帐户信息,比如帐号account_number,账户余额balance,姓firstname,名lastname,年龄age,城市city等信息。
上面的查询语句表示查询账号小于100而已账户余额大于47500的信息。
返回结果表示,有5个信息命中(5 hits)。
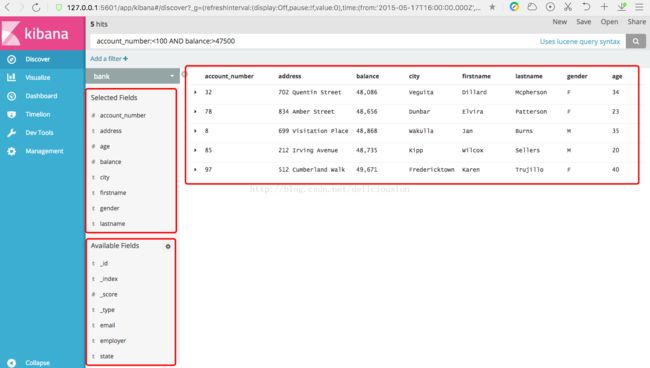
这些数据信息,我们并不是每个字段都需要查看的,这个时候我们可以对字段进行筛选,这个与数据库的select意思差不多。具体操作如下。
把鼠标指向Avaliable Fields可用字段中的任意一个字段,比如下面的account_number字段,该字段会显示一个add添加按钮,点击add按钮,即可筛选。
筛选后,右边就只会显示筛选的列。
同理,我们筛选多个列,比如下面的account_number、address、balance、city、firstname、lastname、gender、age。
在左边的列表,我们还可以看到左边的列表,Seleted Fields显示已经筛选的字段,Avaliabe Fields显示可筛选但未被筛选的字段。
本次演示,从数据导入到ES,到在kibana中显示、查询、并筛选数据,主要了解es与kibana结合可以做什么,后续还会有kibana可视化图的演示。也是根据这三个数据集。
本次演示比较复杂,过程很多,如果有什么疑问,请进行提出,大家一起探讨,也欢迎大家批评指正。
有什么想法的请留言,大家一起交流。
