SpringMVC之旅第1章:基于IDEA 构建Maven+SpringMVC+FreeMarker的Web工程
这篇文章不是解释为啥这么搭这个工程,仅仅是纪录了步骤,便于quickly start...
一、构建基于maven的web工程
首先我们需要构建一个基于maven的web工程~
Step1、File->New->Project->Maven

Step2、按照如图s1->s2->s3->s4 这四个步骤操作
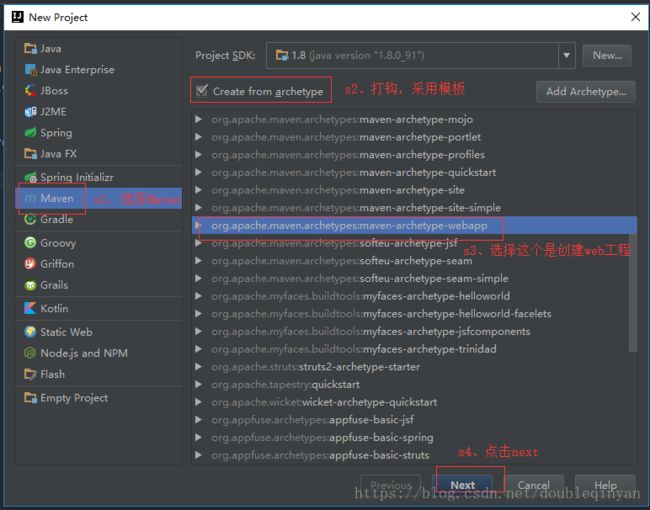
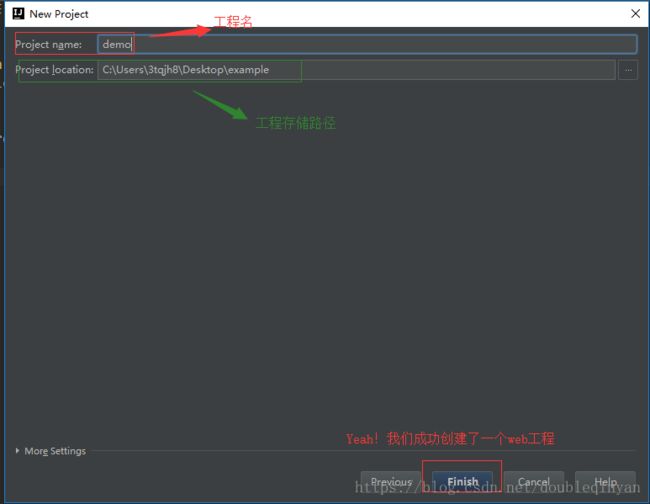
Step3、按要求填写,如有疑问可查看maven相关说明,然后继续next

Step4、按要求继续填写
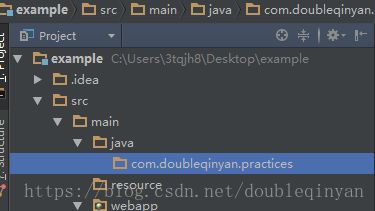
Step4、工程创建完成后我们来看看目录层级,会发现Oh,No! 怎么没有java、resource等等,没关系,这些在后续需要时都可以自己添加~

比如我创建了java路径和resource路径:
(1)java:主要用于放java文件
(2)resource:主要用于放配置文件
最后在创建package,这个package路径按照之前填写的GroupId进行创建
二、引入SpringMvc + FreeMarker
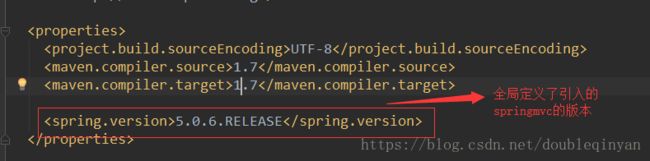
1、工程创建好后首先看pom.xml文件。如下截图中红框圈出来的部分或者直接摘出来的配置都是基于创建好pom.xml文件里增量部分。
(1)定义了版本号
(2)添加的依赖
  org.springframework
  spring-core
  ${spring.version}


  org.springframework
  spring-web
  ${spring.version}


  org.springframework
  spring-webmvc
  ${spring.version}


  org.springframework
  spring-context-support
  ${spring.version}


  org.springframework
  spring-tx
  ${spring.version}


  javax.servlet
  javax.servlet-api
  4.0.0


  org.freemarker
  freemarker
  2.3.22
2、然后再看WEB-INF/web.xml文件:整web.xml配置可替换成如下
xml version="1.0" encoding="UTF-8"?>
xmlns:xsi="http://www.w3.org/2001/XMLSchema-instance"
xmlns="http://java.sun.com/xml/ns/javaee"
xsi:schemaLocation="http://java.sun.com/xml/ns/javaee http://java.sun.com/xml/ns/javaee/web-app_3_0.xsd"
version="3.0">
---------- 我是愉悦的分割线 :重点说一下servlet------------------------
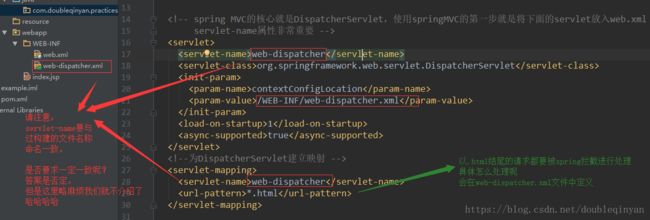
---------- 我是愉悦的分割线 ------------------------
3、web-dispatcher.xml文件:
详细配置见下问,可直接复制粘贴使用。
这里的配置包含两层:(1)定义了请求进来,要扫描哪些文件;(2)定义了freemarker的设置
xml version="1.0" encoding="UTF-8"?>
xmlns:xsi="http://www.w3.org/2001/XMLSchema-instance"
xmlns="http://www.springframework.org/schema/beans" xmlns:mvc="http://www.springframework.org/schema/mvc"
xmlns:context="http://www.springframework.org/schema/context"
xsi:schemaLocation="http://www.springframework.org/schema/beans
http://www.springframework.org/schema/beans/spring-beans.xsd http://www.springframework.org/schema/mvc http://www.springframework.org/schema/mvc/spring-mvc.xsd http://www.springframework.org/schema/context http://www.springframework.org/schema/context/spring-context.xsd">
<mvc:annotation-driven />
<context:component-scan base-package="com.doubleqinyan.practices" />
id="fmXmlEscape" class="freemarker.template.utility.XmlEscape"/>
id="freemarkerConfig"
class="org.springframework.web.servlet.view.freemarker.FreeMarkerConfigurer">
name="templateLoaderPath">
name="freemarkerVariables">
key="xml_escape" value-ref="fmXmlEscape"/>
name="freemarkerSettings">
key="template_update_delay">0
key="default_encoding">UTF-8
key="output_encoding">UTF-8
key="locale">zh_CN
key="date_format">yyyy-MM-dd
key="time_format">HH:mm:ss
key="datetime_format">yyyy-MM-dd HH:mm:ss
key="number_format">#
id="urlBasedViewResolver"
class="org.springframework.web.servlet.view.UrlBasedViewResolver">
name="viewClass"
value="org.springframework.web.servlet.view.freemarker.FreeMarkerView">
id="viewResolver"
class="org.springframework.web.servlet.view.freemarker.FreeMarkerViewResolver">
name="viewClass"
value="org.springframework.web.servlet.view.freemarker.FreeMarkerView"/>
name="prefix" value=""/>
name="suffix" value=""/>
name="order" value="1"/>
name="viewNames" value="*.ftl"/>
name="requestContextAttribute" value="rc"/>
name="contentType" value="text/html; charset=utf-8"/>
name="cache" value="true"/>
name="exposeSessionAttributes" value="true"/>
---------- 我是愉悦的分割线 :重点说一下freeMarker-----------------------
(1)

(2)

---------- 我是愉悦的分割线 ------------------------
如上,我们已经完成了引入SpringMVC+FreeMarker的所有配置,接下来我们写一个demo,让我们的工程运行起来。
三、Quickly start!
1、相应的文件
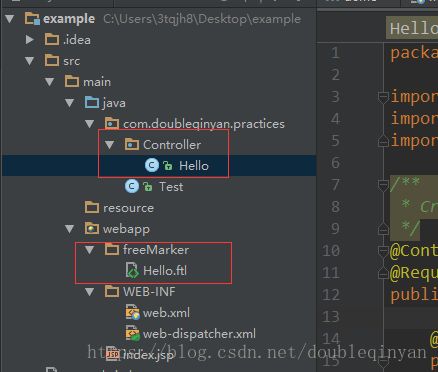
(1)后台相应代码:
@Controller
@RequestMapping("/test")
public class Hello {

    @RequestMapping(value = "hello")
    public String hello(ModelMap modelMap){
        String w1 = "Hello";
        String w2 = "World!";
        String w3 = "My 1st project.";
        String w4 = "Hahahahaha ^_^";
        modelMap.addAttribute("w1", w1);
        modelMap.addAttribute("w2", w2);
        modelMap.addAttribute("w3", w3);
        modelMap.addAttribute("w4", w4);
        return "Hello.ftl";
    }
}
(2)前端代码
html PUBLIC "-//W3C//DTD HTML 4.01Transitional//EN" "http://www.w3.org/TR/html4/loose.dtd">


    http-equiv="Content-Type"content="text/html; charset=UTF-8">
    </span>Insert title here<span style="color:#e8bf6a;">


${w1}  ${w2}
${w3}  ${w4}
2、启动
为啥这里是exmple呢?因为我把工程存在了一个example的文件夹里,如果默认不修改工程存储路径,那么应该是demo
