centos7 安装elk日志分析系统
架构图

Elasticsearch:搜索,提供分布式全文搜索引擎;
Logstash: 日志收集,管理,存储;
Kibana :日志的过滤web 展示;
Filebeat:监控日志文件、转发,其已取代 logstash forwarder;
一、准备工作
设置 yum源,采用官网提供的源
https://www.elastic.co/guide/en/elasticsearch/reference/current/rpm.html
下载并安装公共签名密钥:
rpm --import https://artifacts.elastic.co/GPG-KEY-elasticsearch
创建yum的repo文件
vim /etc/yum.repos.d/elasticsearch.repo内容如下
[elasticsearch-6.x]
name=Elasticsearch repository for 6.x packages
baseurl=https://artifacts.elastic.co/packages/6.x/yum
gpgcheck=1
gpgkey=https://artifacts.elastic.co/GPG-KEY-elasticsearch
enabled=1
autorefresh=1
type=rpm-md
二、elasticsearch安装
elasticsearch依赖Java开发环境支持,先安装JDK。
yum -y install java-1.8.0-openjdk安装Elasticsearch
yum -y install elasticsearch
systemctl start elasticsearch
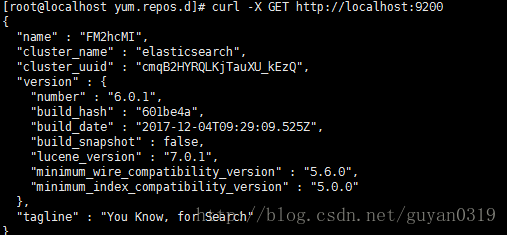
ElasticSearch默认的对外服务的HTTP端口是9200,节点间交互的TCP端口是9300。
ss -tlnp |grep -E '9200|9300'curl -X GET http://localhost:9200yum -y install logstash
systemctl start logstash四、安装Kibana
yum -y install kibana
systemctl start kibana
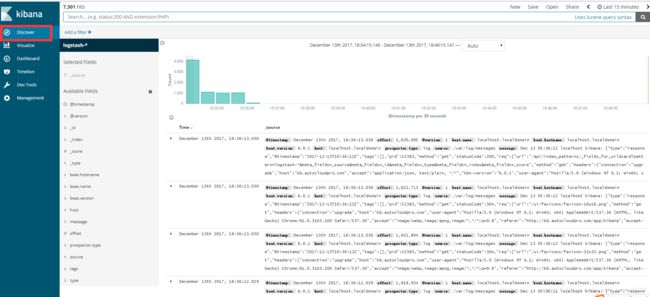
五、浏览器http://localhost:5601

六、配置nginx 访问
vim /etc/nginx/conf.d/kibana.conf
server {
    listen       80;
    server_name  kb.com;
    access_log  /var/log/nginx/kibana.aniu.co.access.log;
    error_log   /var/log/nginx/kibana.aniu.co.access.log;
    #auth_basic "Restricted Access";
    #auth_basic_user_file /etc/nginx/htpasswd.users;
    location / {
        proxy_pass http://localhost:5601;
        proxy_http_version 1.1;
        proxy_set_header Upgrade $http_upgrade;
        proxy_set_header Connection 'upgrade';
        proxy_set_header Host $host;
        proxy_cache_bypass $http_upgrade;
    }
}
systemctl reload nginx访问 http://kb.com
yum  -y install  filebeat
systemctl start filebeat
systemctl enable filebeat
配置 Filebeat
vim /etc/filebeat/filebeat.yml ##配置filebeat
#============= Filebeat prospectors ===============
filebeat.prospectors:
- input_type: log
  enabled: true #更改为true以启用此prospectors配置。
  paths:
    #- /var/log/*.log
    - /var/log/messages
#==================== Outputs =====================
#------------- Elasticsearch output ---------------
#output.elasticsearch:
  # Array of hosts to connect to.
  #hosts: ["localhost:9200"]
#---------------- Logstash output -----------------
output.logstash:
  # The Logstash hosts
  hosts: ["localhost:5044"]
注意:要注释以下两行

output.elasticsearch和output.logstash只能同时开启一个
并且设置
enabled: true #更改为true以启用此prospectors配置。
systemctl restart filebeat八、配置logstash
创建配置文件
vim /etc/logstash/conf.d/01-logstash-initial.conf
input {
  beats {
    port => 5044
    type => "logs"
  }
}

filter {
  #if [type] == "sy" {
    grok {
      match => { "message" => "%{SYSLOGTIMESTAMP:syslog_timestamp} %{SYSLOGHOST:syslog_hostname} %{DATA:syslog_program}(?:\[%{POSINT:syslog_pid}\])?: %{GREEDYDATA:syslog_message}" }
      add_field => [ "received_at", "%{@timestamp}" ]
      add_field => [ "received_from", "%{host}" ]
    }
    geoip {
      source => "clientip"
    }
    syslog_pri {}
    date {
      match => [ "syslog_timestamp", "MMM d HH:mm:ss", "MMM dd HH:mm:ss" ]
    }
 # }
}

output {
  elasticsearch { hosts => ["localhost:9200"] }
  stdout { codec => rubydebug }
}
查看端口
ss -tlnp|grep -E ‘5044|9600’
![]()
验证logstash配置文件
/usr/share/logstash/bin/logstash -f /etc/logstash/conf.d/01-logstash-initial.conf --config.test_and_exit显示Configuration OK 证明配置成功
如果报错:WARNING: Could not find logstash.yml which is typically located in $LS_HOME/config or /etc/logstash. You can specify the path using –path.settings. Continuing using
解决办法:
cd /usr/share/logstash
ln -s /etc/logstash ./config参考资料:
https://www.elastic.co/guide/index.html
http://www.cnblogs.com/hanyifeng/p/5509985.html
http://blog.51cto.com/wangzhijian/1878636#comment


