文章来自我的博客
正文之前
之前有做过一个练手的商品管理的小项目,然后用 SSM 重构了,接下来又做了一个模拟注册登录的界面,然后前两天用 SSM 重构了这个项目的后台代码,修改了一点前端页面,后台功能不变
接下来还有在此基础上做新的功能:保持登陆状态,查看个人信息等,然后把注册登陆界面整合至商品管理的项目,一步一步扩大
正文
1. 项目截图
下面的文档中有给出截图
2. 功能实现
- 注册、登陆
常规的注册登陆操作
- 验证码
输出验证码,单击验证码图片可刷新
- 验证用户
注册是验证用户名、电话号码和邮箱是否已被注册,登陆时验证用户是否已注册以及密码是否正确,两个过程中都有检测验证码的准确性
3. 具体说明
我还是放上项目的 README 文档吧:
Registration-login-interface2
Version 0.1
使用 SSM 框架来对原先的 Registration-login-interface 进行重构,页面做细微改动,后台使用框架,来达到同样的效果:
0.1 版本是使用框架进行重构,接下来的 0.2 版本将会是添加一些功能:用户保持登陆状态,添加一张 SQL 表来存放用户信息,并在页面中进行个人信息添加和修改
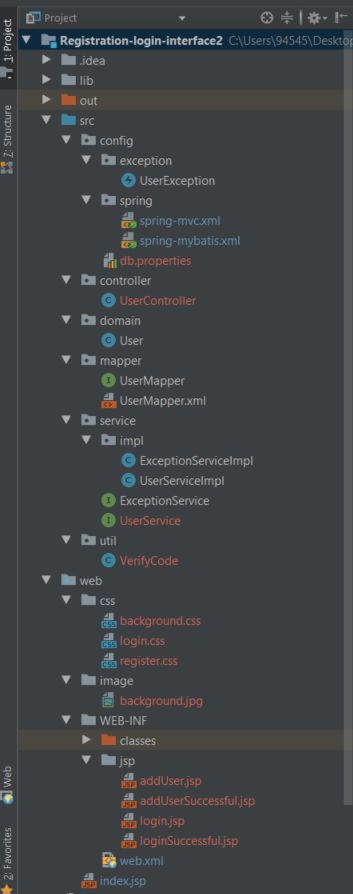
1. 文件结构
关于建包和创建哪些类,不多说,直接上一整个项目的图:
2. 配置文件(config 包)
将 Spring 和 MyBatis 整合的方式,在之前的 new-p-m 和 mybatis-spring 官方文档 中都能找到答案,这里直接给出配置:
数据库信息(db.properties):
jdbc.driver = com.mysql.jdbc.Driver
jdbc.url = jdbc:mysql://localhost:3306/user
jdbc.username = xxx(你自己的用户名)
jdbc.password = xxx(你自己的密码)
spring-mvc.xml:
spring-mybatis.xml:
3. web.xml
        contextConfigLocation
        /WEB-INF/classes/config/spring/spring-mybatis.xml


        org.springframework.web.context.ContextLoaderListener


        dispatcher
        org.springframework.web.servlet.DispatcherServlet

            contextConfigLocation
            classpath:config/spring/spring-mvc.xml


        dispatcher
        *.action
第 2 步中配置的两个文件作为上下文配置信息,最后的 url 映射是 xxx.action 的形式
4. 实体类(User.java)
为了节省篇幅,这里不给出实体类代码,和 Registration-login-interface 中的实体类是一样的
5. 自定义异常
自定义的异常是调用父类方法来实现的,因用户注册或登陆时输入有误而抛出
public class UserException extends Exception {
//自定义异常
public UserException(String message) {
super(message);
}
}
6. 映射器
MyBatis-Spring 提供的 MapperFactoryBean 能够进行动态代理,能够将数据映射器接口注入到 Service 层中的 Bean 里,注意,一定要是接口,不能是实现类,所以我们这里写了一个 UserMapper:
public interface UserMapper {
    void addUser(User user);
    User findUserByName(String username);
    User findUserByPhone(String phone);
    User findUserByEmail(String email);
}
映射器接口对应着一个同名的 XML 映射器文件文件:UserMapper.xml
这个映射器中写的是 SQL 语句,这里面有四句,添加,按照名称、电话号码和邮箱进行查找,映射文件的命名空间(namespace)对应着映射器接口的名称,SQL 语句的 id 对应着接口中的方法,不能有误
INSERT INTO user(username,password,phone,email)
VALUES (#{username}, #{password}, #{phone}, #{email})
6. 验证码
SSM 版本的验证码没有变化,还是 Registration-login-interface 中的验证码,不做更改
7. Service 层
Service 层有两个接口,一个是关于注册和登陆的:
public interface UserService {
    public void addUser(User user) throws UserException;
    public void login(User user) throws UserException;
}
另一个是检测注册和登陆过程中的错误情况:
@Service
public interface ExceptionService {

    //_user 是从数据库中查找出的记录,user 是用户输入
    public void loginException(User user, User db_user) throws UserException;

    public void addUserException1(User user) throws UserException;

    public void addUserException2(User user) throws UserException;
}
先写 ExceptionService 的实现,在注册和登陆过程中要使用:
    //先创建 Bean,接下来会用到
    private final UserMapper userMapper;

    @Autowired
    public ExceptionServiceImpl(UserMapper userMapper) {
        this.userMapper = userMapper;
    }

    //先判断输入格式是否有误
    public void addUserException1(User user) throws UserException{
        if (user.getUsername() == null || user.getUsername().trim().isEmpty()){
            throw new UserException("用户名不能为空");
        }else if (user.getUsername().length() < 5 || user.getUsername().length() > 15){
            throw new UserException("用户名必须为5-15个字符");
        }

        if (user.getPassword() == null || user.getPassword().trim().isEmpty()){
            throw new UserException("密码不能为空");
        }else if (user.getPassword().length() < 5 || user.getPassword().length() > 15){
            throw new UserException("密码必须为5-15个字符");
        }

        if (user.getPhone() == null || user.getPhone().trim().isEmpty()){
            throw new UserException("电话号码不能为空");
        }

        if (user.getEmail() == null || user.getEmail().trim().isEmpty()){
            throw new UserException("邮箱不能为空");
        }
    }

    //再判断输入的信息是否已被注册
    public void addUserException2(User user) throws UserException{
        //这三者都必须是唯一的
        if (userMapper.findUserByName(user.getUsername()) != null){
            throw new UserException("该用户名已被注册");
        } else if (userMapper.findUserByPhone(user.getPhone()) != null){
            throw new UserException("该电话号码已被注册");
        } else if (userMapper.findUserByEmail(user.getEmail()) != null){
            throw new UserException("该邮箱已被注册");
        }
    }

    //登入检测
    public void loginException(User user, User db_user) throws UserException {

        if(db_user == null){
            throw new UserException("该用户不存在");
        }
        if(!user.getPassword().equals(db_user.getPassword())){
            throw new UserException("密码错误");
        }
    }

    //验证码检测
    @Override
    public void verifyCodeException(String inputVerifyCode, String code) throws UserException {
        if (inputVerifyCode == null || inputVerifyCode.trim().isEmpty()){
            throw new UserException("验证码不能为空");
        } else if (inputVerifyCode.length() != 4){
            throw new UserException("验证码长度应为 4 位");
        } else if (!inputVerifyCode.equals(code)){
            throw new UserException("验证码错误");
        }
    }
然后是 UserService 的实现:
    //先是用构造器注入来创建 UserMapper 和 ExceptionService 两个 Bean
    private final UserMapper userMapper;

    private final ExceptionService exceptionService;

    @Autowired
    public UserServiceImpl(UserMapper userMapper, ExceptionService exceptionService) {
        this.userMapper = userMapper;
        this.exceptionService = exceptionService;
    }

    public void addUser(User user) throws UserException {
        //先判断用户的输入是否有错
        exceptionService.addUserException1(user);
        //再判断用户的信息是否已被注册
        exceptionService.addUserException2(user);
        userMapper.addUser(user);
    }

    //根据用户输入名字去数据库查找有没有这个用户,如果没有,就会抛出异常
    public void login(User user) throws UserException {
        User db_user = userMapper.findUserByName(user.getUsername());
        exceptionService.loginException(user, db_user);
    }
可能有人会觉得为什么登陆的方法没有返回值,其实如果登入成功,也就是没有抛出异常,在 Controller 中就可以接着执行后面的方法,如果用户名或密码错误,是会抛出异常,中断程序的
8. Controller
到了关键的一步,Controller 负责处理 DispatcherServlet 分发的请求:
首先是使用构造器注入来创建三个 Bean:
    private final UserService userService;

    private final VerifyCode verifyCode;

    private final ExceptionService exceptionService;

    @Autowired
    public UserController(UserService userService, VerifyCode verifyCode, ExceptionService exceptionService) {
        this.userService = userService;
        this.verifyCode = verifyCode;
        this.exceptionService = exceptionService;
    }
userService 就是用于注册和登陆的,verifyCode 就是用于得到验证码,exceptionService 是用来检测注册和登陆过程中是否出现错误
在注册和登陆之前,都需要得到带有表单的页面:
    //在注册之前需要先得到注册的界面
    @RequestMapping("/preAdd")
    public ModelAndView preAdd(){
        return new ModelAndView("addUser");
    }

    //同样的,需要先得到界面
    @RequestMapping("preLogin")
    public ModelAndView preLogin(){
        return new ModelAndView("login");
    }
然后是注册的过程,先调用 addUser() 方法,如果用户注册的时候出现了问题,比如说用户名、电话号码或者邮箱已被注册,就直接抛出异常,就没有执行验证码验证的方法了,如果没问题,就接着检测验证码输入,将表单输入与验证码文本进行比较
    @RequestMapping("/addUser")
    public ModelAndView addUser(User user, HttpServletRequest request){
        ModelAndView modelAndView;
        //如果下面的 try 语句块没有抛出异常,则返回 addUserSuccessful.jsp
        modelAndView = new ModelAndView("addUserSuccessful");
        try{
            //先调用添加用户的方法,看看有没有因为不符规定的输入而导致异常抛出
            userService.addUser(user);
            //然后再看有没有因为验证码错误而导致异常抛出
            exceptionService.verifyCodeException(request.getParameter("verifyCode"), verifyCode.getText());
        } catch (UserException e){
            //如果捕获异常,就带着异常信息返回注册界面
            modelAndView = new ModelAndView("addUser");
            modelAndView.addObject("message", e.getMessage());
        }
        return modelAndView;
    }
登陆的过程,也是先先检查用户输入信息是否有误,再检查验证码信息
    //登陆的逻辑和上面是一样的
    @RequestMapping("/login")
    public ModelAndView login(User user, HttpServletRequest request) {
        ModelAndView modelAndView;
        modelAndView = new ModelAndView("loginSuccessful");
        try {
            userService.login(user);
            exceptionService.verifyCodeException(request.getParameter("verifyCode"), verifyCode.getText());
        } catch (UserException e){
            modelAndView = new ModelAndView("login");
            modelAndView.addObject("message", e.getMessage());
        }
        return modelAndView;
    }
最后是关于输出验证码图片的操作:
//得到验证码,然后用于 jsp 文件的 ![]() 标签的 src 属性中
@RequestMapping("/getVerifyCode")
public void setVerifyCode(HttpServletResponse response)
throws IOException{
//设置响应格式
response.setContentType("image/jpg");
//得到图片
BufferedImage image = verifyCode.getImage();
//输出
verifyCode.output(image, response.getOutputStream());
}
标签的 src 属性中
@RequestMapping("/getVerifyCode")
public void setVerifyCode(HttpServletResponse response)
throws IOException{
//设置响应格式
response.setContentType("image/jpg");
//得到图片
BufferedImage image = verifyCode.getImage();
//输出
verifyCode.output(image, response.getOutputStream());
}

