vue2.x源码解析五——数据驱动--4.render
1.连接上一节
在上一节中我们提到了在src/core/instance/lifecycle.js 中通过渲染Watcher实时去监测调用updateComponent方法,从而实现的页面实时渲染,vm._render()主要是生成的VNode(虚拟DOM),下面我们来讲一讲vm._render()方法的实现
updateComponent = () => {
      vm._update(vm._render(), hydrating)
    }
2.vm._render
Vue 的 _render 方法是实例的一个私有方法,它用来把实例渲染成一个虚拟 Node。 src/core/instance/render.js :
Vue.prototype._render = function (): VNode {
  const vm: Component = this
  const { render, _parentVnode } = vm.$options

  // reset _rendered flag on slots for duplicate slot check
  if (process.env.NODE_ENV !== 'production') {
    for (const key in vm.$slots) {
      // $flow-disable-line
      vm.$slots[key]._rendered = false
    }
  }

  if (_parentVnode) {
    vm.$scopedSlots = _parentVnode.data.scopedSlots || emptyObject
  }

  // set parent vnode. this allows render functions to have access
  // to the data on the placeholder node.
  vm.$vnode = _parentVnode
  // render self
  let vnode
  try {
    vnode = render.call(vm._renderProxy, vm.$createElement)
  } catch (e) {
    handleError(e, vm, `render`)
    // return error render result,
    // or previous vnode to prevent render error causing blank component
    /* istanbul ignore else */
    if (process.env.NODE_ENV !== 'production') {
      if (vm.$options.renderError) {
        try {
          vnode = vm.$options.renderError.call(vm._renderProxy, vm.$createElement, e)
        } catch (e) {
          handleError(e, vm, `renderError`)
          vnode = vm._vnode
        }
      } else {
        vnode = vm._vnode
      }
    } else {
      vnode = vm._vnode
    }
  }
  // return empty vnode in case the render function errored out
  if (!(vnode instanceof VNode)) {
    if (process.env.NODE_ENV !== 'production' && Array.isArray(vnode)) {
      warn(
        'Multiple root nodes returned from render function. Render function ' +
        'should return a single root node.',
        vm
      )
    }
    vnode = createEmptyVNode()
  }
  // set parent
  vnode.parent = _parentVnode
  return vnode
}
2.1 - 步骤1
拿到vue实例参数中的render函数,这个render函数可以使用户自己写的,也可以是template编译成的render函数
const { render, _parentVnode } = vm.$options2.2 - 步骤2
去调用这个render函数
 try {
      vnode = render.call(vm._renderProxy, vm.$createElement)
    } catch (e) {
    }
2.2.2 vm.$createElement
创建虚拟的DOM
定义在
export function initRender (vm: Component) {
     // 编译时创建VNode的方法
      vm._c = (a, b, c, d) => createElement(vm, a, b, c, d, false)
      // 手写render函数的时候创建VNode的方法
      vm.$createElement = (a, b, c, d) => createElement(vm, a, b, c, d, true)
}
initRender这个函数在new Vue的时候会去调用在src/core/instance/init.js中可以看到
initRender(vm)对于vm.$createElement我们可举一个例子
例如:
<div id="app">div>const vm = new Vue({
el: '#app',
render(createElement) {
return createElement('div', {
attrs: {
id: '#hcd'
}
},this.message)
},
data() {
return {
message: 'this vue'
}
}
})会发现render产生的
<div id="hcd">this vuediv>会覆盖掉
<div id="app">div>页面中没有了id为app的div
这也是我们不能将vue实例挂载在body和html的原因,因为会覆盖
并且比
<div id="app">{{msg}}div>加载的更优化,这是因为,dom是先与js加载的,所以会先看到{{msg}}显示在页面上,而render的方式会在vue实例加载后直接显示数据在页面上
2.2.2 vm._renderProxy
vm._renderProxy为当前上下文
我们在new Vue的时候会去调用在src/core/instance/init.js中可以看到
 /* istanbul ignore else */
    if (process.env.NODE_ENV !== 'production') {
      initProxy(vm)
    } else {
      vm._renderProxy = vm
    }
生成环境的vm._renderProxy = vm,就不用多说了,我们来看dev环境的initProxy(vm),
在src/core/instance/proxy.js中
initProxy = function initProxy (vm) {
    if (hasProxy) {
      // determine which proxy handler to use
      const options = vm.$options
      const handlers = options.render && options.render._withStripped
        ? getHandler
        : hasHandler
      vm._renderProxy = new Proxy(vm, handlers)
    } else {
      vm._renderProxy = vm
    }
  }
他其实做的就是遍历vue实例下面的所有属性,如果我们访问一个vue实例中没有定义的属性,就会报错。(因为只有在dev环境才会执行initProxy(vm),所以这些错误只有在dev环境才会爆出来,生成环境是看不到的)
2.3 - 步骤3
由步骤2生成了vnode ,它是一个虚拟 Node,对vnode进行判断
 if (!(vnode instanceof VNode)) {
      if (process.env.NODE_ENV !== 'production' && Array.isArray(vnode)) {
        warn(
          'Multiple root nodes returned from render function. Render function ' +
          'should return a single root node.',
          vm
        )
      }
      vnode = createEmptyVNode()
    }
如果vnode 是一个数组,说明有多个根节点,就会报错,这也是我们的vue中只能有一个根源上
3.Virtual DOM
vm._render 最终是通过执行 createElement 方法并返回的是 vnode,它是一个虚拟 Node。Vue 2.0 相比 Vue 1.0 最大的升级就是利用了 Virtual DOM。因此在分析 createElement 的实现前,我们先了解一下 Virtual DOM 的概念。
3.1 原生DOM
它产生的前提是浏览器中的 DOM 是很“昂贵”的,为了更直观的感受,我们可以简单的把一个简单的 div 元素的属性都打印出来,如图所示:
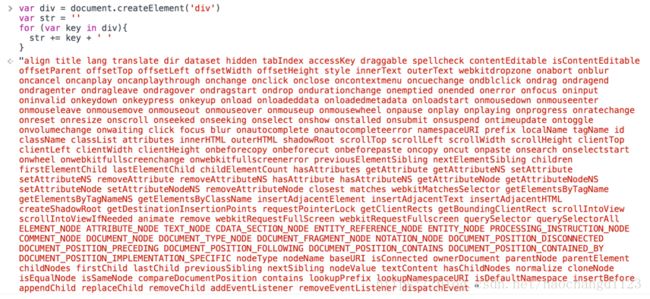
可以看到,真正的 DOM 元素是非常庞大的,因为浏览器的标准就把 DOM 设计的非常复杂。当我们频繁的去做 DOM 更新,会产生一定的性能问题。
3.2 Virtual DOM的出现
而 Virtual DOM 就是用一个原生的 JS 对象去描述一个 DOM 节点,所以它比创建一个 DOM 的代价要小很多。
在 Vue.js 中,Virtual DOM 是用 VNode 这么一个 Class 去描述,它是定义在 src/core/vdom/vnode.js 中的。
export default class VNode {
  tag: string | void;
  data: VNodeData | void;
  children: ?Array;
  text: string | void;
  elm: Node | void;
  ns: string | void;
  context: Component | void; // rendered in this component's scope
  key: string | number | void;
  componentOptions: VNodeComponentOptions | void;
  componentInstance: Component | void; // component instance
  parent: VNode | void; // component placeholder node

  // strictly internal
  raw: boolean; // contains raw HTML? (server only)
  isStatic: boolean; // hoisted static node
  isRootInsert: boolean; // necessary for enter transition check
  isComment: boolean; // empty comment placeholder?
  isCloned: boolean; // is a cloned node?
  isOnce: boolean; // is a v-once node?
  asyncFactory: Function | void; // async component factory function
  asyncMeta: Object | void;
  isAsyncPlaceholder: boolean;
  ssrContext: Object | void;
  fnContext: Component | void; // real context vm for functional nodes
  fnOptions: ?ComponentOptions; // for SSR caching
  fnScopeId: ?string; // functional scope id support

  constructor (
    tag?: string,
    data?: VNodeData,
    children?: ?Array,
    text?: string,
    elm?: Node,
    context?: Component,
    componentOptions?: VNodeComponentOptions,
    asyncFactory?: Function
  ) {
    this.tag = tag
    this.data = data
    this.children = children
    this.text = text
    this.elm = elm
    this.ns = undefined
    this.context = context
    this.fnContext = undefined
    this.fnOptions = undefined
    this.fnScopeId = undefined
    this.key = data && data.key
    this.componentOptions = componentOptions
    this.componentInstance = undefined
    this.parent = undefined
    this.raw = false
    this.isStatic = false
    this.isRootInsert = true
    this.isComment = false
    this.isCloned = false
    this.isOnce = false
    this.asyncFactory = asyncFactory
    this.asyncMeta = undefined
    this.isAsyncPlaceholder = false
  }

  // DEPRECATED: alias for componentInstance for backwards compat.
  /* istanbul ignore next */
  get child (): Component | void {
    return this.componentInstance
  }
} 可以配合flow的配置文件./flow/vnode.js一起来看。
可以看到 Vue.js 中的 Virtual DOM 的定义还是略微复杂的,因为它这里包含了很多 Vue.js 的特性。这里千万不要被这些茫茫多的属性吓到,实际上 Vue.js 中 Virtual DOM 是借鉴了一个开源库 snabbdom 的实现,然后加入了一些 Vue.js 特色的东西。
snabbdom:https://github.com/snabbdom/snabbdom
3.3 Virtual DOM到底是啥
其实 VNode 是对真实 DOM 的一种抽象描述,它的核心定义无非就几个关键属性,标签名、数据、子节点、键值等,其它属性都是都是用来扩展 VNode 的灵活性以及实现一些特殊 feature 的。由于 VNode 只是用来映射到真实 DOM 的渲染,不需要包含操作 DOM 的方法,因此它是非常轻量和简单的。
Virtual DOM 除了它的数据结构的定义,映射到真实的 DOM 实际上要经历 VNode 的 create、diff、patch 等过程。那么在 Vue.js 中,VNode 的 create 是通过之前提到的 createElement 方法创建的,我们接下来分析这部分的实现。
4.createElement
由上面我们知道
export function initRender (vm: Component) {
     // 编译时创建VNode的方法
      vm._c = (a, b, c, d) => createElement(vm, a, b, c, d, false)
      // 手写render函数的时候创建VNode的方法
      vm.$createElement = (a, b, c, d) => createElement(vm, a, b, c, d, true)
}
也就是或都回去调用createElement方法,这个定义在
src/core/vdom/create-elemenet.js:
// wrapper function for providing a more flexible interface
// without getting yelled at by flow
export function createElement (
  context: Component,  // vm实例
  tag: any, //标签
  data: any, // vnode的数据
  children: any, // vnode的子节点,进而可以构建vnode树进而映射DOM树
  normalizationType: any,
  alwaysNormalize: boolean
): VNode | Array<VNode> {
 //如果传入参数时,没有传data这个参数,那么实参和形参改变对应顺序
  if (Array.isArray(data) || isPrimitive(data)) {
    normalizationType = children
    children = data
    data = undefined
  }
  if (isTrue(alwaysNormalize)) {
    normalizationType = ALWAYS_NORMALIZE
  }
  //去调用 _createElement
  return _createElement(context, tag, data, children, normalizationType)
}
createElement 方法实际上是对 _createElement 方法的封装,它允许传入的参数更加灵活,在处理这些参数后,调用真正创建 VNode 的函数 _createElement
同样在src/core/vdom/create-elemenet.js中_createElement:
export function _createElement (
  context: Component,
  tag?: string | Class<Component> | Function | Object,
  data?: VNodeData,
  children?: any,
  normalizationType?: number
): VNode | Array<VNode> {
  if (isDef(data) && isDef((data: any).__ob__)) {
    process.env.NODE_ENV !== 'production' && warn(
      `Avoid using observed data object as vnode data: ${JSON.stringify(data)}\n` +
      'Always create fresh vnode data objects in each render!',
      context
    )
    return createEmptyVNode()
  }
  // object syntax in v-bind
  if (isDef(data) && isDef(data.is)) {
    tag = data.is
  }
  if (!tag) {
    // in case of component :is set to falsy value
    return createEmptyVNode()
  }
  // warn against non-primitive key
  if (process.env.NODE_ENV !== 'production' &&
    isDef(data) && isDef(data.key) && !isPrimitive(data.key)
  ) {
    if (!__WEEX__ || !('@binding' in data.key)) {
      warn(
        'Avoid using non-primitive value as key, ' +
        'use string/number value instead.',
        context
      )
    }
  }
  // support single function children as default scoped slot
  if (Array.isArray(children) &&
    typeof children[0] === 'function'
  ) {
    data = data || {}
    data.scopedSlots = { default: children[0] }
    children.length = 0
  }
  if (normalizationType === ALWAYS_NORMALIZE) {
    children = normalizeChildren(children)
  } else if (normalizationType === SIMPLE_NORMALIZE) {
    children = simpleNormalizeChildren(children)
  }
  let vnode, ns
  if (typeof tag === 'string') {
    let Ctor
    ns = (context.$vnode && context.$vnode.ns) || config.getTagNamespace(tag)
    if (config.isReservedTag(tag)) {
      // platform built-in elements
      vnode = new VNode(
        config.parsePlatformTagName(tag), data, children,
        undefined, undefined, context
      )
    } else if (isDef(Ctor = resolveAsset(context.$options, 'components', tag))) {
      // component
      vnode = createComponent(Ctor, data, context, children, tag)
    } else {
      // unknown or unlisted namespaced elements
      // check at runtime because it may get assigned a namespace when its
      // parent normalizes children
      vnode = new VNode(
        tag, data, children,
        undefined, undefined, context
      )
    }
  } else {
    // direct component options / constructor
    vnode = createComponent(tag, data, context, children)
  }
  if (Array.isArray(vnode)) {
    return vnode
  } else if (isDef(vnode)) {
    if (isDef(ns)) applyNS(vnode, ns)
    if (isDef(data)) registerDeepBindings(data)
    return vnode
  } else {
    return createEmptyVNode()
  }
}
_createElement 方法有 5 个参数:
- context 表示 VNode 的上下文环境,它是 Component 类型;
- tag 表示标签,它可以是一个字符串,也可以是一个 Component;
- data 表示 VNode 的数据,它是一个 VNodeData 类型,可以在 flow/vnode.js
中找到它的定义,这里先不展开说; - children 表示当前 VNode 的子节点,它是任意类型的,它接下来需要被规范为标准的 VNode 数组;
- normalizationType 表示子节点规范的类型,类型不同规范的方法也就不一样,它主要是参考 render
函数是编译生成的还是用户手写的。
4.1 children 的规范化
由于 Virtual DOM 实际上是一个树状结构,每一个 VNode 可能会有若干个子节点,这些子节点应该也是 VNode 的类型。_createElement 接收的第 4 个参数 children 是任意类型的,因此我们需要把它们规范成 VNode 类型。
_createElement方法会根据normalizationType不同调用不同方法
SIMPLE_NORMALIZE = 1,ALWAYS_NORMALIZE = 2
  if (normalizationType === ALWAYS_NORMALIZE) {
    children = normalizeChildren(children)
  } else if (normalizationType === SIMPLE_NORMALIZE) {
    children = simpleNormalizeChildren(children)
  }
方法都定义在们的定义都在 src/core/vdom/helpers/normalzie-children.js 中:
4.1.1 simpleNormalizeChildren
// 对children进行遍历,(只会有一层深度)
export function simpleNormalizeChildren (children: any) {
  for (let i = 0; i < children.length; i++) {
   // 如果是二维数组,就将其concat为一维数组
    if (Array.isArray(children[i])) {
      return Array.prototype.concat.apply([], children)
    }
  }
  // 返回一维数组,数组中每一个元素都是一个vnode
  return children
}
simpleNormalizeChildren 方法调用场景是—–render 函数当函数是编译生成的。
理论上编译生成的 children 都已经是 VNode 类型的,但这里有一个例外,就是 functional component 函数式组件返回的是一个数组而不是一个根节点,所以会通过 Array.prototype.concat 方法把整个 children 数组打平,让它的深度只有一层。
4.1.2 normalizeChildren
export function normalizeChildren (children: any): ?Array<VNode> {
//如果传入的是基本数据类型,例如this.message代表的字符串,那么就创建一个文本结点
  return isPrimitive(children)
      //调用createTextVNode函数,其实就是将其tostring,返回一个文本结点vnode
    ? [createTextVNode(children)]
      // 如果是 isArray,就调用normalizeArrayChildren方法
    : Array.isArray(children)
      ? normalizeArrayChildren(children)
      : undefined
}
normalizeChildren 方法的调用场景有 2 种,
- 一个场景是 render 函数是用户手写的,当 children 只有一个节点的时候,Vue.js 从接口层面允许用户把
children 写成基础类型用来创建单个简单的文本节点,这种情况会调用 createTextVNode 创建一个文本节点的VNode; - 另一个场景是当编译 slot、v-for 的时候会产生嵌套数组的情况,会调用 normalizeArrayChildren 方法,
normalizeArrayChildren方法
function normalizeArrayChildren (children: any, nestedIndex?: string): Array<VNode> {
  const res = []
  let i, c, lastIndex, last
  // 遍历children
  for (i = 0; i < children.length; i++) {
    c = children[i]
    if (isUndef(c) || typeof c === 'boolean') continue
    lastIndex = res.length - 1
    last = res[lastIndex]
    //  如果是数组,递归children
    if (Array.isArray(c)) {
      if (c.length > 0) {
        c = normalizeArrayChildren(c, `${nestedIndex || ''}_${i}`)
        // 合并相连的两个文本节点
        if (isTextNode(c[0]) && isTextNode(last)) {
          res[lastIndex] = createTextVNode(last.text + (c[0]: any).text)
          c.shift()
        }
        res.push.apply(res, c)
      }
      // 如果children是基础类型
    } else if (isPrimitive(c)) {
        // 合并相邻TextNode
      if (isTextNode(last)) {
        res[lastIndex] = createTextVNode(last.text + c)
      } else if (c !== '') {
          //放到数组中
        res.push(createTextVNode(c))
      }
    } else {
      if (isTextNode(c) && isTextNode(last)) {
        res[lastIndex] = createTextVNode(last.text + c.text)
      } else {
        if (isTrue(children._isVList) &&
          isDef(c.tag) &&
          isUndef(c.key) &&
          isDef(nestedIndex)) {
          c.key = `__vlist${nestedIndex}_${i}__`
        }
        res.push(c)
      }
    }
  }
  return res
}
normalizeArrayChildren 接收 2 个参数:
- children 表示要规范的子节点
- nestedIndex 表示嵌套的索引,因为单个 child 可能是一个数组类型。
normalizeArrayChildren 主要的逻辑:
- 就是遍历 children,获得单个节点 c,
- 然后对 c 的类型判断,如果是一个数组类型,则递归调用 normalizeArrayChildren;
- 如果是基础类型,则通过 createTextVNode 方法转换成 VNode 类型;
否则就已经是 VNode 类型了,如果 children 是一个列表并且列表还存在嵌套的情况,则根据 nestedIndex 去更新它的key。
这里需要注意一点,在遍历的过程中,对这 3 种情况都做了如下处理:如果存在两个连续的 text 节点,会把它们合并成一个 text 节点。
4.1.3总结
children 的规范化,children 变成了一个类型为 VNode 的 Array。也就是说Array中每一个元素都是VNode(虚拟DOM)。
simpleNormalizeChildren(children):
遍历最多二维,输出元素都是VNode的一维array
normalizeChildren :
可遍历多层,合并两个连续的 text 节点,输出元素都是VNode的一维array
4.2.VNode 的创建
回到 createElement 函数,规范化 children 后,接下来会去创建一个 VNode 的实例:
let vnode, ns
//对 tag 做判断
if (typeof tag === 'string') {
  let Ctor
  ns = (context.$vnode && context.$vnode.ns) || config.getTagNamespace(tag)
  //如果是内置的节点,例如我们常用的
  if (config.isReservedTag(tag)) {
    // 创建 vnode,config.parsePlatformTagName(tag)为平台的保留标签
    vnode = new VNode(
      config.parsePlatformTagName(tag), data, children,
      undefined, undefined, context
    )
  } else if (isDef(Ctor = resolveAsset(context.$options, 'components', tag))) {
    // 对组件进行解析
    vnode = createComponent(Ctor, data, context, children, tag)
  } else {
    // 如果是不认识的标签
    vnode = new VNode(
      tag, data, children,
      undefined, undefined, context
    )
  }
} else {
  // direct component options / constructor
  vnode = createComponent(tag, data, context, children)
}- 先对 tag 做判断,如果是 string 类型,则接着判断如果是内置的一些节点,则直接创建一个普通 VNode,
- 如果是为已注册的组件名,则通过 createComponent 创建一个组件类型的 VNode,
- 否则创建一个未知的标签的 VNode。
- 如果是 tag 一个 Component 类型,则直接调用
- createComponent 创建一个组件类型的 VNode 节点。对于 createComponent 创建组件类型的 VNode
的过程,我们之后会去介绍,本质上它还是返回了一个 VNode。
5.总结
我们大致了解了 createElement 创建 VNode 的过程,每个 VNode 有 children,children 每个元素也是一个 VNode,这样就形成了一个 VNode Tree,它很好的描述了我们的 DOM Tree。