Okio笔记
一、基本认识
Okio库是一个由square公司开发的,它补充了java.io和java.nio的不足,以便能够更加方便,快速地访问、存储和处理数据。而OkHttp的底层也使用该库作为支持。而在开发中,使用该库可以大大的带来方便。
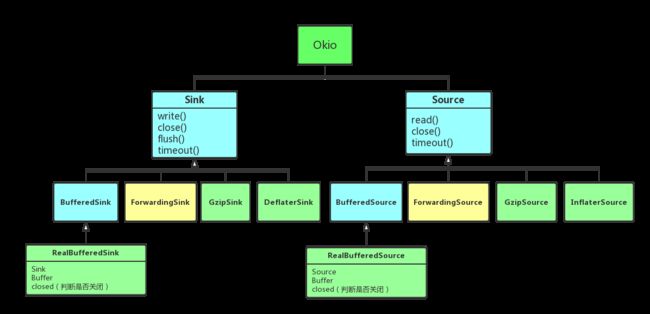
Okio中有两个关键的接口,Sink和Source,这两个接口都继承了Closeable接口;而Sink可以简单的看做OutputStream,Source可以简单的看做InputStream,这两个接口都是支持读写超时设置的。
它们各自有一个支持缓冲区的子类接口, BufferedSink和 BufferedSource,而BufferedSink有一个实现类 RealBufferedSink,BufferedSource有一个实现类 RealBufferedSource;此外,Sink和Source它门还各自有一个支持gzip压缩的实现类 GzipSink和 GzipSource;一个具有委托功能的抽象类 ForwardingSink和 ForwardingSource;还有一个实现类便是 InflaterSource和 DeflaterSink,这两个类主要用于压缩,为GzipSink和GzipSource服务;
BufferedSink中定义了一系列写入缓存区的方法,比如write方法写byte数组,writeUtf8写字符串,还有一些列的writeByte,writeString,writeShort,writeInt,writeLong,writeDecimalLong等等方法。BufferedSource定义的方法和BufferedSink极为相似,只不过一个是写一个是读,基本上都是一一对应的,如readUtf8,readByte,readString,readShort,readInt等等等等。这两个接口中的方法有兴趣的点源码进去看就可以了。
二、简单使用
//简单的文件读写
public void readWriteFile() throws Exception {
    //1.文件
    File file = new File("resources/dest.txt");
    //2.构建写缓冲池
    BufferedSink sink = Okio.buffer(Okio.sink(file));
    //3.向缓冲池写入文本
    sink.writeUtf8("Hello, java.io file!");
    //4.关闭缓冲池
    sink.close();

    //1.构建读文件缓冲源
    BufferedSource source = Okio.buffer(Okio.source(file));
    //2.读文件
    source.readUtf8();
    //3.关闭缓冲源
    source.close();
}

//文件内容的追加
public void appendFile() throws Exception {
    File file = new File("resources/dest.txt");
    //1.将文件读入,并构建写缓冲池
    BufferedSink sink = Okio.buffer(Okio.appendingSink(file));
    //2.追加文本
    sink.writeUtf8("Hello, ");
    //3.关闭
    sink.close();

    //4.再次追加文本,需要重新构建缓冲池对象
    sink = Okio.buffer(Okio.appendingSink(file));
    //5.追加文本
    sink.writeUtf8("java.io file!");
    //6.关闭缓冲池
    sink.close();
}

//通过路径来读写文件
public void readWritePath() throws Exception {
    Path path = new File("resources/dest.txt").toPath();
    //1.构建写缓冲池
    BufferedSink sink = Okio.buffer(Okio.sink(path));
    //2.写缓冲
    sink.writeUtf8("Hello, java.nio file!");
    //3.关闭缓冲
    sink.close();

    //1.构建读缓冲源
    BufferedSource source = Okio.buffer(Okio.source(path));
    //2.读文本
    source.readUtf8();
    //3.关闭缓冲源
    source.close();
}

//写Buffer,在okio中Buffer是一个很重要的对象,在后面我们在详细介绍。
public void sinkFromOutputStream() throws Exception {
    //1.构建buffer对象
    Buffer data = new Buffer();
    //2.向缓冲中写入文本
    data.writeUtf8("a");
    //3.可以连续追加,类似StringBuffer
    data.writeUtf8("c");

    //4.构建字节数组流对象
    ByteArrayOutputStream out = new ByteArrayOutputStream();
    //5.构建写缓冲池
    Sink sink = Okio.sink(out);
    //6.向池中写入buffer
    sink.write(data, 2);
}

//读Buffer
public void sourceFromInputStream() throws Exception {
    //1.构建字节数组流
    InputStream in = new ByteArrayInputStream(
        ("a"  + "c").getBytes(UTF_8));
    // Source: ac
    //2.缓冲源
    Source source = Okio.source(in);
    //3.buffer
    Buffer sink = new Buffer();
    //4.将数据读入buffer
    sink.readUtf8(2);
}

//Gzip功能
public static void gzipTest(String[] args) {
    Sink sink = null;
    BufferedSink bufferedSink = null;
    GzipSink gzipSink = null;
    try {
        File dest = new File("resources/gzip.txt");
        sink = Okio.sink(dest);
        gzipSink = new GzipSink(sink);
        bufferedSink = Okio.buffer(gzipSink);
        bufferedSink.writeUtf8("android vs ios");
    } catch (IOException e) {
        e.printStackTrace();
    } finally {
        closeQuietly(bufferedSink);
    }

    Source source = null;
    BufferedSource bufferedSource = null;
    GzipSource gzipSource = null;
    try {
        File file = new File("resources/gzip.txt");
        source = Okio.source(file);
        gzipSource = new GzipSource(source);
        bufferedSource = Okio.buffer(gzipSource);
        String content = bufferedSource.readUtf8();
        System.out.println(content);
    } catch (IOException e) {
        e.printStackTrace();
    } finally {
        closeQuietly(bufferedSource);
    }
}

public static void closeQuietly(Closeable closeable) {
    if (closeable != null) {
        try {
            closeable.close();
        } catch (RuntimeException rethrown) {
            throw rethrown;
        } catch (Exception ignored) {
        }
    }
}
可以看到,okio的文件读写操作,使用起来是很简单的,减少了很多io操作的基本代码,并且对内存和cpu使用做了优化(代码直观当然是看不出来的,okio作者在buffer类中有详细的说明,后面我们再分析这个类)。
此外还有一个ByteString类,这个类可以用来做各种变化,它将byte转会为String,而这个String可以是utf8的值,也可以是base64后的值,也可以是md5的值,也可以是sha256的值,总之就是各种变化,最后取得你想要的值。
三、Okio框架结构与源码分析
Okio框架分析
Okio的简单使用,无非下面几个步骤:
a. 构建对象
b. 读、写
c. 关闭缓冲对象
构建缓冲对象
通过Okio的buffer(Source source)和buffer(Sink sink)方法,构建缓冲对象
public static BufferedSource buffer(Source source) {
    return new RealBufferedSource(source);
}

public static BufferedSink buffer(Sink sink) {
    return new RealBufferedSink(sink);
}
这两个static方法,返回 读、写池:BufferedSource 、BufferedSink。Source、Sink ,这两种参数从哪里来?看看Okio下面两个static方法:
public static Sink sink(File file) throws FileNotFoundException {
    if (file == null) throw new IllegalArgumentException("file == null");
    return sink(new FileOutputStream(file));
}

public static Source source(File file) throws FileNotFoundException {
    if (file == null) throw new IllegalArgumentException("file == null");
    return source(new FileInputStream(file));
}
类似的方法还有
sink(File file) Sinksink(OutputStream out) Sinksink(Path path, OpenOption... options) Sinksink(Socket socket) Sinksource(File file) Sourcesource(InputStream in) Sourcesource(Path path, OpenOption... options) Sourcesource(Socket socket) Source
以sink方法为例,最后都是调用
  private static Sink sink(final OutputStream out, final Timeout timeout) {
    if (out == null) throw new IllegalArgumentException("out == null");
    if (timeout == null) throw new IllegalArgumentException("timeout == null");

    return new Sink() {//new了一个Sink对象,这个对象就是emitCompleteSegments方法中的sink
      @Override public void write(Buffer source, long byteCount) throws IOException {
        checkOffsetAndCount(source.size, 0, byteCount);
        while (byteCount > 0) {
          timeout.throwIfReached();
          Segment head = source.head;
          int toCopy = (int) Math.min(byteCount, head.limit - head.pos);
          out.write(head.data, head.pos, toCopy);//真正完成写操作!

          head.pos += toCopy;
          byteCount -= toCopy;
          source.size -= toCopy;

          if (head.pos == head.limit) {
            source.head = head.pop();
            SegmentPool.recycle(head);
          }
        }
      }

      @Override public void flush() throws IOException {
        out.flush();
      }

      @Override public void close() throws IOException {
        out.close();
      }

      @Override public Timeout timeout() {
        return timeout;
      }

      @Override public String toString() {
        return "sink(" + out + ")";
      }
    };
  }
读、写操作
下面以写操作为例,来查看源码,在RealBufferedSink中
@Override
public BufferedSink writeUtf8(String string, int beginIndex, int endIndex)
      throws IOException {
    if (closed) throw new IllegalStateException("closed");
    buffer.writeUtf8(string, beginIndex, endIndex);//写入到buffer中
    return emitCompleteSegments();//将buffer中的内容写入到sink成员变量中去,然后将自身返回
}
可以看到这里,有一个成员变量buffer,并调用了其writeUtf8方法,源码如下:
@Override
public Buffer writeUtf8(String string, int beginIndex, int endIndex) {
    ...
    // Transcode a UTF-16 Java String to UTF-8 bytes.
    for (int i = beginIndex; i < endIndex;) {
      int c = string.charAt(i);

      if (c < 0x80) {
        Segment tail = writableSegment(1);
        byte[] data = tail.data;
        int segmentOffset = tail.limit - i;
        int runLimit = Math.min(endIndex, Segment.SIZE - segmentOffset);

        // Emit a 7-bit character with 1 byte.
        data[segmentOffset + i++] = (byte) c; // 0xxxxxxx

        // Fast-path contiguous runs of ASCII characters. This is ugly, but yields a ~4x performance
        // improvement over independent calls to writeByte().
        while (i < runLimit) {
          c = string.charAt(i);
          if (c >= 0x80) break;
          data[segmentOffset + i++] = (byte) c; // 0xxxxxxx
        }

        int runSize = i + segmentOffset - tail.limit; // Equivalent to i - (previous i).
        tail.limit += runSize;
        size += runSize;

      } else if (c < 0x800) {
        // Emit a 11-bit character with 2 bytes.
        writeByte(c >>  6        | 0xc0); // 110xxxxx
        writeByte(c       & 0x3f | 0x80); // 10xxxxxx
        i++;

      } else if (c < 0xd800 || c > 0xdfff) {
        ...
      }
    }
    return this;
  }

  @Override
  public Buffer writeByte(int b) {
    //返回一个可写的Segment,可以使用的capacity至少为1(一个Segment的总大小为8KB),若当前Segment已经写满了,则会新建一个Segment返回
    Segment tail = writableSegment(1);
    tail.data[tail.limit++] = (byte) b;//将入参放到Segment中
    size += 1;//总长度+1
    return this;
  }
这一切的背后都是一个叫做Buffer的类在支持着缓冲区,Buffer是BufferedSink和BufferedSource的实现类,因此它既可以用来读数据,也可以用来写数据,其内部使用了一个Segment和SegmentPool,维持着一个链表,其循环利用的机制和Android中Message的利用机制是一模一样的。
final class SegmentPool {//这是一个链表,Segment是其元素,总大小为8KB
  static final long MAX_SIZE = 64 * 1024; // 64 KiB.

  static Segment next;//指向链表的下一个元素

  static long byteCount;

  private SegmentPool() {
  }

  static Segment take() {
    synchronized (SegmentPool.class) {
      if (next != null) {//从链表中取出一个Segment
        Segment result = next;
        next = result.next;
        result.next = null;
        byteCount -= Segment.SIZE;
        return result;
      }
    }
    return new Segment(); // Pool is empty. Don't zero-fill while holding a lock.
  }

  static void recycle(Segment segment) {
    if (segment.next != null || segment.prev != null) throw new IllegalArgumentException();
    if (segment.shared) return; // This segment cannot be recycled.
    synchronized (SegmentPool.class) {
      if (byteCount + Segment.SIZE > MAX_SIZE) return; // Pool is full.
      byteCount += Segment.SIZE;//Segment.SIZE固定为8KB
      segment.next = next;
      segment.pos = segment.limit = 0;
      next = segment;
    }
  }
}
内部一个成员变量next指向链表下一个元素,take方法首先判断池中是否存在可用的,存在则返回,不存在则new一个,而recycle则是将不再使用的Segment重新扔到池中去。从而达到一个Segment池的作用。
回到writeUtf8方法中,RealBufferedSink的emitCompleteSegments()方法完成写的提交
@Override
public BufferedSink emitCompleteSegments() throws IOException {
    if (closed) throw new IllegalStateException("closed");
    long byteCount = buffer.completeSegmentByteCount();//返回已经缓存的字节数
    if (byteCount > 0) sink.write(buffer, byteCount);//这个sink就是刚才new的
    return this;
}
Okio的写操作流程图
参考文献
Android 善用Okio简化处理I/O操作
Android Okhttp之Okio解析
