rhel6+rsyslog+logrotate+mysql+loganalyzer
将系统日志收集到mysql数据库中,并通过loganalyzer分析展示
- rsyslog部署
1.1)rsyslog介绍
Linux的日志记录了用户在系统上一切操作,看日志去分析系统的状态是运维人员必须掌握的基本功。
rsyslog日志服务器的优势:
1、日志统一,集中式管理
2、日志实时传送到一个更加安全的远端服务器上,真正记录用户行为,使日志的2次更改可能性大大降低,从而能够对日志进行真实回放,便于问题追踪。
rsyslog的新功能:
rsyslog是一个加强版的syslog,具有各种各样的新功能,典型的有:
1、直接将日志写入到数据库。
2、日志队列(内存队列和磁盘队列)。
3、灵活的模板机制,可以得到多种输出格式。
4、插件式结构,多种多样的输入、输出模块。
5、可以把日志存放在MySQL ,PostgreSQL,Oracle等数据库中
1.2)安装
[root@rhel6_1 ~]# rpm -qa |grep rsyslog
rsyslog-5.8.10-8.el6.x86_64
1.3)配置文件介绍
预备知识
###rsyslog.conf中日志规则的定义的格式
facitlity.priority Target
#facility: 日志设备(可以理解为日志类型):
-------------------------------------------------------------
auth #pam产生的日志,认证日志
authpriv #ssh,ftp等登录信息的验证信息,认证授权认证
cron #时间任务相关
kern #内核
lpr #打印
mail #邮件
mark(syslog) #rsyslog服务内部的信息,时间标识
news #新闻组
user #用户程序产生的相关信息
uucp #unix to unix copy, unix主机之间相关的通讯
local 1~7 #自定义的日志设备
-------------------------------------------------------------
#priority: 级别日志级别:
-------------------------------------------------------------
debug #有调式信息的,日志信息最多
info #一般信息的日志,最常用
notice #最具有重要性的普通条件的信息
warning, warn #警告级别
err, error #错误级别,阻止某个功能或者模块不能正常工作的信息
crit #严重级别,阻止整个系统或者整个软件不能正常工作的信息
alert #需要立刻修改的信息
emerg, panic #内核崩溃等严重信息
###从上到下,级别从低到高,记录的信息越来越少,如果设置的日志类型为err,则日志不会记录比err级别低的日志,只会记录比err更高级别的日志,也包括err本身的日志。
-------------------------------------------------------------
Target:
#文件, 如/var/log/messages
#用户, root,*(表示所有用户)
#日志服务器,@172.16.22.1
#管道 | COMMAND
-------------------------------------------------------------
###############/etc/rsyslog.conf
# rsyslog v5 configuration file
# For more information see /usr/share/doc/rsyslog-*/rsyslog_conf.html
# If you experience problems, see http://www.rsyslog.com/doc/troubleshoot.html
#### MODULES ####
#本地系统日志模块
$ModLoad imuxsock # provides support for local system logging (e.g. via logger command)
#支持日志标记
$ModLoad imklog # provides kernel logging support (previously done by rklogd)
#$ModLoad immark # provides --MARK-- message capability
#允许514端口接收使用UDP AND TCP 协议转发过来的日志
#支持UDP协议
# Provides UDP syslog reception
#$ModLoad imudp
#$UDPServerRun 514
#支持TCP协议
# Provides TCP syslog reception
#$ModLoad imtcp
#$InputTCPServerRun 514
#### GLOBAL DIRECTIVES ####
#使用默认的时间戳格式 定义日志格式默认模块
# Use default timestamp format
$ActionFileDefaultTemplate RSYSLOG_TraditionalFileFormat
# File syncing capability is disabled by default. This feature is usually not required,
# not useful and an extreme performance hit
#$ActionFileEnableSync on
# Include all config files in /etc/rsyslog.d/
$IncludeConfig /etc/rsyslog.d/*.conf
#### RULES ####
# Log all kernel messages to the console.
# Logging much else clutters up the screen.
#kern.* /dev/console
#记录所有日志类型的info级别的信息存到/var/log/messages,但是mail邮件信息、authpriv验证授权信息、计划任务信息等不写入
#服务.日志级别 none级别代表不操作
# Log anything (except mail) of level info or higher.
# Don't log private authentication messages!
*.info;mail.none;authpriv.none;cron.none /var/log/messages
#authpriv 日志写到 /var/log/secure
# The authpriv file has restricted access.
authpriv.* /var/log/secure
#mail 日志写到 /var/log/maillog - 代表异步写入的意思
# Log all the mail messages in one place.
mail.* -/var/log/maillog
#计划任务日志写入到/var/log/cron
# Log cron stuff
cron.* /var/log/cron
#记录所有大于等于emerg级别信息,以wall方式发送给登录到系统给的人
# Everybody gets emergency messages
*.emerg *
#记录UUCP。news.crit 存放到/var/log/spooler
# Save news errors of level crit and higher in a special file.
uucp,news.crit /var/log/spooler
#记录启动日志存放到/var/log/boot
# Save boot messages also to boot.log
local7.* /var/log/boot.log
#日志转发规则
# ### begin forwarding rule ###
# The statement between the begin ... end define a SINGLE forwarding
# rule. They belong together, do NOT split them. If you create multiple
# forwarding rules, duplicate the whole block!
# Remote Logging (we use TCP for reliable delivery)
#
# An on-disk queue is created for this action. If the remote host is
# down, messages are spooled to disk and sent when it is up again.
#$WorkDirectory /var/lib/rsyslog # where to place spool files
#$ActionQueueFileName fwdRule1 # unique name prefix for spool files
#$ActionQueueMaxDiskSpace 1g # 1gb space limit (use as much as possible)
#$ActionQueueSaveOnShutdown on # save messages to disk on shutdown
#$ActionQueueType LinkedList # run asynchronously
#$ActionResumeRetryCount -1 # infinite retries if host is down
# remote host is: name/ip:port, e.g. 192.168.0.1:514, port optional
#*.* @@remote-host:514
# ### end of the forwarding rule ###
# A template to for higher precision timestamps + severity logging
$template SpiceTmpl,"%TIMESTAMP%.%TIMESTAMP:::date-subseconds% %syslogtag% %syslogseverity-text%:%msg:::sp-if-no-1st-sp%%msg:::drop-last-lf%\n"
:programname, startswith, "spice-vdagent" /var/log/spice-vdagent.log;SpiceTmpl
- 日志滚动-logrotate
覆盖之前的日志 保证随着日志的增长 磁盘空间不增长
2.1) logrotate日志滚动的介绍
所有的日志文件都会随着时间的推移和访问次数的增加而迅速增长,因此必须对日志文件进行定期清理以免造成磁盘空间的不必要的浪费,同时也加快了管理员查看日志所用的时间。因而logrotate就非常有存在的必要了,Redhat系统中已经默然安装logrotate且利用logrotate设置了相关对rsyslog日志迅速增长的设置。
logrotate的执行由crond服务实现。在/etc/cron.daily目录中,有个文logrotate,它实际上是个shell script,用来启动logrotate。
logrotate程序每天由cron在指定的时间(/etc/crontab)启动。
2.2) 配置文件
[root@rhel6_1 ~]# sed -e '/^#/d' -e '/^$/d' /etc/logrotate.conf
weekly #每周清理一次日志文件
rotate 4 #保存四个轮换日志
create #清除旧日志的同时,创建新的空日志文件
dateext #使用日期为后缀的回滚文件 #可以去/var/log目录下看看
include /etc/logrotate.d #包含/etc/logrotate.d目录下的所有配置文件
/var/log/wtmp { #对/var/log/wtmp这个日志文件按照下面的设定日志回滚
monthly #每月轮转一次
create 0664 root utmp #设置wtmp这个日志文件的权限,属主,属组
minsize 1M #日志文件必须大于1M才会去轮换(回滚)
rotate 1 #保存一个轮换日志
}
/var/log/btmp {
missingok #如果文件丢失不报错
monthly
create 0600 root utmp
rotate 1
}
#############
[root@rhel6_1 ~]# cat /etc/logrotate.d/syslog
/var/log/cron #这些文件是rsyslog.conf文件中全局配置定义中指定的Target的路径
/var/log/maillog
/var/log/messages
/var/log/secure
/var/log/spooler
{
sharedscripts
postrotate # 轮换之后重启rsyslog服务
/bin/kill -HUP `cat /var/run/syslogd.pid 2> /dev/null` 2> /dev/null || true
endscript
}
三、修改rsyslog日志文件,重定义输出日志文件
3.1)将所有信息保存到/var/log/baism.log
#vim /etc/rsyslog.conf
#注意:#baism# 代表是我自己给注释的
#### RULES ####
# Log all kernel messages to the console.
# Logging much else clutters up the screen.
#kern.* /dev/console
# Log anything (except mail) of level info or higher.
# Don't log private authentication messages!
#baism# *.info;mail.none;authpriv.none;cron.none /var/log/messages
# The authpriv file has restricted access.
#baism# authpriv.* /var/log/secure
# Log all the mail messages in one place.
#baism# mail.* -/var/log/maillog
# Log cron stuff
#baism# cron.* /var/log/cron
# Everybody gets emergency messages
#baism# *.emerg *
# Save news errors of level crit and higher in a special file.
#baism# uucp,news.crit /var/log/spooler
# Save boot messages also to boot.log
#baism# local7.* /var/log/boot.log
#添加以下这行 *.* 代表匹配所有设备的所有日志
*.* /var/log/baism.log
3.2) 重启rsyslog日志服务 验证
[root@rhel6_1 ~]#
[root@rhel6_1 ~]# /etc/init.d/rsyslog restart
关闭系统日志记录器: [确定]
启动系统日志记录器: [确定]
3.3) 验证
3.3.1) 验证日志文件是否存在
[root@rhel6_1 ~]# ls /var/log/baism.log
/var/log/baism.log
3.3.2 验证日志文件是否有日志滚动 使用SSH登录测试下 看看是否有登录日志
[root@rhel6_1 ~]# tailf /var/log/baism.log
Mar 16 17:40:07 rhel6_1 kernel: imklog 5.8.10, log source = /proc/kmsg started.
Mar 16 17:40:07 rhel6_1 rsyslogd: [origin software="rsyslogd" swVersion="5.8.10" x-pid="21172" x-info="http://www.rsyslog.com"] start
#ssh登录验证信息也有了
Mar 16 17:42:10 rhel6_1 sshd[21185]: Accepted password for root from 192.168.180.254 port 49949 ssh2
Mar 16 17:42:10 rhel6_1 sshd[21185]: pam_unix(sshd:session): session opened for user root by (uid=0)
Mar 16 17:42:10 rhel6_1 sshd[21187]: Accepted password for root from 192.168.180.254 port 49950 ssh2
Mar 16 17:42:10 rhel6_1 sshd[21187]: pam_unix(sshd:session): session opened for user root by (uid=0)
Mar 16 17:42:10 rhel6_1 sshd[21187]: subsystem request for sftp
四、将日志存到远程服务器
4.1) 客户端配置
#vim /etc/rsyslog.conf
#注意:#baism# 代表是我自己给注释的
#### RULES ####
# Log all kernel messages to the console.
# Logging much else clutters up the screen.
#kern.* /dev/console
# Log anything (except mail) of level info or higher.
# Don't log private authentication messages!
#baism# *.info;mail.none;authpriv.none;cron.none /var/log/messages
# The authpriv file has restricted access.
#baism# authpriv.* /var/log/secure
# Log all the mail messages in one place.
#baism# mail.* -/var/log/maillog
# Log cron stuff
#baism# cron.* /var/log/cron
# Everybody gets emergency messages
#baism# *.emerg *
# Save news errors of level crit and higher in a special file.
#baism# uucp,news.crit /var/log/spooler
# Save boot messages also to boot.log
#baism# local7.* /var/log/boot.log
#添加以下这行 *.* 代表匹配所有设备的所有日志 日式服务器为192.168.180.241
*.* @192.168.180.241
4.2) 服务器端设置
开启日志接收端口
# Provides UDP syslog reception
#$ModLoad imudp
#$UDPServerRun 514
# Provides TCP syslog reception
#$ModLoad imtcp
#$InputTCPServerRun 514
改为
# Provides UDP syslog reception
$ModLoad imudp
$UDPServerRun 514
# Provides TCP syslog reception
$ModLoad imtcp
$InputTCPServerRun 514
4.3) 重启服务器 和 客户端 rsyslog日志服务
验证
#4.3.1客户端将日志发给服务端 测试命令 logger
#client
[root@rhel6_1 ~]# logger "hello I'M client 241"
#4.3.2 服务端 接收
[root@rhel6_6 ~]# tailf /var/log/messages
Mar 17 05:39:37 rhel6_6 system-config-network[1668]: chmod 0644 //etc/sysconfig/networking/devices/ifcfg-eth0
Mar 17 05:39:42 rhel6_6 kernel: e1000: eth0 NIC Link is Up 1000 Mbps Full Duplex, Flow Control: None
Mar 17 05:39:42 rhel6_6 kernel: ADDRCONF(NETDEV_UP): eth0: link is not ready
Mar 17 05:39:42 rhel6_6 kernel: ADDRCONF(NETDEV_CHANGE): eth0: link becomes ready
Mar 17 06:26:35 rhel6_6 kernel: Kernel logging (proc) stopped.
Mar 17 06:26:35 rhel6_6 rsyslogd: [origin software="rsyslogd" swVersion="5.8.10" x-pid="1180" x-info="http://www.rsyslog.com"] exiting on signal 15.
Mar 17 06:26:35 rhel6_6 kernel: imklog 5.8.10, log source = /proc/kmsg started.
Mar 17 06:26:35 rhel6_6 rsyslogd: [origin software="rsyslogd" swVersion="5.8.10" x-pid="2155" x-info="http://www.rsyslog.com"] start
Mar 16 17:48:44 rhel6_1 kernel: imklog 5.8.10, log source = /proc/kmsg started.
Mar 16 17:48:44 rhel6_1 rsyslogd: [origin software="rsyslogd" swVersion="5.8.10" x-pid="21300" x-info="http://www.rsyslog.com"] start
#发现 RHEL6_1客户端发过来的日志 就成功了
Mar 16 17:49:14 rhel6_1 root: hello I'M client 241
五、日志存到mysql
#服务器安装
- LAMP架构
- rsyslog-mysql
[root@rhel6_6 ~]# yum -y install httpd mysql-server mysql php php-mysql rsyslog-mysql
#启动mysql服务
[root@rhel6_6 ~]# service mysqld start
#寻找模板数据库
[root@rhel6_6 ~]# ls /usr/share/doc/rsyslog-mysql-5.8.10/
createDB.sql
#导入数据库
[root@rhel6_6 ~]# mysql < /usr/share/doc/rsyslog-mysql-5.8.10/createDB.sql
[root@rhel6_6 ~]# mysql -e "show databases"
+--------------------+
| Database |
+--------------------+
| information_schema |
| Syslog |
| mysql |
| test |
+--------------------+
##如果看到Syslog 就说明成功了
[root@rhel6_6 ~]# mysql
mysql> grant all on Syslog.* to root identified by "baism";
Query OK, 0 rows affected (0.00 sec)
mysql> flush privileges;
Query OK, 0 rows affected (0.00 sec)
服务器设置
#### RULES ####
# Log all kernel messages to the console.
# Logging much else clutters up the screen.
#kern.* /dev/console
# Log anything (except mail) of level info or higher.
# Don't log private authentication messages!
#baism# *.info;mail.none;authpriv.none;cron.none /var/log/messages
# The authpriv file has restricted access.
#baism# authpriv.* /var/log/secure
# Log all the mail messages in one place.
#baism# mail.* -/var/log/maillog
# Log cron stuff
#baism# cron.* /var/log/cron
# Everybody gets emergency messages
#baism# *.emerg *
# Save news errors of level crit and higher in a special file.
#baism# uucp,news.crit /var/log/spooler
#注意 :ommysql:192.168.180.241,Syslog,root, 代表哪个机器,DB哪个库,DB哪个用户,密码多少
*.* :ommysql:192.168.180.241,Syslog,root,baism
# Save boot messages also to boot.log
local7.* /var/log/boot.log
客户端设置
yum -y install rsyslog-mysql #提供ommysql客户端模块
#### RULES ####
# Log all kernel messages to the console.
# Logging much else clutters up the screen.
#kern.* /dev/console
# Log anything (except mail) of level info or higher.
# Don't log private authentication messages!
#baism# *.info;mail.none;authpriv.none;cron.none /var/log/messages
# The authpriv file has restricted access.
#baism# authpriv.* /var/log/secure
# Log all the mail messages in one place.
#baism# mail.* -/var/log/maillog
# Log cron stuff
#baism# cron.* /var/log/cron
# Everybody gets emergency messages
#baism# *.emerg *
# Save news errors of level crit and higher in a special file.
#baism# uucp,news.crit /var/log/spooler
# Save boot messages also to boot.log
#baism# local7.* /var/log/boot.log
$Modload ommysql #载入mysql模块
*.* @192.168.180.241 #代表和哪个服务器通信
*.* :ommysql:192.168.180.241,Syslog,root,baism #服务器的IP,库,DB数据库用户,密码
##验证日志是否存在数据库
#客户端设置
[root@rhel6_1 ~]# logger -p info "jajlalal client"
#服务端检测
mysql> select * from Syslog.SystemEvents \G;
...................省略
*************************** 16. row ***************************
ID: 16
CustomerID: NULL
ReceivedAt: 2017-03-17 07:24:54
DeviceReportedTime: 2017-03-16 18:46:49
Facility: 1
Priority: 6
FromHost: rhel6_1
Message: jajlalal client
NTSeverity: NULL
Importance: NULL
EventSource: NULL
EventUser: NULL
EventCategory: NULL
EventID: NULL
EventBinaryData: NULL
MaxAvailable: NULL
CurrUsage: NULL
MinUsage: NULL
MaxUsage: NULL
InfoUnitID: 1
SysLogTag: root:
EventLogType: NULL
GenericFileName: NULL
SystemID: NULL
16 rows in set (0.00 sec)
六、日志分析
下载:loganalyzer-4.1.5.tar.gz 一个PHP网站
#服务器设置 安装lamp 并 安装网站
[root@rhel6_6 ~]# tar xf loganalyzer-4.1.5.tar.gz
[root@rhel6_6 ~]# cp -r loganalyzer-4.1.5/src/* /var/www/html/
[root@rhel6_6 ~]# cp loganalyzer-4.1.5/contrib/* /var/www/html/
[root@rhel6_6 ~]# sh /var/www/html/configure.sh
[root@rhel6_6 ~]# mysql -h localhost -u root -pbaism
mysql> create database loganalyzer;
Query OK, 1 row affected (0.00 sec)
mysql> grant all on loganalyzer.* to vfast identified by 'baism';
Query OK, 0 rows affected (0.00 sec)
mysql> flush privileges;
Query OK, 0 rows affected (0.00 sec)
网站设置看图片1-9 其中8是最后一步点完成即可
访问web站点:192.168.180.241,安装loganalyzer站点
点击here去安装这个网站。
STEP1: 安装前的介绍,点击下一步(Next)
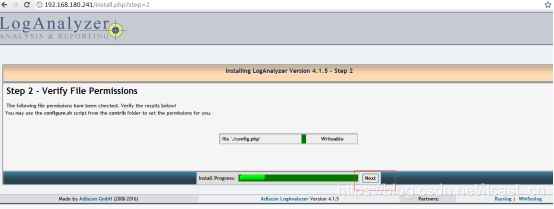
STEP2:验证文件权限
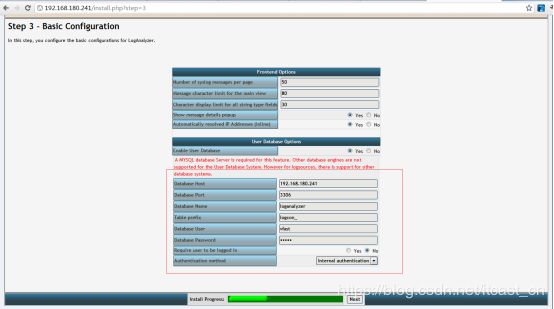
STEP3:输入数据库的信息,让网站能连接你准备好的数据库
STEP4: web站点会在数据库中安装表及数据导入
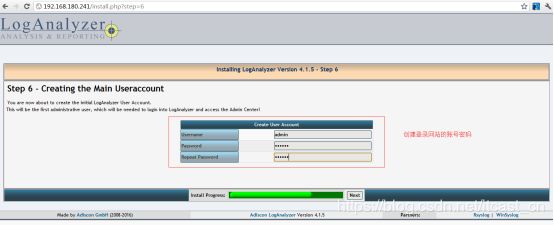
STEP6: 创建web站点管理员
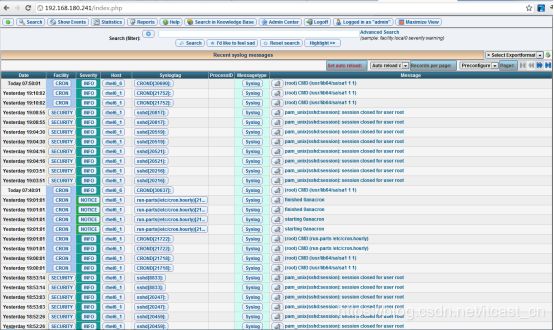
设置成功后,重新访问网站,看到下图,日志导入成功了。


