Centos7搭建maven私服nexus3
安装难度: ★☆☆☆☆
繁琐程度:★☆☆☆☆
易错程度:★☆☆☆☆
一 准备
java8: https://mp.csdn.net/postedit/82432145
maven3.3.9: https://mp.csdn.net/postedit/82493855
二 安装
- 下载安装包:
方式一:
nexus: https://www.sonatype.com/download-oss-sonatype
方式二:
执行命令:
wget https://sonatype-download.global.ssl.fastly.net/nexus/3/nexus-3.9.0-01-unix.tar.gz经测试第二种方式有点慢
- 解压:
tar -xvf nexus-3.9.0-01-unix.tar.gz- 移动文件夹:
mv nexus-3.9.0-01 /opt/soft/nexus-3.9注意: 没有soft文件夹要创建
此步骤可执行可不执行(建议执行):\
- 创建软连接:
ln -s /opt/soft/nexus-3.9.0-01 /opt/shortcut/nexusshortcut目录要自己创建
优点:其他应用引用软连接,当软件版本更改时只需修改软连接即可
useradd -d "/home/nexus" -m -s "/sbin/nologin" nexus
chown -R nexus:nexus /opt/shortcut/nexus
chown -R nexus:nexus /opt/soft/sonatype-work
chown -R nexus:nexus /opt/soft/sonatype-work (nexus的日志记录文件,不然启动不了)
修改../etc/nexus-default.properties配置文件:
修改nexus-default.properties中的port和host属性,其中host属性不能写127.0.0.1和localhost[这个我访问不了],最后写的是DHCP(动态获取ip地址)时的ip地址
application-port=8081
application-host=172.17.139.88
启动和停止:
进入bin目录:
./nexus start //后台启动,不显示日志
./nexus run & //后台启动,显示日志
停止:
./nexus stop #或者直接杀死线程
上面在启动过程中出现告警:不推荐使用root用户启动。这个告警不影响nexus的正常访问和使用。
去掉上面WARNING的办法:修改配置
vi /etc/profile
export RUN_AS_USER=root
使配置生效: source /etc/profile这样就不报错了
[

启动成功
访问:

使用内置账号admin admin123登陆 ,就这么简单就可以使用了
使用nexus3
nexus的默认仓库:

下面介绍一下Nexus默认的仓库:
Central: 代理中央仓库、策略为Release、只会下载和缓存中央仓库中的发布版本构件。
Releases: 策略为Release的宿主仓库、用来部署组织内部的发布版本内容。
Snapshots: 策略为Snapshot的宿主仓库、用来部署组织内部的快照版本内容。
- 创建一个阿里云的代理仓库:


阿里云仓库地址 : http://maven.aliyun.com/nexus/content/groups/public/
- 修改组信息

修改maven-releases 仓库配置

deployment pollcy有三个值:
- read-only: 只读
- disable redeploy: 读和部署
- allow redeploy: 读, 部署, 删除
使用:
给大家分享一下我的配置,可能不太好但是能用:
maven setting.xml 配置:
E:\repository\本地仓库地址


      nexus-releases
      admin
      admin123


      nexus-snapshots
      admin
      admin123


       nexus-releases
      http://IP地址/repository/maven-public/
      *
pom.xml配置:
			nexus-releases
			Nexus Release Repository
			http://39.106.190.10:9081/repository/maven-releases/


			nexus-snapshots
			Nexus Snapshot Repository
			http://39.106.190.10:9081/repository/maven-snapshots/
需要注意的是,settings.xml中server元素下id的值必须与POM中repository或snapshotRepository下id的值完全一致。将认证信息放到settings下而非POM中,是因为POM往往是它人可见的,而settings.xml是本地的
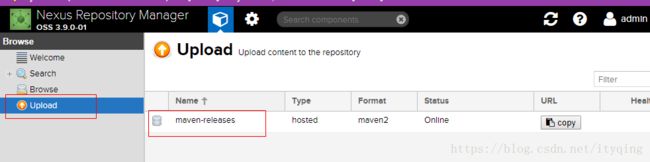
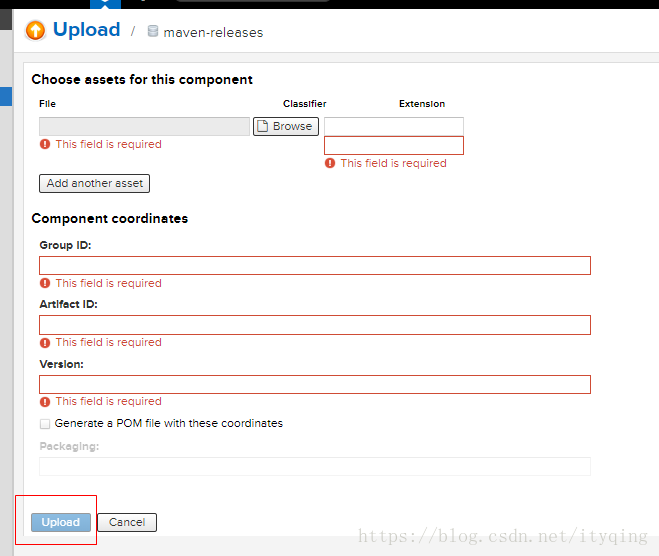
使用nexus repository manager 上传jar包
删除jar:


附:
setting.xml详解: https://blog.csdn.net/allwords/article/details/78222606
https://blog.csdn.net/arnolian/article/details/78837653
https://www.jianshu.com/p/26626b8f9355