基于Springboot2.1+Mybatis+Swagger的接口框架搭建
Swagger是一个非常强大并且提供API接口设计、测试等工具。通过Swagger我们可以只关注接口的实现和测试,并且通过Swagger UI测试接口极其的方便,不需要单独写接口测试逻辑或代码。本文基于Springboot2.1+MyBatis+Swagger搭建一个对接口调用。
在进行下面操作之前,需要安装数据库。本文采用的是mysql数据库,其安装方式可以参考文档我之前的一篇文档(https://blog.csdn.net/java_foryou/article/details/83624663)。
言归正传,开始。。。。。。。
建数据库表
在数据库(如数据库名为:test)创建一个数据库表为table1.
CREATE TABLE `table1` (
  `ID` varchar(255) NOT NULL COMMENT '主键',
  `NAME` varchar(255) DEFAULT NULL COMMENT '姓名',
  `PWD` varchar(255) DEFAULT NULL COMMENT '密码',
  PRIMARY KEY (`ID`)
) ENGINE=InnoDB DEFAULT CHARSET=latin1;
通过IDEA创建项目
利用IDEA创建项目,其创建步骤可以百度或者参考我之前的一篇文档(https://blog.csdn.net/java_foryou/article/details/83000961)。
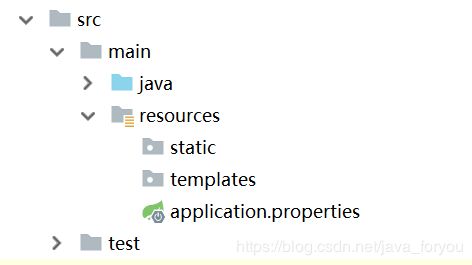
在创建好项目过后,其src下面的结构如下:

查看pom.xml文件。其加入的相关依赖如下所示:
<project xmlns="http://maven.apache.org/POM/4.0.0" xmlns:xsi="http://www.w3.org/2001/XMLSchema-instance"
	xsi:schemaLocation="http://maven.apache.org/POM/4.0.0 http://maven.apache.org/xsd/maven-4.0.0.xsd">
	<modelVersion>4.0.0modelVersion>

	<groupId>com.test.shirogroupId>
	<artifactId>shiroartifactId>
	<version>0.0.1-SNAPSHOTversion>
	<packaging>jarpackaging>

	<name>shironame>
	<description>Shiro project for Spring Bootdescription>

	<parent>
		<groupId>org.springframework.bootgroupId>
		<artifactId>spring-boot-starter-parentartifactId>
		<version>2.1.0.RELEASEversion>
		<relativePath/>
	parent>

	<properties>
		<project.build.sourceEncoding>UTF-8project.build.sourceEncoding>
		<project.reporting.outputEncoding>UTF-8project.reporting.outputEncoding>
		<java.version>1.8java.version>
	properties>

	<dependencies>
		<dependency>
			<groupId>org.springframework.bootgroupId>
			<artifactId>spring-boot-starter-webartifactId>
		dependency>
		<dependency>
			<groupId>org.mybatis.spring.bootgroupId>
			<artifactId>mybatis-spring-boot-starterartifactId>
			<version>1.3.2version>
		dependency>
		<dependency>
			<groupId>tk.mybatisgroupId>
			<artifactId>mapperartifactId>
			<version>3.4.1version>
		dependency>

		<dependency>
			<groupId>org.springframework.bootgroupId>
			<artifactId>spring-boot-configuration-processorartifactId>
			<optional>trueoptional>
		dependency>
		<dependency>
			<groupId>org.springframework.sessiongroupId>
			<artifactId>spring-session-coreartifactId>
		dependency>
		<dependency>
			<groupId>com.alibabagroupId>
			<artifactId>druidartifactId>
			<version>1.0.27version>
		dependency>

		<dependency>
			<groupId>mysqlgroupId>
			<artifactId>mysql-connector-javaartifactId>
			<scope>runtimescope>
		dependency>
		<dependency>
			<groupId>org.springframework.bootgroupId>
			<artifactId>spring-boot-starter-testartifactId>
			<scope>testscope>
		dependency>
		<dependency>
			<groupId>org.springframework.securitygroupId>
			<artifactId>spring-security-testartifactId>
			<scope>testscope>
		dependency>

		<dependency>
			<groupId>io.springfoxgroupId>
			<artifactId>springfox-swagger2artifactId>
			<version>2.6.1version>
		dependency>

		<dependency>
			<groupId>io.springfoxgroupId>
			<artifactId>springfox-swagger-uiartifactId>
			<version>2.6.1version>
		dependency>
	dependencies>

	<build>
		<resources>
			<resource>
				<directory>src/main/javadirectory>
				<includes>
					<include>**/*.xmlinclude>
				includes>
				<filtering>falsefiltering>
			resource>
			<resource>
				<directory>src/main/resourcesdirectory>
			resource>
		resources>
		<plugins>
			<plugin>
				<groupId>org.springframework.bootgroupId>
				<artifactId>spring-boot-maven-pluginartifactId>
			plugin>
		plugins>
	build>
project>
配置数据库连接属性
在application.properties文件里面,配置数据库的链接相关的属性。其内容如下:
spring.datasource.username=XXX
spring.datasource.password=XXXXXXX
spring.datasource.driver-class-name=com.mysql.jdbc.Driver
spring.datasource.url=jdbc:mysql://[IP]:3306/[database]?characterEncoding=utf8
注
此处配置的用户名(spring.datasource.username)和密码(spring.datasource.password)应该为能够访问该数据库的用户名密码。spring.datasource.url里面配置的IP为数据库安装的IP地址,数据库名为使用的数据库名。
数据库连接代码实现
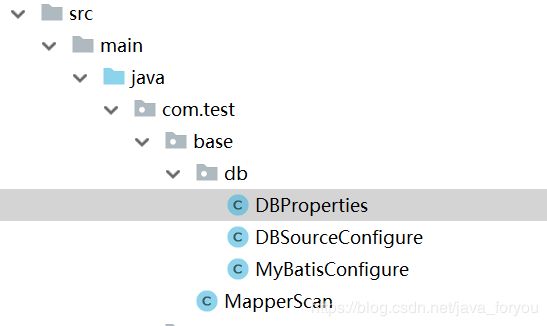
数据库连接相关的代码package结构如下:

下面逐一描述每个文件的意义:
DBProperties用于自动读取配置文件application.properties并将涉及到的配置封装为实体bean。
注:如果在pom.xml文件里面缺少spring-boot-configuration-processor artifactId,则实体bean封装失败,相应的值为默认值。
注:在DBProperties中的注解@ConfigurationProperties中的prefix = "spring.datasource"表示将配置文件(application.properties)中以spring.datasource开始的配置封装到该bean里面。
import org.springframework.boot.context.properties.ConfigurationProperties;
import org.springframework.stereotype.Component;

@Component
@ConfigurationProperties(prefix = "spring.datasource")
public class DBProperties {
    private String url;
    private String username;
    private String password;
    private String driverClassName;

    public String getUrl() {
        return url;
    }

    public void setUrl(String url) {
        this.url = url;
    }

    public String getUsername() {
        return username;
    }

    public void setUsername(String username) {
        this.username = username;
    }

    public String getPassword() {
        return password;
    }

    public void setPassword(String password) {
        this.password = password;
    }

    public String getDriverClassName() {
        return driverClassName;
    }

    public void setDriverClassName(String driverClassName) {
        this.driverClassName = driverClassName;
    }
}
DBSourceConfigure用于配置DataSource。其代码如下:
import javax.sql.DataSource;

/**
 * Structe DB connection
 */
@Configuration
public class DBSourceConfigure {
    @Autowired
    private DBProperties dbProperties;

    @Bean(name = {"dataSource"})
    public DataSource dataSource(){
        DruidDataSource druidDataSource = new DruidDataSource();
        druidDataSource.setUrl(dbProperties.getUrl());
        druidDataSource.setPassword(dbProperties.getPassword());
        druidDataSource.setUsername(dbProperties.getUsername());
        druidDataSource.setDriverClassName(dbProperties.getDriverClassName());
        return druidDataSource;
    }
}
MyBatisConfigure为mybatis相关的信息配置。
import org.springframework.boot.autoconfigure.AutoConfigureAfter;
import org.springframework.context.annotation.Configuration;
import org.springframework.jdbc.datasource.DataSourceTransactionManager;
import org.springframework.transaction.PlatformTransactionManager;
import org.springframework.transaction.annotation.TransactionManagementConfigurer;

import javax.annotation.Resource;
import javax.sql.DataSource;

@Configuration
@AutoConfigureAfter({DBSourceConfigure.class})
public class MyBatisConfigure implements TransactionManagementConfigurer {
    @Resource(name = "dataSource")
    private DataSource dataSource;
    @Override
    public PlatformTransactionManager annotationDrivenTransactionManager() {
        return new DataSourceTransactionManager(dataSource);
    }
}
MapperScan用于配置mapper扫描等相关信息。
mport com.test.base.db.MyBatisConfigure;
import org.springframework.boot.autoconfigure.AutoConfigureAfter;
import org.springframework.context.annotation.Bean;
import org.springframework.context.annotation.Configuration;
import tk.mybatis.spring.mapper.MapperScannerConfigurer;

import java.util.Properties;

@Configuration
@AutoConfigureAfter({MyBatisConfigure.class})
public class MapperScan {
    @Bean
    public static MapperScannerConfigurer mapperScannerConfigurer(){
        MapperScannerConfigurer mapperScannerConfigurer = new MapperScannerConfigurer();
        mapperScannerConfigurer.setSqlSessionFactoryBeanName("sqlSessionFactory");
        mapperScannerConfigurer.setBasePackage("com.test.bs.presists");
        Properties properties = new Properties();
        properties.setProperty("notEmpty", "false");
        properties.setProperty("IDENTITY", "MYSQL");
        mapperScannerConfigurer.setProperties(properties);
        return mapperScannerConfigurer;
    }
}
以上为数据库配置、数据库连接、mapper扫描代码实现。
接口代码
这部分将对接口以及业务逻辑代码(这里只做简单实现,具体的需要根据其实际业务进行处理)。

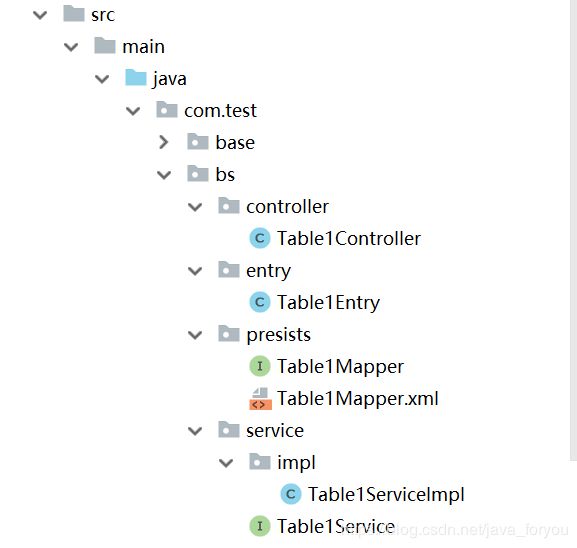
同样,这里将对每一个文件进行描述:
Table1Controller定义接口,用于对外调用(如Web调用,其他功能模块调用)。代码中@ApiOperation注解需要与Swagger一起使用,swagger将在后面的步骤中介绍。
import com.test.bs.entry.Table1Entry;
import com.test.bs.service.Table1Service;
import io.swagger.annotations.ApiOperation;
import org.springframework.beans.factory.annotation.Autowired;
import org.springframework.web.bind.annotation.RequestMapping;
import org.springframework.web.bind.annotation.RequestMethod;
import org.springframework.web.bind.annotation.RestController;

import java.util.List;

@RestController
@RequestMapping("/table")
public class Table1Controller {

    @Autowired
    Table1Service table1Service;

    @ApiOperation(value = "保存任务", notes = "保存任务")
    @RequestMapping(value = "dataList", method = RequestMethod.POST)
    public List<Table1Entry> dataList(){
        return table1Service.listData();
    }
}
Table1Entry实体类,其属性对应表table1的列。
import javax.persistence.Column;
import javax.persistence.Table;
import java.io.Serializable;

@Table(name = "table1")
public class Table1Entry implements Serializable {
    @Column(name="ID")
    private String id;
    @Column(name="NAME")
    private String name;
    @Column(name="PWD")
    private String password;

    public String getId() {
        return id;
    }

    public void setId(String id) {
        this.id = id;
    }

    public String getName() {
        return name;
    }

    public void setName(String name) {
        this.name = name;
    }

    public String getPassword() {
        return password;
    }

    public void setPassword(String password) {
        this.password = password;
    }
}
Table1Mapper.xml用于配置实体bean Table1Entry与表table1的列的映射关系以及相应的SQL操作。
<mapper namespace="com.test.bs.presists.Table1Mapper">
    <resultMap id="resultMap" type="com.test.bs.entry.Table1Entry">
        <result property="id" column="ID"/>
        <result property="name" column="NAME"/>
        <result property="password" column="PWD"/>
    resultMap>
    <select id="dataList" resultMap="resultMap">
      select ID,`NAME`,PWD from table1
    select>
mapper>
Table1Mapper,对应于Table1Mapper.xml中的CRUD语句。其Table1Mapper和Table1Mapper.xml的文件名必须相同(后缀不同),否则对SQL的操作将会失败。
import com.test.bs.entry.Table1Entry;
import java.util.List;
public interface Table1Mapper {
    public List<Table1Entry> dataList();
}
Table1Service只是定义接口而已,所以这里附上Table1ServiceImpl代码。
import com.test.bs.entry.Table1Entry;
import com.test.bs.presists.Table1Mapper;
import com.test.bs.service.Table1Service;
import org.springframework.beans.factory.annotation.Autowired;
import org.springframework.stereotype.Service;
import java.util.List;
@Service
public class Table1ServiceImpl implements Table1Service{
    @Autowired
    Table1Mapper table1Mapper;
    @Override
    public List<Table1Entry> listData() {
        return table1Mapper.dataList();
    }
}
至此,DB配置和业务接口及代码已完成。到这步,相应的接口即可提供给外部系统使用。由于对我们自己而言,需要对接口测试的话,需要写一堆代码才能进行。所以这里我们引入swagger,这样我们在测试的时,当接口完成后,不需要再写一堆堆代码才能对测试接口。因为通过Swagger UI,当系统启动后,我们直接通过浏览器就可以调用接口并进行测试。
swagger代码
附上swagger代码。
import io.swagger.annotations.ApiOperation;
import org.springframework.context.annotation.Bean;
import org.springframework.context.annotation.Configuration;
import org.springframework.web.servlet.config.annotation.WebMvcConfigurer;
import springfox.documentation.builders.ApiInfoBuilder;
import springfox.documentation.builders.PathSelectors;
import springfox.documentation.builders.RequestHandlerSelectors;
import springfox.documentation.service.ApiInfo;
import springfox.documentation.spi.DocumentationType;
import springfox.documentation.spring.web.plugins.Docket;
import springfox.documentation.swagger2.annotations.EnableSwagger2;
@Configuration
@EnableSwagger2
public class SwaggerView implements WebMvcConfigurer  {
    @Bean
    public Docket swaggerSpringMvcPlugin(){
        return  new Docket(DocumentationType.SWAGGER_2).apiInfo(createApiInfo()).select().apis(RequestHandlerSelectors.withMethodAnnotation(ApiOperation.class)).paths(PathSelectors.any()).build();
    }
    private ApiInfo createApiInfo(){
        return new ApiInfoBuilder().title("测试").description("接口").version("V0.1").build();
    }
}
好了,接下来我修改一下启动方法,添加注解@ComponentScan(“com.test”)。然后运行该main方法启动该项目。
import org.springframework.boot.SpringApplication;
import org.springframework.boot.autoconfigure.SpringBootApplication;
import org.springframework.context.annotation.ComponentScan;

@SpringBootApplication
@ComponentScan("com.test")
public class ShiroApplication {
	public static void main(String[] args) {
		SpringApplication.run(ShiroApplication.class, args);
	}
}
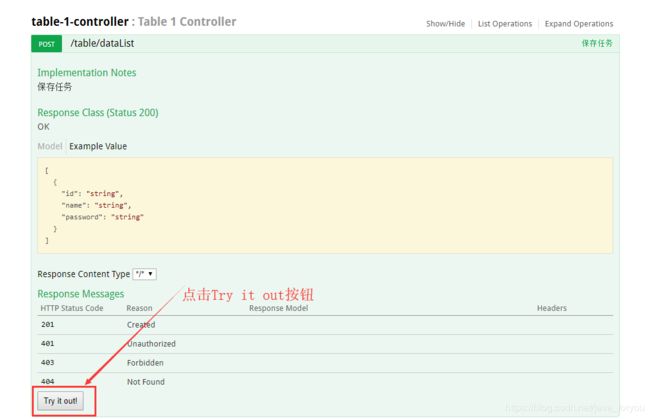
当启动完成并成功后,在浏览器输入http://[IP]:8080/swagger-ui.html。当打开该URL后,将会看到如下所示界面:

展开接口,点击Try it out! 按钮,表table1里面的数据将会展示在页面中。

到此,整个搭建和测试过程已完成~~~~~~~~~~~~~~~
【另】
如果出现每次启动Springboot后,在打开链接时,需要登录界面(如下图)

这是因为在POM.XML文件里面加入了下面的依赖。我们只需要在pom.xml里面删掉下面的依赖即可。否则在即使登录后,浏览器调用接口时,需要传入用户名和密码,不然电泳接口时将会返回403。
		<dependency>
			<groupId>org.springframework.bootgroupId>
			<artifactId>spring-boot-starter-securityartifactId>
		dependency>