** iOS下数据持久化常用的几种方式:**
- NSUserDefaults
- plist(属性列表)
- NSKeyedArchiver(对象归档)
- iOS的嵌入式关系数据库SQLite3
- 苹果公司提供的持久化工具 Core Data
** 上面几种方式,有一个共同的要素,就是应用的/Documents文件夹。每个应用都有自己的/Documents文件夹,且仅能读写各自/Documents文件中的内容 **
先让我们我们看看sandbox(沙盒)
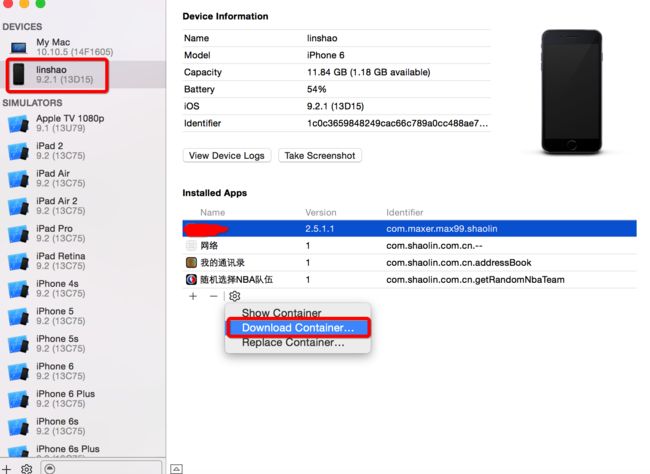
将手机与电脑连接好之后,按如下步骤进行操作
另一种方式
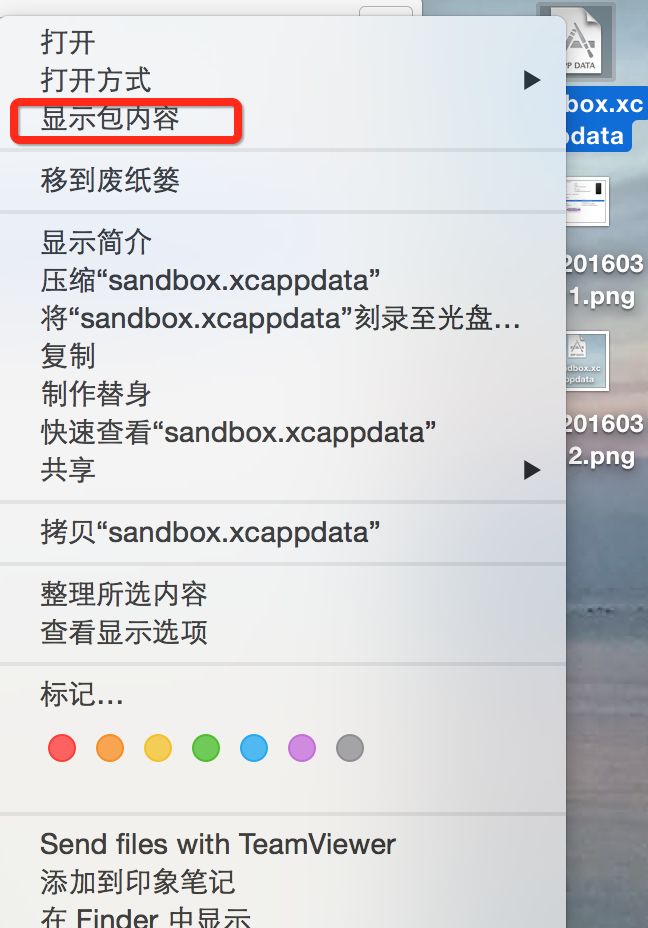
下载这个文件我们会得到一个.xcappdata的文件
右键显示包内容
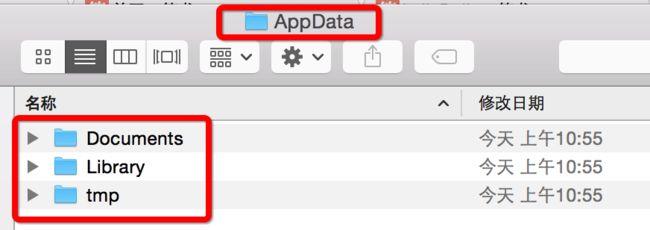
逐一打开你要的文件吧
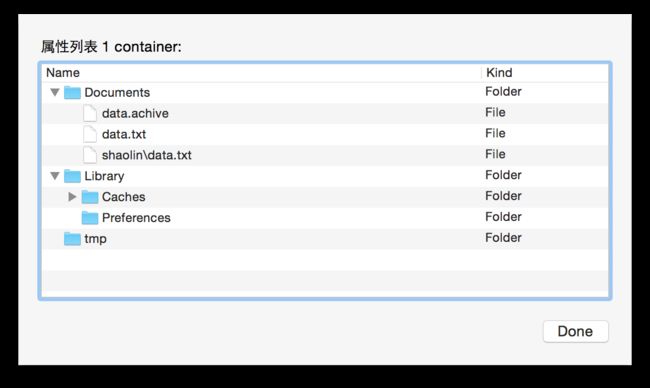
沙盒目录结构清晰的展现在我们眼前
- Documents:保存应用运行时生成的需要持久化的数据,iTunes同步设备时** 会 **备份该目录。例如,游戏应用可将游戏存档保存在该目录
- tmp:保存应用运行时所需的临时数据,使用完毕后再将相应的文件从该目录删除。应用没有运行时,系统也可能会清除该目录下的文件。iTunes同步设备时** 不会 **备份该目录
- Library/Caches:保存应用运行时生成的需要持久化的数据,iTunes同步设备时** 不会 **备份该目录。一般存储体积大、不需要备份的非重要数据
- Library/Preference:保存应用的所有偏好设置,iOS的Settings(设置)应用** 会 *在该目录中查找应用的设置信息。iTunes同步设备时 会 *备份该目录
NSUserDefaults:
直接上代码:
static NSString* const key = @"key";
[[NSUserDefaults standardUserDefaults] setValue:@"YES" forKey:key];
[NSUserDefaults standardUserDefaults] valueForKey:key]
[userDefaults removeObjectForKey:key];
[userDefaults synchronize];
上面的示例代码基本就是NSUserDefaults所有用法了,虽然很简单,但还是有几点需要注意:
- 建议将所有的的key单独存放(好处自己领会)
- NSUserDefaults可以存储的数据类型包括:NSData、NSString、NSNumber、NSDate、NSArray、NSDictionary。如果要存储其他类型,则需要转换为前面的类型,才能用NSUserDefaults存储。之前碰到个坑就是从服务器拿到数据部分用这种方式存储,服务器返回NSNull,我们这边也没有model层转,就直接存储了,导致app卡掉但并没有闪退之类,就是线程卡死的情况
- 同步问题,在适当的时候同步。因为synchronize的开销可能会很大,因为要比较内存中和存储中的所有用户偏好默认值,如果有好几百个key value 同步是非常消耗性能的。
- 偏好设置是专门用来保存应用程序的配置信息的,( 用过Settings.bundle的应该都很熟悉),所以一般不要在偏好设置中保存其他数据。
- 偏好设置会将所有数据保存到同一个文件中。即preference目录下的一个以此应用包名来命名的plist文件。
plist(属性列表):
首先需要知道什么是序列化对象(serialized object):指可以被转换为字节流以便于存储到文件中或通过网络进行传输的对象
可以被序列化的类型只有如下几种:
NSArray
NSMutableArray
NSDictionary
NSMutableDictionary
NSData
NSMutableData
NSString
NSMutableString
NSNumber
NSDate
还是直接上代码示例
/**
 *  获取存储路径
 */
- (NSString*)dataFilePath {
    NSArray *paths = NSSearchPathForDirectoriesInDomains(NSDocumentDirectory, NSUserDomainMask, YES);
    NSString *documentDirectory = paths[0];
    return [documentDirectory stringByAppendingPathComponent:@"data.plist"];//nsstring真强大
}
我们在app处于非活跃状态时存储一些东东
UIApplication* app = [UIApplication sharedApplication];
[[NSNotificationCenter defaultCenter] addObserver:self selector:@selector(appWillResignActive:) name:UIApplicationWillResignActiveNotification object:app];

- (void)appWillResignActive:(NSNotification*)notification {
    NSString* filePath = [self dataFilePath];
    NSArray* arr = @[@1,@2,@3,@4];
    [arr writeToFile:filePath atomically:YES];
}
在我们需要这些东东的时候从文件中读取
NSString* filePath = [self dataFilePath];
if ([[NSFileManager defaultManager]fileExistsAtPath:filePath]) {
    NSArray* arr = [[NSArray alloc]initWithContentsOfFile:filePath];
}
NSKeyedArchiver(对象归档):
在Cocoa中,Archiver是另一种形式的序列化,是任何对象都可实现的更常规的类型
** 说明:**
- 只有遵守了NSCoding或 NSSecureCoding(更为安全的归档协议)协议,并且实现了协议里归档与解归档的方法的的类创建的对象才能够进行归档
- 最好也实现以下NSCopying,NSCopying与NSCoding一起实现好处在于允许复制对象,使用数据模型对象时有较大的灵活性
还是直接上代码
#import
@interface FourLines : NSObject

@property(copy,nonatomic)NSArray* lines;

@end

#import "FourLines.h"

//编解码的key
static NSString* const klinesKey = @"klinesKey";

@implementation FourLines

#pragma mark -  NSCoding

- (void)encodeWithCoder:(NSCoder *)aCoder {
    [aCoder encodeObject:self.lines forKey:klinesKey];
}

- (nullable instancetype)initWithCoder:(NSCoder *)aDecoder {
    self = [super init];
    if (self) {
        self.lines = [aDecoder decodeObjectForKey:klinesKey];
    }
    return self;
}

#pragma mark -  NSCopying

- (id)copyWithZone:(nullable NSZone *)zone {
    FourLines* copy = [[[self class]allocWithZone:zone]init];
    NSMutableArray* linesCopy = [NSMutableArray array];
    for (id line in self.lines) {
        [linesCopy addObject:[line copyWithZone:zone]];
    }
    copy.lines = linesCopy;
    return copy;
}

@end
写入数据,编码:文件路径还是用上面代码中定义的文件路径
- (void)appWillResignActive:(NSNotification*)notification {
    NSString* filePath = [self dataFilePath];
    FourLines* lines = [[FourLines alloc]init];
    lines.lines = @[@"a",@"b",@"c",@"d"];
    NSMutableData* data = [[NSMutableData alloc]init];
    NSKeyedArchiver* archiver = [[NSKeyedArchiver alloc]initForWritingWithMutableData:data];
    [archiver encodeObject:lines forKey:kRootKey];
    [archiver finishEncoding];
    // NSData *data = [NSKeyedArchiver archivedDataWithRootObject:lines];

    [data writeToFile:filePath atomically:YES];
}
读取数据,解码:
NSString* filePath = [self dataFilePath];
 if ([[NSFileManager defaultManager]fileExistsAtPath:filePath]) {
        NSData* data = [[NSMutableData alloc]initWithContentsOfFile:filePath];
        NSKeyedUnarchiver* unarchiver = [[NSKeyedUnarchiver alloc]initForReadingWithData:data];
        FourLines* four = [unarchiver decodeObjectForKey:kRootKey];
        [unarchiver finishDecoding];

// FourLines* four = [NSKeyedUnarchiver unarchiveObjectWithData: data];
        for (int i = 0; i < 4; i++) {
            //to do
        }
}

UIApplication* app = [UIApplication sharedApplication];
[[NSNotificationCenter defaultCenter] addObserver:self selector:@selector(appWillResignActive:) name:UIApplicationWillResignActiveNotification object:app];
iOS的嵌入式关系数据库SQLite3 :
这里跳过SQLite3,直接上FMDB
简介
FMDB是iOS平台的SQLite数据库框架,它是以OC的方式封装了SQLite的C语言API,它相对于cocoa自带的C语言框架有如下的优点:
使用起来更加面向对象,省去了很多麻烦、冗余的C语言代码
对比苹果自带的Core Data框架,更加轻量级和灵活
提供了多线程安全的数据库操作方法,有效地防止数据混乱
注:FMDB的gitHub地址
本文不进行详解
苹果公司提供的持久化工具 Core Data:
这里主要说明以下谓词的概念:类似SQL的where定义条件
在创建项目的时候
具体使用不进行详解
希望能给大家带来帮助O(∩_∩)O


