使用rancher 2.0部署kubernetes1.10安装istio
目录
一、安装 docker(docker-ce 17.03.2)
二、安装docker-compose
三、部署harbor
四、部署rancher
五、部署kubernetes
1、安装NFS Server 服务器端
2、Rancher(K8S) node节点
3、启用额外的Rancher Catalogs
4、启用nfs-client-provisioner 从而支持NFS Storage Classes
5、设置
六、部署istio:
rancher清除k8s集群,重新部署注意事项:
安装环境,centos7,docker-ce-17.03.1+,docker-compose 1.13+
以下安装资源有限,
| 节点名称 | IP | 备注 |
| harbor | 192.1681.15 | harbor节点 |
| k8s-master1 | 192.1681.15 | rancher节点,k8s主节点 |
| k8s-node1 | 192.168.1.16 | k8s node节点 |
注:推荐使用harbor使用HA部署,rancher节点一个,k8s主节点HA3个,k8s数据节点至少1个,可进行横向扩展。
内核调优:
cat >> /etc/sysctl.conf<一、安装 docker(docker-ce 17.03.2)
准备工作
# 添加用户(可选)
sudo adduser docker
# 为新用户设置密码
sudo echo docker:docker123 | chpasswd
# 为新用户添加sudo权限
sudo echo 'docker ALL=(ALL) ALL' >> /etc/sudoers
# 卸载旧版本Docker软件
sudo yum remove docker \
              docker-client \
              docker-client-latest \
              docker-common \
              docker-latest \
              docker-latest-logrotate
安装两个文件
docker-engine-selinux-17.03.0.ce-1.e17.centos.noarch
docker-engine-17.03.0-ce-1.e17.centos.noarch
配置/etc/sysconfig/docker,使用私有仓库
OPTIONS="--selinux-enabled --og-driver=json-file"配置/etc/docker/daemon.json,配置镜像下载和上传并发数
{
"disable-legacy-registry": true,
"registry-mirrors":"https://192.168.1.15:2443", #镜像加速地址
"max-concurrent-downloads": 3, #下载并发数
"max-concurrent-uploads": 5, #上传并发数
"graph":"/mnt/docker" #docker数据存放目录
}
二、安装docker-compose
直接使用yum install docker-compose
三、部署harbor
安装harbor为了使在一个网络内,可以docker pull时,直接从harbor里拿取镜像,并且不带有前缀私有仓库地址,达到效果如下:
docker login -u admin -p 123xxxx 192.168.1.15:2443
docker tag rancher/rancher:v2.0.0 192.168.1.15:2443/rancher/rancher:v2.0.0
docker push rancher/rancher:v2.0.0
这样做的目的为了安装rancher时,拉镜像不出问题,因所有的kubernetes集群都安装在docker内。
以下载在线安装包为例
1、下载harbor源码安装包,https://github.com/goharbor/harbor/releases,切换到make目录下。
2、ssl签名(harbor默认是使用http进行服务注册请求,修改成安全的SSL请求)
私有CA签名证书:
openssl req \
    -newkey rsa:4096 -nodes -sha256 -keyout ca.key \
    -x509 -days 365 -out ca.crt
为服务端(web)生成证书签名请求文件
openssl req \
    -newkey rsa:4096 -nodes -sha256 -keyout harbor.key \
    -out harbor.csr
用第一步创建的CA证书给第二步生成的签名请求进行签名:
echo subjectAltName = IP:192.168.1.15 > extfile.cnf
openssl x509 -req -days 365 -in harbor.csr -CA ca.crt -CAkey ca.key -CAcreateserial -extfile extfile.cnf -out harbor.crt
3、修改harbor.cfg
必需参数,修改以下参数,证书的生成请参考:https://github.com/goharbor/harbor/blob/master/docs/configure_https.md
hostname = 192.168.1.15:2443
ui_url_protocol = https
ssl_cert = /root/harbor/harbor.crt
ssl_cert_key = /root/harbor/harbor.key
可选参数
修改docker-compose.yml文件的proxy的ports参数:
  proxy:
    image: vmware/nginx-photon:v1.5.2
    container_name: nginx
    restart: always
    volumes:
      - ./common/config/nginx:/etc/nginx:z
    networks:
      - harbor
    ports:
      - 2080:80 #不使用默认的web端口,改为2080
      - 2443:443 #如使用ssl访问
      - 24443:4443
    depends_on:
      - mysql
      - registry
      - ui
      - log
4、安装
./prepair
[root@k8s-master harbor]# ./prepare
Clearing the configuration file: ./common/config/adminserver/env
Clearing the configuration file: ./common/config/ui/env
Clearing the configuration file: ./common/config/ui/app.conf
Clearing the configuration file: ./common/config/ui/private_key.pem
Clearing the configuration file: ./common/config/db/env
Clearing the configuration file: ./common/config/jobservice/env
Clearing the configuration file: ./common/config/jobservice/config.yml
Clearing the configuration file: ./common/config/registry/config.yml
Clearing the configuration file: ./common/config/registry/root.crt
Clearing the configuration file: ./common/config/nginx/cert/harbor.crt
Clearing the configuration file: ./common/config/nginx/cert/harbor.key
Clearing the configuration file: ./common/config/nginx/nginx.conf
Clearing the configuration file: ./common/config/log/logrotate.conf
loaded secret from file: /data/secretkey
Generated configuration file: ./common/config/nginx/nginx.conf
Generated configuration file: ./common/config/adminserver/env
Generated configuration file: ./common/config/ui/env
Generated configuration file: ./common/config/registry/config.yml
Generated configuration file: ./common/config/db/env
Generated configuration file: ./common/config/jobservice/env
Generated configuration file: ./common/config/jobservice/config.yml
Generated configuration file: ./common/config/log/logrotate.conf
Generated configuration file: ./common/config/jobservice/config.yml
Generated configuration file: ./common/config/ui/app.conf
Generated certificate, key file: ./common/config/ui/private_key.pem, cert file: ./common/config/registry/root.crt
The configuration files are ready, please use docker-compose to start the service.
[root@k8s-master harbor]#
5、在make/common/templates/registrys打开生成registry的配置文件config.yml:
version: 0.1
log:
  level: info
  fields:
    service: registry
storage:
  cache:
    layerinfo: inmemory
  filesystem:
    rootdirectory: /storage
  maintenance:
    uploadpurging:
      enabled: false
  delete:
    enabled: true
http:
  addr: :5000
  secret: placeholder
  debug:
    addr: localhost:5001
auth:
  token:
    issuer: harbor-token-issuer
    realm: https://192.168.1.15:2443/service/token
    rootcertbundle: /etc/registry/root.crt
    service: harbor-registry
notifications:
  endpoints:
  - name: harbor
    disabled: false
    url: http://ui:8080/service/notifications
    timeout: 3000ms
    threshold: 5
    backoff: 1s
启动docker-compose
docker-compose up -d
在其他节点,需要把ca.crt放到/etc/docker/certs.d/192.168.1.15:2443/下
在其他节点上创建目录:
[root@k8s-node1 ~] mkdir -p /etc/docker/certs.d/192.168.1.15:2443/
[root@k8s-master docker]# scp -r /etc/docker/certs.d/192.168.1.15\:2443/ca.crt [email protected]:/etc/docker/certs.d/192.168.1.15\:2443/ca.crt
测试上传镜像到harbor:
[root@k8s-master registry]# docker login -u admin -p Harbor12345 192.168.1.15:2443
WARNING! Using --password via the CLI is insecure. Use --password-stdin.
Login Succeeded
[root@k8s-master harbor]# docker push 192.168.1.15:2443/rancher/rancher
The push refers to a repository [192.168.1.15:2443/rancher/rancher]
cb237b37efb7: Pushed
e13cac6da5cb: Pushed
f85b287202ab: Pushed
9711039640e3: Pushed
616be2998788: Pushed
0e9b84168c32: Pushed
8950fe202115: Pushed
ec8257ff6a7a: Pushed
7422efa72a14: Pushed
b6a02001ba33: Pushed
a26724645421: Pushed
a30b835850bf: Pushed
latest: digest: sha256:6d53d3414abfbae44fe43bad37e9da738f3a02e6c00a0cd0c17f7d9f2aee373a size: 2827
以上操作从部署docker,docker-compose到harbor是为了安装rancher准备,主要是解决在隔离网络的情况下能直接使用docker拉取镜像运行容器。
四、部署rancher
把rancher的镜像上传到harbor仓库中:
docker push 192.168.1.15:2443/rancher/rancher
docker rmi -f $(docker images | grep rancher | awk '{print $3}')
选择一台主机,安装rancher镜像,可在没有公网的情况下,直接从harbor里拉取docker镜像 进行安装:
[root@k8s-master harbor]# docker run -d --restart=unless-stopped -p 80:80 -p 443:443 rancher/rancher:latest
Unable to find image 'rancher/rancher:latest' locally
latest: Pulling from rancher/rancher
124c757242f8: Pull complete
2ebc019eb4e2: Pull complete
dac0825f7ffb: Pull complete
82b0bb65d1bf: Pull complete
ef3b655c7f88: Pull complete
437f23e29d12: Pull complete
52931d58c1ce: Pull complete
b930be4ed025: Pull complete
4a2d2c2e821e: Pull complete
9137650edb29: Pull complete
f1660f8f83bf: Pull complete
a645405725ff: Pull complete
Digest: sha256:6d53d3414abfbae44fe43bad37e9da738f3a02e6c00a0cd0c17f7d9f2aee373a
Status: Downloaded newer image for rancher/rancher/rancher:latest
cf98c58ebaef4f38f19dfbfdf2a5f6e3a3d69cf0c2bfd5881e04ee1d47578a6b
五、部署kubernetes
在rancher里进行k8s的集群部署:
1、在一台可用的公网环境下,部署rancher后,新建集群,再把相关的镜像push到harobr中去,以供在隔离的内网中部署。
此处直接使用脚本一键上传:
cat import_harbor.sh
#!/bin/bash
declare -a images=()
harbor_url="192.168.1.15:2443"
images=$(docker images | grep rancher |awk -F " " '{print $1 ":" $2}')
for i in ${images[@]}
do
docker rmi -f $harbor_url"/"$i
docker tag $i $harbor_url"/"$i
docker push $harbor_url"/"$i
done
上传到harbor后的rancher镜像列表(共14个镜像文件):
2、部署第一个集群:
这里使用安全的k8s集群配置,用到RBAC,SERVERACCOUNT,CLUSTERROLE,CLUSTERROLEBING等。
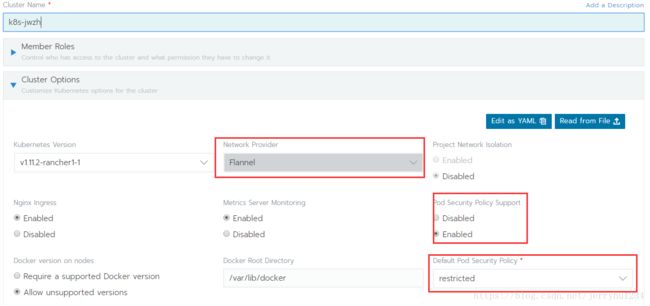
选择network provider为flannel,pod security 为enable,default pod security policy为restrict。
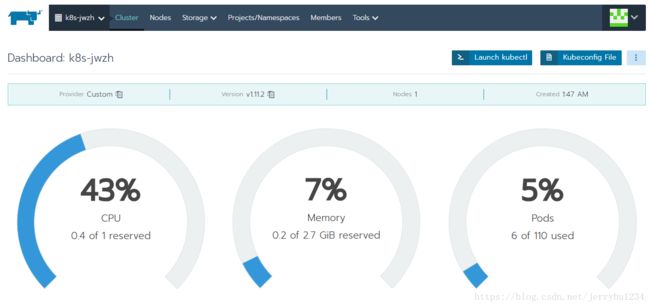
创建结果为:
集群
节点
添加k8s主节点,将以下的命令在主节点上执行:
添加k8s数据节点,将下面的执行命令在数据节点主机。
部署存储,使用动态类创建PV,这里使用NFS搭建。
1、安装NFS Server 服务器端
略过,自己搭建,我使用的是群晖提供的NFS服务
192.168.1.16:/opt/pv-nfs
2、Rancher(K8S) node节点
所有node安装mount nfs客户端支持
yum install -y nfs-utils
mount -t nfs 192.168.1.16:/opt/pv-nfs /mnt/
确保node节点可以挂载nfs
3、启用额外的Rancher Catalogs
Global 》 Catalog 》
Helm Stable(Enable)
Helm Incubator (Enable)
注意启用后需要等10多分钟才能看到Catalogs里面的内容
4、启用nfs-client-provisioner 从而支持NFS Storage Classes
Global 》 Catalog 》 Launch
搜索 nfs-client-provisioner 》 View Details
add Answer
nfs.server:192.168.1.16
nfs.path:/opt/pv-nfs
5、设置
Global 》 Cluster 》 Storage 》Storage Classes 》
nfs-client 》 Set as default
好了现在可以愉快的部署Catalogs 或者 helm 的应用了, 需要持久化的应用能自动的在NFS共享中开辟新的文件夹存储空间了
六、部署istio:
rancher清除k8s集群,重新部署注意事项:
1)在rancher UI中删除node,删除cluster;
2)需在rancher节点删除以下目录,以防有脏数据:
#删除k8s中的相关文件
rm -rf /etc/kubernetes
rm -rf /etc/kubelet.d
#删除k8s中的etcd数据。
rm -rf /var/lib/etcd
rm -rf /var/lib/rancher
3)删除由rancher安装的k8s集群,包括容器和挂载的数据卷:
docker rm -f -v $(docker ps -a | grep rancher | awk '{print $1}')
docker volume prune
docker container prune
docker network prune
4)如遇到 kubelet容器,无法启动时,可能是因10250端口被占用:
docker logs kubelet
......
I1001 13:31:18.042308   87326 server.go:129] Starting to listen on 0.0.0.0:10250
I1001 13:31:18.042902   87326 server.go:302] Adding debug handlers to kubelet server.
F1001 13:31:18.043472   87326 server.go:141] listen tcp 0.0.0.0:10250: bind: address already in use
#找到占用端口的进程ID
netstat -anotpl | grep 10250
#kill 进程ID
kill 89349
待续.....


