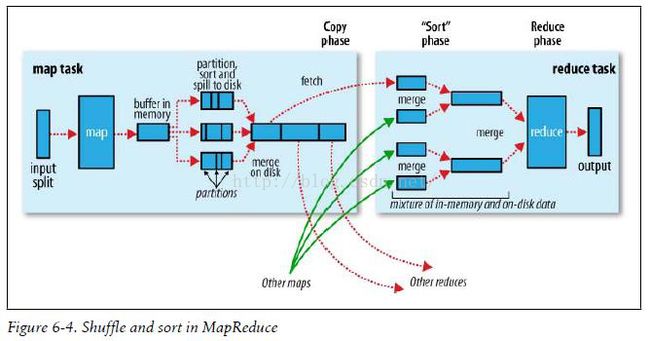
Hadoop-MapReduce过程
问题引入:
先 定义需求,给出如下2个字段,要求先按第1个字段升序,若第1字段相同则按第2字段升序(二次排序):
20 21
50 51
1 2
3 4
5 6
7 82
63 70
50 522
40 511
20 53
12 98
20 522
63 61
12 211
31 42
7 8
结果:
1	2
3	4
5	6
7	8
7	82
12	98
12	211
20	21
20	53
20	522
31	42
40	511
50	51
50	522
63	61
63 70map阶段
mapreduce使用job.setInputFormatClass定义的InputFormat将输入的数据集分割成小数据块splites,默认情况下一个block恰为一个splite,而一个splite恰好对应一个map任务。map的输出不是写入到hdfs,而是输入到1个容量为100M的环形缓冲区中,当缓冲区的已用空间超过容量的80%,Partitioner会根据key的确定其分配到哪个分区从而决定它会分配到哪个reduce上,HashPartitioner是mapreduce的默认partitioner。其源代码如下
public class HashPartitioner extends Partitioner {
  public int getPartition(K key, V value,int numReduceTasks) {
    return (key.hashCode() & Integer.MAX_VALUE) % numReduceTasks;
  }
} reduce阶段
便于说明,我们把上图的reduce定义为'r1',其分区称为'p1'。reduce会把不同map传递过来的小'p1'合并成一个大的‘p1’并按key排序(图中sort phase下部),然后对数据进行分组,相同的key会分到同一组,它们的value放在一个value迭代器,而这个迭代器的key使用属于同一个组的所有key的第一个key。我们也可以定义自己的分组策略,之后我会在例子中说明。
具体代码实现:
import org.apache.hadoop.io.*;
import org.apache.hadoop.fs.Path;
import org.apache.hadoop.mapreduce.Job;
import org.apache.hadoop.mapreduce.Mapper;
import org.apache.hadoop.mapreduce.Reducer;
import org.apache.hadoop.mapreduce.lib.input.FileInputFormat;
import org.apache.hadoop.mapreduce.lib.output.FileOutputFormat;

import java.io.DataInput;
import java.io.DataOutput;
import java.io.IOException;

public class SecondSort {

    //自定义的Key类型,其继承WritableComparable可以实现排序
    public static class DataBean implements WritableComparable {
        private int first;
        private int second;

        public int getFirst() {
            return first;
        }

        public int getSecond() {
            return second;
        }

        public void set(int first, int second) {
            this.first = first;
            this.second = second;
        }

        @Override
        //我们使用默认的HashPartitioner,让其按照first分区
        public int hashCode() {
            return first;
        }

        //排序的函数
        public int compareTo(DataBean db) {
            int r = this.first - db.first;
            return r == 0 ? this.second - db.second : r;
        }

        //序列化
        public void write(DataOutput out) throws IOException {
            int r1 = 0;
            out.writeInt(first);
            out.writeInt(second);
        }

        //反序列化
        public void readFields(DataInput in) throws IOException {
            first = in.readInt();
            second = in.readInt();
        }
    }

    //自定义mapper
    public static class SsMapper extends Mapper {
        private DataBean db = new DataBean();
        private IntWritable intValue = new IntWritable();

        @Override
        protected void map(LongWritable key, Text value, Context context) throws IOException, InterruptedException {
            String[] arrs = value.toString().split(" ");
            int first = Integer.parseInt(arrs[0]); //获得第1个字段值
            int second = Integer.parseInt(arrs[1]); //获得第2个字段值
            db.set(first, second); //设置自定义类型的值
            intValue.set(second);
            context.write(db, intValue);// key保存复合键,value为null
        }
    }

    //自定义reducer
    public static class SsRedeucer extends Reducer {

        private Text txtKey = new Text();

        @Override
        protected void reduce(DataBean key, Iterable values, Context context) throws IOException, InterruptedException {
            //简单地输出first 和 second 字段
            for (IntWritable v : values) {
                txtKey.set(String.valueOf(key.getFirst()));
                context.write(txtKey, v);
            }
        }
    }

    //因为key是复合键,我们使用自己的分组策略:按key分组
    //注意在main方法中添加 job.setGroupingComparatorClass(GroupingComparator.class);
    public static class GroupingComparator extends WritableComparator {

        //这个构造函数必须使用,否则会报空异常
        protected GroupingComparator() {
            super(DataBean.class, true);
        }

        @Override
        //重写比较函数
        public int compare(WritableComparable a, WritableComparable b) {
            DataBean db1 = (DataBean) a;
            DataBean db2 = (DataBean) b;
            return db1.getFirst() - db2.getFirst();
        }
    }


    public static void main(String[] args) throws Exception {
        Job job = Job.getInstance();
        job.setJarByClass(SecondSort.class);

        job.setMapperClass(SsMapper.class);
        job.setMapOutputKeyClass(DataBean.class);
        job.setMapOutputValueClass(IntWritable.class);

        job.setReducerClass(SsRedeucer.class);
        job.setOutputKeyClass(Text.class);
        job.setOutputValueClass(IntWritable.class);

        job.setGroupingComparatorClass(GroupingComparator.class);

        FileInputFormat.setInputPaths(job, new Path(args[0]));
        FileOutputFormat.setOutputPath(job, new Path(args[1]));

        job.waitForCompletion(true);

    }
}
上面的代码只使用了一个分区和reduce(单节点可做测试),为了进一步说明自定义的Patitioner,我们定义自己的Patitioner
    /*自定义分区策略:使用3个分区,按first的值分配(注意在main函数中添加)
    *  job.setPartitionerClass(SsPartioner.class);
    *  job.setNumReduceTasks(3);
    */
    public static class SsPartioner extends Partitioner {
        @Override
        public int getPartition(DataBean dataBean, IntWritable intWritable, int numPartitions) {
            return dataBean.first % 3;
        }
    }
如此我们使用3个reduce(在集群环境)来做归于操作,其hdfs的结果文件如下图

