配置GLEW+GLFW并使用Xcode写OpenGL应用
闲话
因为这几天一直在忙着图形学的实验,发现真的是很蛋疼,因为课程还在使用glut等openGL1.x版本的固定管线API,但是我感觉这和我们计算机行业追求新技术的宗旨完全不同啊,现在openGL2.x已经完全不支持固定管线了,只支持可编程管线,而且国内的资料真的很乱,想要找一些老版openGL的相关资料已经很难了,大部分都是可编程管线API的教程。所以,这篇文章就先记录一下我通过网络上的资料学习到的如何在Xcode中搭建GLEW+GLFW的环境。
正题
首先在mac中要安装glew和glfw,这里我安装这两个工具使用的是homebrew包管理,这东西超级好用,安装命令很简单,大家可以去网络上找一下很多资料的。安装完homebrew之后,用以下两个命令安装glew和glfw
brew install glew

brew install glfw3我自己在安装遇到的问题就是,在安装完glew之后,可能会有个警告就是告诉你glew还没有link,这时候你只要执行:
brew link glew
就可以完成link,警告也会消失。通过brew命令安装的软件包都会在
/usr/local/Cellar
文件夹下面,在这里你就可以找到glew和glfw3两个文件夹。
接下来就是在Xcode中的配置,在Xcode中找到Peference菜单项,这个一般在File菜单项左边的那个Xcode项目中,然后在里面找到Locations项,再点击Custom Paths,添加四项,依次为:
Name Display Name Path

glew_header glew_header /usr/local/Cellar/glew/2.0.0/include

glew_lib glew_lib /usr/local/Cellar/glew/2.0.0/lib

glfw_header glfw_header /usr/local/Cellar/glfw3/3.2.1/include

glfw_lib glfw_lib /usr/local/Cellar/glfw3/3.2.1/lib
然后创建一个新的Xcode项目(command line tool),语言选择C++。接着,在项目的Bulid Settings里面找到Header Search Paths和Library Search Paths两项,在Header Search Paths中加入
$(glew_header) $(glfw_header)
这两项,$()显示的就是刚才我们在locations中配置的文件路径,同理也在Library Search Paths中加入
$(glew_lib) $(glfw_lib)
添加之后效果图如下所示![]()
完成了上述过程之后,还有最后一步,就是导入framework。在项目的General中找到Linked Frameworks and Libraries,点击‘+’号,添加如下三个文件
OpenGL.framework libGLEW.2.0.0.dylib libglfw3.3.2.dylib

添加两个dylib文件的方法是,在你没有在framework中搜索到这两个文件时,点击add other,然后点击shift+command+G进入/usr/local文件夹,然后根据我们之前说的安装glew和glfw3的路径找到这两个文件夹,在这两个文件夹中找到这两个文件,当然这两个文件可能和我图中给出的文件名不同还是因为安装的版本号不同,这个需要注意一下。
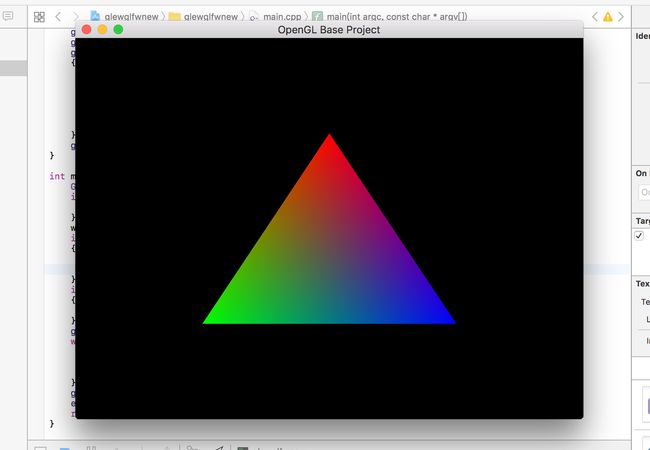
环境配置好之后我们可以测试一下,测试如下代码:
#include

#include

#include


void Render(void)

{

glClearColor(0.0f, 0.0f, 0.0f, 1.0f);

glClear(GL_COLOR_BUFFER_BIT);

glBegin(GL_TRIANGLES);

{

glColor3f(1.0,0.0,0.0);

glVertex2f(0, .5);

glColor3f(0.0,1.0,0.0);

glVertex2f(-.5,-.5);

glColor3f(0.0, 0.0, 1.0);

glVertex2f(.5, -.5);

}

glEnd();

}


int main(int argc, const char * argv[]) {

GLFWwindow* win;

if(!glfwInit()){

return -1;

}

win = glfwCreateWindow(640, 480, "OpenGL Base Project", NULL, NULL);

if(!win)

{

glfwTerminate();

exit(EXIT_FAILURE);

}

if(!glewInit())

{

return -1;

}

glfwMakeContextCurrent(win);

while(!glfwWindowShouldClose(win)){

Render();

glfwSwapBuffers(win);

glfwPollEvents();

}

glfwTerminate();

exit(EXIT_SUCCESS);

return 0;

}
文中用到的一些资料在这里统一附上链接,并表示感谢。
jianshu
zrz0f
yaohuiji
programminglangzi
from: http://trailblazerxc.com/2016/10/28/how-to-configure-GLEW-GLFW-on-your-mac/
With Xcode on OS X
If you are using the dynamic library version of GLFW, simply add it to the project dependencies.
If you are using the static library version of GLFW, add it and the Cocoa, OpenGL, IOKit and CoreVideo frameworks to the project as dependencies. They can all be found in /System/Library/Frameworks.
With command-line on OS X
It is recommended that you use pkg-config when building from the command line on OS X. That way you will get any new dependencies added automatically. If you still wish to build manually, you need to add the required frameworks and libraries to your command-line yourself using the -l and -framework switches.
If you are using the dynamic GLFW library, which is named libglfw.3.dylib, do:
cc -o myprog myprog.c -lglfw -framework Cocoa -framework OpenGL -framework IOKit -framework CoreVideo
If you are using the static library, named libglfw3.a, substitute -lglfw3 for -lglfw.
Note that you do not add the .framework extension to a framework when linking against it from the command-line.
The OpenGL framework contains both the OpenGL and GLU APIs, so there is nothing special to do when using GLU. Also note that even though your machine may have libGL-style OpenGL libraries, they are for use with the X Window System and will not work with the OS X native version of GLFW.
http://www.glfw.org/docs/latest/build_guide.html#build_link_xcode

