opencv学习(一)之Mat类
大概说一下opencv来源。opencv最初是Intel在俄罗斯的团队实现的,而在后期Intel对opencv的支持力度慢慢变小。在08年,美国一家机器人公司Willow Garage开始大力支持opencv,在得到支持后opencv更新速度明显加快,加入了很多新特性。在opencv1.x时代,数据类型为IplImage,在使用这种数据类型时,考虑内存管理称为众多开发者的噩梦。在进入到opencv2.x时代,一种新的数据类型Mat被定义,将开发者极大的解脱出来。所以在接下来的教程中,都会使用Mat类,而在看到IplImage类数据时也不要感到奇怪。
Mat类有两种基本的数据结构组成,一种是矩阵头(包括矩阵尺寸、存储方法、存储路径等信息),另一个是指向包含像素值的矩阵的指针(矩阵维度取决于其存储方法)。矩阵头的尺寸是个常数,但是矩阵自身的尺寸根据图像不同而不同。Mat类的定义有很多行,下面列出来一些关键属性如下所示:
class CV_EXPORTS Mat
{
public:
//......很多函数定义,在此省略
...
/*flag参数包含许多关于矩阵的信息,如:
Mat的标识
数据是否连续
深度
通道数目
*/
int flags;
int dims;   //矩阵的维数,取值应该大于或等于2
int rows,cols;  //矩阵的行列数
uchar* data;    //指向数据的指针
int* refcount;  //指向引用计数的指针,如果数据由用户分配则为NULL

//......其他的一些函数
};
可以把Mat看作是一个通用的矩阵类,可以通过Mat中诸多的函数来创建和操作多维矩阵。有很多种方法可以创建一个Mat对象。
Mat类提供了一系列的构造函数,可以根据需求很方便的创建Mat对象,其部分构造方法如下:
Mat::Mat()      //无参数构造方法

/*创建行数为rows,列数为cols,类型为type的图像*/
Mat::Mat(int rows, int cols, int type)

/*创建大小为size,类型为type的图像*/
Mat::Mat(Size size, int type)

/*创建行数为rows,列数为cols,类型为type的图像
并将所有元素初始化为s*/
Mat::Mat(int rows, int cols, int type, const Scalar& s)
ex:Mat(3,2,CV_8UC1, Scalar(0))  //三行两列所有元素为0的一个矩阵

/*创建大小为size,类型为type,初始元素为s*/
Mat::Mat(Size size, int type, const Scalar& s)

/*将m赋值给新创建的对象*/
Mat::Mat(const Mat& m)  //此处不会发生数据赋值,而是两个对象共用数据

/*创建行数为rows,列数为cols,类型为type的图像
此构造函数不创建图像数据所需内存而是直接使用data所指内存
图像的步长由step指定*/
Mat::Mat(int rows, int cols, int type, void* data, size_t step = AUTO_STEP)

Mat::Mat(Size size, int type, void* data, size_t step = AUTO_STEP)  //同上

/*创建新的图像为m数据的一部分,其具体的范围由rowRange和colRange指定
此构造函数也不进行图像数据的复制操作,与m共用数据*/
Mat::Mat(const Mat& m, const Range& rowRange, const Range& colRange)

/*创建新的矩阵为m的一部分,具体的范围由roi指定
此构造函数同样不进行数据的复制操作与m共用数据*/
Mat::Mat(const Mat& m, const Rect& roi)
在构造函数中很多都涉及到type,type可以是CV_8UC1, CV_8UC3, …,CV_64FC4等。这些type中的8U表示8位无符号整数(unsigned int), 16S表示16位有符号整数,64F表示64位浮点数即double类型,C表示channel表示图像通道,C后面的数字表示通道数。如C1表示单通道图像,C4表示4通道图像,以此类推。如果需要更多的通道数,需要使用宏CV_8UC(n)重定义,其中n是需要的通道数。如
Mat M(3, 2, CV_8UC(5)); //创建3行2列通道为5的图像#include 也可以使用create()函数创建对象。如果create()函数指定的参数与图像之前的参数相同,则不进行实质的内存申请操作,如果参数不同,则减少原始数据内存的索引并重新申请内存。使用方法如下所示:
#include 运行结果如下
**值得注意的是使用create()函数无法初始化Mat类。
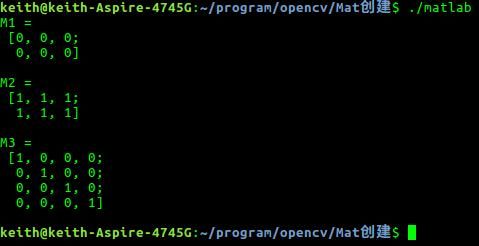
opencv也可以使用Matlab的风格创建函数如:zeros(),ones()和eyes()。这些方法使得代码非常简洁,使用也非常方便。在使用这些函数时需要指定图像的大小和类型。
#include 运行结果如图所示:
在已有Mat类的基础上创建一个Mat类,即新创建的类是已有Mat类的某一行或某一列,可以使用clone()或copyTo(),这样的构造方式不是以数据共享方式存在。可以利用setTo()函数更改矩阵的值进行验证,方法如下:
#include 程序中M4.row(0)就是指的M4的第一行,其它类似。必须值得注意的是:在本篇介绍中工较少了clone()、copyTo()、和”=”三种实现矩阵赋值的方式。其中”=”是使用重载的方式将矩阵值赋值给新的矩阵,而这种方式下,被赋值的矩阵和赋值矩阵之间共享空间,改变任何一个矩阵的值会影响到另外一个矩阵。而clone()和copyTo()两种方法在赋值后,两个矩阵的存储空间是独立的,不存在共享空间的情况。
运行结果如下
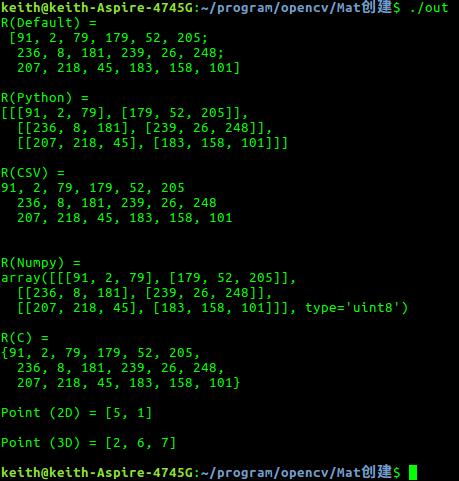
opencv中还支持其他的格式化输入,
#include 运行结果如图所示:
其中Point2f和Point3f都是opencv中常见的数据类型,在以后的学习中还会见到!
参考文献:opencv_tutorials
《opencv入门教程》


