opencv学习(二十七)之图像缩放函数resize

上一篇介绍了分别利用高斯金字塔和拉普拉斯金字塔结合opencv提供的pyrDown和pyrUp函数实现了图像的缩放,opencv还提供了另外一种图像缩放函数resize()实现对输入图像缩放到指定大小,其函数原型如下:

void cv::resize  ( InputArray  src,  
  OutputArray  dst,  
  Size  dsize,  
  double  fx = 0,  
  double  fy = 0,  
  int  interpolation = INTER_LINEAR  
 ) 

参数解释:
. InputArray src: 输入图像,可以是Mat类型
. OutputArray dst: 输出图像,其尺寸由第三个参数dsize(如果dsize不为0),当dsize为0,输出图像的尺寸由src.size()、fx和fy计算得到,但是输出图像类型与输入图像一致
. Size dsize: 输出图像的尺寸,如果dsize设置为0,则dsize的值将由下式计算得到

dsize=Size(round(fx*src.cols), round(fy*src.rows))

需要注意的是dsize和fx、fy不能同时为0

. double fx = 0: 水平方向上的缩放系数,当fx为0时,将由如下公式计算得到

(double)dsize.width/src.cols

. double fy = 0: 垂直方向上的缩放系数,如果fy为0,将由如下公式计算得到

(double)dsize.height/src.rows

. int interpolation=INTER_LINEAR: 图像缩放的插值算法类型,默认是INTER_LINEAR(线性插值),在opencv3.2中通过查看InterpolationFlags查看详细信息,可选的插值方式如下:
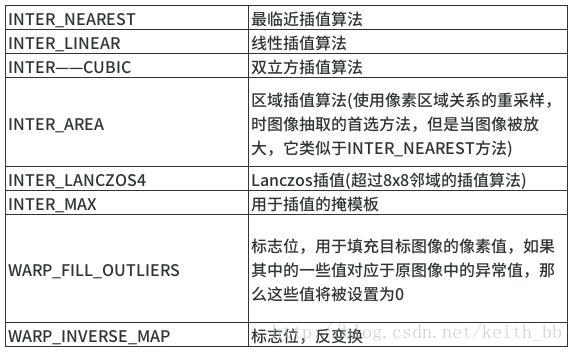
opencv学习(二十七)之图像缩放函数resize_第1张图片

以上的情况是没有初始化目标图像的类型和尺寸也就是没有提前设置好目标图像的类型和尺寸而是由函数根据size.size,dsize,fx和fy计算得到,如果想调整输入图像适应已经创建好的目标图像的时候应该这样调用resize()函数:

resize(src, dst, dst.size(), 0, 0, interpolation);

如果指定图像在水平方向和垂直方向的缩放系数,则调用方式如下:

resize(src, dst, Size(), 0.5, 0.5, interpolation);

一般情况下,如果要缩小桐乡用cv::INTER_AREA算法实现,而放大图像如果想取得较好的效果则使用cv::INTER_CUBIC,此插值算法效果好但是速度慢,而cv::INTER_LINEAR插值相对较快而且效果也是可以接受。

示例程序:

/*
 *程序主要演示了不同的插值算法在图像缩放中效果不同
 *其中图像放大图像原图像用的是缩小后的图像
 *也可以将g_shrinkImage改为g_srcImage观察直接从原图像放大效果
*/

#include 
#include 
#include 
#include 

using namespace std;
using namespace cv;

//定义全局变量
Mat g_srcImage;
Mat g_shrinkImage;
Mat g_enlargeImage;

//定义轨迹条属性
const int resizeTypeMaxValue = 4;   //共八种插值运算类型
int resizeTypeValue = 0;

//声明类型转换函数
int typeDef(int typeNum);

//声明回调函数
void shrinkFun(int, void*);
void enlargeFun(int, void*);

int main()
{
    g_srcImage = imread("resize.jpg");

    //判断文件是否加载成功
    if(!g_srcImage.data)
    {
        cout << "图像加载失败!" << endl;
        return -1;
    }
    else
        cout << "图像加载成功!" << endl << endl;

    namedWindow("原图像", WINDOW_AUTOSIZE);
    imshow("原图像", g_srcImage);

    //轨迹条属性
    char resizeTypeName[20];
    sprintf(resizeTypeName, "插值运算类型 %d", resizeTypeMaxValue);

    namedWindow("图像缩小", WINDOW_AUTOSIZE);
    namedWindow("图像放大", WINDOW_AUTOSIZE);

    //创建轨迹条
    createTrackbar(resizeTypeName, "图像缩小", &resizeTypeValue, resizeTypeMaxValue, shrinkFun);
    shrinkFun(resizeTypeValue, 0);

    createTrackbar(resizeTypeName, "图像放大", &resizeTypeValue, resizeTypeMaxValue, enlargeFun);
    enlargeFun(resizeTypeValue, 0);

    waitKey(0);

    return 0;
}

int typeDef(int typeNum)
{
    int type;

    switch(typeNum)
    {
    case 0:
            type = INTER_NEAREST; break;
    case 1:
            type = INTER_LINEAR; break;
    case 2:
            type = INTER_CUBIC; break;
    case 3:
            type = INTER_AREA; break;
    case 4:
            type = INTER_LANCZOS4; break;
    default:
            break;
    }

    return type;

}

//图像缩小函数
void shrinkFun(int, void*)
{
    int shrinkType;
    shrinkType = typeDef(resizeTypeValue);
    resize(g_srcImage, g_shrinkImage, Size(g_srcImage.cols/2, g_srcImage.rows/2), 0, 0, shrinkType);
    imshow("图像缩小", g_shrinkImage);
}

//图像放大函数
void enlargeFun(int, void*)
{
    int enlargeType;
    enlargeType = typeDef(resizeTypeValue);
    resize(g_shrinkImage, g_enlargeImage, Size(g_shrinkImage.cols*2, g_shrinkImage.rows*2), 0, 0, enlargeType);
    imshow("图像放大", g_enlargeImage);
}

程序运行结果如下:
opencv学习(二十七)之图像缩放函数resize_第2张图片

opencv学习(二十七)之图像缩放函数resize_第3张图片

opencv学习(二十七)之图像缩放函数resize_第4张图片

你可能感兴趣的:(OpenCV基础,opencv2/3基础教程)