Spring+SpringMVC做Redis集群(Sentinel模式)
研究Redis也有一段时间了,在前面的Redis系列文章中,介绍了Redis的安装,集群配置,及节点的增加和删除,但是并未实际的使用到项目中,趁这周末时间,参照项目中实际的使用场景,做了一个Redis集群Spring整合的案例,在介绍案例之前,先简单介绍下Redis集群的方式有哪些
1、单机版 不解释
2、Sentinel 哨兵模式
3、Redis Cluster Redis官方集群方案
4、Redis Sharding集群
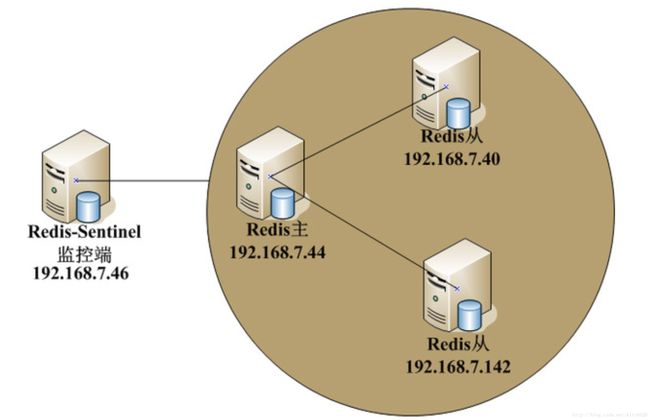
正确的说,哨兵模式是一主多从的结构,并不属于真正的集群,真正的集群应该是多主多从的结构,需要有多台不同物理地址的主机,无赖家里只有一台PC,只能使用Sentinel模式来做集群。先来看下Sentinel模式的集群架构图

首先需要有一台监控服务器,也就是Sentinel,一台主服务器Master,多台从服务器Slave,具体的配置可以参考另一篇博文《Redis序列之Sentinel》,假设Sentinel,Master,Slave都已经配置好了,对应地址分别为:
Sentinel 127.0.0.1:26379,127.0.0.1:26479
Master 127.0.0.1:10003
Slave 127.0.0.1:10001,127.0.0.1:10002
接下来开始Java端的配置准备工作
1、在Maven的pom.xml文件中,增加redis的引用
<dependency>
    <groupId>org.springframework.datagroupId>
    <artifactId>spring-data-redisartifactId>
    <version>1.5.2.RELEASEversion>
dependency>
<dependency>
    <groupId>redis.clientsgroupId>
    <artifactId>jedisartifactId>
    <version>2.9.0version>
dependency>
2、增加redis.properties文件,文件中只需要指定sentinel即可(原来一直误认为是配置master和slave),文件内容如下
redis.sentinel.host1=127.0.0.1
redis.sentinel.port1=26379

redis.sentinel.host2=127.0.0.1
redis.sentinel.port2=26479

redis.pool.maxTotal=1024
redis.pool.maxIdle=200
redis.pool.maxWaitMillis=1000
redis.pool.testOnBorrow=true

redis.pool.timeBetweenEvictionRunsMillis=30000
redis.pool.minEvictableIdleTimeMillis=30000
redis.pool.softMinEvictableIdleTimeMillis=10000
redis.pool.numTestsPerEvictionRun=1024

#1000*60*60*1
redis.pool.expire=3600000
redis.pool.unlock=false
3、在Spring的applicationContext.xml文件中,增加Redis的配置
<bean class="org.springframework.beans.factory.config.PropertyPlaceholderConfigurer">
    <property name="locations">
       <list>
          <value>classpath:config/redis.propertiesvalue>
       list>
    property>
bean>


<cache:annotation-driven cache-manager="cacheManager"/>


<bean id="jedisPoolConfig" class="redis.clients.jedis.JedisPoolConfig">
       <property name="maxTotal" value="${redis.pool.maxTotal}" />
       <property name="maxIdle" value="${redis.pool.maxIdle}" />
       <property name="numTestsPerEvictionRun" value="${redis.pool.numTestsPerEvictionRun}" />
       <property name="timeBetweenEvictionRunsMillis" value="${redis.pool.timeBetweenEvictionRunsMillis}" />
       <property name="minEvictableIdleTimeMillis" value="${redis.pool.minEvictableIdleTimeMillis}" />
       <property name="softMinEvictableIdleTimeMillis" value="${redis.pool.softMinEvictableIdleTimeMillis}" />
       <property name="maxWaitMillis" value="${redis.pool.maxWaitMillis}" />
       <property name="testOnBorrow" value="${redis.pool.testOnBorrow}" />
bean>


<bean id="sentinelConfiguration" class="org.springframework.data.redis.connection.RedisSentinelConfiguration">
    <property name="master">
        <bean class="org.springframework.data.redis.connection.RedisNode">

            <property name="name" value="mymaster">property>
        bean>
    property>

    <property name="sentinels">
        <set>
            <bean class="org.springframework.data.redis.connection.RedisNode">
                <constructor-arg name="host" value="${redis.sentinel.host1}">constructor-arg>
                <constructor-arg name="port" value="${redis.sentinel.port1}">constructor-arg>
            bean>
            <bean class="org.springframework.data.redis.connection.RedisNode">
                <constructor-arg name="host" value="${redis.sentinel.host2}">constructor-arg>
                <constructor-arg name="port" value="${redis.sentinel.port2}">constructor-arg>
            bean>
        set>
    property>
bean>
<bean id="redisConnectionFactory" class="org.springframework.data.redis.connection.RedisConnectionFactory">
    <constructor-arg name="sentinelConfig" ref="sentinelConfiguration">constructor-arg>
    <constructor-arg name="poolConfig" ref="jedisPoolConfig">constructor-arg>
bean>
<bean id="redisTemplate" class="org.springframework.data.redis.core.RedisTemplate">
    <property name="connectionFactory" ref="redisConnectionFactory">property>
bean>

<bean id="cacheManager" class="org.springframework.data.redis.cache.RedisCacheManager">
    <constructor-arg ref="redisTemplate" />
bean>
特别说明:
1、Sentinel的集群模型,在Java端配置时,只需要指定有哪些Sentinel就可以了,不需要指定Master和Slave,之前不清楚,导致启动一直报找不到可用的Sentinel
2、在Spring配置文件中一定要增加
3、
以上准备工作完成后,就可以在Java代码中使用Redis了,很多人是以硬编码的方式在代码中使用缓存,这种对业务代码的侵入性是很强的,不方便后期的维护和扩展,这里使用注解方式,只需要在类或方法名上增加注解就可以了
@Override
@Cacheable(value="user")
public UserVO selectUserById(String userId) throws Exception {
    return userDao.selectUserById(userId);
}
现在把Tomcat服务启动起来,发现Sentinel已经加载进来了,显示127.0.0.1:10003是Master
一月 02, 2017 11:53:09 下午 redis.clients.jedis.JedisSentinelPool initSentinels
信息: Trying to find master from available Sentinels...
一月 02, 2017 11:53:14 下午 redis.clients.jedis.JedisSentinelPool initSentinels
信息: Redis master running at 127.0.0.1:10003, starting Sentinel listeners...
一月 02, 2017 11:53:14 下午 redis.clients.jedis.JedisSentinelPool initPool
信息: Created JedisPool to master at 127.0.0.1:10003
第二次调用selectUserById方法,已经从缓存中取值,再没有请求DB查询了
INFO 2017-01-02 23:57:14 http-bio-8080-exec-3 com.bug.controller.user.UserController.login 24-line login method start,the parameter is :
DEBUG 2017-01-02 23:57:15 http-bio-8080-exec-3 org.springframework.cache.interceptor.AbstractFallbackCacheOperationSource.getCacheOperations 109-line Adding cacheable method 'selectUserById' with attribute: [CacheableOperation[public com.bug.model.user.UserVO com.bug.service.user.impl.UserServiceImpl.selectUserById(java.lang.String) throws java.lang.Exception] caches=[user] | key='' | condition='' | unless='']
DEBUG 2017-01-02 23:57:16 http-bio-8080-exec-3 org.springframework.data.redis.core.RedisConnectionUtils.doGetConnection 125-line Opening RedisConnection
DEBUG 2017-01-02 23:57:16 http-bio-8080-exec-3 org.springframework.data.redis.core.RedisConnectionUtils.releaseConnection 205-line Closing Redis Connection
自定义Key生成器
默认生成器是SimpleKeyGenerator,生成的Key是经过HashCode转换过的,不能通过Key清除指定接口的缓存,因此需要我们自己实现Key生成器,增加Key生成器实现类CacheKeyGenerator,并实现KeyGenerator接口,代码如下:
public class CacheKeyGenerator implements KeyGenerator {
    @Override
    public Object generate(Object target, Method method, Object... params) {
        StringBuilder key = new StringBuilder();
        key.append(target.getClass().getName());
        key.append(".");
        key.append(method.getName());
        return key.toString();
    }
}
这里Key的生成规则是类的限定名+方法名,可以确保在同一项目中,key不会重名,如果还需要把查询条件也作为Key的一部分,可以把params加进来
Key生成器需要配置在applicationContext.xml文件中,如下
<cache:annotation-driven cache-manager="cacheManager" key-generator="cacheKeyGenerator"/>
<bean id="cacheKeyGenerator" class="com.bug.common.CacheKeyGenerator">bean>