手把手教你搭建目标检测器-附代码
翻译:刘威威
编辑:祝鑫泉
前 言
本文译自:[http://www.hackevolve.com/create-your-own-object-detector/](http://www.hackevolve.com/create-your-own-object-detector/ )
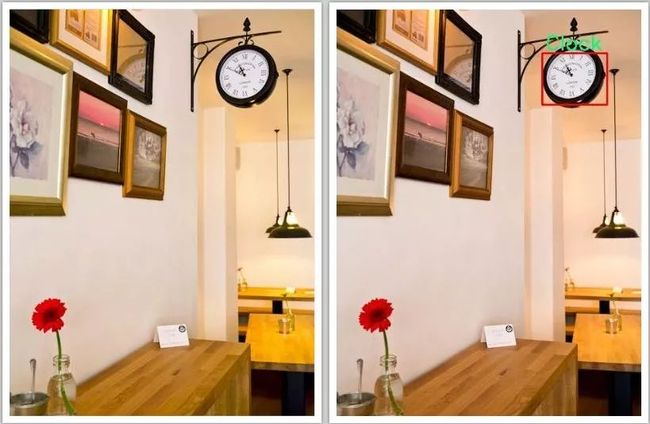
手动搭建属于自己的目标检测器现在已经不是一个很难的事情,比较常见的方法有Haarcascades 和HOG+SVM,后者在精度上优于前者,此篇文章中,将详细介绍如何使用HOG+SVM搭建自己的检测器,实现效果如下:
理论上说本文的方法适合检测各种经过训练的目标,此篇文章将以检测钟表为例子,检测图像中标记的目标。
任务说明
为了端对端的训练一个目标检测器,检测需要检测的目标,在此是钟表,首先需要标注出图像中的钟表,其次是训练,所有需要做的是:
收集数据
标注图像中目标的位置
训练检测器
保存并测试模型
我们所建立的工程结构如下:
Object Detector
├── detector.py
├── gather_annotations.py
├── selectors/
├── train.py
└── test.py
selectors 包含 BoxSelector 函数类,用来标注(选择)目标区域
gather_annotations.py 允许我们使用选择器标注图像的脚本。
detector.py 此文件中包含ObjectDetector类,用来训练和检测目标。
train.py 用来训练目标检测器
test.py 测试检测器
收集图像
本文以检测钟表为例子,介绍如何检测各种物品,因此,本实验收集的都是钟表图像,部分训练图像如下:
标注数据
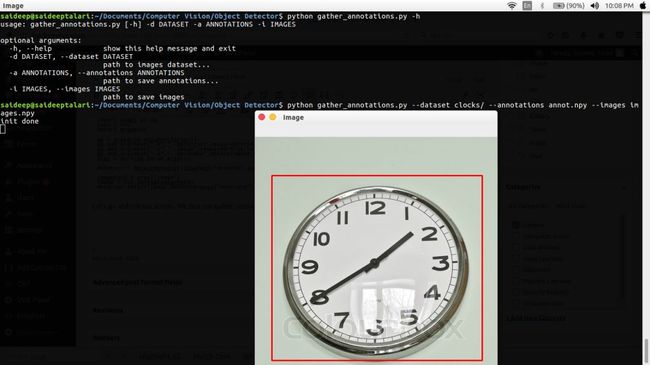
已经拥有了训练数据,接下来需要对数据做标注,所使用的是上文介绍的BoxSelector类,写在gather_annotations.py文件中,此文件中的函数负责标注并保存在硬盘上。
import numpy as np
import cv2
import argparse
from imutils.paths import list_images
from selectors import BoxSelector
#parse arguments
ap = argparse.ArgumentParser()
ap.add_argument("-d","--dataset",required=True,help="path to images dataset...")
ap.add_argument("-a","--annotations",required=True,help="path to save annotations...")
ap.add_argument("-i","--images",required=True,help="path to save images")
args = vars(ap.parse_args())
dataset 表示训练数据集的路径
annotations 表示保存标注到本地的路径
images 保存图像数据到本地的路径
#annotations and image paths
annotations = []
imPaths = []
#loop through each image and collect annotations
for imagePath in list_images(args["dataset"]):
    #load image and create a BoxSelector instance
    image = cv2.imread(imagePath)
    bs = BoxSelector(image,"Image")
    cv2.imshow("Image",image)
    cv2.waitKey(0)
    #order the points suitable for the Object detector
    pt1,pt2 = bs.roiPts
    (x,y,xb,yb) = [pt1[0],pt1[1],pt2[0],pt2[1]]
    annotations.append([int(x),int(y),int(xb),int(yb)])
    imPaths.append(imagePath)
首先,建立两个空的列表,用来存放annotation 和图像的路径,我们需要保存图像的路径,这样就可以按序号索引图像的标注,确保不会索引错。然后遍历整张图像,建立一个BoxSelector实例帮助我们使用鼠标选择区域,然后通过鼠标选择收集annotation 通过分类将annotation和 image path append到 annotations and imPaths 中
最终,收集到了annotations 和 imPaths 到numpy的数组中,并保存到本地。
创建目标检测器
关于HOG(http://www.learnopencv.com/histogram-of-oriented-gradients/)和SVM(https://docs.opencv.org/2.4/doc/tutorials/ml/introduction_to_svm/introduction_to_svm.html),此部分不做介绍,鉴于直接使用HOG和SVM很麻烦,因此可以使用dlib 包,里面封装的有目标检测的API,实际的HOG+SVM可以拆解为下述步骤。
训练:
创建一个HOG descriptor,其包含pixels per cell, cells per block 和orientations
使用descriptor从标注好的区域提取特征
以提取的HOG特征创建一个线性的SVM多分类器
测试:估计平均的widows size
缩小或者放大图像到固定大小,然后建立image pyramid
从每一个定位中提取HOG特征
使用当前的HOG特征估计训练的SVM分类概率,如果超过设置的阈值,则区域中包含目标,否则不包含。
接下来,打开detector.py文件,开始撸代码:
import dlib
import cv2
class ObjectDetector(object):
    def __init__(self,options=None,loadPath=None):
        #create detector options
        self.options = options
        if self.options is None:
            self.options = dlib.simple_object_detector_training_options()
        #load the trained detector (for testing)
        if loadPath is not None:
            self._detector = dlib.simple_object_detector(loadPath)
此部分创建了一个ObjectDetector类,需要两个关键的参数:
option 目标检测器的options 用来控制HOG和SVM超参数
loadpath 用来从本地加载训练好的检测器
首先对于简单的样本检测器,使用默认的options ,通过使用dlib.simple_object_detector_training_options(), 里面已经包含了一些超参数,比如:window_size,num_threads等等, 可以帮助我们训练和拟合检测器,在测试过程中,可以直接加载训练好的检测器。
def _prepare_annotations(self,annotations):
        annots = []
        for (x,y,xb,yb) in annotations:
            annots.append([dlib.rectangle(left=long(x),top=long(y),right=long(xb),bottom=long(yb))])
        return annots
    def _prepare_images(self,imagePaths):
        images = []
        for imPath in imagePaths:
            image = cv2.imread(imPath)
            image = cv2.cvtColor(image,cv2.COLOR_BGR2RGB)
            images.append(image)
        return images
然后,我们定义了两个_prepare_annotations 和 _prepare_images 用来处理数据到一个检测器适合处理的形式,和从imagePaths中加载图像并转化为RGB,因为使用CV2读到的数据是BGR形式的,需要转化为RGB形式。
然后就是创建一个fit 函数了,具有以下参数:
imagePaths 一个类型为unicode的numpy 的array,包含的是图像的路径
annotations 包含对应图像的annotations
visualize 标志位,是否可视化HOG提取的特征,默认是false
savepath 保存训练好模型的路径,默认是None
def fit(self, imagePaths, annotations, visualize=False, savePath=None):
        annotations = self._prepare_annotations(annotations)
        images = self._prepare_images(imagePaths)
        self._detector = dlib.train_simple_object_detector(images, annotations, self.options)
        #visualize HOG
        if visualize:
            win = dlib.image_window()
            win.set_image(self._detector)
            dlib.hit_enter_to_continue()
        #save detector to disk
        if savePath is not None:
            self._detector.save(savePath)
手下使用定义好的_prepare_annotations 和 _prepare_images准备annotations和images,然后使用images创建一个dlib.train_simple_object_detector的实例,然后处理HOG的可视化特征并保存在本地。
def predict(self,image):
        boxes = self._detector(image)
        preds = []
        for box in boxes:
            (x,y,xb,yb) = [box.left(),box.top(),box.right(),box.bottom()]
            preds.append((x,y,xb,yb))
        return preds
    def detect(self,image,annotate=None):
        image = cv2.cvtColor(image,cv2.COLOR_BGR2RGB)
        preds = self.predict(image)
        for (x,y,xb,yb) in preds:
            image = cv2.cvtColor(image,cv2.COLOR_RGB2BGR)
            #draw and annotate on image
            cv2.rectangle(image,(x,y),(xb,yb),(0,0,255),2)
            if annotate is not None and type(annotate)==str:
                cv2.putText(image,annotate,(x+5,y-5),cv2.FONT_HERSHEY_SIMPLEX,1.0,(128,255,0),2)
        cv2.imshow("Detected",image)
        cv2.waitKey(0)
到目前为止,已经建立好了fit ,predict (以图像为输入,输出检测目标在图像中的位置)并且定义了detect (将图像转化为RGB并预测bounding box),接下来就是训练检测器了,首先创建train.py,填入如下代码:
from detector import ObjectDetector
import numpy as np
import argparse
ap = argparse.ArgumentParser()
ap.add_argument("-a","--annotations",required=True,help="path to saved annotations...")
ap.add_argument("-i","--images",required=True,help="path to saved image paths...")
ap.add_argument("-d","--detector",default=None,help="path to save the trained detector...")
args = vars(ap.parse_args())
print "[INFO] loading annotations and images"
annots = np.load(args["annotations"])
imagePaths = np.load(args["images"])
detector = ObjectDetector()
print "[INFO] creating & saving object detector"
detector.fit(imagePaths,annots,visualize=True,savePath=args["detector"])
最后还有一个test.py脚本,用来测试我们的模型。
from detector import ObjectDetector
import numpy as np
import cv2
import argparse
ap = argparse.ArgumentParser()
ap.add_argument("-d","--detector",required=True,help="path to trained detector to load...")
ap.add_argument("-i","--image",required=True,help="path to an image for object detection...")
ap.add_argument("-a","--annotate",default=None,help="text to annotate...")
args = vars(ap.parse_args())
detector = ObjectDetector(loadPath=args["detector"])
imagePath = args["image"]
image = cv2.imread(imagePath)
detector.detect(image,annotate=args["annotate"])开始跑代码了,首先,运行gather_annotations.py,选择图像中目标的区域 。
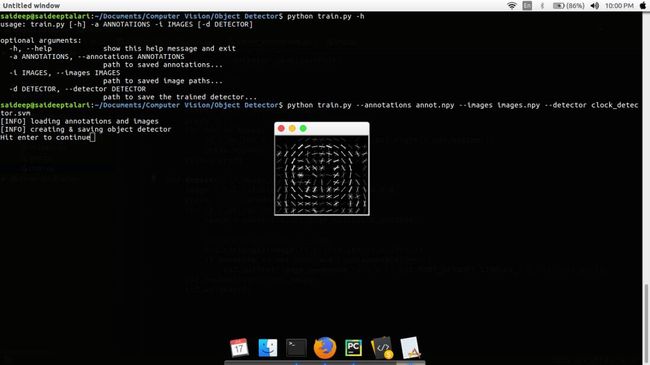
获得annotations和image后,开始运行train.py训练检测器
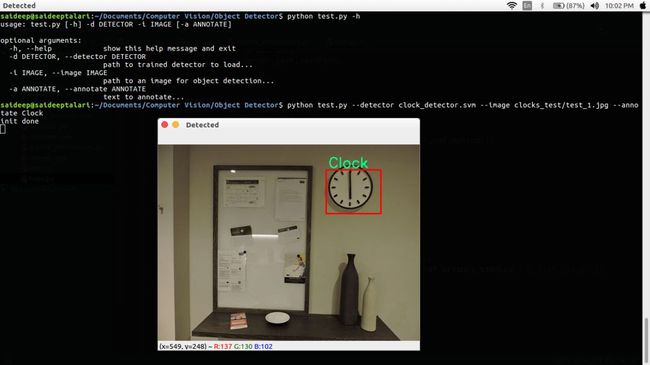
运行完之后,检测器就训练好了,我们可以可视化训练好的HOG特征,然后给定测试图像,运行test.py检测图像中的目标
现在,已经完成了工程的所有部分,完整代码请移步GitHub(https://github.com/saideeptalari/Object-Detector)
end
机器学习算法全栈工程师
一个用心的公众号
进群,学习,得帮助
你的关注,我们的热度,
我们一定给你学习最大的帮助


