Android Design Support Library v28 新增组件详解
1.简介
Google在近期发布了最新的Design Support Library 28.0.0-alpha3版本,其中新增了一些非常实用的组件,本篇文章将会对其进行详细的介绍,一起来看下!
如果你对Material Design还不太了解,可以点击这篇文章《Design Support Library介绍》了解一下。
引入依赖库
在app根目录的buil.gradle文件中加入依赖:
dependencies {
    ...
    implementation 'com.android.support:design:28.0.0-alpha3'
}
2.MaterialButton
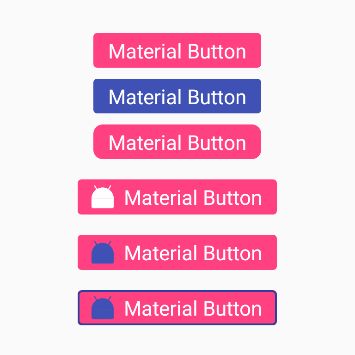
MaterialButton组件继承于Button,因此可以使用Button的大部分属性,可以更便捷的设置按钮圆角、边框、图标等属性,看下效果:
对应的布局文件:
"http://schemas.android.com/apk/res/android"
    xmlns:app="http://schemas.android.com/apk/res-auto"
    android:layout_width="match_parent"
    android:layout_height="match_parent"
    android:gravity="center"
    android:orientation="vertical">

    .support.design.button.MaterialButton
        android:layout_width="wrap_content"
        android:layout_height="wrap_content"
        android:gravity="center"
        android:text="Material Button"
        android:textAllCaps="false"
        android:textAppearance="?android:attr/textAppearanceLargeInverse"
        app:rippleColor="@color/color_white" />

    .support.design.button.MaterialButton
        android:layout_width="wrap_content"
        android:layout_height="wrap_content"
        android:backgroundTint="@color/colorPrimary"
        android:gravity="center"
        android:text="Material Button"
        android:textAllCaps="false"
        android:textAppearance="?android:attr/textAppearanceLargeInverse" />

    .support.design.button.MaterialButton
        android:layout_width="wrap_content"
        android:layout_height="wrap_content"
        android:gravity="center"
        android:text="Material Button"
        android:textAllCaps="false"
        android:textAppearance="?android:attr/textAppearanceLargeInverse"
        app:cornerRadius="10dp" />

    .support.design.button.MaterialButton
        android:layout_width="wrap_content"
        android:layout_height="50dp"
        android:layout_marginTop="10dp"
        android:gravity="center"
        android:text="Material Button"
        android:textAllCaps="false"
        android:textAppearance="?android:attr/textAppearanceLargeInverse"
        app:icon="@mipmap/ic_launcher"
        app:iconSize="30dp" />

    .support.design.button.MaterialButton
        android:layout_width="wrap_content"
        android:layout_height="50dp"
        android:layout_marginTop="10dp"
        android:gravity="center"
        android:text="Material Button"
        android:textAllCaps="false"
        android:textAppearance="?android:attr/textAppearanceLargeInverse"
        app:icon="@mipmap/ic_launcher"
        app:iconSize="30dp"
        app:iconTint="@color/colorPrimary" />

    .support.design.button.MaterialButton
        android:layout_width="wrap_content"
        android:layout_height="50dp"
        android:layout_marginTop="10dp"
        android:gravity="center"
        android:text="Material Button"
        android:textAllCaps="false"
        android:textAppearance="?android:attr/textAppearanceLargeInverse"
        app:icon="@mipmap/ic_launcher"
        app:iconSize="30dp"
        app:iconTint="@color/colorPrimary"
        app:strokeColor="@color/colorPrimaryDark"
        app:strokeWidth="2dp" />
注意:MaterialButton必须设置textAppearance属性,如果没有的话会报错,不知道是不是bug。
MaterialButton属性速查表:
| 属性 | 介绍 |
|---|---|
| app:backgroundTint | 按钮背景着色 |
| app:backgroundTintMode | 按钮背景的着色模式 |
| app:icon | 按钮图标(在文字左边,不能设置位置) |
| app:iconSize | 按钮图标大小 |
| app:iconPadding | 按钮图标的内边距 |
| app:iconTint | 按钮图标着色 |
| app:iconTintMode | 按钮图标的着色模式 |
| app:additionalPaddingStartForIcon | 按钮图标的左内边距 |
| app:additionalPaddingEndForIcon | 按钮图标的右内边距 |
| app:strokeColor | 按钮边框颜色 |
| app:strokeWidth | 按钮边框宽度 |
| app:cornerRadius | 按钮圆角角度 |
| app:rippleColor | 按钮点击水波纹效果颜色 |
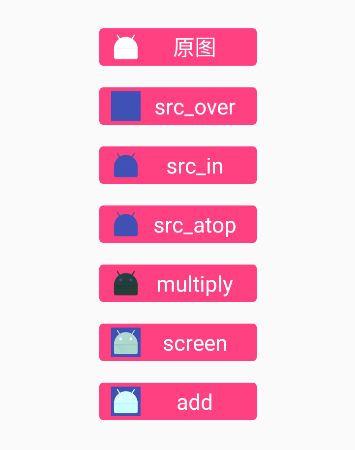
着色模式效果
3.Chip & ChipGroup
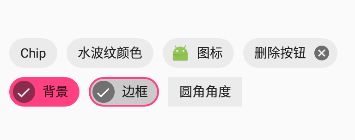
在Chip组件出现之前,我们一直都是通过自定义控件的形式来实现关键字标签等UI效果的,比如《Android 流式布局FlowLayout 实现关键字标签》中实现的效果,现在Chip & ChipGroup组件可以对其进行原生支持了,非常Nice,看下效果:
对应的布局文件:
"http://schemas.android.com/apk/res/android"
    xmlns:app="http://schemas.android.com/apk/res-auto"
    android:layout_width="match_parent"
    android:layout_height="match_parent"
    android:gravity="center"
    android:orientation="vertical">

    .support.design.chip.ChipGroup
        android:id="@+id/chip_group"
        android:layout_width="match_parent"
        android:layout_height="wrap_content"
        android:layout_margin="10dp"
        app:chipSpacing="10dp"
        app:singleSelection="false">

        .support.design.chip.Chip
            android:layout_width="wrap_content"
            android:layout_height="wrap_content"
            android:checkable="true"
            android:clickable="true"
            android:text="Chip"
            android:textAllCaps="false" />

        .support.design.chip.Chip
            android:layout_width="wrap_content"
            android:layout_height="wrap_content"
            android:clickable="true"
            android:text="水波纹颜色"
            android:textAllCaps="false"
            app:rippleColor="@color/colorAccent" />

        .support.design.chip.Chip
            android:layout_width="wrap_content"
            android:layout_height="wrap_content"
            android:checkable="true"
            android:clickable="true"
            android:text="图标"
            android:textAllCaps="false"
            app:chipIcon="@mipmap/ic_launcher"
            app:chipIconEnabled="true"
            app:chipIconSize="20dp"
            app:iconStartPadding="5dp" />

        .support.design.chip.Chip
            android:id="@+id/chip_close"
            android:layout_width="wrap_content"
            android:layout_height="wrap_content"
            android:checkable="true"
            android:clickable="true"
            android:text="删除按钮"
            android:textAllCaps="false"
            app:closeIconEnabled="true" />

        .support.design.chip.Chip
            android:layout_width="wrap_content"
            android:layout_height="wrap_content"
            android:checkable="true"
            android:clickable="true"
            android:text="背景"
            android:textAllCaps="false"
            app:chipBackgroundColor="@color/colorAccent" />

        .support.design.chip.Chip
            android:layout_width="wrap_content"
            android:layout_height="wrap_content"
            android:checkable="true"
            android:clickable="true"
            android:text="边框"
            android:textAllCaps="false"
            app:chipStrokeColor="@color/colorAccent"
            app:chipStrokeWidth="2dp" />

        .support.design.chip.Chip
            android:layout_width="wrap_content"
            android:layout_height="wrap_content"
            android:checkable="true"
            android:clickable="true"
            android:text="圆角角度"
            android:textAllCaps="false"
            app:chipCornerRadius="0dp" />

    .support.design.chip.ChipGroup>
单选或多选功能需要设置android:checkable=”true”才可以实现,官方给的设置方式是app:checkable=“true”,会报错找不到,可能是bug,发布正式版的时候再看看。
Chip组件默认不支持点击,需要设置android:clickable=”true”才可以。
ChipGroup属性速查表:
| 属性 | 介绍 |
|---|---|
| app:chipSpacing | Chip在水平&垂直方向的间距 |
| app:chipSpacingHorizontal | Chip在水平方向的间距 |
| app:chipSpacingVertical | Chip在垂直方向的间距 |
| app:singleLine | 是否单行显示Chip,默认为false |
| app:singleSelection | 是否为单选模式,默认为false |
Chip属性速查表:
| 属性 | 介绍 |
|---|---|
| app:chipBackgroundColor | Chip背景颜色 |
| app:chipCornerRadius | Chip圆角角度 |
| app:chipStrokeColor | Chip边框颜色 |
| app:chipStrokeWidth | Chip边框宽度 |
| app:rippleColor | Chip点击水波纹效果颜色 |
| app:chipIconEnabled | 是否在Chip上显示图标,默认为true |
| app:chipIcon | Chip图标(在文字左边,不能设置位置) |
| app:chipIconSize | Chip图标大小 |
| app:closeIconEnabled | 是否显示Chip关闭按钮,默认为false |
| app:closeIcon | Chip关闭按钮图标 |
| app:closeIconTint | Chip关闭按钮着色 |
| app:closeIconSize | Chip关闭按钮大小 |
| app:checkedIconEnabled | 是否显示Chip选中图标,默认为true |
| app:checkedIcon | Chip选中图标 |
| app:chipStartPadding | Chip左内边距 |
| app:chipEndPadding | Chip右内边距 |
| app:iconStartPadding | Chip图标左内边距 |
| app:iconEndPadding | Chip图标右内边距 |
| app:textStartPadding | Chip文字左内边距 |
| app:textEndPadding | Chip文字右内边距 |
| app:closeIconStartPadding | Chip关闭图标左内边距 |
| app:closeIconEndPadding | Chip关闭图标右内边距 |
4.MaterialCardView
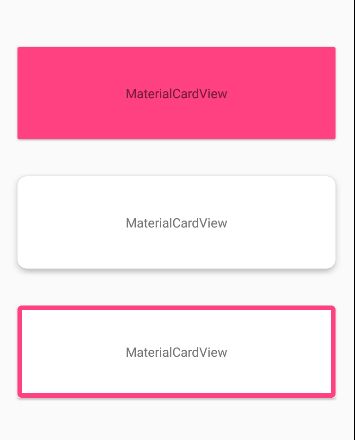
与普通CardView相比,可以设置边框样式,看下效果:
对应的布局文件:
"http://schemas.android.com/apk/res/android"
    xmlns:app="http://schemas.android.com/apk/res-auto"
    android:layout_width="match_parent"
    android:layout_height="match_parent"
    android:gravity="center"
    android:orientation="vertical">

    .support.design.card.MaterialCardView
        android:layout_width="match_parent"
        android:layout_height="100dp"
        android:layout_margin="20dp"
        app:cardBackgroundColor="@color/colorAccent">

        "wrap_content"
            android:layout_height="wrap_content"
            android:layout_gravity="center"
            android:text="MaterialCardView" />

    .support.design.card.MaterialCardView>

    .support.design.card.MaterialCardView
        android:layout_width="match_parent"
        android:layout_height="100dp"
        android:layout_margin="20dp"
        app:cardCornerRadius="10dp"
        app:cardElevation="5dp">

        "wrap_content"
            android:layout_height="wrap_content"
            android:layout_gravity="center"
            android:text="MaterialCardView" />

    .support.design.card.MaterialCardView>

    .support.design.card.MaterialCardView
        android:layout_width="match_parent"
        android:layout_height="100dp"
        android:layout_margin="20dp"
        app:strokeColor="@color/colorAccent"
        app:strokeWidth="5dp">

        "wrap_content"
            android:layout_height="wrap_content"
            android:layout_gravity="center"
            android:text="MaterialCardView" />

    .support.design.card.MaterialCardView>
MaterialCardView属性速查表:
| 属性 | 介绍 |
|---|---|
| app:strokeColor | MaterialCardView边框颜色 |
| app:strokeWidth | MaterialCardView边框宽度 |
5.BottomAppBar
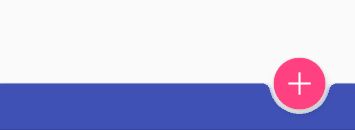
BottomAppBar组件通常会与FloatingActionButton组件一起使用,但是在开发过程中不是很常用,看下效果:
对应的布局文件:
.support.design.widget.CoordinatorLayout xmlns:android="http://schemas.android.com/apk/res/android"
    xmlns:app="http://schemas.android.com/apk/res-auto"
    android:layout_width="match_parent"
    android:layout_height="match_parent">

    .support.design.widget.FloatingActionButton
        android:layout_width="wrap_content"
        android:layout_height="wrap_content"
        android:src="@mipmap/ic_add"
        app:fabSize="normal"
        app:layout_anchor="@id/bottom_app_bar" />

    .support.design.bottomappbar.BottomAppBar
        android:id="@+id/bottom_app_bar"
        android:layout_width="match_parent"
        android:layout_height="50dp"
        android:layout_gravity="bottom"
        app:backgroundTint="@color/colorPrimary"
        app:fabAlignmentMode="end"
        app:fabAttached="true" />

.support.design.widget.CoordinatorLayout>
根布局需要使用CoordinatorLayout,FloatingActionButton通过layout_anchor属性与BottomAppBar绑定在一起。
BottomAppBar属性速查表:
| 属性 | 介绍 |
|---|---|
| app:backgroundTint | BottomAppBar背景着色 |
| app:fabAlignmentMode | FAB位置(居中或居右),默认为居右 |
| app:fabAttached | 是否绑定FAB,默认为true |
| app:fabCradleMargin | BottomAppBar与FAB的距离,默认为5dp |
| app:fabCradleRoundedCornerRadius | BottomAppBar与FAB相邻处的圆角角度,默认为8dp |
| app:fabCradleVerticalOffset | FAB在BottomAppBar中的垂直偏移量,默认为0dp |
6.写在最后
到这里Design Support Library v28新增组件就介绍完了,如有错误或者遗漏的地方可以给我留言评论,谢谢!
代码已上传至GitHub,欢迎Star、Fork!
GitHub地址:https://github.com/alidili/DesignSupportDemo
本文Demo的Apk下载地址:https://github.com/alidili/DesignSupportDemo/raw/master/DesignSupportDemo.apk
