ELK日志分析平台之logstash
logstash
Logstash 是一个接收,处理,转发日志的工具。支持系统日志,webserver日志,错误日志,应用日志,总之包括所有可以抛出来的日志类型。在一个典型的使用场景下(ELK):用 Elasticsearch作为后台数据的存储,kibana用来前端的报表展示。Logstash在其过程中担任搬运工的角色,它为数据存储,报表查询和日志解析创建了一个功能强大的管道链。Logstash 提供了多种多样的input,filters,codecs 和 output 组件,让使用者轻松实现强大的功能。
(本文所有主机ip均为172.25.17网段,主机名和ip相对应。比如172.25.17.3对应server3)
一 服务安装和测试
在server4端安装logstash:
[root@server4 ~]# ls
elasticsearch-2.3.3.rpm        jdk-8u121-linux-x64.rpm
elasticsearch-head-master.zip  logstash-2.3.3-1.noarch.rpm
[root@server4 ~]# rpm -ivh logstash-2.3.3-1.noarch.rpm
Preparing...                ########################################### [100%]
   1:logstash               ########################################### [100%]
服务测试:指定格式输出:
[root@server4 opt]# /opt/logstash/bin/logstash -e 'input { stdin {} } output { stdout {} }'
Settings: Default pipeline workers: 1
Pipeline main started
hello
2018-08-25T02:38:13.829Z server4 hello
world
2018-08-25T02:38:20.293Z server4 world
另一种格式更加详细的输出:
[root@server4 opt]# /opt/logstash/bin/logstash -e 'input { stdin {} } output { stdout { codec => rubydebug} }'
Settings: Default pipeline workers: 1
Pipeline main started
westos
{
       "message" => "westos",
      "@version" => "1",
    "@timestamp" => "2018-08-25T02:39:30.353Z",
          "host" => "server4"
}
linux
{
       "message" => "linux",
      "@version" => "1",
    "@timestamp" => "2018-08-25T02:39:33.807Z",
          "host" => "server4"
}
将终端的数据发送到elasticsearch:
[root@server4 opt]# /opt/logstash/bin/logstash -e 'input { stdin {} } output { elasticsearch {hosts => ["172.25.17.4"] index => "logstash-%{+YYYY.MM.dd}"} stdout { codec => rubydebug } }'
Settings: Default pipeline workers: 1
Pipeline main started
test
{
       "message" => "test",
      "@version" => "1",
    "@timestamp" => "2018-08-25T02:44:41.249Z",
          "host" => "server4"
}
hello
{
       "message" => "hello",
      "@version" => "1",
    "@timestamp" => "2018-08-25T02:44:48.346Z",
          "host" => "server4"
}
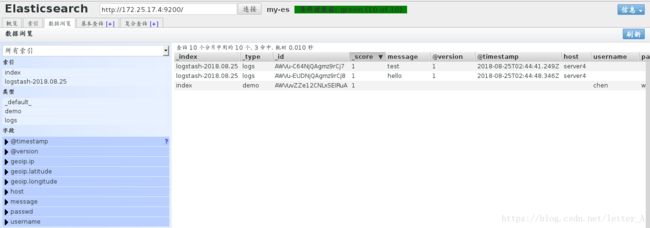
在浏览器中查看接收的数据:

二 新建文件使用模块输出
在server4端新建文件:
[root@server4 opt]# cd /etc/logstash/conf.d/
[root@server4 conf.d]# vim es.conf
文件内容:
  1 input {
  2         stdin {}
  3 }
  4
  5 output {
  6         elasticsearch {
  7                 hosts => ["172.25.17.4"]
  8                 index => "logstash-%{+YYYY.MM.dd}"
  9         }
 10         stdout {
 11                 codec => rubydebug
 12         }
 13 }
指定文件路径运行并输入数据:
[root@server4 conf.d]# /opt/logstash/bin/logstash -f /etc/logstash/conf.d/es.conf
Settings: Default pipeline workers: 1
Pipeline main started
aaaaaaa
{
       "message" => "aaaaaaa",
      "@version" => "1",
    "@timestamp" => "2018-08-25T03:41:35.611Z",
          "host" => "server4"
}
bbbbbbb
{
       "message" => "bbbbbbb",
      "@version" => "1",
    "@timestamp" => "2018-08-25T03:41:41.944Z",
          "host" => "server4"
}
三 将输入的数据存放在指定文件中:
[root@server4 conf.d]# vim es.conf
加入file模块,将输入的数据保存在/tmp/testfile中:
  1 input {
  2         stdin {}
  3 }
  4
  5 output {
  6         elasticsearch {
  7                 hosts => ["172.25.17.4"]
  8                 index => "logstash-%{+YYYY.MM.dd}"
  9         }
 10         stdout {
 11                 codec => rubydebug
 12         }
 13         file {
 14                 path => "/tmp/testfile"
 15                 codec => line { format => "custom format: %{message}" }
 16         }
 17 }
运行并输入数据:
[root@server4 conf.d]# /opt/logstash/bin/logstash -f /etc/logstash/conf.d/es.conf
Settings: Default pipeline workers: 1
Pipeline main started
cccccccc
{
       "message" => "cccccccc",
      "@version" => "1",
    "@timestamp" => "2018-08-25T03:48:55.507Z",
          "host" => "server4"
}
dddddddd
{
       "message" => "dddddddd",
      "@version" => "1",
    "@timestamp" => "2018-08-25T03:49:00.552Z",
          "host" => "server4"
}
[root@server4 conf.d]# cat /tmp/testfile
custom format: cccccccc
custom format: dddddddd
四 将日志导入到logstash
编辑文件:
[root@server4 conf.d]# vim es.conf
设定日志导入:
  1 input {
  2         file {
  3                 path => "/var/log/messages"
  4                 start_position => "beginning"
  5 }
  6 }
  7
  8 output {
  9         elasticsearch {
 10                 hosts => ["172.25.17.4"]
 11                 index => "message-%{+YYYY.MM.dd}"
 12         }
 13         stdout {
 14                 codec => rubydebug
 15         }
 16 }
运行:
[root@server4 conf.d]# /opt/logstash/bin/logstash -f /etc/logstash/conf.d/es.conf
Settings: Default pipeline workers: 1
Pipeline main started
重新打开一个终端ssh到server4,并输入数据:
[root@server4 conf.d]# logger eeeeeeeeee
[root@server4 conf.d]# logger eeeeeeeeee
[root@server4 conf.d]# logger eeeeeeeeee
[root@server4 conf.d]# logger eeeeeeeeee
[root@server4 conf.d]# logger eeeeeeeeee
[root@server4 conf.d]# logger eeeeeeeeee
之后这些数据会自动显示在终端里:
[root@server4 conf.d]# /opt/logstash/bin/logstash -f /etc/logstash/conf.d/es.conf
Settings: Default pipeline workers: 1
Pipeline main started
{
       "message" => "Aug 25 12:51:29 server1 root: ddddddddd",
      "@version" => "1",
    "@timestamp" => "2018-08-25T04:51:30.467Z",
          "path" => "/var/log/messages",
          "host" => "server4"
}
{
       "message" => "Aug 25 12:51:33 server1 root: ddddddddd",
      "@version" => "1",
    "@timestamp" => "2018-08-25T04:51:34.481Z",
          "path" => "/var/log/messages",
          "host" => "server4"
}
{
       "message" => "Aug 25 12:51:34 server1 root: ddddddddd",
      "@version" => "1",
    "@timestamp" => "2018-08-25T04:51:34.482Z",
          "path" => "/var/log/messages",
          "host" => "server4"
}
{
       "message" => "Aug 25 12:51:34 server1 root: ddddddddd",
      "@version" => "1",
    "@timestamp" => "2018-08-25T04:51:35.484Z",
          "path" => "/var/log/messages",
          "host" => "server4"
}
{
       "message" => "Aug 25 12:51:35 server1 root: ddddddddd",
      "@version" => "1",
    "@timestamp" => "2018-08-25T04:51:35.576Z",
          "path" => "/var/log/messages",
          "host" => "server4"
}
[root@server4 conf.d]# vim /var/log/messages

五 通过514端口接收server5的日志:
server4端:
[root@server4 conf.d]# vim es.conf 1 input {
2 syslog {
3 port => 514
4 }
5 }
6
7 output {
8 elasticsearch {
9 hosts => ["172.25.17.4"]
10 index => "message-%{+YYYY.MM.dd}"
11 }
12 stdout {
13 codec => rubydebug
14 }
15 }
server5端:
[root@server5 elasticsearch]# vim /etc/rsyslog.conf
 80 # ### end of the forwarding rule ###
 81 *.* @@172.25.17.4:514
重启服务:
[root@server5 elasticsearch]# /etc/init.d/rsyslog restart
Shutting down system logger:                               [  OK  ]
Starting system logger:                                    [  OK  ]
server4端运行:
[root@server4 conf.d]# /opt/logstash/bin/logstash -f /etc/logstash/conf.d/es.conf
Settings: Default pipeline workers: 1
Pipeline main started
server5端键入内容:
[root@server5 elasticsearch]# logger hello world
[root@server5 elasticsearch]# logger hello world
[root@server5 elasticsearch]# logger hello world
[root@server5 elasticsearch]# logger hello world
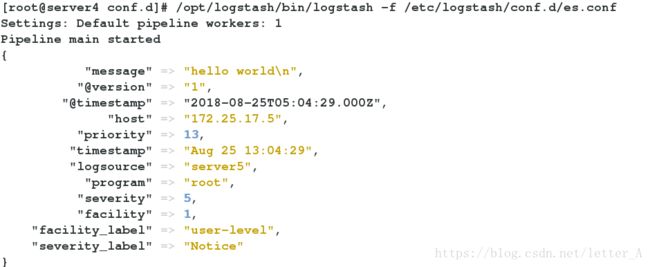
server4端接收到数据:
[root@server4 conf.d]# /opt/logstash/bin/logstash -f /etc/logstash/conf.d/es.conf
Settings: Default pipeline workers: 1
Pipeline main started
{
"message" => "hello world\n",
"@version" => "1",
"@timestamp" => "2018-08-25T05:04:29.000Z",
"host" => "172.25.17.5",
"priority" => 13,
"timestamp" => "Aug 25 13:04:29",
"logsource" => "server5",
"program" => "root",
"severity" => 5,
"facility" => 1,
"facility_label" => "user-level",
"severity_label" => "Notice"
}
{
"message" => "hello world\n",
"@version" => "1",
"@timestamp" => "2018-08-25T05:04:30.000Z",
"host" => "172.25.17.5",
"priority" => 13,
"timestamp" => "Aug 25 13:04:30",
"logsource" => "server5",
"program" => "root",
"severity" => 5,
"facility" => 1,
"facility_label" => "user-level",
"severity_label" => "Notice"
}
六 利用filter模块将日志按照[ ]符整合成一行:
新建文件:
[root@server4 conf.d]# vim aaa.conf 文件内容:
  1 input {
  2         file {
  3                 path => "/var/log/elasticsearch/my-es.log"
  4                 start_position => "beginning"
  5         }
  6 }
  7
  8 filter {
  9   multiline {
 10 #       type => "type"
 11         pattern => "^\["
 12         negate => true
 13         what => "previous"
 14         }
 15 }
 16
 17 output {
 18         elasticsearch {
 19                 hosts => ["172.25.17.4"]
 20                 index => "es-%{+YYYY.MM.dd}"
 21         }
 22         stdout {
 23                 codec => rubydebug
 24         }
 25 }
执行:
[root@server4 conf.d]# /opt/logstash/bin/logstash -f /etc/logstash/conf.d/aaa.conf
可以看到原来换行的内容合并到了一行:

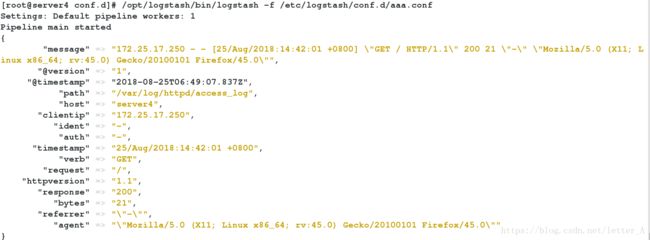
七 处理apache日志:
安装apache新建首页文件并开启服务:
[root@server4 conf.d]# yum install httpd -y
[root@server4 conf.d]# cd /var/www/html/
[root@server4 html]# ls
[root@server4 html]# vim index.html
[root@server4 html]# /etc/init.d/httpd start
Starting httpd: httpd: Could not reliably determine the server's fully qualified domain name, using 172.25.17.4 for ServerName
                                                           [  OK  ]
编辑文件:
[root@server4 conf.d]# vim aaa.conf
内容:
  1 input {
  2         file {
  3                 path => ["/var/log/httpd/access_log","/var/log/httpd/error_log"]
  4                 start_position => "beginning"
  5         }
  6 }
  7
  8 filter {
  9         grok {
 10                 match => { "message" => "%{COMBINEDAPACHELOG}"}
 11         }
 12 }
 13
 14 output {
 15         elasticsearch {
 16                 hosts => ["172.25.17.4"]
 17                 index => "apache-%{+YYYY.MM.dd}"
 18         }
 19         stdout {
 20                 codec => rubydebug
 21         }
 22 }


