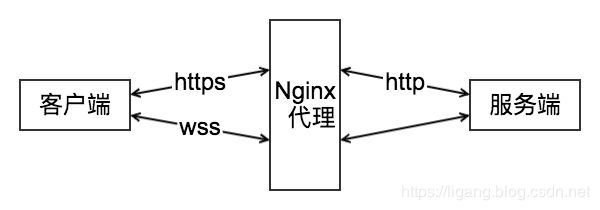
Nginx 配置https及wss
部署单页应用 SPA 时,我们通常使用 Nginx 做中间层进行转发代理。为了保护 Web 安全,要求我们使用 HTTPS(HTTP + SSL) 以及 WSS(Websocket + SSL) 进行通信。HTTPS 及 WSS 协议旨在保护用户数据在网络上不被窃听(机密性) 和不被篡改(完整性)。

HTTP 与 HTTPS 区别
- HTTPS 协议需要到 CA 申请证书,一般免费证书较少,因而需要一定费用;
- HTTP 是超文本传输协议,信息是明文传输,HTTPS 则是具有安全性的 SSL 加密传输;
- HTTP 和 HTTPS 使用的是完全不同的连接方式,用的端口也不一样,前者默认是80,后者默认是443;
- HTTP 的连接很简单,是无状态的;HTTPS 协议是由 SSL + HTTP 协议构建的可进行加密传输、身份认证的网络协议,比HTTP协议安全。
Nginx 如何配置 HTTPS
下述,/usr/local/nginx 为已有 Nginx 安装路径
第一步:到 Nginx 官网,现在指定版本源码:下载,如 nginx-1.15.8.tar.gz
第二步: 解压相关下载文件 tar -zxvf nginx-1.15.8.tar.gz
第三步:进入解压目录,执行如下编译等操作
$ cd nginx-1.15.8
# 源码构建 ./configure --help
$ ./configure --prefix=/usr/local/nginx --with-http_stub_status_module --with-http_ssl_module --with-file-aio --with-http_realip_module
$ make
第四步:备份&覆盖已有 Nginx 操作
# [可选]备份已有 Nginx
$ cp /usr/local/nginx/sbin/nginx /usr/local/nginx/sbin/nginx.bak
# 新的覆盖旧的
$ cp objs/nginx /usr/local/nginx/sbin/nginx
如果 Nginx 已在运行,会抛出 cp: 无法创建普通文件"/usr/local/nginx/sbin/nginx": 文本文件忙 错误!此时,只需要停止 Nginx 服务即可。
/usr/local/nginx/sbin/nginx -s stop# 查看端口使用 $ netstat -lntp Active Internet connections (only servers) Proto Recv-Q Send-Q Local Address Foreign Address State PID/Program name tcp 0 0 0.0.0.0:80 0.0.0.0:* LISTEN 21307/nginx: master tcp 0 0 0.0.0.0:22 0.0.0.0:* LISTEN 3072/sshd tcp 0 0 0.0.0.0:443 0.0.0.0:* LISTEN 21307/nginx: master # 结束 80 端口进程 $ kill 21307
第五步:测试是否成功
$ /usr/local/nginx/sbin/nginx -t
出现以下提示代表成功
nginx:configuration file /usr/local/nginx/conf/nginx.conf test issuccessful
nginx: theconfiguration file /usr/local/nginx/conf/nginx.conf syntax is ok
第六步:启动 Nginx
$ /usr/local/nginx/sbin/nginx -c /usr/local/nginx/conf/nginx.conf
注意,这里需要重新拉取配置文件,不能直接 reload,否则会抛出 nginx: [error] invalid PID number “” in “/usr/local/nginx/logs/nginx.pid” 错误!
最后一步:配置 server
生成 crt 及相关内容
server {
	listen	80;
	server_name	www.domain.com;
	# http 重定向到 https
	return 301 https://$server_name$request_uri;
}
server {
	listen	443 ssl;
	server_name	www.domain.com;
	# ssl 相关
  ssl_certificate 	/usr/local/ssl/ssl.crt;	# 证书文件,绝对路径
	ssl_certificate_key 	/usr/local/ssl/private_nopwd.key; # 私钥文件
	ssl_protocols    	TLSv1 TLSv1.1 TLSv1.2;
	...
}
OpenSSL 生成 root CA 及签发证书
openssl 是目前最流行的 SSL 密码库工具,其提供了一个通用、健壮、功能完备的工具套件,用以支持 SSL/TLS 协议的实现。
生成公钥、私钥:
# 生成一个1024/2048位的私钥
$ openssl genrsa -out private.key 1024 # without password
$ openssl genrsa -des3 -out private.key 1024 # password protected
# nginx使用的私钥需要去除密码口令
$ openssl rsa -in private.key -pubout -out private_nopwd.key
# 查看相关秘钥
$ openssl rsa -noout -text -in public.key
生成证书请求文件:
$ openssl req -new -key private.key -out cert.csr
# 查看证书请求
$ openssl req -noout -text -in cert.csr
-new:申请新的证书-key:指定私钥文件
生成一个新的文件 cert.csr,即一个证书请求文件,你可以拿着这个文件去数字证书颁发机构(即CA)申请一个数字证书。CA 会给你一个新的文件 cacert.pem,那才是包含公钥给对方用的数字证书。
自签名证书(免费),无需CA签发,通常测试使用:
$ openssl x509 -req -days 3650 -in cert.csr -signkey private_nopwd.key -out ssl.crt

Signature ok
subject=/C=CN/ST=beijing/L=beijing/O=idss/OU=fe/CN=fe.domain.com/emailAddress=[email protected]
Getting Private key
-x509:证书版本号,509是给CA自己创建证书的准用选项-days:指定证书有效期
WSS 相关配置
To turn a connection between a client and server from HTTP/1.1 into WebSocket, the protocol switchmechanism available in HTTP/1.1 is used.
location /chat/ {
    proxy_pass http://backend;
    proxy_http_version 1.1;
    proxy_set_header Upgrade $http_upgrade;
    proxy_set_header Connection "upgrade";
    # 默认60s断开连接
    proxy_read_timeout 60s;;
}
注意: 默认情况下,如果代理服务器在60秒内未传输任何数据,则将关闭连接。使用 proxy_read_timeout 指令可以增加此超时。或者,代理服务器可以配置为定期发送WebSocket ping帧以重置超时并检查连接是否仍然存在。
参考链接
- https://www.openssl.org/docs/man1.0.2/man1/openssl-genrsa.html
- https://www.cnblogs.com/xth0331/p/9655576.html
- http://nginx.org/en/docs/http/websocket.html