深入了解Java爬虫的运用技术
首先我们需要知道关于爬虫的一些基本概念,下面我来做一些简单的介绍。
1.爬虫是什么?
爬虫又叫网络爬虫,是一种运行在互联网上为了获取数据的自动化程序或脚本
2.爬虫解决了什么问题
爬虫解决了获取数据的问题
3.爬虫爬取的数据有什么用
和搜索引擎结合使用,对数据进行分析,提取有价值的信息,得到数据的商业价值
4.爬虫的简单分类
• 通用爬虫:百度 爬取互联网所有数据的爬虫叫做通用爬虫
• 垂直爬虫:为做数据分析而爬取特定数据的爬虫叫做垂直爬虫。
总结:在互联网上,大多数都是垂直爬虫,也就是值爬取一定范围内的数据。
5.爬虫的运行原理及实现技术分析
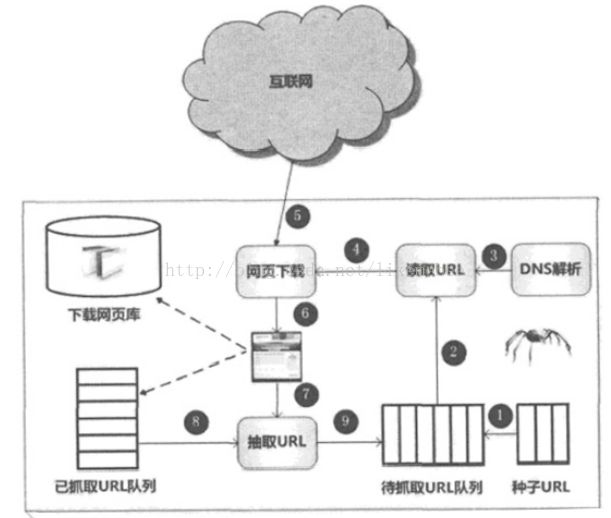
• 1、将一个种子URL存放到队里中
• 2、从队列中读取一个URL
• 3、发起网络请求(上图4-5-6步)
o 3.1、域名解析,得到IP地址
o 3.2、发起HTTP请求
o 3.3、下载页面
• 4、解析HTML文档(上图7-8-9步)
* 解析HMTL文档获取网页中所有URL
o 分页页面是否爬取过
如果没有爬取就放入待抓取的URL队里中
总结:爬虫开发的两大核心技术
Httpclient:帮助我们更好发送网络请求
Jsoup:帮助我们更好的解析html
知道我们开发爬虫的两大核心技术后,我们简单的写一个入门级程序吧!
首先我们先导入2个核心依赖包:
<dependency>
    <groupId>org.apache.httpcomponentsgroupId>
    <artifactId>httpclientartifactId>
    <version>4.5.3version>
dependency>
<dependency>

    <groupId>org.jsoupgroupId>
    <artifactId>jsoupartifactId>
    <version>1.10.3version>
dependency>
使用Httpclient来发送一个Get请求:
package com.yida.spider.httpclient;

import java.io.IOException;

import org.apache.http.HttpEntity;
import org.apache.http.client.methods.CloseableHttpResponse;
import org.apache.http.client.methods.HttpGet;
import org.apache.http.impl.client.CloseableHttpClient;
import org.apache.http.impl.client.HttpClients;
import org.apache.http.util.EntityUtils;

public class HttpClientGet {

    public static void main(String[] args) throws Exception {
        //1.指定一个url
        String url = "https://www.tianyancha.com/";
        //2.创建一个默认的httpclient对象
        CloseableHttpClient httpClient = HttpClients.createDefault();
        //3.如果是get请求那就创建一个get对象
        HttpGet httpGet = new HttpGet(url);
        httpGet.setHeader("user-agent", "Mozilla/5.0 (Windows NT 6.1; WOW64) AppleWebKit/537.36 (KHTML, like Gecko) Chrome/50.0.2661.102 Safari/537.36");
        //4.发起请求
        CloseableHttpResponse execute = httpClient.execute(httpGet);
        //5.获取数据
        HttpEntity entity = execute.getEntity();
        //6.打印数据
        String html = EntityUtils.toString(entity,"utf-8");

        System.out.println(html);

    }
}
使用Httpclient发送一个post请求:
package com.yida.spider.httpclient;

import java.io.IOException;
import java.util.ArrayList;

import org.apache.http.HttpEntity;
import org.apache.http.client.ClientProtocolException;
import org.apache.http.client.entity.UrlEncodedFormEntity;
import org.apache.http.client.methods.CloseableHttpResponse;
import org.apache.http.client.methods.HttpPost;
import org.apache.http.impl.client.CloseableHttpClient;
import org.apache.http.impl.client.HttpClients;
import org.apache.http.message.BasicNameValuePair;
import org.apache.http.util.EntityUtils;

public class HttpClientPost {
    public static void main(String[] args) throws Exception {
        //1.指定一个url
        String url = "https://www.tianyancha.com/login";
        //2.创建一个默认的httpclient对象
        CloseableHttpClient httpClient = HttpClients.createDefault();
        //3.如果是post请求那就创建一个post对象
        HttpPost httpPost = new HttpPost(url);
        //set header
        httpPost.setHeader("user-agent", "Mozilla/5.0 (Windows NT 6.1; WOW64) AppleWebKit/537.36 (KHTML, like Gecko) Chrome/50.0.2661.102 Safari/537.36");

        ArrayList basicNameValuePairs = new ArrayList();
        //设置参数(设置登录名和密码实现自动登录)
        basicNameValuePairs.add(new BasicNameValuePair("username", "zhoujie"));
        basicNameValuePairs.add(new BasicNameValuePair("password", "1314520"));

        httpPost.setEntity(new UrlEncodedFormEntity(basicNameValuePairs));

        CloseableHttpResponse execute = httpClient.execute(httpPost);
        HttpEntity entity = execute.getEntity();
        String html = EntityUtils.toString(entity,"utf-8");
        System.out.println(html);
    }
}
使用Httpclient发送了get或者post请求后,给我们返回的其实是一个html文档对象,我们需要提取html文档里面有用的数据,可以使用js的getElementById等操作dom的方式来获取我们想要的数据,但是不推荐使用此方法,太繁琐,不方便,这里给大家推荐的是jsoup来解析,使用jsoup可直接解析某个URL地址、HTML文本内容。它提供了一套非常省力的API,可通过DOM,CSS以及类似于jQuery的操作方法来取出和操作数据。
一下 既然我们已经知道了这2大核心技术的基本用法,是不是 该来运用一下呢!接下来给大家做一个比较高级的案例,挑战一下自己吧!!!案例演示的是爬取虎嗅网站的所有新闻数据,爬取之前先进行一下要使用的技术点分析。
①爬取的新闻数据这里我们选择放在mysql数据库里,由于mybatis框架比较大 ,我们这里仅仅演示的是一个案例,所以这里 采用的是Spring自带的jdbctmplate来操作 数据库 就可以了。
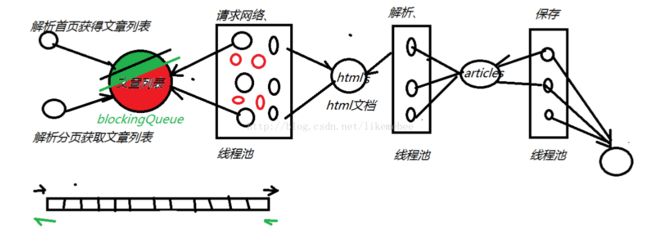
②爬取 一个网站所有的新闻数据这个量是十分庞大的,为了提高我们的爬取速度,我们使用多线程来提高我们爬取新闻数据的速度,又由于创建和销毁线程开销很大,可能需要上千个时钟周期,为了避免cpu花费不必要的时间在这上面,由此使用线程池的技术。
③我们爬取新闻的数据 过程分析:首先进入虎嗅首页(http://www.huxiu.com),按F12进入开发者模式查看新闻数据源码。发现每一条新闻数据div有一个data-id的属性对应一串数据,比如是 aid,点开几条新闻数据进行分析,我们惊奇的发现新闻的详情页url的格式是String url = “https://www.huxiu.com/article/“+aid+”.html”;那么我们先把首页所有的新闻列的data-id的属性爬取出来放进 一个消息队列里(ArrayBlockingQueue消息队列这里不做过多的介绍,有不清楚的可以留言,有必要的话我可以单独开一篇文章来进行说明),然后一直往下拉,发现虎嗅新闻的网站分页是点击加载更多来进行一个ajax请求,来获取分页数据,然后分析出分页请求必要的三个参数,由此可以进行分页数据的请求,获取所有的aid后,就可以进行详情页的url解析了,开多线程来 解析新闻的详情页,然后将解析出来的html文档放进 articleHtmlQueue消息队列中,后面的分析过程都是一样的,按照此思路进行分析下去 。。。。。。。。。。。。(略)为此结合下面的一张图来帮助大家的理解:
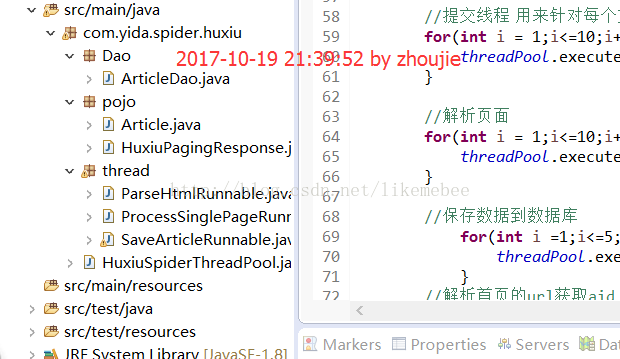
下面先给大家看一下整个案例的项目结构:
然后项目所需依赖 pom.xml如下 :
<project xmlns="http://maven.apache.org/POM/4.0.0" xmlns:xsi="http://www.w3.org/2001/XMLSchema-instance" xsi:schemaLocation="http://maven.apache.org/POM/4.0.0 http://maven.apache.org/xsd/maven-4.0.0.xsd">
  <modelVersion>4.0.0modelVersion>
  <groupId>com.yida.spidergroupId>
  <artifactId>spider_huxiuartifactId>
  <version>0.0.1-SNAPSHOTversion>


<dependencies>
        <dependency>
            <groupId>org.apache.httpcomponentsgroupId>
            <artifactId>httpclientartifactId>
            <version>4.5.3version>
        dependency>

        <dependency>
            <groupId>org.jsoupgroupId>
            <artifactId>jsoupartifactId>
            <version>1.10.3version>
        dependency>

        <dependency>
            <groupId>org.springframeworkgroupId>
            <artifactId>spring-jdbcartifactId>
            <version>4.2.6.RELEASEversion>
        dependency>

        <dependency>
            <groupId>mysqlgroupId>
            <artifactId>mysql-connector-javaartifactId>
            <version>5.1.41version>
        dependency>
        <dependency>
            <groupId>c3p0groupId>
            <artifactId>c3p0artifactId>
            <version>0.9.1.2version>
        dependency>

        <dependency>
            <groupId>com.alibabagroupId>
            <artifactId>fastjsonartifactId>
            <version>1.2.31version>
        dependency>
        <dependency>
            <groupId>com.google.code.gsongroupId>
            <artifactId>gsonartifactId>
            <version>2.8.1version>
        dependency>
    dependencies>


    <build>
    <plugins>
            <plugin>
                <groupId>org.apache.maven.pluginsgroupId>
                <artifactId>maven-compiler-pluginartifactId>
                <version>3.1version>
                <configuration>
                    <source>1.8source>
                    <target>1.8target>
                    <encoding>utf-8encoding>
                configuration>
            plugin>
        plugins>
  build>
project>
封装新闻数据的pojo类(这里为了方便,全部使用的String):
package com.yida.spider.huxiu.pojo;
public class Article {
    private String id;
    private String url;
    private String title;
    private String author;
    private String createTime;
    private String pl;
    private String zan;
    private String sc;
    private String content;


    public String getId() {
        return id;
    }
    public void setId(String id) {
        this.id = id;
    }
    public String getUrl() {
        return url;
    }
    public void setUrl(String url) {
        this.url = url;
    }
    public String getTitle() {
        return title;
    }
    public void setTitle(String title) {
        this.title = title;
    }
    public String getAuthor() {
        return author;
    }
    public void setAuthor(String author) {
        this.author = author;
    }
    public String getCreateTime() {
        return createTime;
    }
    public void setCreateTime(String createTime) {
        this.createTime = createTime;
    }
    public String getPl() {
        return pl;
    }
    public void setPl(String pl) {
        this.pl = pl;
    }
    public String getZan() {
        return zan;
    }
    public void setZan(String zan) {
        this.zan = zan;
    }
    public String getSc() {
        return sc;
    }
    public void setSc(String sc) {
        this.sc = sc;
    }
    public String getContent() {
        return content;
    }
    public void setContent(String content) {
        this.content = content;
    }
    @Override
    public String toString() {
        return "Article [url=" + url + ", title=" + title + ", author=" + author + ", createTime=" + createTime
                + ", pl=" + pl + ", zan=" + zan + ", sc=" + sc + ", content=" + content + "]";
    }

}
封装分页数据所需的HuxiuPagingResponse类:
package com.yida.spider.huxiu.pojo;

public class HuxiuPagingResponse {
    private String data;
    private String last_dateline;
    private String msg;
    private String result;
    private String total_page;
    public String getData() {
        return data;
    }
    public void setData(String data) {
        this.data = data;
    }
    public String getLast_dateline() {
        return last_dateline;
    }
    public void setLast_dateline(String last_dateline) {
        this.last_dateline = last_dateline;
    }
    public String getMsg() {
        return msg;
    }
    public void setMsg(String msg) {
        this.msg = msg;
    }
    public String getResult() {
        return result;
    }
    public void setResult(String result) {
        this.result = result;
    }
    public String getTotal_page() {
        return total_page;
    }
    public void setTotal_page(String total_page) {
        this.total_page = total_page;
    }
    @Override
    public String toString() {
        return "HuxiuPagingResponse [data=" + data + ", last_dateline=" + last_dateline + ", msg=" + msg + ", result="
                + result + ", total_page=" + total_page + "]";
    }
}
操作数据库的ArticleDao:
package com.yida.spider.huxiu.Dao;

import org.springframework.jdbc.core.JdbcTemplate;

import com.mchange.v2.c3p0.ComboPooledDataSource;
import com.yida.spider.huxiu.pojo.Article;


/**
 * JdbcTemplate 指定数据源
 *      drivermanagersource 数据源bug
 *      c3p0,druid
 *      ComboPooledDataSource
 * @author zhoujie
 *
 */
public class ArticleDao extends JdbcTemplate{
    //通过构造方法加载数据源
    public ArticleDao() {
        // 创建C3P0的datasource 1.配置 2.代码
        ComboPooledDataSource dataSource = new ComboPooledDataSource();
        // 1.url
        // 2.driver
        // 3.username&password
        dataSource.setUser("root");
        dataSource.setPassword("root");
        dataSource.setJdbcUrl("jdbc:mysql://localhost:3306/spider?characterEncoding=utf-8");
        setDataSource(dataSource);
    }
    public void save(Article article) {
        String sql = "INSERT INTO `spider`.`huxiu_article` (`id`, `title`, `author`, `createTime`, `zan`, `pl`, `sc`, `content`, `url` ) VALUES( ?,?,?,?,?,?,?,?,?)";
        update(sql, article.getId(),article.getTitle(),article.getAuthor(),article.getCreateTime(),article.getZan(),article.getPl(),article.getSc(),article.getContent(),article.getUrl());
    }
}
主入口HuxiuSpiderThreadPool:
package com.yida.spider.huxiu;

import java.io.IOException;
import java.util.ArrayList;
import java.util.concurrent.ArrayBlockingQueue;
import java.util.concurrent.ExecutorService;
import java.util.concurrent.Executors;

import org.apache.http.HttpEntity;
import org.apache.http.client.ClientProtocolException;
import org.apache.http.client.entity.UrlEncodedFormEntity;
import org.apache.http.client.methods.CloseableHttpResponse;
import org.apache.http.client.methods.HttpGet;
import org.apache.http.client.methods.HttpPost;
import org.apache.http.client.methods.HttpRequestBase;
import org.apache.http.impl.client.CloseableHttpClient;
import org.apache.http.impl.client.HttpClients;
import org.apache.http.message.BasicNameValuePair;
import org.apache.http.util.EntityUtils;
import org.jsoup.Jsoup;
import org.jsoup.nodes.Document;
import org.jsoup.nodes.Element;
import org.jsoup.select.Elements;

import com.google.gson.Gson;
import com.yida.spider.huxiu.Dao.ArticleDao;
import com.yida.spider.huxiu.pojo.Article;
import com.yida.spider.huxiu.pojo.HuxiuPagingResponse;
import com.yida.spider.huxiu.thread.ParseHtmlRunnable;
import com.yida.spider.huxiu.thread.ProcessSinglePageRunnable;
import com.yida.spider.huxiu.thread.SaveArticleRunnable;


public class HuxiuSpiderThreadPool {
    // 保存数据
        public static ArticleDao articleDao = new ArticleDao();

    //创建固定线程池
    private static ExecutorService threadPool = Executors.newFixedThreadPool(30);

    // dataline用来做分页的请求
    private static String dateLine = null;

    //队列---从首页和分页解析出来的文章url,存放在这个队列中
    public static ArrayBlockingQueue urlQueue = new ArrayBlockingQueue(1000);

    //队列---每个文章解析出来的html文档,放在这个队列中
    public static ArrayBlockingQueue articleHtmlQueue = new ArrayBlockingQueue<>(1000);

    //队列---每个文章的内容,也就是article对象,存放这个队列中
    public static ArrayBlockingQueue articleContentQueue = new ArrayBlockingQueue(1000);


    public static void main(String[] args) {


        //提交线程 用来针对每个文章的url ----进行网络请求
        for(int i = 1;i<=10;i++){
            threadPool.execute(new ProcessSinglePageRunnable());
        }

        //解析页面
        for(int i = 1;i<=10;i++){
            threadPool.execute(new ParseHtmlRunnable());
        }

        //保存数据到数据库
            for(int i =1;i<=5;i++){
                threadPool.execute(new SaveArticleRunnable());
            }
        //解析首页的url获取aid
        processIndexHtml();
        //解析分页的url
        processPageHtml();

    }

    /**
     * 解析分页的url
     */
    private static void processPageHtml() {
        for(int page = 2;page<=1615;page++){
            //编写分页
            String pageUrl = "https://www.huxiu.com/v2_action/article_list";

            System.out.println(page);
            //发送一个post请求
            HttpPost httpPost = new HttpPost(pageUrl);
            //设置参数
            ArrayList parameters = new ArrayList();
            parameters.add(new BasicNameValuePair("huxiu_hash_code","2d9f6e6435e2b71a449ac39a46afe24d"));
            parameters.add(new BasicNameValuePair("page", page+""));
            parameters.add(new BasicNameValuePair("last_dateline", dateLine));

            try {
                httpPost.setEntity(new UrlEncodedFormEntity(parameters));
                String jsonText = getHtmlByRequest(httpPost);
                //将json转换为对象
                Gson gson = new Gson();
                HuxiuPagingResponse huxiuPagingResponse = gson.fromJson(jsonText, HuxiuPagingResponse.class);
                // 每一次请求,都需要解析出新的dataLine
                dateLine = huxiuPagingResponse.getLast_dateline();
                // 获取数据
                String htmlData = huxiuPagingResponse.getData();

                Document doc = Jsoup.parse(htmlData);
                // 解析出div的某个属性data-id
                Elements aidElements = doc.select("div[data-aid]");
                // 依次得到每个新闻的aid
                for (Element element : aidElements) {
                    String aid = element.attr("data-aid");
                    urlQueue.put(aid);
                }

            } catch (Exception e) {
                System.out.println("出错的页码是:"+page);
                e.printStackTrace();
            }

        }


    }

    /**
     * 执行post或者get请求的方法
     * @author zhoujie
     * @param httpPost
     * @throws IOException
     * @throws ClientProtocolException
     */
    public static String getHtmlByRequest(HttpRequestBase request) throws ClientProtocolException, IOException {
        //创建httpclient对象
        CloseableHttpClient httpClient = HttpClients.createDefault();
        //设置user-agent
        request.setHeader("User-Agent","Mozilla/5.0 (Windows NT 10.0; WOW64) AppleWebKit/537.36 (KHTML, like Gecko) Chrome/55.0.2883.87 Safari/537.36");
        CloseableHttpResponse closeableHttpResponse = httpClient.execute(request);
        String html = null;
        if(closeableHttpResponse.getStatusLine().getStatusCode() == 200){
            //得到服务端返回的二进制数据
            HttpEntity entity = closeableHttpResponse.getEntity();
            //将二进制数据转化成字符串
            html = EntityUtils.toString(entity,"utf-8");
            return html;
        }

        return html;

    }

    /**
     * 解析首页的url获取aid
     */
    private static void processIndexHtml() {
        //准备一个url
        String url = "https://www.huxiu.com/";
        //创建httpclient对象
        CloseableHttpClient httpClient = HttpClients.createDefault();
        //发送一个get请求
        HttpGet httpGet = new HttpGet(url);
        //设置user-agent
        //User-Agent:
        httpGet.setHeader("User-Agent","Mozilla/5.0 (Windows NT 10.0; WOW64) AppleWebKit/537.36 (KHTML, like Gecko) Chrome/55.0.2883.87 Safari/537.36");
        String html = null;
        try {
            //执行get请求
            CloseableHttpResponse closeableHttpResponse = httpClient.execute(httpGet);
            //得到服务端返回的二进制数据
            HttpEntity response = closeableHttpResponse.getEntity();
            //将二进制数据转化成字符串
            html = EntityUtils.toString(response);
        } catch (Exception e) {
            e.printStackTrace();
        }
        //使jsoup解析html文档
        Document document = Jsoup.parse(html);
        //获取data_line
        dateLine = document.select("[data-last_dateline]").get(0).attr("data-last_dateline");
        System.out.println("第一次的分页参数dateline为:"+dateLine);
        Elements elements = document.select("div[data-aid]");
        for (Element e: elements){
            try {
                urlQueue.put(e.attr("data-aid"));
            } catch (InterruptedException e1) {
                System.out.println("添加 aid 到urlQueue异常" + e);
            }
        }


    }
}
解析每个url的线程ProcessSinglePageRunnable类:
package com.yida.spider.huxiu.thread;

import org.apache.http.client.methods.HttpGet;

import com.yida.spider.huxiu.HuxiuSpiderThreadPool;

public class ProcessSinglePageRunnable implements Runnable{

    @Override
    public void run() {

        while(true){
            try {
                //解析每个url
                processSingleUrl();
                Thread.sleep(2000);
            } catch (InterruptedException e) {
                // TODO Auto-generated catch block
                e.printStackTrace();
            }
        }
    }

    /**
     * 解析每个url
     * @author zhoujie
     */
    private void processSingleUrl() {
        try {
            String aid = HuxiuSpiderThreadPool.urlQueue.take();
            //得到每个url
            String url = "https://www.huxiu.com/article/"+aid+".html";
            //创建get请求
            HttpGet httpGet = new HttpGet(url);
            //解析url得到html文档
            String htmlByRequest = HuxiuSpiderThreadPool.getHtmlByRequest(httpGet);
            //将得到的html文档加入到articleHtmlQueue队列中
            HuxiuSpiderThreadPool.articleHtmlQueue.put(htmlByRequest);
        } catch (Exception e) {
            e.printStackTrace();
        }

    }

}
解析页面封装成article对象的线程ParseHtmlRunnable类:
package com.yida.spider.huxiu.thread;

import org.jsoup.Jsoup;
import org.jsoup.nodes.Document;
import org.jsoup.select.Elements;

import com.yida.spider.huxiu.HuxiuSpiderThreadPool;
import com.yida.spider.huxiu.pojo.Article;

public class ParseHtmlRunnable implements Runnable{
    @Override
    public void run() {
        while(true){
            parseSingleHtml();
        }
    }

    private void parseSingleHtml() {
        try {
            //从articleHtmlQueue队列里得到html文档
            String html = HuxiuSpiderThreadPool.articleHtmlQueue.take();
            //准备封装article的对象
            Article article = new Article();
            //解析html
            Document document = Jsoup.parse(html);

            //解析文章的id
            String id = document.select("ul[data-id]").get(0).attr("data-id");
            article.setId(id);

            //解析文章的url(直接拼接就可以了)
            String url = "https://www.huxiu.com/article/"+id+".html";
            article.setUrl(url);

            //解析文章的title
            String title = document.select("title").get(0).text();
            article.setTitle(title);
            System.out.println(title);

            // 解析文章author author-name
            Elements names = document.select(".author-name");
            String name = names.get(0).text();
            article.setAuthor(name);

            // 解析文章发布时间
            Elements dates = document.select("[class^=article-time]");
            String date = dates.get(0).text();
            article.setCreateTime(date);

            // 解析文章 评论数
            Elements pls = document.select("[class^=article-pl]");
            String pl = pls.get(0).text();
            article.setPl(pl);

            // 解析文章 点赞数 num
            Elements nums = document.select(".num");
            String num = nums.get(0).text();
            article.setZan(num);

            // 解析文章 收藏数
            Elements shares = document.select("[class^=article-share]");
            String share = shares.get(0).text();
            article.setSc(share);

            // 解析文章正文内容 article-content-wrap
            Elements content = document.select(".article-content-wrap p");
            String contentText = content.text();
            article.setContent(contentText);

            //解析完了后吧article对象放到articleContentQueue队列中
            HuxiuSpiderThreadPool.articleContentQueue.put(article);
        } catch (InterruptedException e) {
            // TODO Auto-generated catch block
            e.printStackTrace();
        }

    }

}
保存数据库的SaveArticleRunnable类(注意操作数据库的线程不能开多了,一度开多了线程 而导致链接数据库的数达到最大数而导致崩溃插入不了数据!):
package com.yida.spider.huxiu.thread;

import com.yida.spider.huxiu.HuxiuSpiderThreadPool;
import com.yida.spider.huxiu.Dao.ArticleDao;
import com.yida.spider.huxiu.pojo.Article;

public class SaveArticleRunnable implements Runnable{
    @Override
    public void run() {

        while(true){
            try {
                // 从articleContentQueue队列取出article对象放到数据库中
                Article article = HuxiuSpiderThreadPool.articleContentQueue.take();
                HuxiuSpiderThreadPool.articleDao.save(article);
            } catch (InterruptedException e) {
                // TODO Auto-generated catch block
                e.printStackTrace();
            }
        }

    }


}
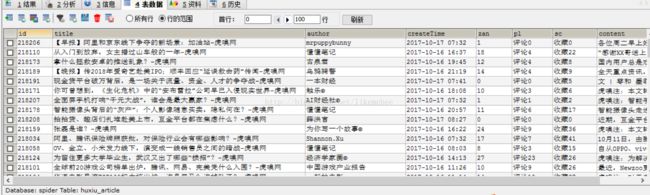
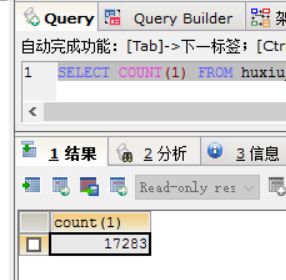
最后运行一下我们的程序吧!等待程序跑几小时的结果!(我只跑了1个小时,查看一下趴了多少条数据吧~)
这里再来扩展一下,随着越来越多的企业开始注重数据这一块的安全性,马云说过,在过去拥有石油就是拥有财富,但是未来是大数据的时代,拥有数据就是拥有财富,人工智能、自动驾驶的小汽车(每秒产生大约100G的庞大数据)……数据更是一块宝地,相信在未来更能体现出来!
当然涉及到爬虫技术,这里介绍的只是一些,还有爬虫的攻防技术。想想如果你是虎嗅的老板,如果这些数据都是你花钱辛辛苦苦收集来的,你会让别人轻易去爬取你的数据吗?肯定是不会的!
那么如何发现爬虫呢?这里简单介绍一下(主要通过如下的技术手段):
单一IP非常规的访问频次
单一IP非常规的数据流量
大量重复简单点的网站浏览行为
只下载网页,没有后续的JS\CSS请求
设置陷阱,使用hidden属性对用户隐藏标签但爬虫可见。
判断请求头
判断cookie
自古以来 ,有攻就有受,这是自然而然的道理!那么如果我们非要去爬取数据并且避免被发现呢?(主要通过如下的技术手段)
多主机策略,分布式爬取。
调整爬取速度
通过变换IP地址或者使用代理服务器来演示
频繁修改自己的User-Agent
Header中的Cache-Control修改为no-cache
当返回状态码是403(服务器资源禁止访问),改变Header和IP。不断改变。
好了,有关爬虫的介绍就到这里了,喜欢本文的点个赞吧!