Android View的工作流程总结分析 (一) -performTraversals
Android View的工作流程
Android View的工作流程主要有三大流程:
measure 流程,测量获得View所需要的宽高
layout 流程,布局决定View在屏幕中具体的位置(决定实际的宽高)
draw 流程 绘制,真正将View的内容绘制显示到屏幕中
一.activity 界面的显示结构

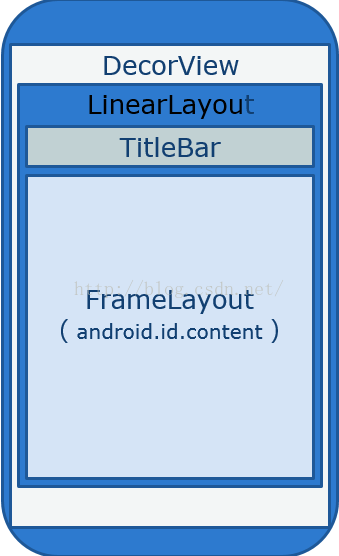
DecorView是每个Activity界面的根视图,DecorView是FrameLayout的子类,是PhoneWindow对象的内部类。DecorView 对象的创建是在setContentView方法第一次执行的时候创建的,DecorView里面是一个LinearLayout布局,这个是根据我们设置的主题样式来决定加入到DecorView中是哪个layout,比如说我们设置是no-title的主题,这时候PhoneWindow生成DecorView的子View的时候就会选择一个没有title的布局R.layout.screen_simple 如下:
这里也就说明了为什么我们requestWindowFeature方法要在setContentView 方法调用之前调用的原因
二. View工作流程的开始
结论:ViewRootImpl调用performTraversals方法开始遍历整个View树,执行View的measure,layout,draw流程。View的工作流程就是从performTraversals开始的。
源码如下:
那么那些地方会触发 performTraversals方法呢?
看一下ViewRootImpl类的源码
scheduleTraversals方法调用的地方就比较多了
1.View 调用重绘方法的时候 invalidate和postInvalidate时
源码分析如下:
看到没invalidateChild回由当前View向上回溯,直到调用到parent返回null 的时候停止。即调用ViewRootImpl类的invalidateChildParent方法,这个方法执行的时候会调用scheduleTraversals()方法,这个方法上面说明最后会执行View绘制流程。
(说明:当VIewRoot和顶级View DecorView 没有建立联系的时候,调用invalidateChild方法回溯到Activity的顶级View即DecorView时,此时顶级View的parent为null,就不会执行View的绘制流程了,此时调用invalidate方法是无效,只有ViewRoot和DecorView建立了联系才会有效。ViewRoot和DecorView建立联系是在Activity的onResume方法之后的,所以正常情况下只有onResume方法执行之后才会看到View显示在屏幕上,也是因为这个原因)。
在分析下postInvalidate方法源码
2.调用View的requestLayout方法
这个方法是层层向上传递,最后调用ViewRootImpl的requestLayout ,这个方法里面同样会执行scheduleTraversals方法,最后执行View的绘制流程
3.ViewRoot和DecorView建立联系的时候,会调用performTraverslas方法,执行View的绘制流程。这是第一次真正调用此方法,完成View的一次完成的遍历流程。ViewRootImpl类的对象是在Activity onResume方法之后才创建的,这时候它们才开始建立联系
源码如下:
分析完了View工作开始的,下面接着讲View的工作的三大流程
Android View的工作流程分析(下)
measure 流程,测量获得View所需要的宽高
layout 流程,布局决定View在屏幕中具体的位置(决定实际的宽高)
draw 流程 绘制,真正将View的内容绘制显示到屏幕中
一.activity 界面的显示结构

DecorView是每个Activity界面的根视图,DecorView是FrameLayout的子类,是PhoneWindow对象的内部类。DecorView 对象的创建是在setContentView方法第一次执行的时候创建的,DecorView里面是一个LinearLayout布局,这个是根据我们设置的主题样式来决定加入到DecorView中是哪个layout,比如说我们设置是no-title的主题,这时候PhoneWindow生成DecorView的子View的时候就会选择一个没有title的布局R.layout.screen_simple 如下:
这里也就说明了为什么我们requestWindowFeature方法要在setContentView 方法调用之前调用的原因
二. View工作流程的开始
结论:ViewRootImpl调用performTraversals方法开始遍历整个View树,执行View的measure,layout,draw流程。View的工作流程就是从performTraversals开始的。
源码如下:
private void performTraversals() {

       ......

       //最外层的根视图的widthMeasureSpec和heightMeasureSpec由来

       //lp.width和lp.height在创建ViewGroup实例时等于MATCH_PARENT

       int childWidthMeasureSpec = getRootMeasureSpec(mWidth, lp.width);

       int childHeightMeasureSpec = getRootMeasureSpec(mHeight, lp.height);

       ......

       performMeasure(childWidthMeasureSpec, childHeightMeasureSpec);

       ......

       performLayout(lp,windowWidth,windowHeight);

       ......

       performDraw();

       ......

}那么那些地方会触发 performTraversals方法呢?
看一下ViewRootImpl类的源码
void doTraversal() {
        if (mTraversalScheduled) {
            mTraversalScheduled = false;
            mHandler.getLooper().removeSyncBarrier(mTraversalBarrier);

            if (mProfile) {
                Debug.startMethodTracing("ViewAncestor");
            }

            Trace.traceBegin(Trace.TRACE_TAG_VIEW, "performTraversals");
            try {
                performTraversals();
            } finally {
                Trace.traceEnd(Trace.TRACE_TAG_VIEW);
            }

            if (mProfile) {
                Debug.stopMethodTracing();
                mProfile = false;
            }
        }
}final TraversalRunnable mTraversalRunnable = new TraversalRunnable();final class TraversalRunnable implements Runnable {
@Override
public void run() {
doTraversal();
}
}final TraversalRunnable mTraversalRunnable = new TraversalRunnable();void scheduleTraversals() {
if (!mTraversalScheduled) {
mTraversalScheduled = true;
mTraversalBarrier = mHandler.getLooper().postSyncBarrier();
mChoreographer.postCallback(
Choreographer.CALLBACK_TRAVERSAL, mTraversalRunnable, null);
if (!mUnbufferedInputDispatch) {
scheduleConsumeBatchedInput();
}
notifyRendererOfFramePending();
}
}scheduleTraversals方法调用的地方就比较多了
1.View 调用重绘方法的时候 invalidate和postInvalidate时
源码分析如下:
      //只能在UI Thread中使用,别的Thread用postInvalidate方法,   View是可见的才有效,回调onDraw方法,针对局部View

   public void invalidate() {
        //invalidate的实质还是调运invalidateInternal方法
        invalidate(true);
    }

   void invalidate(boolean invalidateCache) {
    //实质还是调运invalidateInternal方法
        invalidateInternal(0, 0, mRight - mLeft, mBottom - mTop, invalidateCache, true);
    }

    //!!!!!!看见没有,这是所有invalidate的终极调运方法!!!!!!
    void invalidateInternal(int l, int t, int r, int b, boolean invalidateCache,
            boolean fullInvalidate) {
        ......
            // Propagate the damage rectangle to the parent view.
            final AttachInfo ai = mAttachInfo;
            final ViewParent p = mParent;
            if (p != null && ai != null && l < r && t < b) {
                final Rect damage = ai.mTmpInvalRect;
                //设置刷新区域
                damage.set(l, t, r, b);
                //传递调运Parent ViewGroup的invalidateChild方法
                p.invalidateChild(this, damage);
            }
            ......
    }
      public final void invalidateChild(View child, final Rect dirty) {
        ViewParent parent = this;
        final AttachInfo attachInfo = mAttachInfo;
        ......
        do {
            ......
            //循环层层上级调运,直到ViewRootImpl会返回null
            parent = parent.invalidateChildInParent(location, dirty);
            ......
        } while (parent != null);
    }
@Override
public ViewParentinvalidateChildInParent(int[]location, Rectdirty) {
......
//View调运invalidate最终层层上传到ViewRootImpl后最终触发了该方法
scheduleTraversals();
......
return null;
}
看到没invalidateChild回由当前View向上回溯,直到调用到parent返回null 的时候停止。即调用ViewRootImpl类的invalidateChildParent方法,这个方法执行的时候会调用scheduleTraversals()方法,这个方法上面说明最后会执行View绘制流程。
(说明:当VIewRoot和顶级View DecorView 没有建立联系的时候,调用invalidateChild方法回溯到Activity的顶级View即DecorView时,此时顶级View的parent为null,就不会执行View的绘制流程了,此时调用invalidate方法是无效,只有ViewRoot和DecorView建立了联系才会有效。ViewRoot和DecorView建立联系是在Activity的onResume方法之后的,所以正常情况下只有onResume方法执行之后才会看到View显示在屏幕上,也是因为这个原因)。
在分析下postInvalidate方法源码
public void postInvalidate() {
        postInvalidateDelayed(0);
    }

public void postInvalidateDelayed(long delayMilliseconds) {
        // We try only with the AttachInfo because there's no point in invalidating
        // if we are not attached to our window
        final AttachInfo attachInfo = mAttachInfo;
        //核心,实质就是调运了ViewRootImpl.dispatchInvalidateDelayed方法
        if (attachInfo != null) {
            attachInfo.mViewRootImpl.dispatchInvalidateDelayed(this, delayMilliseconds);
        }
    }

 public void dispatchInvalidateDelayed(View view, long delayMilliseconds) {
        Message msg = mHandler.obtainMessage(MSG_INVALIDATE, view);
        mHandler.sendMessageDelayed(msg, delayMilliseconds);
    }
public void handleMessage(Message msg) {
    ......
    switch (msg.what) {
    case MSG_INVALIDATE:
        ((View) msg.obj).invalidate();
        break;
    ......
    }
    ......
}
2.调用View的requestLayout方法
public void requestLayout() {
        ......
        if (mParent != null && !mParent.isLayoutRequested()) {
            //由此向ViewParent请求布局
            //从这个View开始向上一直requestLayout,最终到达ViewRootImpl的requestLayout
            mParent.requestLayout();
        }
        ......
    }
public void  requestLayout() {
         if (!mHandlingLayoutInLayoutRequest) {
             checkThread();
             mLayoutRequested = true;
             scheduleTraversals();
         }
     }
这个方法是层层向上传递,最后调用ViewRootImpl的requestLayout ,这个方法里面同样会执行scheduleTraversals方法,最后执行View的绘制流程
3.ViewRoot和DecorView建立联系的时候,会调用performTraverslas方法,执行View的绘制流程。这是第一次真正调用此方法,完成View的一次完成的遍历流程。ViewRootImpl类的对象是在Activity onResume方法之后才创建的,这时候它们才开始建立联系
源码如下:
public void setView(View view, WindowManager.LayoutParams attrs, View panelParentView) {
    synchronized (this) {
        if (mView == null) {
            mView = view;
            ...
            requestLayout();
            ...
            //建立DecorView和ViewRootImpl的关联
            view.assignParent(this);
            ...
        }
    }
}

public void  requestLayout() {
         if (!mHandlingLayoutInLayoutRequest) {
             checkThread();
             mLayoutRequested = true;
             scheduleTraversals();
         }
     }
分析完了View工作开始的,下面接着讲View的工作的三大流程
Android View的工作流程分析(下)