源码学习 | Spring Boot启动流程详解
原文章是基于
Spring Boot 1.3.3版本进行分析的,本文基于原文章在Spring Boot 2.0.2版本进行分析并将原作者没有分析完成的部分继续下去。欢迎大家批评指正。参考文章:https://www.cnblogs.com/xinzhao/p/5551828.html。
环境介绍
本文基于Spring Boot版本2.0.2, 使用了spring-boot-starter-web。
配置完成后,编写了代码如下:
@SpringBootApplication
public class DemoApplication {

    public static void main(String[] args) {
        SpringApplication.run(DemoApplication.class, args);
    }
}
@RestController
public class RootController {

    public static final String PATH_ROOT = "/";

    @RequestMapping(PATH_ROOT)
    public String welcome() {
        return "Welcome!";
    }
}
虽然只有几行代码,但是这已经是一个完整的 Web 程序,当访问 url 的 path 部分为 “/” 时,返回字符串 “Welcome!”。
首先是一个非常普通的 java 程序入口,一个符合约定的静态 main 方法。在这个 main 方法中,调用了SpringApplication的静态run方法,并将 DemoApplication 类对象和 main 方法的参数 args 作为参数传递了进去。
然后是一个使用了两个 Spring 注解的 RootController 类,我们在 main 方法中,没有直接使用这个类。
SpringApplication类的静态 run 方法
以下代码摘自:org.springframework.boot.SpringApplication

// 参数对应的就是DemoApplication.class以及main方法中的args
public static ConfigurableApplicationContext run(Class<?> primarySource,
		String... args) {
	return run(new Class<?>[] { primarySource }, args);
}

// 最终运行的这个重载方法(它实际上会构造一个SpringApplication 的实例,然后运行它的run方法)
public static ConfigurableApplicationContext run(Class<?>[] primarySources,
		String[] args) {
	return new SpringApplication(primarySources).run(args);
}
在这个静态方法中,创建SpringApplication对象,并调用该对象的run方法。
构造SpringApplication对象
以下代码摘自:org.springframework.boot.SpringApplication

public SpringApplication(Class<?>... primarySources) {
	this(null, primarySources);
}

public SpringApplication(ResourceLoader resourceLoader, Class<?>... primarySources) {
	this.resourceLoader = resourceLoader;
	Assert.notNull(primarySources, "PrimarySources must not be null");
	// 为成员变量primarySources赋值
	this.primarySources = new LinkedHashSet<>(Arrays.asList(primarySources));
	this.webApplicationType = deduceWebApplicationType();
	setInitializers((Collection) getSpringFactoriesInstances(
			ApplicationContextInitializer.class));
	setListeners((Collection) getSpringFactoriesInstances(ApplicationListener.class));
	this.mainApplicationClass = deduceMainApplicationClass();
}
构造函数中调用了另一个重载方法,初始化 SpringApplication 对象的成员变量 primarySources,webApplicationType,initializers,listeners,mainApplicationClass。primarySources 的赋值比较简单,就是我们传给 SpringApplication.run方法的参数。剩下的几个,我们依次来看看是怎么做的。
webEnvironment:推断应用类型是 Standard 还是 Web
以下代码摘自:org.springframework.boot.SpringApplication

private WebApplicationType webApplicationType;

// 相关常量
private static final String REACTIVE_WEB_ENVIRONMENT_CLASS = "org.springframework.web.reactive.DispatcherHandler";
private static final String MVC_WEB_ENVIRONMENT_CLASS = "org.springframework.web.servlet.DispatcherServlet";
private static final String[] WEB_ENVIRONMENT_CLASSES = { "javax.servlet.Servlet", "org.springframework.web.context.ConfigurableWebApplicationContext" };

public SpringApplication(ResourceLoader resourceLoader, Class<?>... primarySources) {
	...
	this.webApplicationType = deduceWebApplicationType();
	...
}

private WebApplicationType deduceWebApplicationType() {
	if (ClassUtils.isPresent(REACTIVE_WEB_ENVIRONMENT_CLASS, null)
			&& !ClassUtils.isPresent(MVC_WEB_ENVIRONMENT_CLASS, null)) {
		return WebApplicationType.REACTIVE;
	}
	for (String className : WEB_ENVIRONMENT_CLASSES) {
		if (!ClassUtils.isPresent(className, null)) {
			return WebApplicationType.NONE;
		}
	}
	return WebApplicationType.SERVLET;
}
可能会出现三种结果:
- WebApplicationType.REACTIVE:当类路径中存在 REACTIVE_WEB_ENVIRONMENT_CLASS 并且不存在 MVC_WEB_ENVIRONMENT_CLASS 时
- WebApplicationType.NONE:也就是非 Web 型应用(Standard型),此时类路径中不包含 WEB_ENVIRONMENT_CLASSES 中定义的任何一个类时
- WebApplicationType.SERVLET:类路径中包含了 WEB_ENVIRONMENT_CLASSES 中定义的所有类型时
在本文的例子中 webApplicationType 的值为 SERVLET。
initializers:设置初始化器
initializers 成员变量,是一个 ApplicationContextInitializer 类型对象的集合。 顾名思义,ApplicationContextInitializer 是一个可以用来初始化 ApplicationContext 的接口。
以下代码摘自:org.springframework.boot.SpringApplication

private List<ApplicationContextInitializer<?>> initializers;

public SpringApplication(ResourceLoader resourceLoader, Class<?>... primarySources) {
	...
	setInitializers((Collection) getSpringFactoriesInstances(
				ApplicationContextInitializer.class));
	...
}

public void setInitializers(
		Collection<? extends ApplicationContextInitializer<?>> initializers) {
	this.initializers = new ArrayList<>();
	this.initializers.addAll(initializers);
}
可以看到,关键是调用 getSpringFactoriesInstances(ApplicationContextInitializer.class),来获取ApplicationContextInitializer 类型对象的列表。
以下代码摘自:org.springframework.boot.SpringApplication

private <T> Collection<T> getSpringFactoriesInstances(Class<T> type) {
	return getSpringFactoriesInstances(type, new Class<?>[] {});
}

// 这里的入参type就是ApplicationContextInitializer.class
private <T> Collection<T> getSpringFactoriesInstances(Class<T> type,
		Class<?>[] parameterTypes, Object... args) {
	ClassLoader classLoader = Thread.currentThread().getContextClassLoader();
	// Use names and ensure unique to protect against duplicates
	// 使用Set保存names来避免重复元素
	Set<String> names = new LinkedHashSet<>(
			SpringFactoriesLoader.loadFactoryNames(type, classLoader));
	// 根据names来进行实例化
	List<T> instances = createSpringFactoriesInstances(type, parameterTypes,
			classLoader, args, names);
	// 对实例进行排序
	AnnotationAwareOrderComparator.sort(instances);
	return instances;
}
在该方法中主要做了两件事:
- 首先通过调用
SpringFactoriesLoader.loadFactoryNames(type, classLoader)来获取所有 Spring Factories 的名字; - 然后调用
createSpringFactoriesInstances方法根据读取到的名字创建对象。最后会将创建好的对象列表排序并返回。
第一件事
以下代码摘自:org.springframework.core.io.support.SpringFactoriesLoader

public static final String FACTORIES_RESOURCE_LOCATION = "META-INF/spring.factories";

public static List<String> loadFactoryNames(Class<?> factoryClass, @Nullable ClassLoader classLoader) {
	String factoryClassName = factoryClass.getName();
	return loadSpringFactories(classLoader).getOrDefault(factoryClassName, Collections.emptyList());
}

private static Map<String, List<String>> loadSpringFactories(@Nullable ClassLoader classLoader) {
	MultiValueMap<String, String> result = cache.get(classLoader);
	if (result != null) {
		return result;
	}

	try {
		Enumeration<URL> urls = (classLoader != null ?
				classLoader.getResources(FACTORIES_RESOURCE_LOCATION) :
				ClassLoader.getSystemResources(FACTORIES_RESOURCE_LOCATION));
		result = new LinkedMultiValueMap<>();
		while (urls.hasMoreElements()) {
			URL url = urls.nextElement();
			UrlResource resource = new UrlResource(url);
			Properties properties = PropertiesLoaderUtils.loadProperties(resource);
			for (Map.Entry<?, ?> entry : properties.entrySet()) {
				List<String> factoryClassNames = Arrays.asList(
						StringUtils.commaDelimitedListToStringArray((String) entry.getValue()));
				result.addAll((String) entry.getKey(), factoryClassNames);
			}
		}
		cache.put(classLoader, result);
		return result;
	}
	catch (IOException ex) {
		throw new IllegalArgumentException("Unable to load factories from location [" +
				FACTORIES_RESOURCE_LOCATION + "]", ex);
	}
}
可以看到,是从一个名字叫 spring.factories的资源文件中,读取 key 为org.springframework.context.ApplicationContextInitializer的 value。而 spring.factories 的部分内容如下:
以下内容摘自spring-boot-2.0.2.RELEASE.jar中的资源文件META-INF/spring.factories

# Application Context Initializers
org.springframework.context.ApplicationContextInitializer=\
org.springframework.boot.context.ConfigurationWarningsApplicationContextInitializer,\
org.springframework.boot.context.ContextIdApplicationContextInitializer,\
org.springframework.boot.context.config.DelegatingApplicationContextInitializer,\
org.springframework.boot.web.context.ServerPortInfoApplicationContextInitializer
可以看到,最先得到的是ConfigurationWarningsApplicationContextInitializer,ContextIdApplicationContextInitializer,DelegatingApplicationContextInitializer,ServerPortInfoApplicationContextInitializer这四个类的名字。
第二件事
接下来会调用createSpringFactoriesInstances来创建ApplicationContextInitializer实例。
// 关键参数:
// type: org.springframework.context.ApplicationContextInitializer.class
// names: 上一步得到的names集合
// parameterTypes:为一个空的Class集合(new Class[] {})
private <T> List<T> createSpringFactoriesInstances(Class<T> type,
		Class<?>[] parameterTypes, ClassLoader classLoader, Object[] args,
		Set<String> names) {
	List<T> instances = new ArrayList<>(names.size());
	for (String name : names) {
		try {
			// 加载类
			Class<?> instanceClass = ClassUtils.forName(name, classLoader);
			Assert.isAssignable(type, instanceClass);
			// 获取默认的构造方法
			Constructor<?> constructor = instanceClass
					.getDeclaredConstructor(parameterTypes);
			// 使用默认的构造方法实例化类
			T instance = (T) BeanUtils.instantiateClass(constructor, args);
			instances.add(instance);
		}
		catch (Throwable ex) {
			throw new IllegalArgumentException(
					"Cannot instantiate " + type + " : " + name, ex);
		}
	}
	return instances;
}
初始化步骤很直观,没什么好说的,类加载,然后就是得到构造器进行初始化,最后放入到实例列表中。所以在我们的例子中,SpringApplication对象的成员变量 initalizers 就被初始化为,ConfigurationWarningsApplicationContextInitializer,ContextIdApplicationContextInitializer,DelegatingApplicationContextInitializer,ServerPortInfoApplicationContextInitializer 这四个类的对象组成的 list。
下图画出了加载的ApplicationContextInitializer,并说明了他们的作用。至于何时应用他们,且听后面慢慢分解。

listeners:设置监听器
以下代码摘自:org.springframework.boot.SpringApplication

private List<ApplicationListener<?>> listeners;

public SpringApplication(ResourceLoader resourceLoader, Class<?>... primarySources) {
	...
	// 为成员变量 listeners 赋值
	setListeners((Collection) getSpringFactoriesInstances(ApplicationListener.class));
	...
}

public void setListeners(Collection<? extends ApplicationListener<?>> listeners) {
	this.listeners = new ArrayList<>();
	this.listeners.addAll(listeners);
}
listeners 成员变量,是一个 ApplicationListener 类型对象的集合。可以看到获取该成员变量内容使用的是跟成员变量initializers 一样的方法,只不过传入的类型从 ApplicationContextInitializer.class 变成了 ApplicationListener.class 。
看一下 spring.factories 中的相关内容:
以下内容摘自spring-boot-2.0.2.RELEASE.jar中的资源文件META-INF/spring.factories

# Application Listeners
org.springframework.context.ApplicationListener=\
org.springframework.boot.ClearCachesApplicationListener,\
org.springframework.boot.builder.ParentContextCloserApplicationListener,\
org.springframework.boot.context.FileEncodingApplicationListener,\
org.springframework.boot.context.config.AnsiOutputApplicationListener,\
org.springframework.boot.context.config.ConfigFileApplicationListener,\
org.springframework.boot.context.config.DelegatingApplicationListener,\
org.springframework.boot.context.logging.ClasspathLoggingApplicationListener,\
org.springframework.boot.context.logging.LoggingApplicationListener,\
org.springframework.boot.liquibase.LiquibaseServiceLocatorApplicationListener
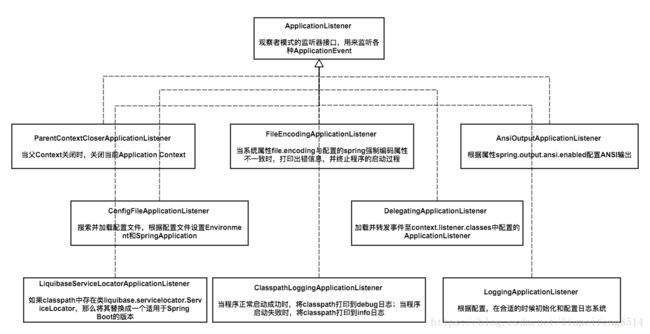
也就是说,在我们的例子中,listener 最终会被初始化为ClearCachesApplicationListener,ParentContextCloserApplicationListener,FileEncodingApplicationListener,AnsiOutputApplicationListener,ConfigFileApplicationListener,DelegatingApplicationListener,ClasspathLoggingApplicationListener,LoggingApplicationListener,LiquibaseServiceLocatorApplicationListener这几个类的对象组成的 list。
下图画出了加载的ApplicationListener,并说明了他们的作用。至于他们何时会被触发,等事件出现时,我们再说明。

mainApplicationClass:推断应用入口类
以下代码摘自:org.springframework.boot.SpringApplication

private Class<?> mainApplicationClass;

public SpringApplication(ResourceLoader resourceLoader, Class<?>... primarySources) {
    ...
    // 为成员变量mainApplicationClass赋值
    this.mainApplicationClass = deduceMainApplicationClass();
    ...
}

private Class<?> deduceMainApplicationClass() {
	try {
		StackTraceElement[] stackTrace = new RuntimeException().getStackTrace();
		for (StackTraceElement stackTraceElement : stackTrace) {
			if ("main".equals(stackTraceElement.getMethodName())) {
				return Class.forName(stackTraceElement.getClassName());
			}
		}
	}
	catch (ClassNotFoundException ex) {
		// Swallow and continue
	}
	return null;
}
它通过构造一个运行时异常,通过异常栈中方法名为 main 的栈帧来得到入口类的名字。在我们的例子中mainApplicationClass 即是我们自己编写的 Application 类。
至此,对于 SpringApplication 实例的初始化过程就结束了。
SpringApplication对象的run方法
经过上面的初始化过程,我们已经有了一个 SpringApplication 对象,根据 SpringApplication 类的静态 run 方法一节中的分析,接下来会调用 SpringApplication 对象的 run 方法。我们接下来就分析这个对象的 run 方法。
/**
 * Run the Spring application, creating and refreshing a new
 * {@link ApplicationContext}.
 * @param args the application arguments (usually passed from a Java main method)
 * @return a running {@link ApplicationContext}
 */
public ConfigurableApplicationContext run(String... args) {
	// 计时工具
	StopWatch stopWatch = new StopWatch();
	stopWatch.start();
	ConfigurableApplicationContext context = null;
	Collection<SpringBootExceptionReporter> exceptionReporters = new ArrayList<>();
	// 设置java.awt.headless系统属性为true - 没有图形化界面
	configureHeadlessProperty();
	// KEY 1 - 获取SpringApplicationRunListeners
	SpringApplicationRunListeners listeners = getRunListeners(args);
	// 发出开始执行的事件
	listeners.starting();
	try {
		ApplicationArguments applicationArguments = new DefaultApplicationArguments(
				args);
		// KEY 2 - 根据SpringApplicationRunListeners以及参数来准备环境
		ConfigurableEnvironment environment = prepareEnvironment(listeners,
				applicationArguments);
		configureIgnoreBeanInfo(environment);
		// 准备Banner打印器 - 就是启动Spring Boot的时候打印在console上的ASCII艺术字体
		Banner printedBanner = printBanner(environment);
		// KEY 3 - 创建Spring上下文
		context = createApplicationContext();
		// 准备异常报告器
		exceptionReporters = getSpringFactoriesInstances(
				SpringBootExceptionReporter.class,
				new Class[] { ConfigurableApplicationContext.class }, context);
		// KEY 4 - Spring上下文前置处理
		prepareContext(context, environment, listeners, applicationArguments,
				printedBanner);
		// KEY 5 - Spring上下文刷新
		refreshContext(context);
		// KEY 6 - Spring上下文后置处理
		afterRefresh(context, applicationArguments);
		// 停止计时器
		stopWatch.stop();
		if (this.logStartupInfo) {
			new StartupInfoLogger(this.mainApplicationClass)
					.logStarted(getApplicationLog(), stopWatch);
		}
		// 发出结束执行的事件
		listeners.started(context);
		callRunners(context, applicationArguments);
	}
	catch (Throwable ex) {
		handleRunFailure(context, ex, exceptionReporters, listeners);
		throw new IllegalStateException(ex);
	}

	try {
		listeners.running(context);
	}
	catch (Throwable ex) {
		handleRunFailure(context, ex, exceptionReporters, null);
		throw new IllegalStateException(ex);
	}
	return context;
}
这个 run 方法包含的内容也是有点多的,根据上面列举出的关键步骤逐个进行分析。
SpringApplicationRunListeners
以下代码摘自:org.springframework.boot.SpringApplication

public ConfigurableApplicationContext run(String... args) {
	...
	SpringApplicationRunListeners listeners = getRunListeners(args);
	...
}

private SpringApplicationRunListeners getRunListeners(String[] args) {
	Class<?>[] types = new Class<?>[] { SpringApplication.class, String[].class };
	return new SpringApplicationRunListeners(logger, getSpringFactoriesInstances(
			SpringApplicationRunListener.class, types, this, args));
}
run 方法中,加载了一系列 SpringApplicationRunListener 对象。可以看到,加载 SpringApplicationRunListener 时,使用的是跟加载 ApplicationContextInitializer 和 ApplicationListener 时一样的方法。那么加载了什么,就可以从spring.factories文件中看到了:
以下内容摘自spring-boot-2.0.2.RELEASE.jar中的资源文件META-INF/spring.factories

# Run Listeners
org.springframework.boot.SpringApplicationRunListener=\
org.springframework.boot.context.event.EventPublishingRunListener
可以看到,在我们的例子中加载的是 org.springframework.boot.context.event.EventPublishingRunListener。我们看一看这个 SpringApplicationRunListener 究竟做了点什么工作了?
以下代码摘自:org.springframework.boot.context.event.EventPublishingRunListener

public class EventPublishingRunListener implements SpringApplicationRunListener, Ordered {

	private final SpringApplication application;

	private final String[] args;

	private final SimpleApplicationEventMulticaster initialMulticaster;

	public EventPublishingRunListener(SpringApplication application, String[] args) {
		this.application = application;
		this.args = args;
		this.initialMulticaster = new SimpleApplicationEventMulticaster();
		for (ApplicationListener<?> listener : application.getListeners()) {
			this.initialMulticaster.addApplicationListener(listener);
		}
	}

	@Override
	public int getOrder() {
		return 0;
	}

	@Override
	public void starting() {
		this.initialMulticaster.multicastEvent(
				new ApplicationStartingEvent(this.application, this.args));
	}

	@Override
	public void environmentPrepared(ConfigurableEnvironment environment) {
		this.initialMulticaster.multicastEvent(new ApplicationEnvironmentPreparedEvent(
				this.application, this.args, environment));
	}

	@Override
	public void contextPrepared(ConfigurableApplicationContext context) {

	}

	...

	@Override
	public void started(ConfigurableApplicationContext context) {
		context.publishEvent(
				new ApplicationStartedEvent(this.application, this.args, context));
	}

	@Override
	public void running(ConfigurableApplicationContext context) {
		context.publishEvent(
				new ApplicationReadyEvent(this.application, this.args, context));
	}

	......
	......

}
EventPublishingRunListener 在对象初始化时,将 SpringApplication 对象的成员变量 listeners 全都保存下来,然后在自己的 public 方法被调用时,发布相应的事件,或执行相应的操作。可以说这个 RunListener 是在 SpringApplication 对象的 run 方法执行到不同的阶段时,发布相应的 event 给 SpringApplication 对象的成员变量 listeners 中记录的事件监听器。
下图画出了 SpringApplicationRunListeners 相关的类结构,虽然我们的例子中只有一个 SpringApplicationRunListener ,但在这样的设计下,想要扩展是非常容易的!

接下来,我们看一下在调用 listeners 的 starting 方法。在我们的例子中,也就是发布了 ApplicationStartingEvent 时,我们已经加载的事件监听器都做了什么操作。至于其它事件的发布,我们按照代码执行的顺序在后面的章节在介绍。
以下是监听 ApplicationStartingEvent 事件的监听器类:
- LoggingApplicationListener
- BackgroundPreinitializer:实现了ApplicationListener接口
- LiquibaseServiceLocatorApplicationListener:会检查classpath中是否有liquibase.servicelocator.ServiceLocator并做相应操作;
LoggingApplicationListener
监听ApplicationStartingEvent ,会根据 classpath 中的类情况创建相应的日志系统对象,并执行一些初始化之前的操作。
以下代码摘自:org.springframework.boot.context.logging.LoggingApplicationListener

@Override
public void onApplicationEvent(ApplicationEvent event) {
	if (event instanceof ApplicationStartingEvent) {
		onApplicationStartingEvent((ApplicationStartingEvent) event);
	}
	...
}

private void onApplicationStartingEvent(ApplicationStartingEvent event) {
	this.loggingSystem = LoggingSystem
			.get(event.getSpringApplication().getClassLoader());
	this.loggingSystem.beforeInitialize();
}
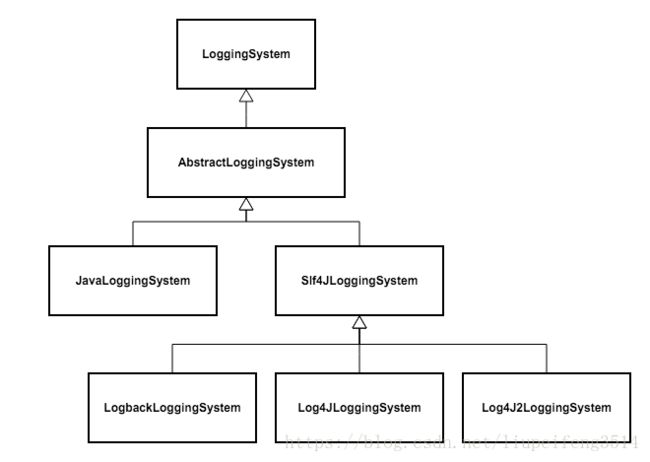
我们的例子中,创建的是 org.springframework.boot.logging.logback.LogbackLoggingSystem 类的对象,Logback是 SpringBoot 默认采用的日志系统。下图画出了 SpringBoot 中的日志系统体系:

BackgroundPreinitializer:实现了ApplicationListener接口
监听ApplicationStartingEvent ,会启动一个后台线程完成一些耗时的初始化。
以下代码摘自:org.springframework.boot.autoconfigure.BackgroundPreinitializer

@Override
public void onApplicationEvent(SpringApplicationEvent event) {
	if (event instanceof ApplicationStartingEvent
			&& preinitializationStarted.compareAndSet(false, true)) {
		performPreinitialization();
	}
	...
}

private void performPreinitialization() {
	try {
		Thread thread = new Thread(new Runnable() {

			@Override
			public void run() {
				runSafely(new ConversionServiceInitializer());
				runSafely(new ValidationInitializer());
				runSafely(new MessageConverterInitializer());
				runSafely(new MBeanFactoryInitializer());
				runSafely(new JacksonInitializer());
				runSafely(new CharsetInitializer());
				preinitializationComplete.countDown();
			}

			public void runSafely(Runnable runnable) {
				try {
					runnable.run();
				}
				catch (Throwable ex) {
					// Ignore
				}
			}

		}, "background-preinit");
		thread.start();
	}
	catch (Exception ex) {
		...
	}
}