Faster RCNN中anchor的生成过程
主要参考py-faster-rcnn开源代码中的generate_anchors的实现:
首先来看main函数:
if __name__ == '__main__':
    import time
    t = time.time()
    a = generate_anchors()   #最主要的就是这个函数
    print time.time() - t
    print a
    from IPython import embed; embed()
进入到generate_anchors函数中:
def generate_anchors(base_size=16, ratios=[0.5, 1, 2],
                     scales=2**np.arange(3, 6)):
    """
    Generate anchor (reference) windows by enumerating aspect ratios X
    scales wrt a reference (0, 0, 15, 15) window.
    """

    base_anchor = np.array([1, 1, base_size, base_size]) - 1
    print ("base anchors",base_anchor)
    ratio_anchors = _ratio_enum(base_anchor, ratios)
    print ("anchors after ratio",ratio_anchors)
    anchors = np.vstack([_scale_enum(ratio_anchors[i, :], scales)
                         for i in xrange(ratio_anchors.shape[0])])
    print ("achors after ration and scale",anchors)
    return anchors
函数中的参数有三个:
参数有三个:
1.base_size=16
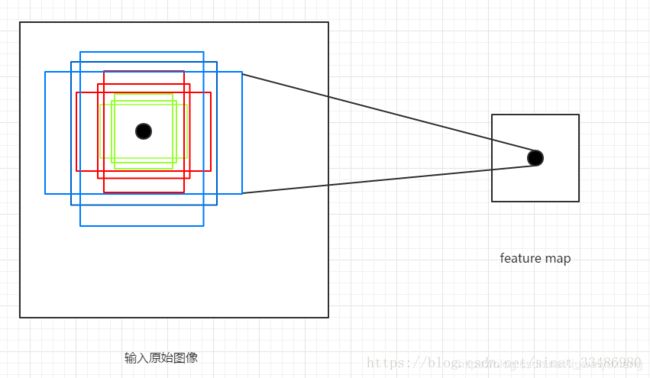
这个参数指定了最初的类似感受野的区域大小,因为经过多层卷积池化之后,feature map上一点的感受野对应到原始图像就会是一个区域,这里设置的是16,也就是feature map上一点对应到原图的大小为16x16的区域。也可以根据需要自己设置。
2.ratios=[0.5,1,2]
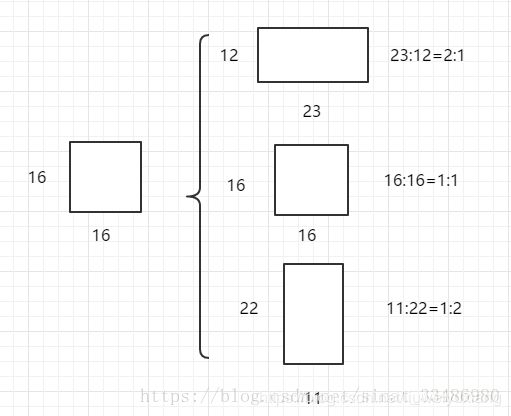
这个参数指的是要将16x16的区域,按照1:2,1:1,2:1三种比例进行变换,如下图所示:

3.scales=2**np.arange(3, 6)
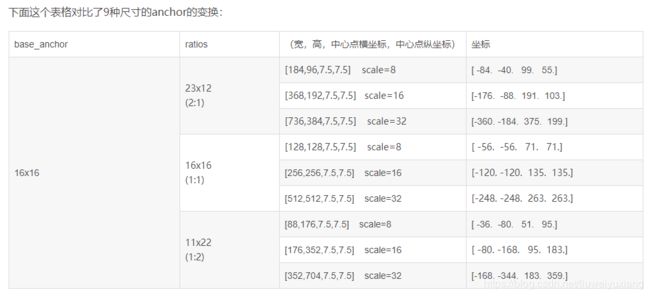
这个参数是要将输入的区域,的宽和高进行三种倍数,23=8,24=16,2^5=32倍的放大,如16x16的区域变成(168)(168)=128128的区域,(1616)(1616)=256256的区域,(1632)(1632)=512512的区域,如下图所示

接下来看generate_anchors函数的第一句代码:
base_anchor = np.array([1, 1, base_size, base_size]) - 1
'''base_anchor值为[ 0,  0, 15, 15]'''
表示最基本的一个大小为16x16的区域,四个值,分别代表这个区域的左上角和右下角的点的坐标。
ratio_anchors = _ratio_enum(base_anchor, ratios)
这一句是将前面的16x16的区域进行ratio变化,也就是输出三种宽高比的anchors,这里调用了_ratio_enum函数,其定义如下:
def _ratio_enum(anchor, ratios):
    """
    Enumerate a set of anchors for each aspect ratio wrt an anchor.
    """
    w, h, x_ctr, y_ctr = _whctrs(anchor)
    size = w * h   #size:16*16=256
    size_ratios = size / ratios  #256/ratios[0.5,1,2]=[512,256,128]
    #round()方法返回x的四舍五入的数字,sqrt()方法返回数字x的平方根
    ws = np.round(np.sqrt(size_ratios)) #ws:[23 16 11]
    hs = np.round(ws * ratios)    #hs:[12 16 22],ws和hs一一对应。as:23&12
    #给定一组宽高向量,输出各个预测窗口,也就是将(宽,高,中心点横坐标,中心点纵坐标)的形式,转成
    #四个坐标值的形式
    anchors = _mkanchors(ws, hs, x_ctr, y_ctr)
    return anchors
输入参数为一个anchor(四个坐标值表示)和三种宽高比例(0.5,1,2)
在这个函数中又调用了一个_whctrs函数,这个函数定义如下,其主要作用是将输入的anchor的四个坐标值转化成(宽,高,中心点横坐标,中心点纵坐标)的形式。
def _whctrs(anchor):
    """
    Return width, height, x center, and y center for an anchor (window).
    """
    w = anchor[2] - anchor[0] + 1
    h = anchor[3] - anchor[1] + 1
    x_ctr = anchor[0] + 0.5 * (w - 1)
    y_ctr = anchor[1] + 0.5 * (h - 1)
    return w, h, x_ctr, y_ctr
通过这个函数变换之后将原来的anchor坐标(0,0,15,15)转化成了w:16,h:16,x_ctr=7.5,y_ctr=7.5的形式,接下来按照比例变化的过程见_ratio_enum的代码注释。最后该函数输出的变换了三种宽高比的anchor如下:
ratio_anchors = _ratio_enum(base_anchor, ratios)
'''[[ -3.5,   2. ,  18.5,  13. ],
    [  0. ,   0. ,  15. ,  15. ],
    [  2.5,  -3. ,  12.5,  18. ]]'''
进行完上面的宽高比变换之后,接下来执行的是面积的scale变换,
 anchors = np.vstack([_scale_enum(ratio_anchors[i, :], scales)
                         for i in xrange(ratio_anchors.shape[0])])
这里最重要的是_scale_enum函数,该函数定义如下,对上一步得到的ratio_anchors中的三种宽高比的anchor,再分别进行三种scale的变换,也就是三种宽高比,搭配三种scale,最终会得到9种宽高比和scale 的anchors。这就是论文中每一个点对应的9种anchors。
def _scale_enum(anchor, scales):
    """
    Enumerate a set of anchors for each scale wrt an anchor.
    """

    w, h, x_ctr, y_ctr = _whctrs(anchor)
    ws = w * scales
    hs = h * scales
    anchors = _mkanchors(ws, hs, x_ctr, y_ctr)
    return anchors
_scale_enum函数中也是首先将宽高比变换后的每一个ratio_anchor转化成(宽,高,中心点横坐标,中心点纵坐标)的形式,再对宽和高均进行scale倍的放大,然后再转换成四个坐标值的形式。最终经过宽高比和scale变换得到的9种尺寸的anchors的坐标如下:
anchors = np.vstack([_scale_enum(ratio_anchors[i, :], scales)
                         for i in xrange(ratio_anchors.shape[0])])
'''
[[ -84.  -40.   99.   55.]
 [-176.  -88.  191.  103.]
 [-360. -184.  375.  199.]
 [ -56.  -56.   71.   71.]
 [-120. -120.  135.  135.]
 [-248. -248.  263.  263.]
 [ -36.  -80.   51.   95.]
 [ -80. -168.   95.  183.]
 [-168. -344.  183.  359.]]
'''

以我的理解,得到的这些anchors的坐标是相对于原始图像的,因为feature map的大小一般也就是60*40这样的大小,而上面得到的这些坐标都是好几百,因此是相对于原始大图像而设置的这9种组合的尺寸,这些尺寸基本上可以包含图像中的任何物体,如果画面里出现了特大的物体,则这个scale就要相应的再调整大一点,来包含特大的物体。

总结:
- 首先有个base_size(faster rcnn中是16),指定生成的基础anchor的大小,生成的基础anchor的长和宽都是base_size,这时候只有一个anchor
- 以base_size的大小为基础按照长宽比,生成指定长宽比的基础anchor,fater rcnn中的长宽比有三种
- 根据指定的缩放比例,对基础anchor进行缩放,faster rcnn中缩放比例一共有三种,分别是8,16,32,三种比例的基础anchor分别乘以缩放比例,就得到了9个基础anchor
- 上面的过程描述了特征上一个cell对应的anchor的生成过程,对于特征图上的每个cell,都要生成9个anchor。在faster rcnn中还给提供一个featrue_stride的参数,特征图上移动一个cell相当于原图多大的距离。其实也就是感受野的大小,在faster rcnn中是16,从原图到回归boxes的特征图经过了16倍的下采样。只需要将上面生成的9个基础anchor每次向右,或者向下移动16个像素,直至anchor铺满原图像,特征图的每个cell都对应了9个anchor。
原文链接:
- faster R-CNN中anchors 的生成过程(generate_anchors源码解析)
- RCNN系列——Faster RCNN anchor生成解析