Spring学习之AOP
1、AOP的概念
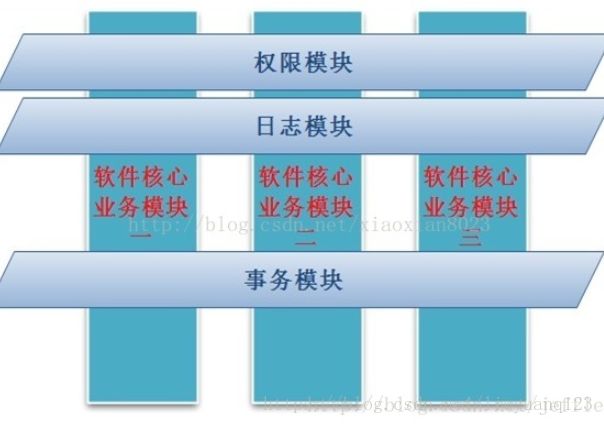
AOP全拼Aspect Oriented Programming,意思是面向切面编程,是对面向对象编程的一个补充,AOP是由动态代理实现,将那些与业务无关却被多个业务共同调用的逻辑给抽取和封装起来,形成切面。常用的地方如权限检查,日志输出等情况。如图:

2、AOP的注解配置
第一步编写切面类:
public class LogInterceptor {
    public void before() {
        System.out.println("before。。。。");
    }
    public void after() {
        System.out.println("after。。。。");
    }
    public void AfterReturning() {
        System.out.println("@AfterReturning。。。。");
    }
}
第二步在切面类上配置切面的注解:
@Aspect//定义切面
public class LogInterceptor {
第三步配置组件注解:
@Component("log")第四步配置切入点和切入方法:
    @Before("execution (public * com.liuyuan.service..*.*(..))")//切入点前
    public void before() {
        System.out.println("before。。。。");
    }
    @After("execution (public * com.liuyuan.service..*.*(..))")//切入点后
    public void after() {
        System.out.println("after。。。。");
    }
    @AfterReturning("execution (public * com.liuyuan.service..*.*(..))")//切入点返回处
    public void AfterReturning() {
        System.out.println("@AfterReturning。。。。");
    }
这里测试了几种方法,还有几种方法没测试,用法一样。
配置切点除了这种方法外,还可以先定义出公共切点然后在配置切入点方法。
@Pointcut("execution (public * com.liuyuan.service..*.*(..))") //公共切入点
    public void method(){}
    @Before("method()") //使用公共切入点
    public void before() {
        System.out.println("before。。。。");
    }
第五步在xml文件中开启aop的注解以及扫描包:
效果是一样的。最后测试即可:
    @Test
    public void testDI(){
        ApplicationContext ctx = new ClassPathXmlApplicationContext("spring/applicationContext.xml",
                "spring/applicationContext-dao.xml","spring/applicationContext-service.xml");
        UserService userService = (UserService) ctx.getBean("userService");
        userService.reduce();
    }
从输出也可以看到,这里其实生成的userService其实已经是一个代理对象了。
3、AOP的XML配置
xml配置比较集中,有三步,首先配置切面,然后配置切点,最后配置切面方法:
    <aop:config>

        <aop:pointcut expression="execution (public * com.liuyuan.service..*.*(..))" id="service"/>

        <aop:aspect id="logAspect" ref="log">

            <aop:before method="before" pointcut-ref="service"/>
            <aop:before method="after" pointcut-ref="service"/>
            <aop:before method="AfterReturning" pointcut-ref="service"/>
        aop:aspect>
    aop:config>
4、注解配置声明式事务
首先徐亚配置数据库连接池:
    id="dataSource" class="com.alibaba.druid.pool.DruidDataSource"
        destroy-method="close">
        <property name="url" value="${jdbc.url}" />
        <property name="username" value="${jdbc.username}" />
        <property name="password" value="${jdbc.password}" />
        <property name="driverClassName" value="${jdbc.driver}" />
        <property name="maxActive" value="1000" />
        <property name="minIdle" value="50" />
然后配置事务管理器:
    <bean id="transactionManager"
        class="org.springframework.jdbc.datasource.DataSourceTransactionManager">

        <property name="dataSource" ref="dataSource" />
    bean>
然后扫描包:
<context:component-scan base-package="com.liuyuan.service" />然后开始事务注解:
<tx:annotation-driven transaction-manager="transactionManager" />最后在需要事务的类上加上组件注解并在对应的方法加上事务注解即可:
@Service
public class UserService {
@Transactional
public void dokill(long phone) {
spring中只要抛出了RuntimeException就会回滚。
5、xml配置声明式事务
比注解的事务稍微复杂一点,首先配置advice:
    <tx:advice id="txAdvice" transaction-manager="transactionManager">

        <tx:attributes>
            <tx:method name="dokill"/>
        tx:attributes>
    tx:advice>
然后调用advice到对应切面即可:
<aop:config>
         <aop:pointcut expression="execution (public * com.liuyuan.service..*.*(..))" id="service"/>
         <aop:advisor advice-ref="txAdvice" pointcut-ref="service"/>
     aop:config>
最后测试和上面的测试方法一样,为了支持事务这里同样生成的是代理类。
6、AOP的作用
AOP的作用主要体现在两个方面,第一使核心业务代码与非核心逻辑分开起来,降低耦合,方便专注于对核心业务模块的开发。第二将业务模块调用的非核心逻辑抽取并封装起来提高了代码的复用性,降低代码的复杂度,提高开发效率。