学习hive
学习hive
1.hive是一个可以将sql翻译为mr程序的工具,支持用户将hdfs上的文件映射为表结构,进行查询
2.HIVE将用户定义的库、表结构等信息存储hive的元数据库
3.hive的查询方式
第一中:交互式查询
hive>select * from t_1;
第二种:将hive作为命令一次性运行
hive -e "use default;create table tset_1(id int,name string); "
将sql写入一个文件比如q.hql,然后用hive命令执行,
hive -f q.hql
第三种:将方式二写入一个xxx.sh脚本中
4.建表:
4.1:表定义信息会被记录到hive的元数据(mysql的hive库)
4.2:会在hdfs上的hive库目录中创建一个跟表名一致的文件夹
4.3:查看表的结构
hive> desc test_1;
4.4:编辑文本
vi test_1.txt
1,zhang,12
2,xailjsn,50
4.5.上传文件到hdfs并查看
hadoop fs -put test_1.txt /user/hive/warehouse/test_1
hive> select * from test_1;
结果和预想的不一样,这是因为建表语句是:create table test_1(id string,name string,age int);并没有指定分隔符”,”
4.6.删除表
hive> drop table test_1;
4.7.重新编辑文件
create table test_1(id string,name string,age int)
row format delimited
fields terminated by ‘,’;
上传文件,和我们想要的结果一样
5.内部表与外部表
5.1外部表: create external table t_3(id int,name string,salary bigint,add string)
row format delimited
fields terminated by ‘,’
location ‘/aa/bb’;
其中externa为关键字
5.2内部表: create table t_2(id int,name string,salary bigint,add string)
row format delimited
fields terminated by ‘,’
location ‘/aa/bb’;
load data local inpath ‘/home/salary.txt’ into table t_2;
将table_2加载到salary.txt中
5.3区别:
内部表的目录由hive创建在默认的仓库目录下:/user/hive/warehouse/…
外部表的目录由用户建表时自己指定: location ‘/位置/’
   drop一个内部表时,表的元信息和表数据目录都会被删除;
   drop一个外部表时,只删除表的元信息,表的数据目录不会删除;
5.4意义:
通常,一个数据仓库系统,数据总有一个源头,而源头一般是别的应用系统产生的,
其目录无定法,为了方便映射,就可以在hive中用外部表进行映射;并且,就算在hive中把
这个表给drop掉,也不会删除数据目录,也就不会影响到别的应用系统
6.分区关键字 PARTITIONED BY
hive> create table test_4(ip string,url string,staylong int)
partitioned by (day string)
row format delimited
fields terminated by ‘,’;
注意分区的day不能存在于表字段中
6.1:准备数据
[root@hdp01 home]# vi pv.data.2019-05-10
192.168.9.10,www.a.com,1000
192.168.10.10,www.b.com,100
192.168.11.10,www.c.com,900
192.168.12.10,www.d.com,100
192.168.13.10,www.e.com,2000
6.2:导入数据到不同的分区目录:
hive> load data local inpath ‘/home/pv.data.2019-05-10’ into table test_4 partition(day=‘2019-05-10’);
查看192.168.72.110:50070的 /user/hive/warehouse/test_4
可以看到有一个day=2019-05-10的文件夹,说明分区成功

6.3:准备数据
[root@hdp01 home]# vi pv.data.2019-05-11
192.168.9.11,www.f.com,100
192.168.10.12,www.g.com,10
192.168.11.13,www.h.com,90
192.168.12.14,www.i.com,10
192.168.13.15,www.g.com,200
6.4:导入数据到不同的分区目录:
hive> load data local inpath ‘/home/pv.data.2019-05-11’ into table test_4 partition(day=‘2019-05-11’);


6.5:查询:
hive> select * from test_4;
6.6:可以分区查:
hive> select * from test_4 where day=“2019-05-11”;
6.7:查看2019-05-11这天的访问人数:
select distinct ip from test_4 where day=“2019-05-11”;
7.导入数据
7.1:将hive运行所在机器的本地磁盘上的文件导入表中:
hive> load data local inpath ‘/home/pv.data.2019-05-11’ overwrite into table test_4 partition(day=”2019-05-12”);
7.2:将hdfs中的文件导入表中:
hive> load data inpath ‘/user.data.2’ into table t_1;
注:不加local关键字,则是从hdfs的路径中移动文件到表目录中;
7.3:从别的表查询数据后插入到一张新建表中:
hive> create table t_1_jz
as
select id,name from test_1;
7.4:从别的表查询数据后插入到一张已存在的表中
加入已存在一张表:可以先建好:
hive> create table t_1_hd like test_1;
从test_1中查询一些数据出来插入到t_1_hd中:
hive>insert into table t_1_hd
select
id,name,age
from test_1
where name=‘ZDP’;
7.5:查找名字带有L的:
insert into table t_1_hd
select
id,name,age
from test_1
where name like’%L’;
7.6:关于分区数据导入另外一张表建表
hive> create table t_4_hd like test_4;
hive> insert into table t_4_hd partition(day=‘2019-04-10’) select ip,url,staylong from test_4 where day=‘2019-05-10’;
8. 导出数据
8.1将数据从hive的表中导出到hdfs的目录中
hive> insert overwrite directory ‘/aa/test_1’
select * from test_1 where name=‘lis’;

注:即使hdfs中没有/aa/bb/目录,也会自动生成
hive> insert overwrite local directory ‘/aa/test_1_2’
row format delimited
fields terminated by ‘,’
select * from test_1 limit 100
hive -e “select * from test_1” | tr “\t” “,” > result.csv
下载到windows下是这样的:

8.2:将数据从hive的表中导出到本地磁盘目录中:
hive> insert overwrite local directory ‘/aa/bb’
select * from test_1 ;
9. HIVE的存储文件格式
9.1:HIVE支持很多种文件格式: SEQUENCE FILE | TEXT FILE | PARQUET FILE | RC FILE
默认为TXT格式,SEQUENCE FILE为链式
9.2:试验:先创建一张表t_seq,指定文件格式为sequencefile
hive> create table t_seq(id int,name string)
stored as sequencefile;
9.3:然后,往表t_seq中插入数据,hive就会生成sequence文件插入表目录中
hive> insert into table t_seq
select * from test_1 ;
10 修改表的分区:
10.1:查看表的分区 show partitions 表名;
hive> show partitions test_4;
10.2:添加分区
hive> alter table test_4 add partition(day=‘2019-05-12’) partition(day=‘2017-04-13’);
10.3:添加完成后,可以检查t_4的分区情况:
hive> show partitions test_4;
10.4:然后,可以向新增的分区中导入数据:
–可以使用load
hive> load data local inpath ‘/root/pv.data.2019-05-12’ into table test_4 partition(day=‘2019-05-12’);
hive> select * from test_4 where day=‘2019-05-12’;
–还可以使用insert
insert into table test_4 partition(day=‘2019-05-16’) select * from test_4 where staylong>80 and partition(day=‘2019-05-11’);
Hive> insert into table test_4 partition(day=‘2019-05-13’)
select ip,url,staylong from test_4 where day=‘2019-05-11’ and staylong>20;
hive> select * from test_4 where day=‘2019-05-13’;
10.5: 删除分区
hive> alter table test_4 drop partition (day=‘2019-05-13’);
hive> select * from test_4;
11.修改表的列定义
11.1:查看t_seq表的定义
hive> desc t_seq;
11.2:添加列:
hive> alter table t_seq add columns(address string,age int);
11.3:查看t_seq表的定义
hive> desc t_seq;
11.4:全部替换:
hive> alter table t_seq replace columns(id int,name string,address string,age int);
11.5:修改已存在的列定义:
hive> alter table t_seq change id uid string;
12. 显示命令
hive> show tables
hive> show databases
show partitions
例子: hive> show partitions test_4;
hive> show functions
– 显示hive中所有的内置函数
hive> desc test_4;
– 显示表定义
hive> desc extended test_4;
– 显示表定义的详细信息
hive> desc formatted test_4;
– 显示表定义的详细信息,并且用比较规范的格式显示
清空表数据,保留表结构
hive> truncate table test_4_st_200;
设置本地运行hive的mapreduce,不提交给yarn
hive>set hive.exec.mode.local.auto=true;
hive在本地跑与在hdfs上跑的区别:
本地没有交给yarn,hdfs上交给了本地
13. DML
13.1: 加载数据到表中
load
insert
13.2:插入单条数据:
hive> insert into table t_seq values(‘10’,‘xx’,‘beijing’,28);
hive> select * from t_seq;
13.3: 多重插入
假如有一个需求:
从test_4中筛选出不同的数据,插入另外两张表中;
hive> create table test_4_st_200 like test_4;
hive> alter table test_4_st_200 add partition(condition=‘lt200’);
FAILED: ValidationFailureSemanticException Partition spec {condition=lt200} contains non-partition columns
如果添加分区只能是day
hive> alter table test_4_st_200 add partition(day=‘lt200’);
hive> insert into table test_4_st_200 partition(day=‘lt200’)
select ip,url,staylong from test_4 where staylong<200;
hive> select * from test_4_st_200;
13.4:我们将staylong小于200的数据添加到test_4_st_200 ,day=‘lt200’,这分区中
我们再将staylong大于200的数据添加到test_4_st_200 ,day=‘gt200’,这分区中,如下:
hive> insert into table test_4_st_200 partition(day=‘gt200’)
select ip,url,staylong from test_4 where staylong>200;
hive> select * from test_4_st_200
但是以上实现方式有一个弊端,两次筛选job,要分别启动两次mr过程,要对同一份源表数据进行两次读取
如果使用多重插入语法,则可以避免上述弊端,提高效率:源表只要读取一次即可
hive> from test_4
insert into table test_4_st_200 partition(day=‘lt200’)
select ip,url,staylong where staylong<200
insert into table test_4_st_200 partition(day=‘gt200’)
select ip,url,staylong where staylong>200;
hive> select * from test_4_st_200;
14.SELECT
14.1:内连接
select a.,b.
from t_a a join t_b b
where a.id=b.id;
14.2:左连接
左表全部保留,左表关联不上的用null表示。
SELECT a.,b. from t_a a LEFT JOIN t_b b on a.id=b.id
14.3:右连接
SELECT a.,b. from t_a a RIGHT JOIN t_b b on a.id=b.id
14.4:笛卡尔积
两表关联,把左表的列和右表的列通过笛卡尔积的形式表达出来。
SELECT * from t_a a JOIN t_b b ;
14.5:左表独有
SELECT a.,b. from t_a a LEFT JOIN t_b b on a.id=b.id WHERE b.id is NULL ;
14.6:右表独有
SELECT a.,b. from t_a a RIGHT JOIN t_b b on a.id=b.id WHERE a.id is NULL ;
14.7:全连接
SELECT a.,b. from t_a a LEFT JOIN t_b b ON a.id=b.id
UNION
SELECT a.,b. from t_a a RIGHT JOIN t_b b on a.id=b.id;
在hive里有full outer join的mysql没有
select a.* ,b.*
from t_a a full outer join t_b b
on a.id=b.id;
15.分桶表
15.1:https://www.cnblogs.com/kouryoushine/p/7809299.html
15.2:将数据按照指定的字段进行分成多个桶中去,就是将数据按照字段进行划分,可以将数据按照字段划分到多个文件当中去
开启hive的桶表功能
set hive.enforce.bucketing=true;
设置reduce的个数
set mapreduce.job.reduces=3;
15.3:创建通表
create table course (c_id string,c_name string,t_id string) clustered by(c_id) into 3 buckets row format delimited fields terminated by ‘\t’;
桶表的数据加载,由于通表的数据加载通过hdfs dfs -put文件或者通过load data均不好使,只能通过insert overwrite
创建普通表,并通过insert overwrite的方式将普通表的数据通过查询的方式加载到桶表当中去
创建普通表:
create table course_common (c_id string,c_name string,t_id string) row format delimited fields terminated by ‘\t’;
普通表中加载数据
load data local inpath ‘/home/course.csv’ into table course_common;
insert overwrite course select * from course_common;
16.HAVING语句
1)having与where不同点
(1)where针对表中的列发挥作用,查询数据;having针对查询结果中的列发挥作用,筛选数据。
(2)where后面不能写分组函数,而having后面可以使用分组函数。
(3)having只用于group by分组统计语句。
2)案例实操:
求每个学生的平均分数
select s_id ,avg(s_score) from score group by s_id;
求每个学生平均分数大于85的人
select s_id ,avg(s_score) avgscore from score group by s_id having avgscore > 85;
17. 排序
Order By:全局排序,一个reduce
1)使用 ORDER BY 子句排序
ASC(ascend): 升序(默认)
DESC(descend): 降序
2)ORDER BY 子句在SELECT语句的结尾
18.分区排序(DISTRIBUTE BY)
Distribute By:类似MR中partition,进行分区,结合sort by使用。
注意,Hive要求DISTRIBUTE BY语句要写在SORT BY语句之前。
对于distribute by进行测试,一定要分配多reduce进行处理,否则无法看到distribute by的效果。
案例实操:
(1) 先按照学生id进行分区,再按照学生成绩进行排序。
设置reduce的个数,将我们对应的s_id划分到对应的reduce当中去
set mapreduce.job.reduces=7;
通过distribute by 进行数据的分区
insert overwrite local directory ‘/home/sort’ select * from score distribute by s_id sort by s_score;
19.CLUSTER BY
当distribute by和sort by字段相同时,可以使用cluster by方式。
cluster by除了具有distribute by的功能外还兼具sort by的功能。但是排序只能是倒序排序,不能指定排序规则为ASC或者DESC。
1) 以下两种写法等价
select * from score cluster by s_id;
select * from score distribute by s_id sort by s_id;
20.小技巧
可以在hive中执行linux命令
hive> !ls /root;
在hive中显示字段名
hive> set hive.cli.print.header=true;
hive> set hive.resultset.use.unique.column.names=false;
21.函数
首先为了测试函数,我们先随便建一张表
hive> create table dual(id string);
hive> insert into table dual values(1);
例如:要测试函数substr怎么使用
hive> select substr(“abcd”,0,2) from dual;
22.日期函数
查看年月日
hive> select current_date from dual;
查看年月日与时间
hive> select current_timestamp from dual;
select unix_timestamp() from dual;
23.日期增减
select date_add(‘2012-12-08’,10) from dual;
2012-12-18
date_sub (string startdate, int days) : string
例:
select date_sub(‘2012-12-08’,10) from dual;
2012-11-28
24.Json函数解析
电影topn
将数据rating.json上传到hdp03的/home下
在hive中先创建一张表,将一行的json看做一个字段
hive> create table t_rate_json(line string) row format delimited;
导入数据
hive> load data local inpath ‘/home/rating.json’ into table t_rate_json;
创建一张表,存储解析后的数据
hive> create table t_rate(movie string,rate int,ts string,uid string) row format delimited fields terminated by ‘\001’;
解析json函数使用get_json_object函数
测试:
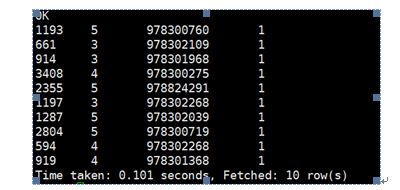
hive> select get_json_object(line,"$.movie") from t_rate_json limit 2;

hive> insert into table t_rate
select get_json_object(line,’ . m o v i e ′ ) , g e t j s o n o b j e c t ( l i n e , ′ .movie'), get_json_object(line,' .movie′),getjsonobject(line,′.rate’),
get_json_object(line,’ . t i m e S t a m p ′ ) , g e t j s o n o b j e c t ( l i n e , ′ .timeStamp'), get_json_object(line,' .timeStamp′),getjsonobject(line,′.uid’)
from t_rate_json;

25.另外一种json解析的方法:
测试:
hive> select
json_tuple(line,“movie”,“rate”,“timeStamp”,“uid”)
as(movie,rate,ts,uid)
from t_rate_json
limit 10;

hive> create table t_rate_a
as
select uid,movie,rate,year(from_unixtime(cast(ts as bigint))) as year,month(from_unixtime(cast(ts as bigint))) as month,day(from_unixtime(cast(ts as bigint))) as day,hour(from_unixtime(cast(ts as bigint))) as hour,
minute(from_unixtime(cast(ts as bigint))) as minute,from_unixtime(cast(ts as bigint)) as ts
from
(select
json_tuple(line,‘movie’,‘rate’,‘timeStamp’,‘uid’) as(movie,rate,ts,uid)
from t_rate_json) tmp;

26.网址解析
例如有网址:http://www.baidu.com/find?cookieid=4234234234
解析成:www.baidu.com /find cookieid 4234234234
测试:
hive> select parse_url_tuple(“http://www.baidu.com/find?cookieid=4234234234”,‘HOST’,‘PATH’,‘QUERY’,‘QUERY:cookieid’)
from dual;

27.explode 和 lateral view
vi sutdent.txt
1,zhangsan,数学:语文:英语:生物
2,lisi,数学:语文
3,wangwu,化学:计算机:java
hive> create table t_xuanxiu(uid string,name string,kc array)
row format delimited
fields terminated by ‘,’
collection items terminated by ‘:’;
加载数据:
hive> load data local inpath “/home/student.txt” into table t_xuanxiu;
hive> select uid,name,kc[0] from t_xuanxiu;
lateral view 表生成函数
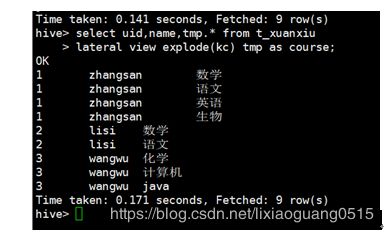
但是实际中经常要拆某个字段,然后一起与别的字段一起出.例如上面的id和拆分的array元素是对应的.我们应该如何进行连接呢?我们知道直接select id,explode()是不行的.这个时候就需要lateral view出厂了.
lateral view为侧视图,意义是为了配合UDTF来使用,把某一行数据拆分成多行数据.不加lateral view的UDTF只能提取单个字段拆分,并不能塞会原来数据表中.加上lateral view就可以将拆分的单个字段数据与原始表数据关联上.
在使用lateral view的时候需要指定视图别名和生成的新列别名
hive> select uid,name,tmp.course from t_xuanxiu
lateral view explode(kc) tmp as course;

28.rownumber() 和 over()函数
常用用于求分布topn
测试:求每个人前两高的分数
vi score.txt
zhangsan,1,90,2
zhangsan,2,95,1
zhangsan,3,68,3
lisi,1,88,3
lisi,2,95,2
lisi,3,98,1
hive> create table t_score(name string,kcid string,score int)
row format delimited
fields terminated by ‘,’;
hive>load data local inpath ‘/home/score.txt’ into table t_score;
hive> select *,row_number() over(partition by name order by score desc) rank from t_score;

hive>select name,kcid,score
from
(select *,row_number() over(partition by name order by score desc) as rank from t_score) tmp
where rank<3;

28.自定义函数
有如下数据
vi user.txt
1,zhangsan:20-1999063017:30:00-beijing
2,lisi:30-1989063017:30:00-shanghai
3,wangwu:22-1997063017:30:00-neimeng
hive> create table user_info(info string)
row format delimited;
hive> load data local inpath ‘/home/user.txt’ into table user_info;
需求:利用上表生成如下表t_user
uid,name,age,birthday,address
思路:可以自定义一个函数parse_user_info,能传入一行数据,返回切分好的字段
写如下hql实现
create t_user
as
select
parse_user_info(info,0) as uid,
parse_user_info(info,1) as uname,
parse_user_info(info,2) as age,
parse_user_info(info,3) as birthday_date,
parse_user_info(info,4) as birthday_time,
parse_user_info(info,5) as address
from user_info;
核心就是实现parse_user_info()函数
实现步骤:
1.写一个java类实现函数所需要的功能
public class UserInfoParser extends UDF{
		public String evaluate(String line,int index) {
		String newLine = line.replaceAll(",", "\001").replaceAll(":", "\001").replaceAll("-", "\001");
		StringBuffer sb = new StringBuffer();
		String[] split = newLine.split("\001");
		StringBuffer append = sb.append(split[0])
		.append("\t")
		.append(split[1])
		.append("\t")
		.append(split[2])
		.append("\t")
		.append(split[3].substring(0,8))
		.append("\t")
		.append(split[3].substring(8, 10)).append(split[4]).append(split[5])
		.append("\t")
		.append(split[6]);

		String res = append.toString();
		return res.split("\t")[index];
	}
	public static void main(String[] args) {
		UserInfoParser parser = new UserInfoParser();
		String evaluate = parser.evaluate("1,zhangsan:20-1999063017:30:00-beijing",2);
		System.out.println(evaluate);
2.将java类打成jar包
3.上传hiveudf.jar到hive所在的机器上
4.在hive的提示符中添加jar包
hive> add jar /home/hiveudf.jar;

5.创建一个hive的自定义函数跟写好的jar包中的java类对应
hive> create temporary function parse_user_info as ‘UserInfoParser’;

hive> select
parse_user_info(info,0) as uid,
parse_user_info(info,1) as uname,
parse_user_info(info,2) as age,
parse_user_info(info,3) as birthday_date,
parse_user_info(info,4) as birthday_time,
parse_user_info(info,5) as address
from user_info;
