Spring Cloud Config + Spring Cloud Bus + RabbitMQ 实现配置中心配置动态更新
一、架构图

当在 Git 仓库中某个应用配置文件中的参数更新后,只需要通过 POST方法访问 config Server 的 /actuator/bus-refresh 接口,就可以让所以的微服务节点更新配置。
在我们的 DEMO 中有一个 Config Server 和 两个 Config Client。另外还有两个配置中心节点。配置中心节点的部署请查看 Spring Cloud Eureka 部署高可用注册中心。
二、Config Server
1. pom.xml
	4.0.0

	com.sande
	config-server
	0.0.1-SNAPSHOT
	jar

	config-server
	Demo project for Spring Boot


		org.springframework.boot
		spring-boot-starter-parent
		2.0.4.RELEASE


		UTF-8
		UTF-8
		1.8
		Finchley.SR1


			org.springframework.boot
			spring-boot-starter-web


			org.springframework.cloud
			spring-cloud-config-server


            org.springframework.cloud
            spring-cloud-starter-bus-amqp


            org.springframework.cloud
            spring-cloud-bus
            2.0.0.RELEASE


            org.springframework.cloud
            spring-cloud-starter-stream-rabbit
            2.0.1.RELEASE


            io.micrometer
            micrometer-core


			org.springframework.boot
			spring-boot-starter-test
			test


            org.springframework.cloud
            spring-cloud-starter-eureka
            1.4.4.RELEASE


			org.springframework.boot
			spring-boot-starter-actuator


				org.springframework.cloud
				spring-cloud-dependencies
				${spring-cloud.version}
				pom
				import


				org.springframework.boot
				spring-boot-maven-plugin
spring-boot-starter-actuator、spring-cloud-starter-bus-amqp、spring-cloud-bus、spring-cloud-starter-stream-rabbit 这个几个依赖配置是实现配置中心配置动态刷新需要的。
2. src/main/resources/application.properties
server.port=7001
spring.application.name=config-server
eureka.client.serviceUrl.defaultZone=http://localhost:1112/eureka/,http://localhost:1111/eureka/
spring.cloud.config.server.git.uri=https://gitee.com/lixiaxin200319/config-repo
spring.cloud.config.server.git.username=lixiaxin200319
spring.cloud.config.server.git.password=密码
spring.cloud.config.server.git.search-paths={application}
spring.cloud.config.label=master
#spring.cloud.config.server.git.repos.dev.pattern=dev/*
#spring.cloud.config.server.git.repos.dev=https://gitee.com/lixiaxin200319/config-repo/dev
spring.cloud.config.server.git.basedir=E:\\JAVA\\Spring\\config-server\\src\\main\\resources\\repos
#spring.cloud.config.server.health.repositories.check.name=check-repo
#spring.cloud.config.server.health.repositories.check.label=master
#spring.cloud.config.server.health.repositories.check.profiles=default
#spring.cloud.config.username=user
#spring.cloud.config.password=123456
#spring.security.user.name=user
#spring.security.user.password=123456
#spring.cloud.config.server.encrypt.enabled=true
3. src/main/resources/bootstap.properties
encrypt.key-store.location=file:///E:/JAVA/Spring/config-server/src/main/resources/shared/config-server.keystore3
encrypt.key-store.alias=config-server3
encrypt.key-store.password=111111
#encrypt.key-store.secret=222222
#encrypt.key=didispace
spring.rabbitmq.host=localhost
spring.rabbitmq.port=5672
spring.rabbitmq.username=springcloud
spring.rabbitmq.password=123456
management.endpoints.web.exposure.include=*
spring.cloud.bus.refresh.enabled=true
注意:在 bootstap.properties 配置文件中 management.endpoints.web.exposure.include=* 不能写成 management.endpoints.web.exposure.include='*' ,配置值加了当引号虽然不报错但配置不会生效。
4. 应用主类
package com.sande.configserver;

import org.springframework.boot.SpringApplication;
import org.springframework.boot.autoconfigure.EnableAutoConfiguration;
import org.springframework.boot.autoconfigure.SpringBootApplication;
import org.springframework.cloud.client.discovery.EnableDiscoveryClient;
import org.springframework.cloud.config.server.EnableConfigServer;
import org.springframework.context.annotation.Configuration;
import org.springframework.web.bind.annotation.RestController;

@EnableDiscoveryClient
@EnableConfigServer
@SpringBootApplication
public class ConfigServerApplication {

	public static void main(String[] args) {
		SpringApplication.run(ConfigServerApplication.class, args);
	}
}
二、Config Client 节点1
1. pom.xml
	4.0.0

	com.sande
	config-client
	0.0.1-SNAPSHOT
	jar

	config-client
	Demo project for Spring Boot


		org.springframework.boot
		spring-boot-starter-parent
		2.0.4.RELEASE


		UTF-8
		UTF-8
		1.8
		Finchley.SR1


			org.springframework.boot
			spring-boot-starter-actuator


            org.springframework.cloud
            spring-cloud-starter-bus-amqp


            org.springframework.cloud
            spring-cloud-bus
            2.0.0.RELEASE


            org.springframework.cloud
            spring-cloud-starter-stream-rabbit
            2.0.1.RELEASE


            io.micrometer
            micrometer-core


            org.springframework.boot
            spring-boot-starter


            org.springframework.boot
            spring-boot-actuator-autoconfigure


			org.springframework.boot
			spring-boot-starter-web


			org.springframework.cloud
			spring-cloud-starter-config


            org.springframework.cloud
            spring-cloud-starter-eureka
            1.4.4.RELEASE


			org.springframework.boot
			spring-boot-starter-test
			test


				org.springframework.cloud
				spring-cloud-dependencies
				${spring-cloud.version}
				pom
				import


				org.springframework.boot
				spring-boot-maven-plugin
spring-boot-starter-actuator、spring-cloud-starter-bus-amqp、spring-cloud-bus、spring-cloud-starter-stream-rabbit 这个几个依赖配置是实现配置中心配置动态刷新需要的。
2. src/main/resources/bootstrap.yml
spring:
  application:
    name: sdcc
  cloud:
    config:
      #uri: http://localhost:7001
      profile: dev
      label: master
      #fail-fast: true
      discovery:
        service-id: config-server
        enabled: true
    bus:
      refresh:
        enabled: true
      #username: user
      #password: 123456

  rabbitmq:
    host: localhost
    port: 5672
    username: springcloud
    password: 123456

server:
  port: 7002
eureka:
  client:
     serviceUrl:
        defaultZone: http://localhost:1112/eureka/,http://localhost:1111/eureka/
management:
    endpoints:
        web:
            exposure:
                include: '*'
注意:在 bootstrap.yml 文件中  的配置值必须为 '*',如果没有单引号配置不会生效。
3. 应用主类
package com.sande.configclient;

import org.springframework.beans.factory.annotation.Value;
import org.springframework.boot.SpringApplication;
import org.springframework.boot.autoconfigure.SpringBootApplication;
import org.springframework.cloud.client.discovery.EnableDiscoveryClient;
import org.springframework.cloud.context.config.annotation.RefreshScope;
import org.springframework.web.bind.annotation.RequestMapping;
import org.springframework.web.bind.annotation.RestController;

@EnableDiscoveryClient
@SpringBootApplication
public class ConfigClientApplication {

	public static void main(String[] args) {
		SpringApplication.run(ConfigClientApplication.class, args);
	}


}

@RefreshScope
@RestController
class MessageRestController {

    @Value("${message:Hello default}")
    private String message;


    @RequestMapping("/message")
    String getMessage() {
        return this.message;
    }

   /* @Value("${info}")
    private String info;


    @RequestMapping("/info")
    String getInfo() {
        return this.info;
    }*/

    @Value("${sdccSellLimit}")
    private String sdccSellLimit;

    @RequestMapping("/sdccSellLimit")
    String getSdccSellLimit() {
        return this.sdccSellLimit;
    }

    @Value("${sdccSellLimitNumber}")
    private String sdccSellLimitNumber;

    @RequestMapping("/sdccSellLimitNumber")
    String getSdccSellLimitNumber() {
        return this.sdccSellLimitNumber;
    }

    @Value("${username}")
    private String username;

    @RequestMapping("/username")
    String getName() {
        return this.username;
    }

    @Value("${password}")
    private String password;

    @RequestMapping("/password")
    String getId() {
        return this.password;
    }

    /*@Value("${prod_version}")
    private String prod_version;

    @RequestMapping("/prod_version")
    String getProd_version() {
        return this.prod_version;
    }*/


}
三、Config Client 节点 2
节点2监听的端口是 7003 ,其他的配置及应用主类都完全和 Config Client 节点1 一样。
四、启动注册中心、Config Server 、Config Client 进行测试。
我们 DEMO 在码云创建的仓库 。sdcc 应用中 sdcc-dev.properties 配置文件的 sdccSellLimit=0.6
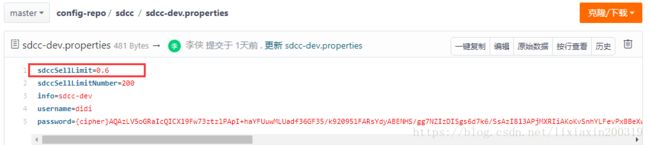
通过 http://localhost:7002/sdccSellLimit 访问 Config Client 1 , http://localhost:7003/sdccSellLimit 访问 Config Client 2 结果都是 0.6。
在代码仓库把 sdccSellLimit 修改为 0.8。然后使用 POST 方法访问 Config Server 的 /actuator/bus-refresh 接口,动态更新所有 Config Client 的参数。


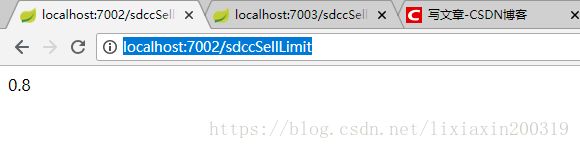
我们看到两个 Config Cleint 节点都已经动态更新了参数。