centos7下elasticsearch安装
1、下载
| 名称 | 版本 | 下载地址 |
|---|---|---|
| elasticsearch | 6.1.1 | https://www.elastic.co/downloads/elasticsearch/elasticsearch-6.3.1.tar.gz |
解压
tar -zxvf  elasticsearch-6.3.1.tar.gz
mv elasticsearch-6.3.1 elasticsearch
2、创建elsearch用户组及elsearch用户
groupadd elsearch
useradd elsearch -g elsearch -p elasticsearch
cd /usr/local
3、修改配置文件
修改network.host 和 http.port
# ---------------------------------- Network -----------------------------------
#
# Set the bind address to a specific IP (IPv4 or IPv6):
#
network.host: 0.0.0.0
#
# Set a custom port for HTTP:
#
http.port: 9200
#
# For more information, consult the network module documentation.
http.cors.enabled: true
http.cors.allow-origin: "*"
开启跨域
http.cors.enabled: true
http.cors.allow-origin: "*"
1、运行elasticsearch:
前台运行命令:./elasticsearch
前台运行命令:./elasticsearch -d
启动es
su elsearch
cd /usr/java/elasticsearch/bin/
./elasticsearch -d
三、错误解决
1、启动es过程这若报以下错误:
org.elasticsearch.bootstrap.StartupException: java.lang.RuntimeException: can not run elasticsearch as root这是因为elasticsearch默认是不支持用root用户来启动的,会报错。解决方案为添加其他用户:
chown -R elsearch:elsearch /usr/java/elasticsearch2、启动es过程这若报以下错误:
Exception in thread "main" 2017-11-12 12:17:55,776 main ERROR No log4j2 configuration file found. Using default configuration: logging only errors to the console. Set system property ‘log4j2.debug‘ to show Log4j2 internal initialization logging.
2017-11-12 12:17:56,319 main ERROR Could not register mbeans java.security.AccessControlException: access denied ("javax.management.MBeanTrustPermission" "register")
原因:elasticsearch.yml中的配置项的格式有问题
解决方案:请尽量保持冒号前面没空格,后面一个空格,不要用tab键
3、启动es过程这若报以下错误:
ERROR: [2] bootstrap checks failed   ##还有错误,这个是要改文件数,这个因为太多我就不放图了。
[1]: max file descriptors [4096] for elasticsearch process is too low, increase to at least [65536]
[root@node1 src]# cat /etc/sysctl.conf
vm.max_map_count=655360
[root@node2 src]# cat /etc/security/limits.conf
* soft nofile 65536
* hard nofile 65536
* soft nproc 65536
* hard nproc 65536
[root@node2 ~]# sysctl -p
vm.max_map_count = 655360最好重启一下
二 安装Elasticsearch head插件
wget  https://github.com/mobz/elasticsearch-head/archive/master.zip
unzip master.zip
三 安装node
wget https://npm.taobao.org/mirrors/node/latest-v4.x/node-v4.4.7-linux-x64.tar.gz
tar -zxvf node-v4.4.7-linux-x64.tar.gz
vi /etc/profile
export NODE_HOME=/usr/java/head/node
export PATH=$PATH:$NODE_HOME/bin
export NODE_PATH=$NODE_HOME/lib/node_modules
执行 source /etc/profile四 安装grunt
cd elasticsearch-head-master
npm install -g grunt-cli  //执行后会生成node_modules文件夹

检查是否安装成功
grunt -version
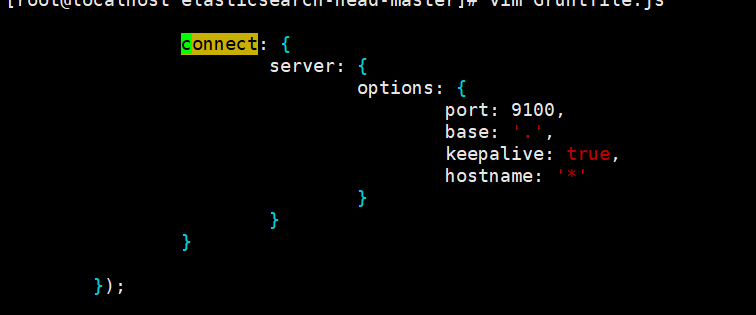
修改head插件源码 修改服务器监听地址:Gruntfile.js
修改连接地址:_site/app.js
运行head
在elasticsearch-head-master目录
npm install [email protected] --ignore-scripts
nohup grunt server &exit
访问http://xxx:9100
添加防火墙:firewall-cmd --zone=public --add-port=9100/tcp --permanent
五 安装kibana
#下载tar包
wget https://artifacts.elastic.co/downloads/kibana/kibana-6.3.1-linux-x86_64.tar.gz
#解压tar包
 tar -xzf kibana-6.3.1-linux-x86_64.tar.gz
在下载tar包的时候需要注意下一安装的es版本号,按照官网的说明版本是对应一致的。
编辑配置文件
vim /data/kibana-6.3.0/config/kibana.yml

server.port: 5601
server.host: "0.0.0.0"
elasticsearch.url: "http://127.0.0.1:9200"

启动

#不能关闭终端
./kibana

#可关闭终端
nohup ./kibana &

查看log命令
nohup.out
http://127.0.0.1:5601/
默认的用户名:elastic
密码为:changeme
六 安装logstash
wget https://artifacts.elastic.co/downloads/logstash/logstash-6.3.1.tar.gz
tar -zxvf logstash-6.3.1.tar.gz
mv logstash-6.3.1  logstash
要和es的版本一致
安装logstash-input-jdbc
bin/logstash-plugin install logstash-input-jdbc配置文件:
input {
        stdin{
        }
        jdbc {
          jdbc_connection_string => "jdbc:mysql://127.0.0.1:3306/cloud_test"
          jdbc_user => "root"
          jdbc_password => "Fan5136481!"
          jdbc_driver_library => "/usr/java/head/logstash/mysqletc/mysql-connector-java-5.1.34.jar"
          jdbc_driver_class => "com.mysql.jdbc.Driver"
          jdbc_paging_enabled => "true"
          jdbc_page_size => "10000"
          statement => "select * from show"
          schedule => "* * * * *"
          type => "jbh_show"
        }
}

filter {
        json {
          source => "message"
          remove_field => ["message"]
        }
}

output {
        elasticsearch {
          hosts => ["localhost:9200"]
          index => "cmscontent"
          document_id => "%{id}"
        }
        stdout {
          codec => json_lines
        }
}
最后需要把一个jdbc驱动放到这个文件夹下,用来连接mysql数据库(一定不要忘记)
启动
./logstash -f ../mysqletc/mysql.conf


