

iPad开发与iPhone开发的异同
简介
1. iPad开发与iPhone开发的异同
2. QQ空间的分析
3. 登录界面的搭建
4. Dock的初始化
5. Dock中BottomMenu的初始化
6. 添加IconButton和添加BottomMenu的子控件
7. 添加Tabbar的子控件
8. IconButton内容设置和BottomMenu子控件点击
9. tabbar点击和全部动态的UISegmentControl
Published using GitBook
My Book
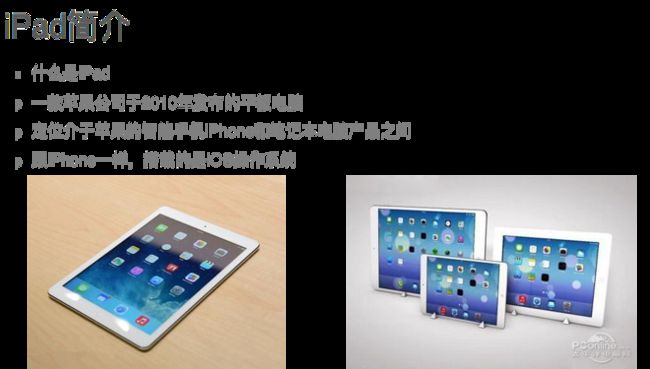
一、iPad与iPhone搭载的系统
两者都是搭载的ios系统
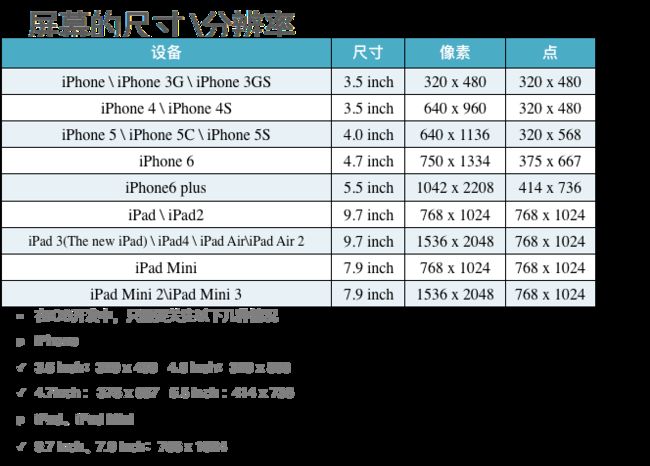
二、屏幕的尺寸与分辨率不同
1.iPhone与iPad有不同的英寸,像素和点,开发一般只关心点坐标系
2.iPhone有3.5inch,4.0inch,4.7inch,5.5inch ,分别对应的点坐标系为:
320x480,320x568,375x667,414x736
3.iPad的有9.7inch和7.9inch,对应的点坐标系都为768x1024
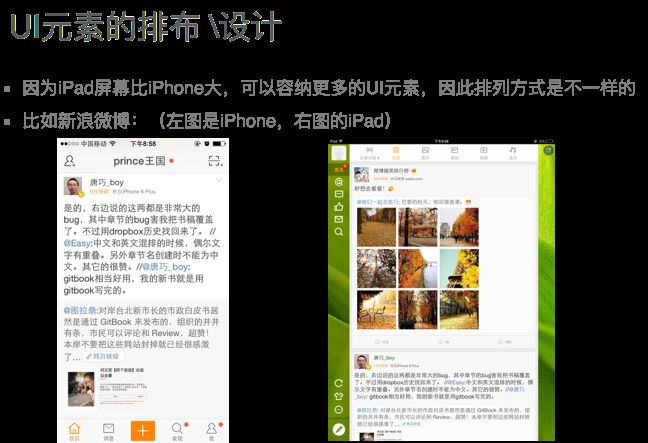
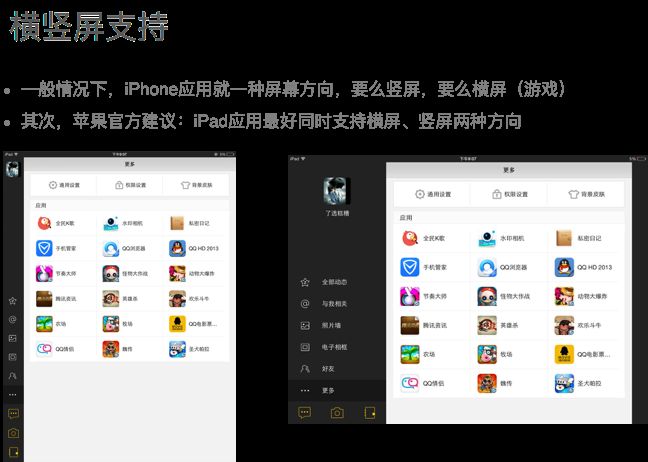
三、UI元素的排布和设计不同
1.一般情况下iPhone应用要求只支持竖屏,iPhone游戏要求只支持横屏
iPad应用一般情况下要求既要支持横屏,也要支持竖屏
2.iPad屏幕更大,他可以容纳更多的UI元素,因此排列方式与iPhone不同
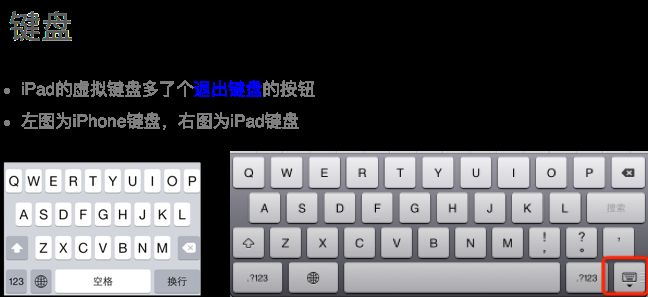
四、iphone键盘与iPad键盘不同
iPad键盘相对于iPhone键盘多了一个退出按钮,用来退出键盘
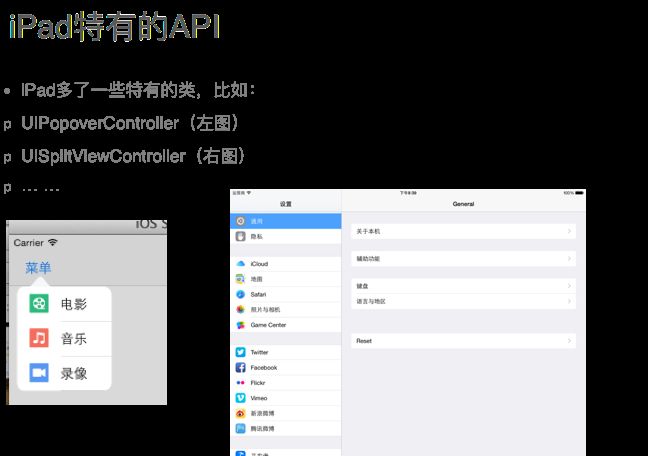
五、在API上的不同
iPad有属于自己特有的API,只能用在iPad开发上
分别为:
UIPopVerController
UISplitViewControlleriPhone上的API在iPad上都可以用
-
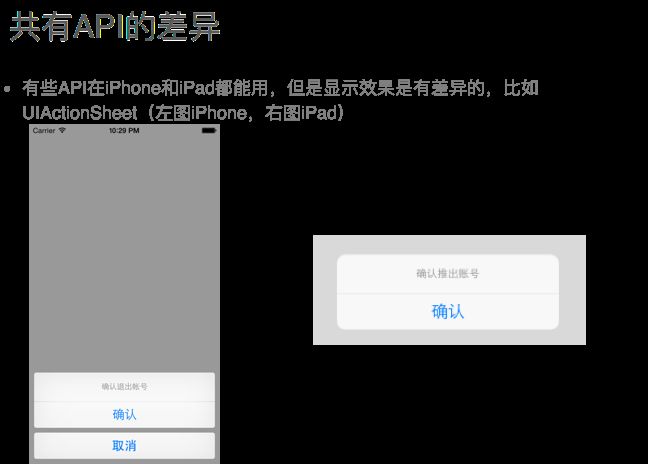
iPhone上与iPad的共有的API在显示效果上有差异
比如:
iPhone的UIActionSheet,会从底部弹出来进行选择,并默认带取消按钮
如果相同的代码运行在iPad上会从中间弹出,并没有取消按钮六、屏幕方向的支持不同
1.iPhone上面支持3个方向,不支持HOME键朝上方向
2.iPad上面支持4个方向七、开发上面的细节不同
1.仅仅开发iPad项目,在创建项目的时候选择iPad
2.如果是需要iPhone与iPad的一起开发的时候选择universal
3.仅仅开发iPhone项目,在创建项目的时候选择iPhone八、设备支持应用程序的不同
1.iPhone上面只能运行iPhone应用程序
2.iPad上面既可以运行iPad程序,也可以运行iPhone程序
如果在iPad运行iPhone程序会把程序等比例拉伸,之后显示在iPad上
九、iPhone开发与iPad开发的流程
开发流程都是一致的
QQ空间的分析
一. 登陆界面
1.登陆界面使用AutoLayout搭建,并适配横竖屏
2.状态栏文字颜色为白色
3.当帐号和密码都为123时可以登陆成功
4.帐号或密码为空提示登陆失败,并给予抖动效果
5.帐号或密码错误提示登陆失败,并给予抖动效果
6.帐号与密码输入框:
1.帐号输入框为明文显示
2.密码输入框为暗文显示
3.帐号输入框return按钮为next
4.密码输入框return按钮为done
5.当输入框中有内容时,return按钮才可以点击
6.当点击next按钮时,切换密码输入框为第一响应者
7.当点击done按钮时,开始登陆
8.取消联想输入
9.当输入框中有内容时,显示删除按钮
10.当切换到输入框时,自动情况输入框内容
7.记住密码与自动登陆逻辑
1.当点击记住密码时,记住密码如果不被选中,自动登陆也不被选中
2.当点击自动登陆时,自动登陆被选中,记住密码也被选中
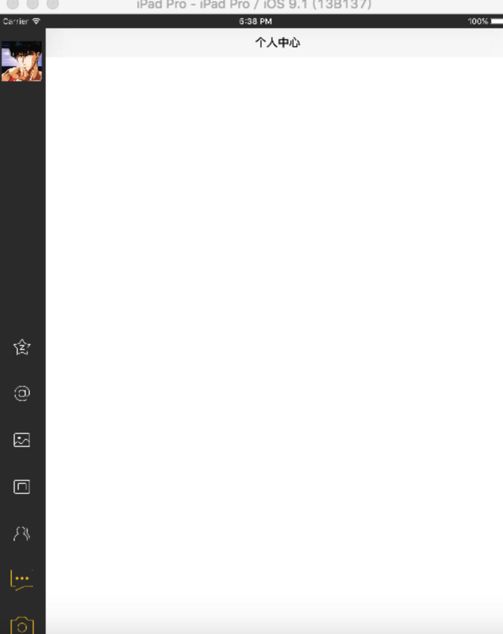
二. 详情界面
• 1.横屏与竖屏状态下,右边内容的宽度相等,高度为控制器的高度
• 2.横屏状态下,左边工具栏的宽度大于竖屏状态下左边工具栏的宽度
• 3.横竖屏切换时,左边工具栏的高度与宽度也跟着切换
4.工具栏被分为上.中.下三大块
1.最上为头像:当点击时,会切换右边控制器的内容,在横屏时,显示文字和图片,竖屏时仅显示图片
2.中间类似tabbar:一个被选中,另一个就会被反选中,会切换右边的控制器的内容,在横屏时显示文字和图标,竖屏时仅显示文字
3.底部菜单:当点击某个会在控制器的部分控件弹出一个控制器,横屏的时候三个控件横着排列,竖屏时,三个控件竖着
登录界面的搭建
• 一.创建项目并导入资源文件
• 二.分文件夹

三.使用Autolayout搭建登陆界面
1.拖入UIImageView,距离控制器的View的顶部为40,并水平居中显示,宽高为图片自身size
2.登陆界面底层交予一个UIView管理(方便做抖动动画),方便显示设置背景颜色,并设置宽高为300x300,距离图片为2.0,并两者中心点对其
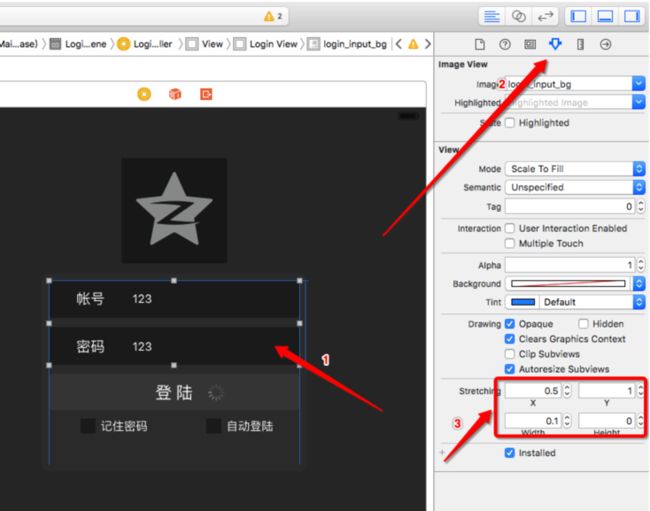
3.拖入输入框背景图片致View中,并对图片进行拉伸,高度为图片高度,宽度为父控件宽度,顶部为0
4.添加两个UILabel到输入框图片中,文字颜色为白色,上面为帐号,下面为密码,宽度为100,高度为45,两个UILabel相隔12,并添加约束
5.添加帐号输入框与密码输入框,改变输入框的style,设置位子均为123,颜色为白色,并相对于UILabel添加约束
6.添加登陆按钮,改变按钮类型为custom(否则不能显示高亮图片),设置普通与高亮背景图片,设置文字为登陆,颜色为白色,宽度为父控件宽度,高度为图片高度,距离上面的控件为10,并添加约束
7.添加两个按钮,分别占据父控件的一半,设置文字左边为记住密码,右边为自动登陆,文字大小为14,设置普通图片与选择图片,并添加约束
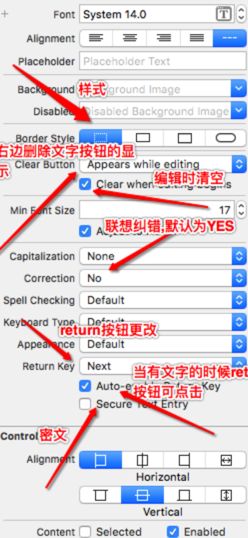
四.细节处理
1.调节登陆View的高度
2.密码为暗文显示
3.帐号输入框,return按钮显示next,没有内容不可点击
4.密码输入框,return按钮显示done,没有内容不可点击
5.取消输入纠错的功能
7.输入框提供小按钮,当在编辑并有内容的时候显示,点击小按钮删除输入框中内容
8.提供当切换为第一响应时,清空输入框中的内容
五.编写代码
1.创建控制器,并拖线获得帐号.密码.自动登陆.记住密码属性,监听三个按钮的点击
2.在登陆点击按钮中
2.1 获取到帐号和密码
2.2 判断帐号密码是否为空,如果为空,给予提示,并执行抖动动画
2.3 模拟提交服务器,判断帐号密码是否正确(默认帐号和密码都为123的时候正确),如果错误给予提示,并执行抖动动画
3.为错误提示抽出一个方法,并添加提示与抖动动画
4.当点击登陆时,退出键盘
5.设置自动登陆与记住密码逻辑
6.添加activityView在登陆按钮右边,并在登陆的时候转动
7.设置当在帐号输入框中点击next,设置密码输入框为第一响应者
8.设置当在密码输入框中点击done,开始登陆
9.设置登陆界面背景为RGB为3个55/255.0,并清空其他背景颜色
10.设置状态栏文字颜色为白色
- (void)showError:(NSString *)error {
1.错误提示
UIAlertController *alertVC = [UIAlertController alertControllerWithTitle:@"登陆失败" message:error preferredStyle:UIAlertControllerStyleAlert];
UIAlertAction *action = [UIAlertAction actionWithTitle:@"确定" style:UIAlertActionStyleCancel handler:nil];
[alertVC addAction:action];
[self presentViewController:alertVC animated:YES completion:nil];
2.抖动动画
CAKeyframeAnimation *shakeAnim = [CAKeyframeAnimation animationWithKeyPath:@"transform.translation.x"];
shakeAnim.values = @[@-10,@0,@10,@0];
shakeAnim.repeatCount = 3;
shakeAnim.duration = 0.1;
[self.loginView.layer addAnimation:shakeAnim forKey:nil];
}
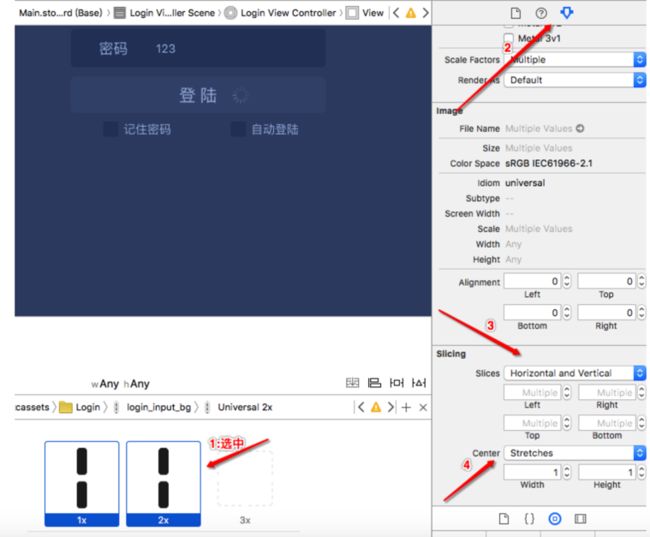
• 五.图片拉伸

• 1: 对图片进行拉伸:
2:在storyboard里进行拉伸:
• 3.代码拉伸:
• 参考:图片之代码拉伸
• 4.举例:
• 拉伸前:

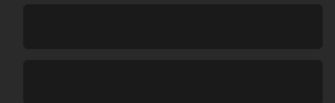
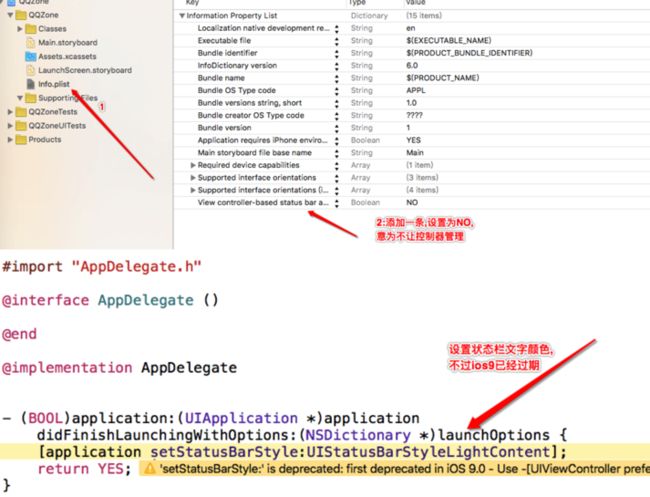
ios9之后(状态栏背景颜色由控制器管理)
1.继承(可以创建一个类继承UIViewController,其他的类继承这个UIViewController)
2.创建UIViewController分类,重写分类方法,不过会有警告
去除警告
pragma clang diagnostic ignored "-Wobjc-protocol-method-implementation"
Dock的初始化
一.创建详情界面控制器
二.设置背景颜色与登陆界面背景颜色
self.view.backgroundColor
= [UIColor colorWithRed:55/255.0 green:55/255.0
blue:55/255.0
alpha:1.0];
三.跳转详情页(当帐号和密码都为123)
1.以modal的形式进入
HomeViewController
*homeVC = [[HomeViewController alloc] init];
[self presentViewController:homeVC animated:YES completion:nil];
2.以切换窗口的根控制的形式进入
self.view.window.rootViewController = [[HomeViewController alloc] init];
四.自定义Dock,继承UIView
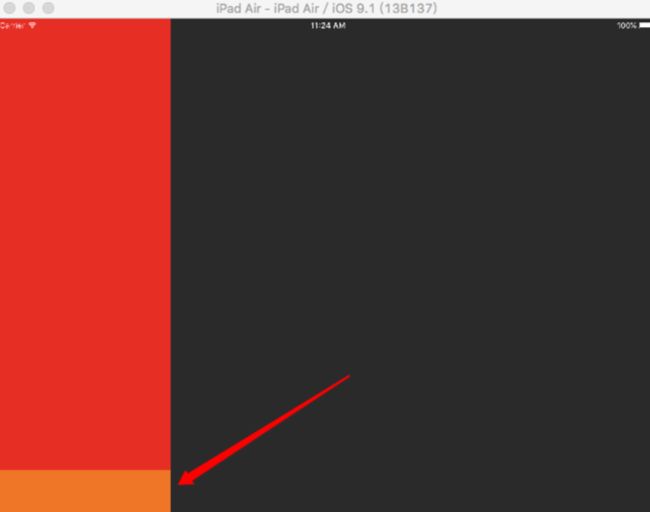
五.初始化Dock
- (void)setupDock
{
1.创建Dock
Dock *dock = [[Dock alloc] init];
dock.backgroundColor = [UIColor redColor];
[self.view addSubview:dock];
self.dock = dock;
2.高度随父控件的拉伸而拉伸
dock.autoresizingMask = UIViewAutoresizingFlexibleHeight;
dock.height = self.view.height;
3.通过当前屏幕方向设置dock的宽度
BOOL isLandscape =self.view.width == 1024;
dock.width = isLandscape ? 270 : 70;
}
六.监听屏幕旋转,设置dock的宽度
ios8 以前
- (void)willRotateToInterfaceOrientation:(UIInterfaceOrientation)toInterfaceOrientation
duration:(NSTimeInterval)duration
{
通过当前屏幕方向设置dock的宽度
BOOL isLandscape =
toInterfaceOrientation == UIInterfaceOrientationLandscapeLeft;
self.dock.width = isLandscape ? 270 :
70;
}
ios8 以后
- (void)viewWillTransitionToSize:(CGSize)size
withTransitionCoordinator:(id)coordinator
{
通过当前屏幕方向设置dock的宽度
BOOL isLandscape = size.width == 1024;
self.dock.width = isLandscape ? 270 :
70;
}
九.关于UIView的autoresizingMask属性的研究
enum {
UIViewAutoresizingNone = 0,
UIViewAutoresizingFlexibleLeftMargin = 1 << 0,
UIViewAutoresizingFlexibleWidth = 1 <<
1,
UIViewAutoresizingFlexibleRightMargin = 1 << 2,
UIViewAutoresizingFlexibleTopMargin = 1 << 3,
UIViewAutoresizingFlexibleHeight = 1 << 4,
UIViewAutoresizingFlexibleBottomMargin = 1 << 5
};
UIViewAutoresizingNone就是不自动调整。
UIViewAutoresizingFlexibleLeftMargin 自动调整与superView左边的距离,保证与superView右边的距离不变。
UIViewAutoresizingFlexibleRightMargin 自动调整与superView的右边距离,保证与superView左边的距离不变。
UIViewAutoresizingFlexibleTopMargin 自动调整与superView顶部的距离,保证与superView底部的距离不变。
UIViewAutoresizingFlexibleBottomMargin 自动调整与superView底部的距离,也就是说,与superView顶部的距离不变。
UIViewAutoresizingFlexibleWidth 自动调整自己的宽度,保证与superView左边和右边的距离不变。
UIViewAutoresizingFlexibleHeight 自动调整自己的高度,保证与superView顶部和底部的距离不变。
UIViewAutoresizingFlexibleLeftMargin
|UIViewAutoresizingFlexibleRightMargin 自动调整与superView左边的距离,保证与左边的距离和右边的距离和原来距左边和右边的距离的比例不变。比如原来距离为20,30,调整后的距离应为68,102,即68/20=102/30。
Dock中BottomMenu的初始化
一.在监听屏幕方法中拿到屏幕选中的时间,添加dock改变宽度的动画效果
ios8 以前
duration 为屏幕旋转的时间
(void)willRotateToInterfaceOrientation:(UIInterfaceOrientation)toInterfaceOrientation
duration:(NSTimeInterval)duration{}
ios8 以后
[coordinator
transitionDuration] 返回屏幕旋转的时间
(void)viewWillTransitionToSize:(CGSize)size
withTransitionCoordinator:(id
{
}
(void)viewWillTransitionToSize:(CGSize)size
withTransitionCoordinator:(id
{
1.通过当前屏幕方向设置dock的宽度
BOOL isLandscape = size.width ==
1024;
2.获取屏幕旋转设置,设置dock宽度改变的动画时间
CGFloat duration = [coordinator transitionDuration];
[UIView animateWithDuration:duration animations:^{
self.dock.width =
isLandscape ? 270 : 70;
}];
}
二.创建Dock子控件->底部菜单(BottomMenu),并设置BottomMenu的autoresizingMask属性(当旋转屏幕时,高度依旧为旋转前Dock的高度,所以会导致BottomMenu的Y值不对)
(void)setupBottomMenu
{
BottomMenu *menu = [[BottomMenu alloc] init];
menu.backgroundColor = [UIColor orangeColor];
[self addSubview:menu];
self.menu = menu;
设置menu与父控件顶部可拉伸,底部不变
menu.autoresizingMask = UIViewAutoresizingFlexibleTopMargin;
}
三.Dock中的子控件设置frame需要知道屏幕方向,Dock对外提供一个告知当前屏幕方向的方法
(void)rotateToLandscape:(BOOL)isLandscape;
dock中
(void)rotateToLandscape:(BOOL)isLandscape
{
1.设置自身的frame
self.width = isLandscape ? kDockLandscapeWidth : kDockProtraitWidth;
2.设置底部菜单的frame,告知底部菜单当前屏幕方向
[self.menu rotateToLandscape:isLandscape];
}
底部菜单
- (void)rotateToLandscape:(BOOL)isLandscape
{
1.设置自身的frame
self.width = self.superview.width;
self.height = isLandscape ? kDockItemHeight : kDockItemHeight * 3;
self.y = self.superview.height - self.height;
}
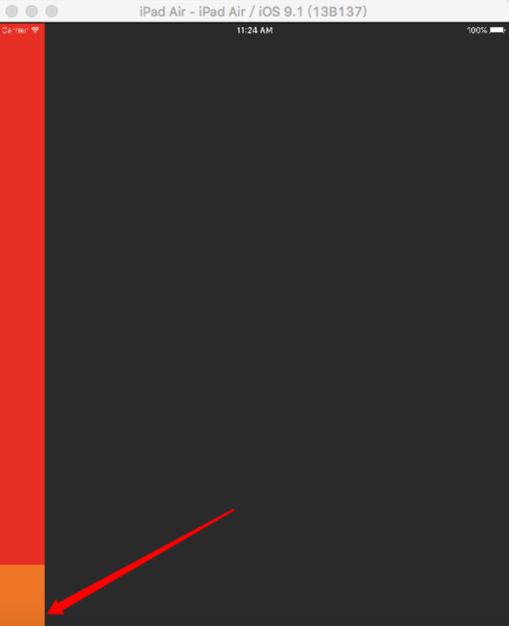
竖屏效果
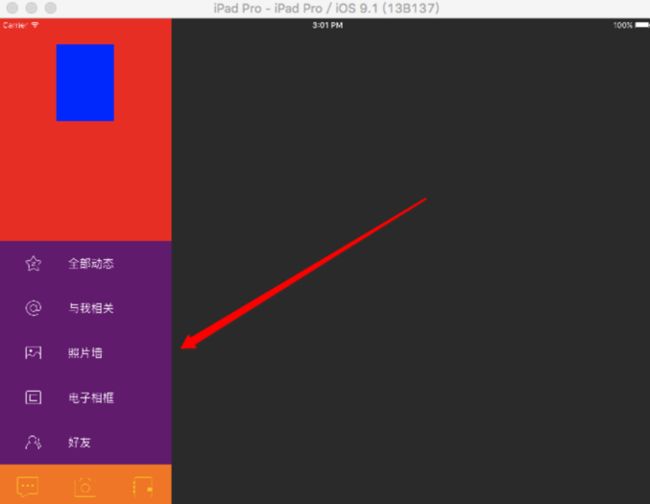
添加IconButton和添加BottomMenu的子控件
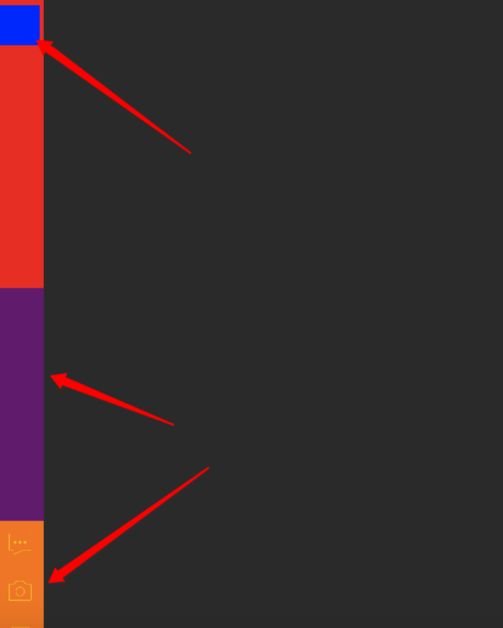
一.添加中间的子控件Tabbar,并设置颜色,设置顶部可拉伸
- (void)setupTabbar
{
Tabbar *tb = [[Tabbar alloc] init];
tb.backgroundColor = [UIColor purpleColor];
[self addSubview:tb];
self.tb = tb;
设置tabbar与父控件顶部可拉伸,底部不变
tb.autoresizingMask = UIViewAutoresizingFlexibleTopMargin;
}
二.在Dock中告诉tabbar当前屏幕方向,并设置Y值(因为Y值需要用到底部菜单的高度)
- (void)rotateToLandscape:(BOOL)isLandscape
{
1.设置自身的frame
self.width = isLandscape ?
kDockLandscapeWidth : kDockProtraitWidth;
2.设置底部菜单的frame,告知底部菜单当前屏幕方向
[self.menu
rotateToLandscape:isLandscape];
3.设置tabbar的frame,告知tabbar当前屏幕方向
[self.tb
rotateToLandscape:isLandscape];
3.1设置tabbar的Y值(当tabbar有高度之后再进行设置)
self.tb.y = self.height
- self.menu.height - self.tb.height;
}
三.设置Tabbar的frame,先设置宽高,再设置x,y
-
(void)rotateToLandscape:(BOOL)isLandscape
{设置自身的frame
self.width = self.superview.width;
self.height = kDockItemHeight * 6;
}
四.添加顶部子控件IconButton
- (void)setupIconButton
{
IconButton *ib = [[IconButton alloc] init];
ib.backgroundColor = [UIColor blueColor];
[self addSubview:ib];
self.ib = ib;
}
IconButton中获取当前屏幕方向,设置自身frame
- (void)rotateToLandscape:(BOOL)isLandscape
{
设置自身frame
self.width = isLandscape ?
kIconButtonLandscapeWidth : kIconButtonProtraitWH;
self.height = isLandscape ?
kIconButtonLandscapeHeight : kIconButtonProtraitWH;
self.y = kIconButtonY;
self.x = (self.superview.width
- self.width) * 0.5;
}
五.添加底部菜单子控件
- (void)setupItemsWithImageName:(NSString *)imageName
{
UIButton *item = [[UIButton alloc] init];
1.设置图标
[item setImage:[UIImage imageNamed:imageName]
forState:UIControlStateNormal];
2.高亮背景颜色
[item setBackgroundImage:[UIImage imageNamed:@"tabbar_separate_selected_bg"]
forState:UIControlStateHighlighted];
[self addSubview:item];
}
- (void)rotateToLandscape:(BOOL)isLandscape
{
0.获取当前子控件的个数
NSInteger count = self.subviews.count;
1.设置自身的frame
self.width = self.superview.width;
self.height = isLandscape ?
kDockItemHeight : kDockItemHeight * count;
self.y = self.superview.height
- self.height;
2.设置子控件的frame
for (NSInteger i = 0; i < count;
i++) {
    2.1取出当前的子控件


  UIButton *item = self.subviews[i];

    2.2设置子控件的frame


  item.width = isLandscape ? self.width
/ count : self.width;
  item.height = kDockItemHeight;


  item.x = isLandscape ? item.width * i : 0;


  item.y = isLandscape ? 0 : item.height * i;
}
}
竖屏效果
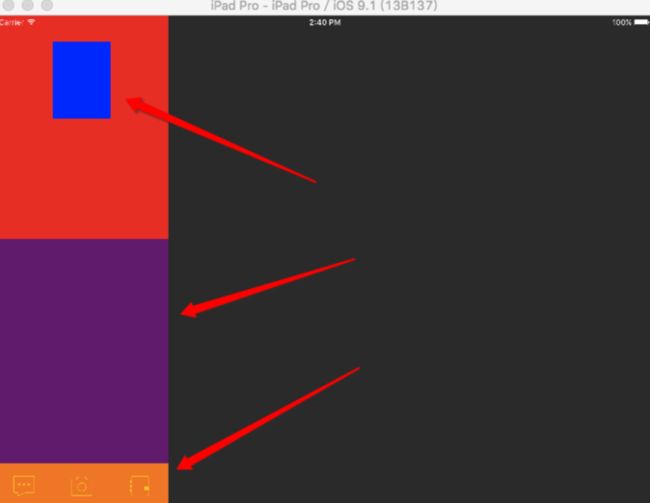
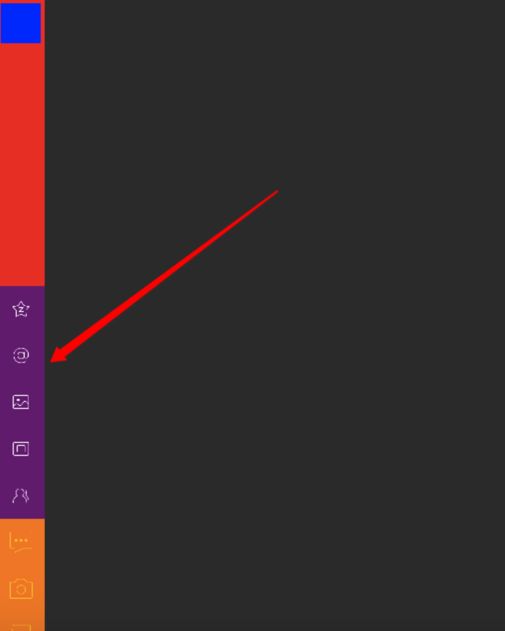
添加Tabbar的子控件
一.添加Tabbar子控件,并自定义TabbarItem继承UIbutton
const CGFloat kRatio = 0.4;
- (void)setupItemsWithImageName:(NSString *)imageName
title:(NSString *)title
{
TabbarItem *item = [[TabbarItem alloc] init];
1.设置文字
[item setTitle:title forState:UIControlStateNormal];
2.设置图标
[item setImage:[UIImage imageNamed:imageName]
forState:UIControlStateNormal];
3.选中背景图片
[item setBackgroundImage:[UIImage imageNamed:@"tabbar_separate_selected_bg"]
forState:UIControlStateSelected];
4.设置tag
item.tag = self.subviews.count;
[self addSubview:item];
5.监听点击
[item addTarget:self action:@selector(itemClick:)
forControlEvents:UIControlEventTouchDown];
}
pragma mark - 事件点击
- (void)itemClick:(UIButton *)item
{
self.seletedBtn.selected =NO;
self.seletedBtn = item;
self.seletedBtn.selected =YES;
}
- (void)rotateToLandscape:(BOOL)isLandscape
{
0.获取当前子控件的个数
NSInteger count = self.subviews.count;
1.设置自身的frame
self.width = self.superview.width;
self.height = kDockItemHeight *
count;
2.设置子控件的frame
for (NSInteger i = 0; i < count;
i++) {
     2.1取出子控件


  UIButton *item = self.subviews[i];

     2.2设置子控件的frame


  item.width = self.width;


  item.height = kDockItemHeight;


  item.y = i * item.height;
}
}
@implementation
TabbarItem
- (instancetype)initWithFrame:(CGRect)frame
{
if (self
= [super initWithFrame:frame]) {
     设置图标内容模式


  self.imageView.contentMode
= UIViewContentModeCenter;
}
return
self;
}
返回UIButton图片的frame
(CGRect)imageRectForContentRect:(CGRect)contentRect
{
 1.判断当前屏幕方向

if (self.width == self.height) { // 竖屏


  return self.bounds;

} else {  横屏


  CGFloat width = self.width
- kRatio;
  CGFloat height = self.height;


  CGFloat x = 0;


  CGFloat y = 0;


  return CGRectMake(x, y,
width, height);
}
}
返回UIButton文字的frame
(CGRect)titleRectForContentRect:(CGRect)contentRect
{
 1.判断当前屏幕方向

if (self.width == self.height) {  竖屏


  return CGRectZero;

} else {  横屏


  CGFloat width = self.width
- (1 - kRatio);
  CGFloat height = self.height;


  CGFloat x = self.width
- kRatio;
  CGFloat y = 0;


  return CGRectMake(x, y,
width, height);
}
}
@end
竖屏效果
IconButton内容设置和BottomMenu子控件点击
一.IconButton设置文字与图标
- (instancetype)initWithFrame:(CGRect)frame
{
if (self
= [super initWithFrame:frame]) {
    1.设置图片


  [self setImage:[UIImage
imageNamed:@"Easy"]
forState:UIControlStateNormal];
    2.设置文字

    [self setTitle:@"哈哈" forState:UIControlStateNormal];


  self.titleLabel.textAlignment
= NSTextAlignmentCenter;
}
return
self;
}
返回UIButton中图片frame
(CGRect)imageRectForContentRect:(CGRect)contentRect
{
1.判断当前屏幕方向

if (self.width == self.height) {  竖屏


  return self.bounds;

} else {  横屏


  CGFloat width = self.width;


  CGFloat height = width;


  CGFloat x = 0;


  CGFloat y = 0;


  return CGRectMake(x, y,
width, height);
}
}
返回UIButton中文字frame
(CGRect)titleRectForContentRect:(CGRect)contentRect
{
 1.判断当前屏幕方向

if (self.width == self.height) {  竖屏


  return CGRectZero;

} else {  横屏


  CGFloat width = self.width;


  CGFloat height = kIconButtonLandscapeTitleH;


  CGFloat x = 0;


  CGFloat y = width;


  return CGRectMake(x, y,
width, height);
}
}
二.监听BottomMenu的点击,使用代理,并设置按钮枚举类型
typedef enum {
BottomMenuTypeMood,  发表心情

BottomMenuTypePhoto, 发表相册

BottomMenuTypeBlog,  发表日志
}
BottomMenuType;
- (instancetype)initWithFrame:(CGRect)frame
{
if (self
= [super initWithFrame:frame]) {
    初始化子控件


  [self
setupItemsWithImageName:@"tabbar_mood"
type:BottomMenuTypeMood];
[self
setupItemsWithImageName:@"tabbar_photo"
type:BottomMenuTypePhoto];
[self
setupItemsWithImageName:@"tabbar_blog"
type:BottomMenuTypeBlog];
}
return
self;
}
pragma mark - 初始化子控件
- (void)setupItemsWithImageName:(NSString *)imageName
type:(BottomMenuType)type
{
UIButton *item = [[UIButton alloc] init];
1.设置图标
[item setImage:[UIImage imageNamed:imageName]
forState:UIControlStateNormal];
2.高亮背景颜色
[item setBackgroundImage:[UIImage imageNamed:@"tabbar_separate_selected_bg"]
forState:UIControlStateHighlighted];
[self addSubview:item];
3.设置tag
item.tag = type;
4.监听事件点击
[item addTarget:self action:@selector(itemClick:)
forControlEvents:UIControlEventTouchUpInside];
}
pragma mark - 事件点击
- (void)itemClick:(UIButton *)item
{
if ([self.delegate
respondsToSelector:@selector(menu:didClickBottomMenuType:)])
{
[self.delegate menu:self didClickBottomMenuType:(int)item.tag];
}
}
三.让控制器成为BottomMenu的代理,讲BottomMenu属性允许访问,并设置只读模式
/** 底部菜单*/
@property (nonatomic, weak, readonly) BottomMenu
*menu;
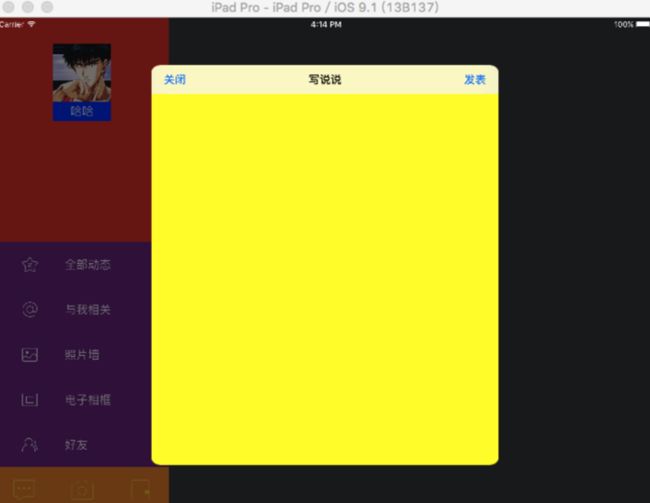
四.实现代理方法,并创建mood控制器,以modal的形式弹出
- (void)menu:(BottomMenu *)menu
didClickBottomMenuType:(BottomMenuType)type
{
switch (type) {
case
BottomMenuTypeMood:
  {


      MoodViewController *moodVC =
[[MoodViewController alloc] init];
CustomNavigationController *moodNav =
[[CustomNavigationController alloc] initWithRootViewController:moodVC];
moodNav.modalPresentationStyle =
UIModalPresentationFormSheet;
[self
presentViewController:moodNav animated:YES
completion:nil];
  }


      break;


  case
BottomMenuTypePhoto:
        NSLog(@"点击了发表图片");


      break;


  case
BottomMenuTypeBlog:
        NSLog(@"点击了发表日志");


      break;


  default:


      break;
}
}
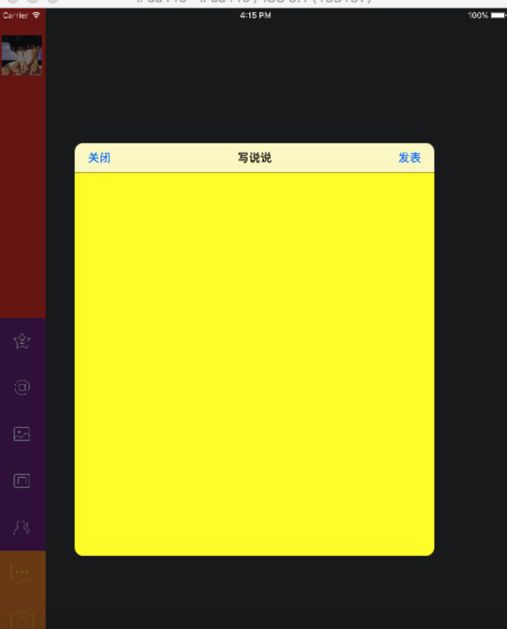
竖屏效果
五
modal的介绍
1.呈现样式 :Modal出来的控制器,最终显示出来的样子
Modal常见有4种呈现样式
UIModalPresentationFullScreen :全屏显示(默认)
UIModalPresentationPageSheet
宽度:竖屏时的宽度(768)
高度:当前屏幕的高度(填充整个高度)
UIModalPresentationFormSheet :占据屏幕中间的一小块
UIModalPresentationCurrentContext :跟随父控制器的呈现样式
1.过渡样式
:Modal出来的控制器,是以怎样的动画呈现出来
Modal一共4种过渡样式
UIModalTransitionStyleCoverVertical :从底部往上钻(默认)
UIModalTransitionStyleFlipHorizontal :三维翻转
UIModalTransitionStyleCrossDissolve :淡入淡出
UIModalTransitionStylePartialCurl :翻页(只显示部分,使用前提:呈现样式必须是UIModalPresentationFullScreen)
tabbar点击和全部动态的UISegmentControl
1.tabbar代理监听点击
@class Tabbar;
@protocol TabbarDelegate
@optional
(void)tabbar:(Tabbar *)tabbar
from:(NSInteger)from to:(NSInteger)to;
@end
pragma mark - 事件点击
(void)itemClick:(UIButton *)item
{
1.调用代理方法
if ([self.delegate
respondsToSelector:@selector(tabbar:from:to:)])
{
[self.delegate tabbar:self from:self.seletedBtn.tag
to:item.tag];
}
2.点击反选
self.seletedBtn.selected =NO;
self.seletedBtn = item;
self.seletedBtn.selected =YES;
}
pragma mark Tabbar代理
(void)tabbar:(Tabbar *)tabbar
from:(NSInteger)from to:(NSInteger)to
{
1.获取上一个下标控制器的View,并从self.view中移除
UIViewController *previousVC = self.childViewControllers[from];
[previousVC.view removeFromSuperview];
2.获取当前小标控制器的View,并添加到self.view中
UIViewController *currentVC = self.childViewControllers[to];
[self.contentView
addSubview:currentVC.view];
3.设置当前内容View的frame
currentVC.view.frame = self.contentView.bounds;
4.记录当前控制器下标
self.currentIndex = to;
}
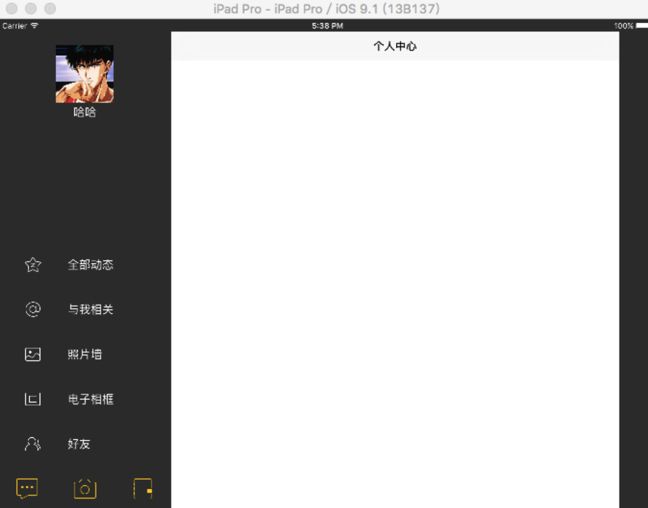
二.IconButton点击
初始化Dock中监听IconButton点击
pragma mark IconButton点击
(void)iconButtonClick
{
1.切换内容控制器
[self tabbar:nil
from:self.currentIndex to:self.childViewControllers.count - 1];
2.取消其他选中
[self.dock.tb unSeleted];
}
三.创建全部动态控制器,设置导航条textView为UISegmentController
(void)viewDidLoad {
[super viewDidLoad];
1.设置背景颜色
self.view.backgroundColor = [UIColor
whiteColor];
2.设置中间segmentController

UISegmentedControl *segControl =
[[UISegmentedControl alloc] initWithItems:@[@"全部", @"特别关心", @"好友动态", @"认证空间"]];
self.navigationItem.titleView =
segControl;
segControl.selectedSegmentIndex = 0;
3.设置UISegmentedControl颜色
segControl.tintColor = [UIColor lightGrayColor];
NSDictionary *attrDict = @{NSForegroundColorAttributeName: [UIColor
blackColor]};
[segControl setTitleTextAttributes:attrDict
forState:UIControlStateNormal];
4.监听UISegmentedControl点击
[segControl addTarget:self action:@selector(segControlClick:)
forControlEvents:UIControlEventValueChanged];
}
(void)segControlClick:(UISegmentedControl
*)segControl
{
NSLog(@"%ld",segControl.selectedSegmentIndex);
}
四:去除背景色
竖屏效果
横屏效果