Android网络与数据存储
第二章学习
SQlite数据库####
概要:
SQLite看名字就知道是个数据库,Android专门为移动端内置了此种轻量级工具,并且为了方便在Java语言中进行数据库操作,编写了SQLiteOpenHelper类来方便在Android中操作数据库”
1.SQLiteOpenHelper类的使用#####
public abstract class SQLiteOpenHelper{}
源代码中的SQLiteOpenHelper是这样开头的,所以,他是一个抽象类,想要使用它,必须将它作为父类,自定义一个类,比如
public class MySQLiteOpenHelper extends SQLiteOpenHelper {

    String CreateTableBook = "Create Table Book("
            + "id integer primary key autoincrement, "
            + "author text ,"
            + "price real,"
            + "pages integer,"
            + "name text,"
            + "category_id integer)";

    String CreateTableCategory = "Create Table Category("
            + "id integer primary key autoincrement, "
            + "category_name text ,"
            + "category_code integer)";

    public MySQLiteOpenHelper(Context context, String name, SQLiteDatabase.CursorFactory factory, int version) {
    /*四个参数分别是:context 上下文;name 所保存的数据库文件名;
    *factory 允许我们在查询数据库的时候返回一个自定义的Cursor,一般不需要;
    * version 表示创建的数据库的版本;
    */
        super(context, name, factory, version);
    }

    //数据库第一次创建时被调用
    @Override
    public void onCreate(SQLiteDatabase db) {
        db.execSQL(CreateTableBook);
        //execSQL方法直接在括号内填写SQL语句即可执行相应的数据库操作
        db.execSQL(CreateTableCategory);
    }

    //软件版本号发生改变时调用
    @Override
    public void onUpgrade(SQLiteDatabase db, int oldVersion, int newVersion) {
        switch (oldVersion) {
            case 1:
                db.execSQL(CreateTableCategory);
            case 2:
                db.execSQL("alter table Book add column category_id integer");
            default:
   /* 以上是一个数据库版本升级标准范例,先判断即将被升级的旧版本号,
    * 如果为1,则执行第一部分,并且也执行第二部分,
    * 如此方便了从低版本直接升级为最新版的数据库
    */
        }
    }
}
代码解析:
我在代码的第一部分中,将需要执行的SQL语言,转换为字符串对象进行操作,第一个的意思是:
新建一张表"Create Table Book"命名为"Book";
在表中存在这些列"id integer primary key autoincrement, "列名为"id",类型为"integer",作为主键(primary key),"autoincrement"代表随着行数的增加自增的;
流程小结:
- Step 1:自定义一个类继承SQLiteOpenHelper类
- Step 2:在该类的构造方法的super中设置好要创建的数据库名,版本号
- Step 3:重写onCreate( )方法创建表结构
- Step 4:重写onUpgrade( )方法定义版本号发生改变后执行的操作
以上完成了一个自定义SQLiteOpenHelper类,然后就可以开始用java语言对数据库进行创建、增删改查等操作了;
我们可以将对数据库进行的操作封装为一系列方法,如下:
0.获得数据库操作的单例:
private SQLiteDatabase db;

public synchronized SQLiteDatabase getDatabaseInstance() {
      if (db == null) {
          db = mMySQLiteOpenHelper.getWritableDatabase();
      }
    return db;
}
1.插入数据:
private ContentValues values;

public void save(){

if(values==null){
        values=new ContentValues();
        }
        //用于填写一行的数据
        values.put("author","郭霖");
        values.put("price",53);
        values.put("pages",553);
        values.put("name","第一行代码 Android");
        getDatabaseInstance().insert("Book",null,values);
        values.clear();
        //插入第二行的数据
        values.put("author","Brian Hardy,Bill Phillips");
        values.put("price",77.40);
        values.put("pages",544);
        values.put("name","Android programming:
        the big nerd ranch guide");
        getDatabaseInstance().insert("Book",null,values);
        values.clear();
        break;
}
2.删除数据:
public void delete(){
     getDatabaseInstance().delete("Book", "price = ?",
     new String[]{"69.99"});
}
3.修改数据:
public void update(){
if (values == null) {
   values = new ContentValues();
   }
   values.put("price", 69.99);
   getDatabaseInstance().update("Book", values, "name = ?",
   new String[]{"Android programming: the big nerd ranch guide"});
   values.clear();
}
4.查询数据:
public Person find(){

Cursor cursor = getDatabaseInstance().query("Book",
new String[]{"name", "price"}, null, null, null, null, null);
if (cursor.moveToFirst()) {
   do {
      String name = cursor.getString(cursor.getColumnIndex("name"));
      //从name列读取String类的数值
     double price = cursor.getDouble(cursor.getColumnIndex("price"));
     //从name列读取String类的数值
     Log.d("MainActivity", "book name is :" + name);
     Log.d("MainActivity", "book price is :" + price);
      } while (cursor.moveToNext());
   }
  cursor.close();
}
代码解析:
其实insert、deldte、update、 query四个方法中最难的是query,而理解了他,其它都不是问题。
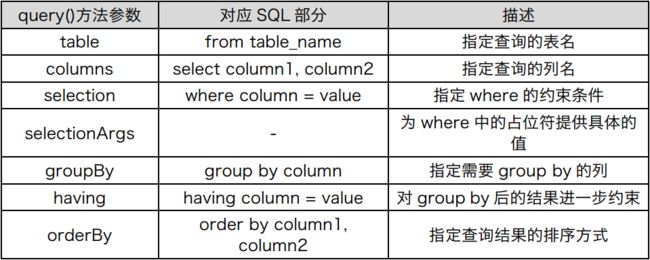
query最少需要接收七个参数:
比如说,我现在要查询Book表中的name和price列中的值,而且我要求查到的书名为《Android programming: the big nerd ranch guide》,不需要排序 ,则代码就如下编写
query("Book",
new String[]{"name", "price"},
"name = ?",
new String[]{"Android programming: the big nerd ranch guide"},
null, null, null);
然后说说ContentValues这个可put相当多类型数据的类了
values.put( ),这里接收2个参数:
第一个是数据保存的列名,
第二个是需要保存的数据。
熟悉了这种对数据库进行操作的方法后,即使不懂SQL语言也不怕了。
5.数据库的“事务”
什么是事务呢?又得举个老套的例子了:
你正在进行一次转账操作,银行会将转账的金额先从你的账户中扣除,然后再向
收款方的账户中添加等量的金额。看上去好像没什么问题吧?可是,如果当你账户中的金额
刚刚被扣除,这时由于一些异常原因导致对方收款失败,这一部分钱就凭空消失了!当然银
行肯定已经充分考虑到了这种情况,它会保证扣钱和收款的操作要么一起成功,要么都不会
成功,而使用的技术就是事务了。
        getDatabaseInstance().beginTransaction();
        try {
        getDatabaseInstance().delete("Book", null, null);
        //删除表内全部数据
        if (values == null) {
        values = new ContentValues();
        }
        values.put("name", "Game of Thrones");
        values.put("author", "George Martin");
        values.put("pages", 720);
        values.put("price", 20.85);
        getDatabaseInstance().insert("Book", null, values);
        values.clear();
        getDatabaseInstance().setTransactionSuccessful();
        } catch (Exception e) {
        e.printStackTrace();
        } finally {
        getDatabaseInstance().endTransaction();
        }
要使用事务
- 第一步 使用beginTransaction(),标记为事务开始;
- 第二步 通过try catch进行数据库操作,防止中间出现错误;
- 第三步 setTransactionSuccessful(),标记事务成功;
- 第四步 最终的,执行endTransaction()结束事务,只有被标记为成功了的数据库操作才生效,如果中断了,那数据库操作就会被回滚到事务开始状态;
-完-
