mysql主从搭建
mysql主从搭建及java读写分离demo
- jdk安装
- 下载mysql版本5.6
- 添加用户mysql和组myGroup
- 解压mysql
- 改变目录权限
- 安装mysql
- 添加mysql启动服务
- 修改mysql配置
- 添加环境变量
- 启动mysql
- 设置数据库root密码
- 主库增加mysql用户名的访问权限
- 查看主库的binlog偏移量position:
- 开启slave同步
jdk安装
https://www.cnblogs.com/yjlch1016/p/8900841.html
下载mysql版本5.6
建议到mysql官方下载:https://dev.mysql.com/downloads/mysql/5.6.html#downloads
我的百度网盘也可下载:https://pan.baidu.com/s/1etS7z8CsRlyb_FlLSErxYA
提取码:ff64
文件名为:mysql-5.6.12-linux-glibc2.5-x86_64.tar.gz
添加用户mysql和组myGroup
useradd mysql
groupadd myGroup
usermod -G myGroup mysql
初始化mysql用户名密码:
passwd mysql
解压mysql
下载好的文件存储到到/usr/local/目录
tar -zxvf mysql-5.6.12-linux-glibc2.5-x86_64.tar.gz
重命名目录(命名为:mysql)
cd /usr/local
mv mysql-5.6.12-linux-glibc2.5-x86_64 mysql
改变目录权限
chown -R mysql:myGroup /usr/local/mysql
注意:-R参数表示递归改变,也即子目录的权限同样改变
安装mysql
/usr/local/mysql/scripts/mysql_install_db --user=mysql --basedir=/usr/local/mysql --datadir=/usr/local/mysql/data
注意:安装过程可能出现错误,需要分析逐一解决,常见错误有:
1、提示:Can’t locate Data/Dumper.pm
解决方法:https://blog.csdn.net/zhengwei125/article/details/79093068
1、解决Can’t locate ExtUtils/MakeMaker.pm in @INC
解决方法:https://blog.csdn.net/celeste7777/article/details/77117371
yum install perl-ExtUtils-MakeMaker
2、gcc未安装错误:
解决方法:
https://blog.csdn.net/btt2013/article/details/78138045
yum -y install gcc
yum -y install gcc-c++
添加mysql启动服务
cp /usr/local/mysql/support-files/mysql.server /etc/init.d/mysql
修改mysql配置
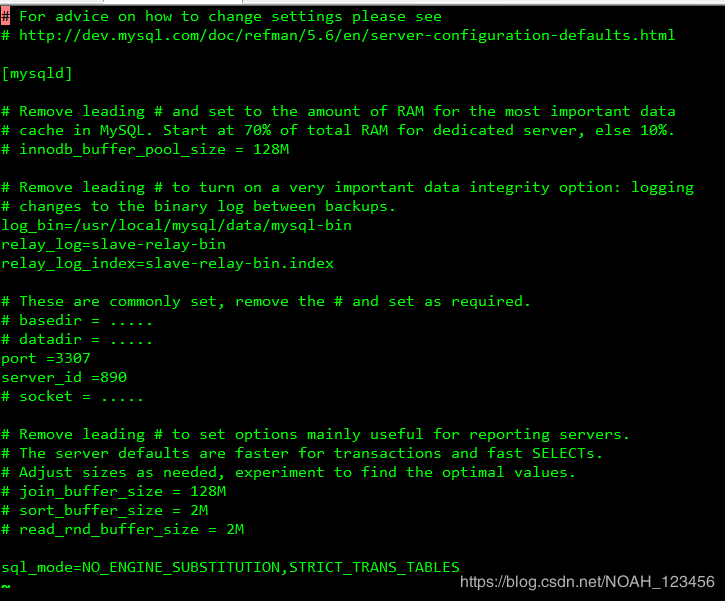
vi /usr/local/mysql/my.cnf
注意:端口号,服务号,binlog, relay-log都要开启(以下为slave的配置)
[mysqld]
log_bin=/usr/local/mysql/data/mysql-bin
relay_log=slave-relay-bin
relay_log_index=slave-relay-bin.index
port =3307
server_id =890
添加环境变量
vi /etc/profile
添加环境变量
export MYSQL_HOME=/usr/local/mysql
PATH= M Y S Q L H O M E / b i n : MYSQL_HOME/bin: MYSQLHOME/bin:PATH
文字有点失真,以图片为准:

生效环境变量:
source /etc/profile
注意:安装了mysql以后,建议重启下服务器(若为环境变量的生效,则不需要重启)
启动mysql
mysql -uroot -h 127.0.0.1 -p
首次登陆没有密码直接回车
指定配置文件的启动方式:
进入bin目录
./mysqld --defaults-file=/etc/my.cnf --user=root &
不确定:WARNING: Found existing config file /usr/local/mysql/my.cnf on the system.
Because this file might be in use, it was not replaced,
but was used in bootstrap (unless you used --defaults-file)
and when you later start the server.
The new default config file was created as /usr/local/mysql/my-new.cnf,
please compare it with your file and take the changes you need.
WARNING: Default config file /etc/my.cnf exists on the system
This file will be read by default by the MySQL server
If you do not want to use this, either remove it, or use the
–defaults-file argument to mysqld_safe when starting the server
拷贝文件my.cnf到/etc目录
设置数据库root密码
登录数据库(注意:首次登录不需要输入密码,登录以后设置root密码):
mysql -u root -p
如果这个命令报错:/tmp/mysql.lock
换用这个命令:
mysql -uroot -h 127.0.0.1 -p
首次登陆没有密码直接回车
use mysql;
UPDATE user SET password=PASSWORD(‘123456’) WHERE user=‘root’;
flush privileges;
注意:flush执行以后密码设置才能生效
主库增加mysql用户名的访问权限
进入主库服务器
cd /usr/local/mysql/bin
注意:执行以下命令后,输入上步已经设置好的root密码
mysql -uroot -h 127.0.0.1 -p
或者
mysql -u root -p
创建用户:mysql
CREATE USER ‘mysql’@‘host’ IDENTIFIED BY ‘123456’;
设置mysql用户的登录密码:
UPDATE user SET password=PASSWORD(‘123456’) WHERE user=‘mysql’;
生效设置(这步别忘记喽,否则无效)
flush privileges;
开启远程访问权限:
mysql -uroot -h 127.0.0.1 -p
use mysql;
grant all privileges on . to root@’%’ identified by “123456”;
flush privileges;
另外一台从机器远程连接测试下:
cd /usr/local/mysql/bin
mysql -h 121.175.107.11 -P 3306 -u mysql -p
查看主库的binlog偏移量position:
cd /usr/local/mysql/bin
mysql -uroot -h 127.0.0.1 -p
或者
mysql -u root -p
show master status;
开启slave同步
进入从服务器
cd /usr/local/mysql/bin
mysql -uroot -h 127.0.0.1 -p
或者
mysql -u root -p
注意:1、假设主服务器的IP:192.168.0.104
2、master服务器产生的日志master-bin序号为为如上截图001780
3、日志偏移位置:16258
change master to master_host=‘192.168.0.104’,
master_port=3306,
master_user=‘mysql’,
master_password=‘123456’,
master_log_file=‘mysql-bin.001780’,
master_log_pos=16612;
启动Slave开启同步
start slave;
show slave status\G;
注意:如果slave_io_running和slave_sql_running都为yes,那么表明可以成功同步了。
io状态为no的常见问题分析:
1、检查master的日志的序号和偏移量,从库连接master指定参数确认一致。


