基于web管理的 DNS 服务器安装与配置
一、准备主机
1、centos 7.6最小化安装
2、将centos base源改变为国内源,选择USTC源
替换/etc/yum.repos.d/CentOS-Base.repo
# CentOS-Base.repo
#
# The mirror system uses the connecting IP address of the client and the
# update status of each mirror to pick mirrors that are updated to and
# geographically close to the client. You should use this for CentOS updates
# unless you are manually picking other mirrors.
#
# If the mirrorlist= does not work for you, as a fall back you can try the
# remarked out baseurl= line instead.
#
#
[base]
name=CentOS-$releasever - Base
#mirrorlist=http://mirrorlist.centos.org/?release=$releasever&arch=$basearch&repo=os
baseurl=https://mirrors.ustc.edu.cn/centos/$releasever/os/$basearch/
gpgcheck=1
gpgkey=file:///etc/pki/rpm-gpg/RPM-GPG-KEY-CentOS-7
#released updates
[updates]
name=CentOS-$releasever - Updates
# mirrorlist=http://mirrorlist.centos.org/?release=$releasever&arch=$basearch&repo=updates
baseurl=https://mirrors.ustc.edu.cn/centos/$releasever/updates/$basearch/
gpgcheck=1
gpgkey=file:///etc/pki/rpm-gpg/RPM-GPG-KEY-CentOS-7
#additional packages that may be useful
[extras]
name=CentOS-$releasever - Extras
# mirrorlist=http://mirrorlist.centos.org/?release=$releasever&arch=$basearch&repo=extras
baseurl=https://mirrors.ustc.edu.cn/centos/$releasever/extras/$basearch/
gpgcheck=1
gpgkey=file:///etc/pki/rpm-gpg/RPM-GPG-KEY-CentOS-7
#additional packages that extend functionality of existing packages
[centosplus]
name=CentOS-$releasever - Plus
# mirrorlist=http://mirrorlist.centos.org/?release=$releasever&arch=$basearch&repo=centosplus
baseurl=https://mirrors.ustc.edu.cn/centos/$releasever/centosplus/$basearch/
gpgcheck=1
enabled=0
gpgkey=file:///etc/pki/rpm-gpg/RPM-GPG-KEY-CentOS-7
3、添加epel源,依然选择ustc
[root@Centos7u6 ~]#yum install http://mirrors.ustc.edu.cn/epel/epel-release-latest-7.noarch.rpm
[root@Centos7u6 ~]#yum install -y epel-release
[root@Centos7u6 ~]#sed -e 's!^mirrorlist=!#mirrorlist=!g' \
-e 's!^#baseurl=!baseurl=!g' \
-e 's!//download\.fedoraproject\.org/pub!//mirrors.ustc.edu.cn!g' \
-e 's!http://mirrors\.ustc!https://mirrors.ustc!g' \
-i /etc/yum.repos.d/epel.repo /etc/yum.repos.d/epel-testing.repo
4、[root@Centos7u6 ~]#yum makecache
5、安全设置
5.1 SELINUX设置
[root@dns2 etc]# setenforce 0
[root@dns2 etc]# sed -i 's/SELINUX=enforcing/SELINUX=disabled/g' /etc/selinux/config
5.2设置防火墙
[root@dns2 etc]# firewall-cmd --add-service=http --permanent
[root@dns2 etc]# firewall-cmd --add-service=https --permanent
[root@dns2 etc]# firewall-cmd --add-service=dns --permanent
[root@dns2 etc]# firewall-cmd --reload
二、安装mariadb
[root@dns2 etc]# yum install mariadb-server
[root@dns2 etc]# systemctl start mariadb
[root@dns2 etc]# systemctl enable mariadb
[root@dns2 etc]# mysql_secure_installation
三、安装php、httpd
[root@dns2 etc]# yum install php php-mysql
[root@dns2 etc]# yum install httpd
[root@dns2 etc]# systemctl enable httpd
四、安装namedmanager
[root@dns2 etc]# rpm --import http://repos.jethrocarr.com/jethrocarr_signing_key.gpg
[root@dns2 etc]# yum install wget
[root@dns2 etc]# wget -O /etc/yum.repos.d/jethrocarr-c7-public.repo http://repos.jethrocarr.com/config/centos/7/jethrocarr-c7-public.repo
[root@dns2 etc]# yum install namedmanager-www
[root@dns2 etc]# yum install namedmanager-bind
五、安装bind
[root@dns2 etc]# yum install bind
[root@dns2 etc]# systemctl enable named
六、编辑配置文件
1、named
[root@dns2 etc]# chown named:named /etc/named.namedmanager.conf
[root@dns2 etc]# vi /etc/named.conf
options {
    listen-on port 53 { any; }; // Modify here
    listen-on-v6 port 53 { ::1; };
    directory   "/var/named";
    dump-file   "/var/named/data/cache_dump.db";
    statistics-file "/var/named/data/named_stats.txt";
    memstatistics-file "/var/named/data/named_mem_stats.txt";
    allow-query     { any; }; // Modify here
......
include "/etc/named.rfc1912.zones";
include "/etc/named.root.key";
include "/etc/named.namedmanager.conf";  // Added this line
2、配置namedmanager
[root@dns2 etc]# vi /etc/namedmanager/config-bind.php
......
$config["api_url"]      = "http://10.20.100.4/namedmanager";           // Modify here Application Install Location
$config["api_host"]           = "10.20.100.4";                        //ADD this line for namedmanager_logpush
$config["api_server_name"]  = "dns2.xxxx.edu.cn";               // Modify here Name of the DNS server (important: part of the authentication process)
$config["api_auth_key"]     = "dns2key";                    // Modify here API authentication key, this key will be used in the manager portal.
......
$config["bind"]["version"]      = "9";                  // version of bind (currently only 9 is supported, although others may work)
$config["bind"]["reload"]       = "/usr/sbin/rndc reload";      // command to reload bind config & zonefiles
$config["bind"]["config"]     = "/etc/named.namedmanager.conf";   // configuration file to write bind config too
$config["bind"]["zonefiledir"]        = "/var/named/";            // directory to write zonefiles too
                                        // note: if using chroot bind, will often be /var/named/chroot/var/named/
$config["bind"]["verify_zone"]      = "/usr/sbin/named-checkzone";      // Used to verify each generated zonefile as OK
$config["bind"]["verify_config"]    = "/usr/sbin/named-checkconf";      // Used to verify generated NamedManager configuration
......
3、配置httpd
[root@dns2 etc]# vi /etc/httpd/conf/httpd.conf
......
七、导入数据库模板
[root@dns2 etc]# cd /usr/share/namedmanager/resources/
[root@dns2 etc]# vi autoinstall.pl
.......
# default settings
# (only need to change these if you are doing development work)
my $db_user     = "root";       # name of user to be used to create data
my $db_name     = "namedmanager";   # name of the DB to create
my $db_host     = "localhost";      # MySQL server

my $db_bs_user      = "namedmanager";   # name of the aoconf user to create
my $db_bs_password  = "123456";# Modify here random_password(10); # random password to generate
[root@dns2 etc]# ./autoinstall.pl
八、重新启动服务
[root@dns2 etc]# systemctl restart httpd
[root@dns2 etc]# systemctl restart mariadb
[root@dns2 etc]# systemctl restart named-chroot
九、通过web配置DNS
1、登录管理界面
https://10.20.100.4/namedmanager,使用 setup/setup123为username/password
2、配置(configuration)
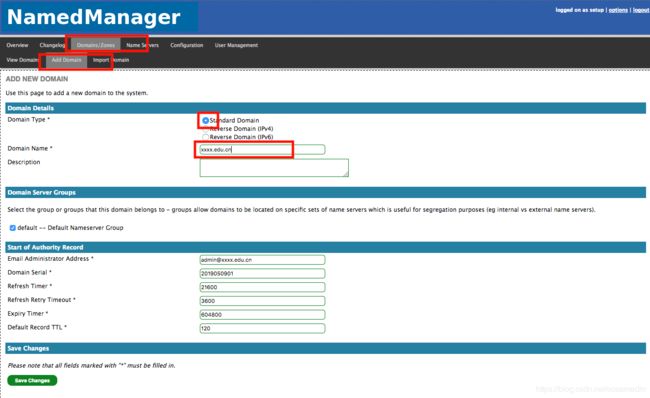
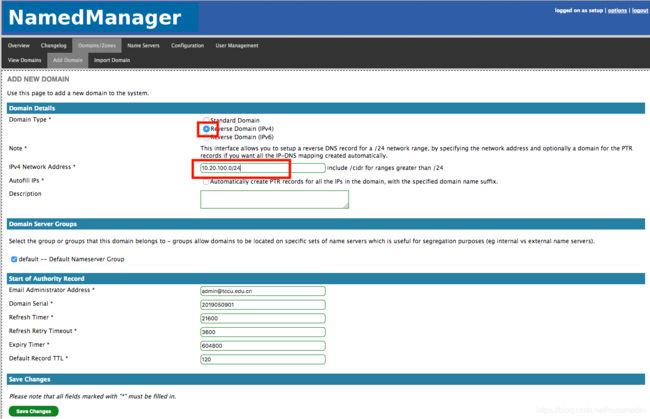
3、添加domain
"Domains/zones -> View Domains, -> Add New Domain".
a、正向解析domain
b、反向解析domain
4、add a nameserver
5、添加DNS记录
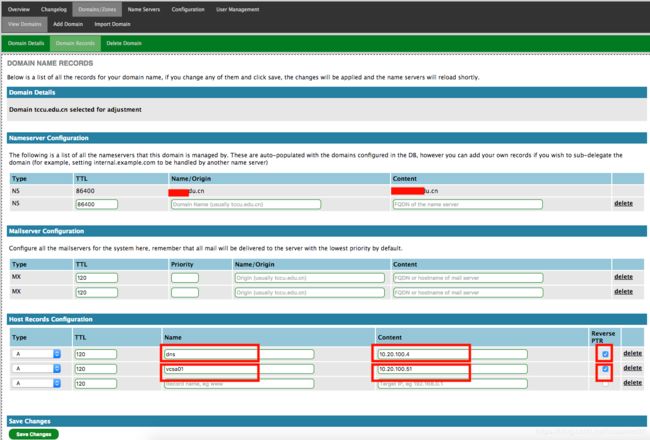
Domains/zones -> View Domains, 选择 "xxxx.edu.cn", 然后选择 "domain records"
反向解析记录自动生成
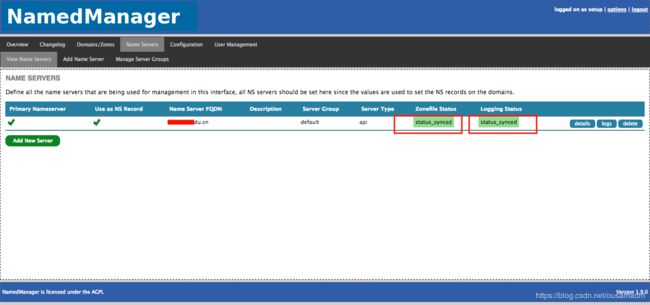
6、查看DNS服务器状态,如果同步完成信息如下
祝你好运


